
Arduino - Adafruit MPR121 12-Key Capacitive Touch Sensor Breakout
On this page you will find a tutorial for how to connect and use a Adafruit MPR121 12-Key Capacitive Touch Sensor Breakout to an Arduino board to send the data to for example Isadora. This is useful because the Adafruit board can act as an replacement for the Bare Conductive since they are no longer active since 05-03-2025.

Step 1:
Buy an Adafruit MPR121 12-Key Capacitive Touch Sensor Breakout for example here
Step 2:
Wire up the board:
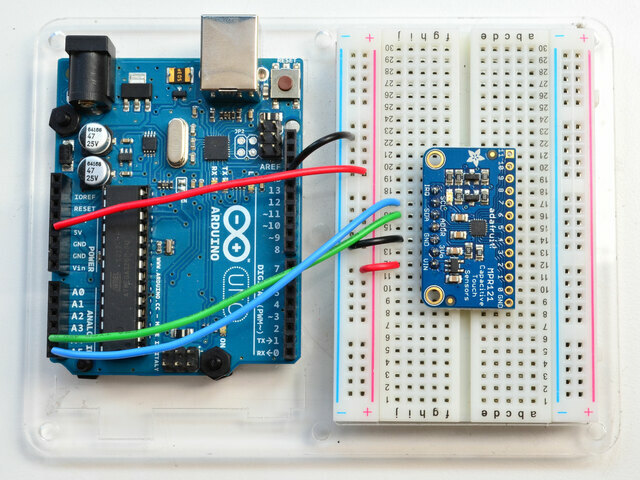
- Connect Vin to the power supply, 3-5V is fine. Use the same voltage that the microcontroller logic is based off of. For most Arduinos, that is 5V
- Connect GND to common power/data ground
- Connect the SCL pin to the I2C clock SCL pin on your Arduino. On an UNO & '328 based Arduino, this is also known as A5, on a Mega it is also known as digital 21 and on a Leonardo/Micro, digital 3
- Connect the SDA pin to the I2C data SDA pin on your Arduino. On an UNO & '328 based Arduino, this is also known as A4, on a Mega it is also known as digital 20 and on a Leonardo/Micro, digital 2
Step 3:
Install the Arduino library and test.
- Open up the Arduino library manager and search for: Adafruit MPR121 library and install it.
- Then open Examples -> Adafruit MPR121 -> MPR121test
Thats it! Now open up the serial terminal window at 9600 speed to begin the test. Make sure you see the "MPR121 found!" text which lets you know that the sensor is wired correctly. Now touch the 12 pads with your fingertip to activate the touch-detection
You now have the board successfully working! if you get the message: "MPR121 not found, check wiring?" make sure to check all the wires on the side of the sensor and the side of Arduino to make sure you did not make any mistake.
Step 4:
Let's get the data over to Isadora!
For this we will use the Arduino "Datastream..ino" that is meant to be used together with Bare Conductive this file can be found here
Open the file in Arduino and go to line 44:
if(!MPR121.begin(0x5C)){
and change to:
if(!MPR121.begin(0x5A)){
This weird thing: 0x5C is the IC2 address of the board. On the bare conductive this is 0x5C but if we connect it to the Arduino it is 0x5A.
Upload the code and then you can us it in Isadora with the same Isadora Patch as you use for the Bare Conductive!