3D depth camera's & motion tracking
In this book you can find different sources and tutorials concerning the use of 3D depth camera's like Kinect (360, v1 and v2), Azure, Intel RealSense and iPad Pro with lidar combined with creative software.
These devices include infrared depth sensing camera's, RGB color camera's & microphones. The SDK enables features such as skeleton tracking, hand interactions, point clouds and voice recognition. Each sensor has different specs.
- Types of Depth camera's
- Kinect
- Setup & Lighting
- Kinect comparison
- Kinect in Isadora
- Record your movement for testing
- macOS: Kinect + Processing (M1 Monterry & Ventura)
- macOS: Kinect + Touchdesigner (MAC M1)
- Windows: Drivers
- Windows: Kinect In Touchdesigner
- Example projects
- Mediapipe
- Oak D
- Zed 2i
- Various Plugins & tutorials
- Apps & alternatives to 3D camera's
- Depths camera's & apps for 3d scanning
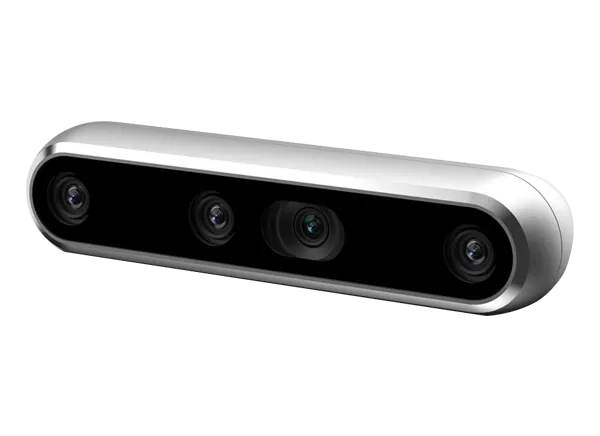
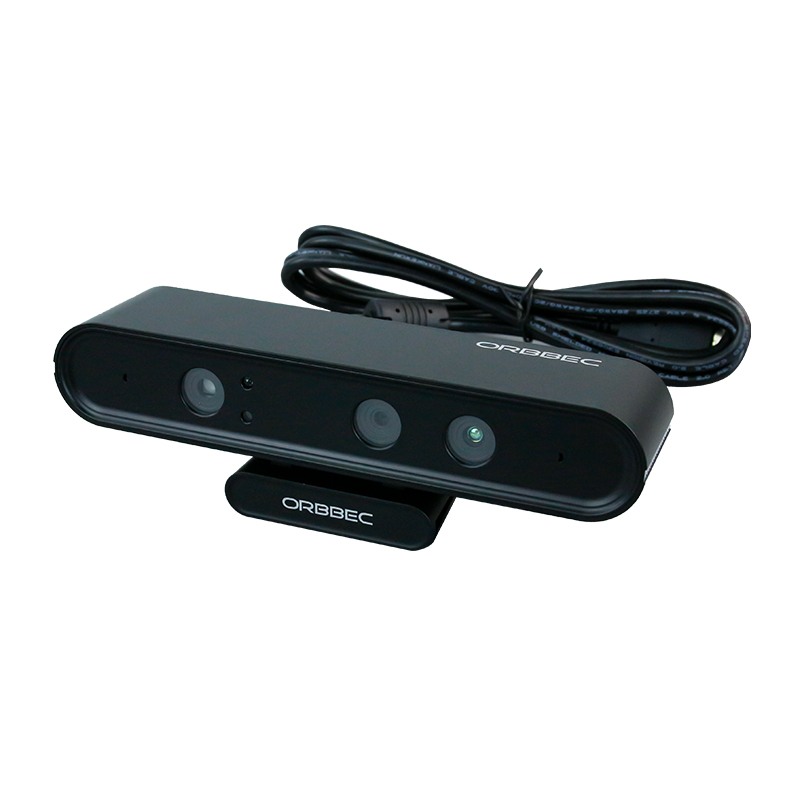
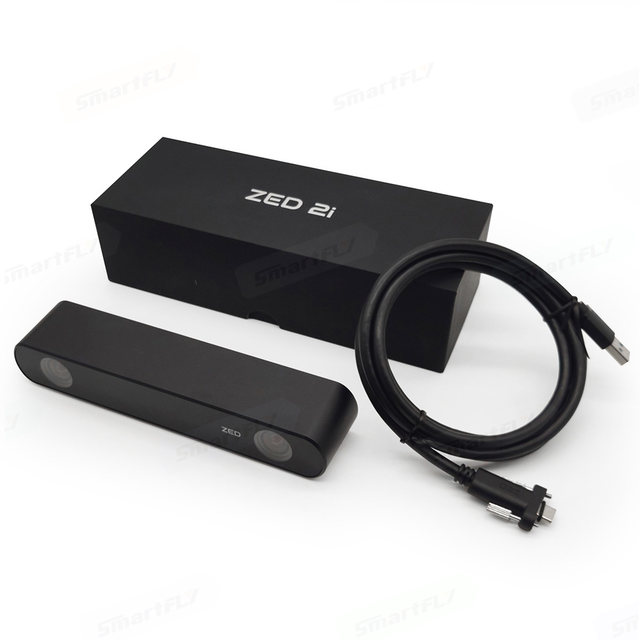
Types of Depth camera's
At HKU we have most of these camera's available. Inform about the possibilities at the Blackbox
|
|
|
|
|
|
Orbec Astra
|
zed 2i |
|
Oak D Lite |
|
|
|
|
|
|


Some comparison articles:
https://www.generationrobots.com/blog/en/luxonis-vs-realsense-which-depth-camera-should-i-choose/
https://docs.ipisoft.com/Depth_Sensors_Comparison
the 3 kinects compared: https://www.mdpi.com/1424-8220/21/2/413
depth maps compared
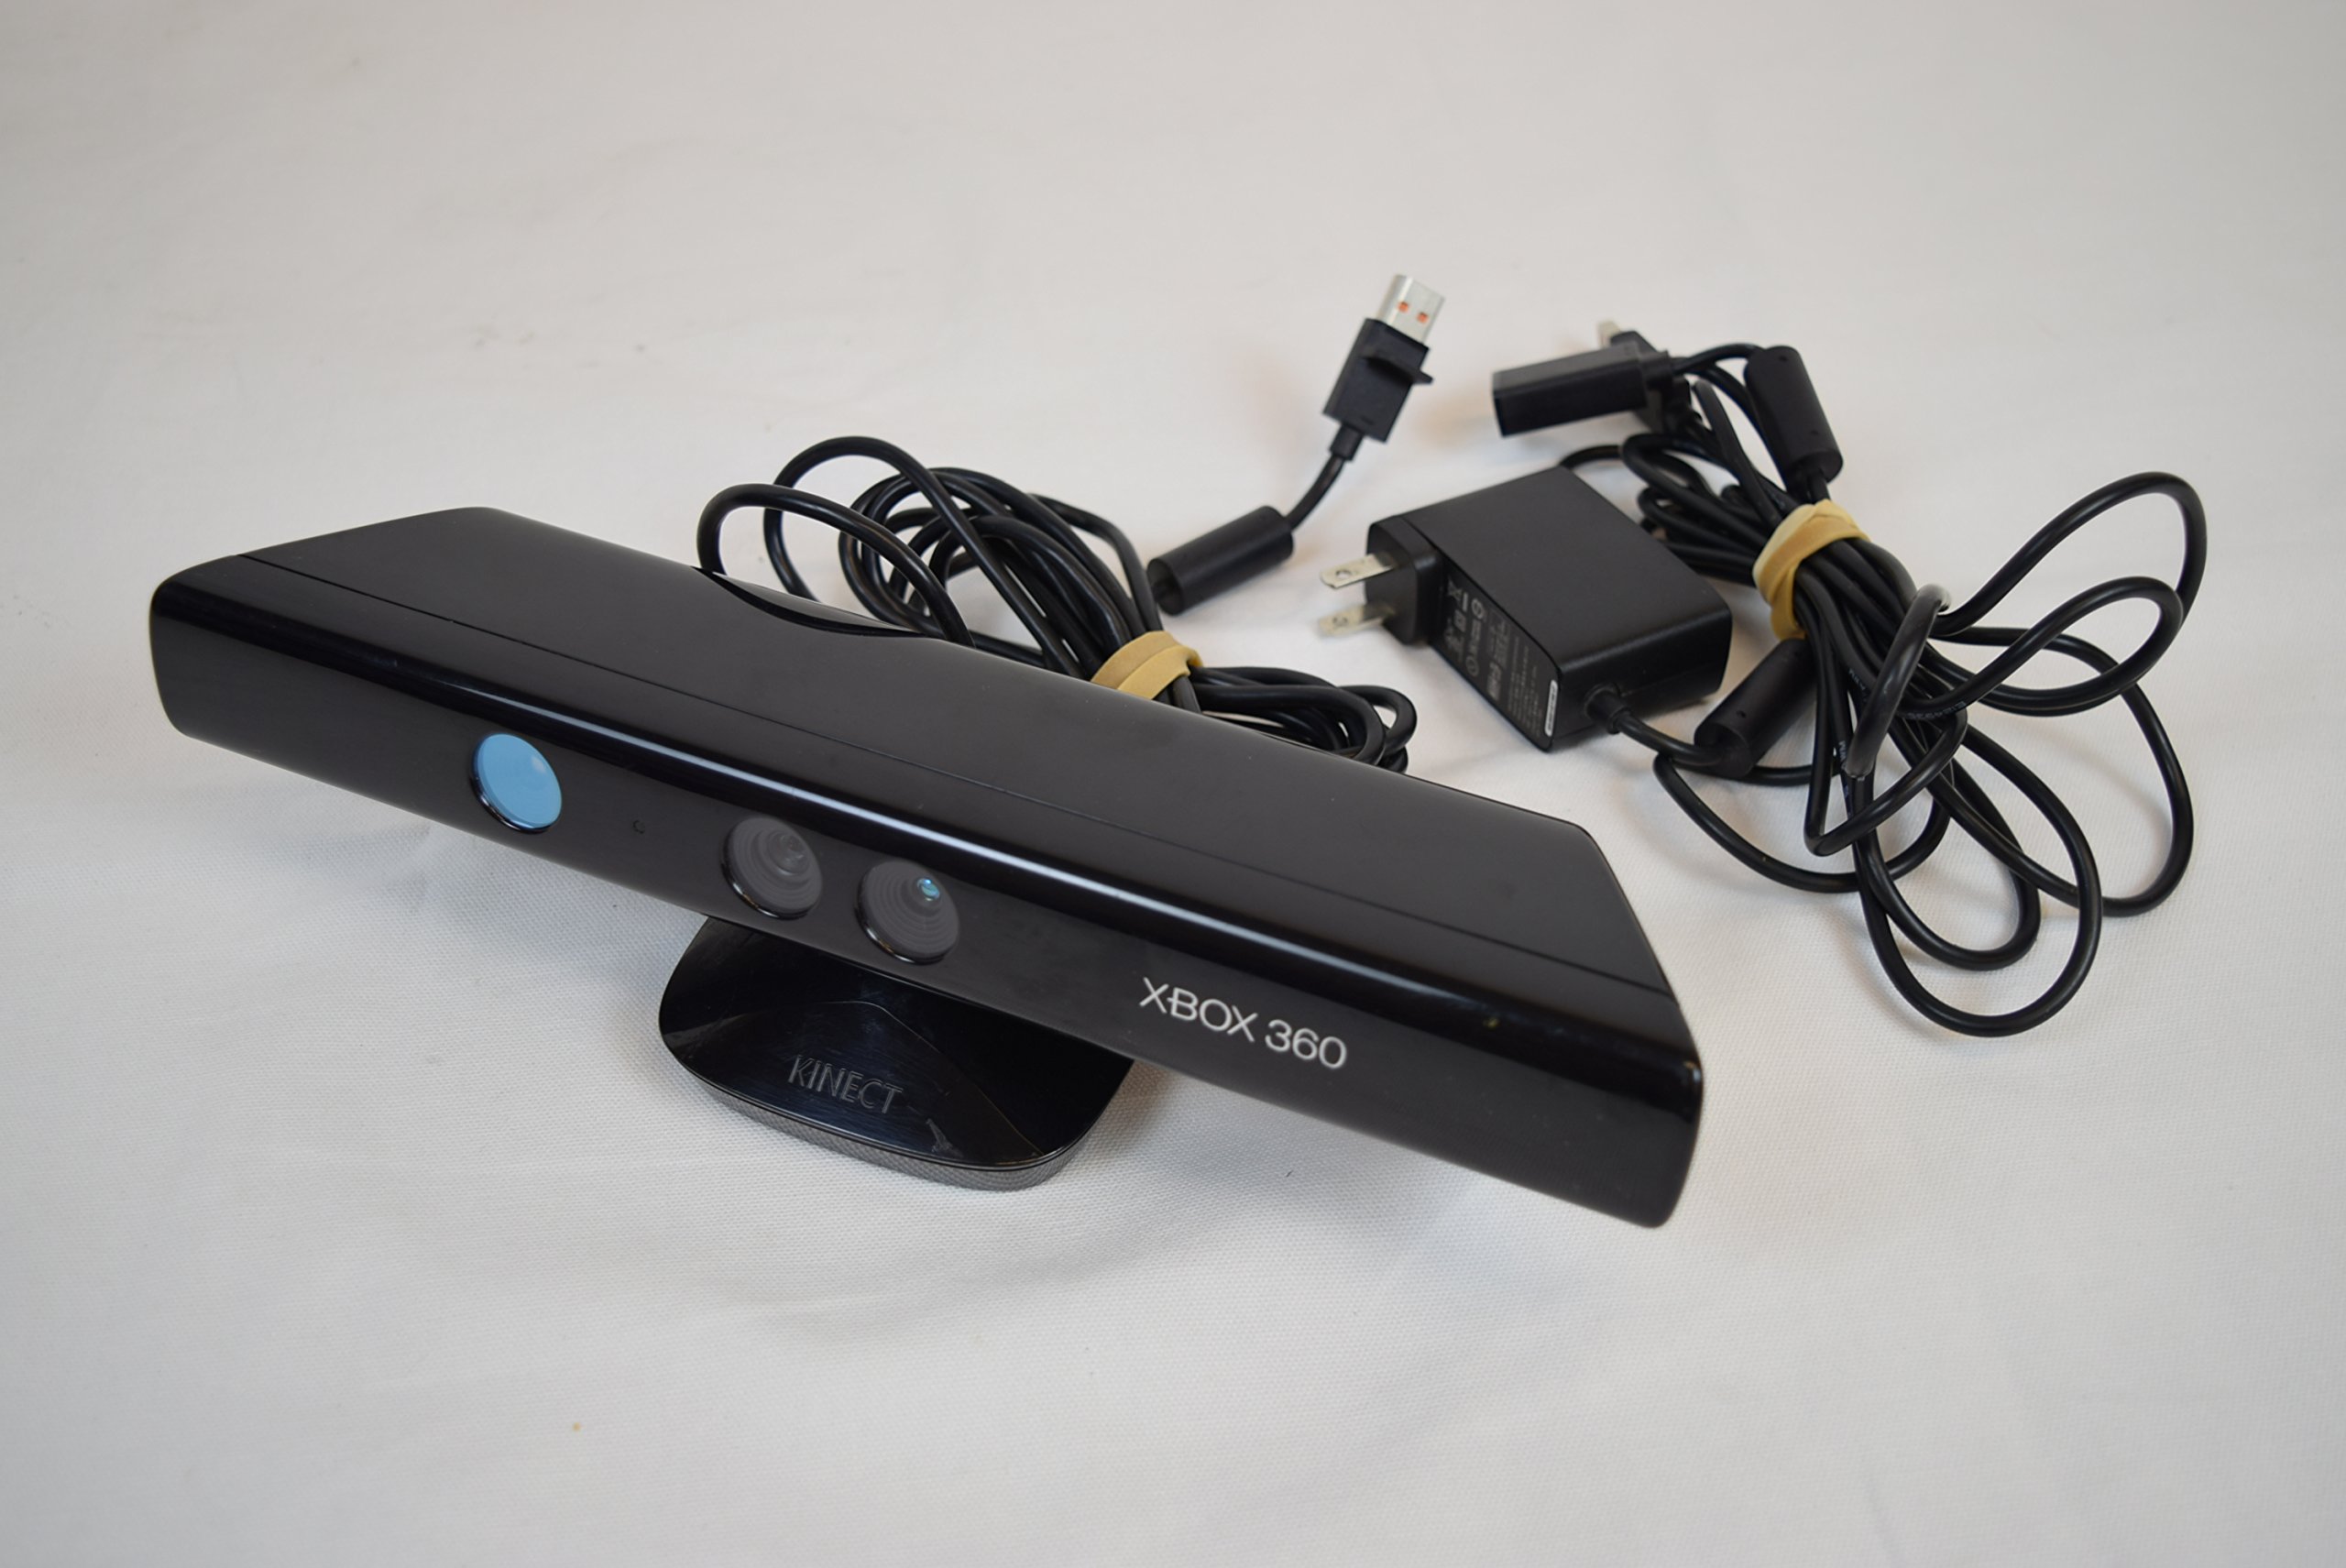
Kinect
- Kinect 360 & Kinect One works on Mac with Isadora
- Kinect works on PC in various types of software.
- Install drivers first! Make sure to select the right driver & only install one driver at a time to avoid problems.
- Allow a warmup time of 30-60 minutes for stable results.
Setup & Lighting
How you setup your Kinect matters a lot for your performance.
Think about placement, light & what you are wearing.

How to Set Up Your Living Room for Microsoft Kinect
Welcome to the future. Now here's how to prepare your space for it
By Dan Nosowitz
Posted on Nov 30, 2010
So you've decided to spring for a Microsoft Kinect (or you're buying one as a gift, or you're planning on getting one as a gift), eh? Congratulations! It's great (mostly)! But here's the thing: Not every living room can handle the Kinect, and even in the ones that can, there are some specifics you may not realize that can really make the Kinect experience better (without hacking). Here's our guide to making sure you get the most out of this futuristic arm-flailing fun.
The Space
Your actual living room space is the most immediately important variable in setting up a Kinect, and also really the only one that can be a dealbreaker. Make no mistake: You need a large living room, in the right shape, to be able to use the Kinect at all. The Kinect requires a large rectangular space free of obstacles in front of the TV, so get comfortable with hauling your coffee table away when you want to play.
Microsoft suggests a space of six feet by six feet in front of the Kinect sensor for one player, and eight feet by six feet for two players. (The Kinect can currently only handle two players at once, though that'll probably change in the future.) In my experience, those numbers are the bare minimum–for comfortable and spacious play, I'd recommend eight-by-six for one player and ten-by-six for two players. Get ready to shove your couch backwards and haul your coffee table into the kitchen–it's a necessary evil of playing Kinect.
Even the bare minimum is going to disqualify a lot of living rooms, due either to shape (that long and skinny living room may be big on paper, but it won't work here) or size. Sorry to pretty much rule out the entire island of Manhattan, but before you buy a Kinect, break out the measuring tape.
The Sensor
The sensor is an amazing piece of hardware-software synergy, and luckily, it's actually a pretty flexible device. Its movable head allows it to aim up or down, so you have a pretty lenient set of rules as to where it can be placed. Microsoft recommends between two and six feet off the ground, either directly below or above your TV, and centered with it. In my experience, two feet above the ground might be a little low, especially if your living room isn't enormous–it'll be tricky for the sensor to capture both your feet and head.
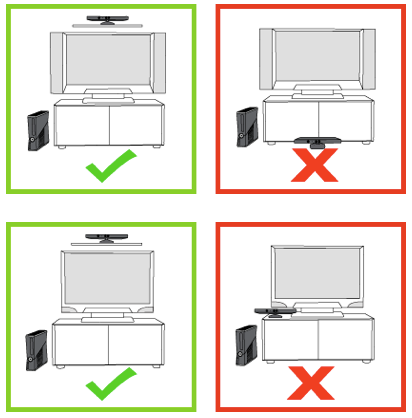
Above the TV sounds great on paper, but unless you want your TV to get really friendly with a lot of duct tape, you'll need to buy the separate Kinect TV mount, which costs $40. Luckily, the sensor works just fine when placed on your TV stand. Make sure to move it as close to the edge as possible, so its view isn't blocked by the stand itself, and feel free to stack it on some DVD cases or whatever to give it a little extra height.
Don't bother trying to tilt the sensor up or down–it'll make this horrible clicking protestation, since it actually has a motor inside that'll tilt it to the correct angle automatically. You can actually break it by trying to forcibly point it up and down, so just leave it alone, you monster. And don't put it in a cabinet, like the one your TV might sit on: The sensor needs room to breathe and move about and it should not be confined inside tight spaces.
One last rule: Do not place the sensor on top of a speaker. That's mostly aimed at those of you with center speakers, but be careful about the location of your TV's speakers as well, if you're using those. More about that in the "Audio" section below. Nearby speakers can screw up the Kinect's audio sensors, and vibrations can screw up its video sensors, which would remove the Kinect's reason for being and possibly its sense of identity. You don't want to be responsible for the self-loathing it would feel if that happened.
The Light
Again, Microsoft really came through here: The Kinect is remarkably flexible in terms of operability under various lighting conditions. That's not to say that there aren't things you can do to help it out a bit, of course. Your enemies in this case are natural light (as usual, am I right, nerds?) and halogen light. Try to avoid having either natural or halogen light on the players while in play, and obviously don't shine light directly onto the sensor itself.
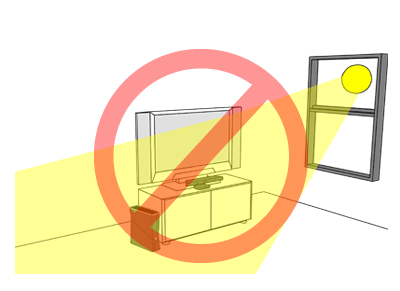
Kinect works best in dim, but not dark, conditions, with even lighting throughout. If you have big windows, shade them during the day, and don't light up your living room like a dentist's office at night. The reason to avoid utter darkness is simply for fun's sake–the Kinect will definitely recognize gestures in the dark, which is good for controlling movies. But dim lighting is the best compromise for the gleeful awkwardness of playing Kinect: You want to be able to see your fellow players, but you don't want harsh clinical light to make their every move even less flattering.
The Video
The video side of the home theater setup is much less important. The Kinect works best, in general, with a modern HDTV, simply because it's an Xbox 360 peripheral and was designed for one. The specifics–LCD vs. plasma, 60Hz vs. 120Hz, Samsung vs. Not Samsung–don't really matter any more than usual. Just remember that you'll be in a different viewing position: You'll probably be moving your couch backwards (if you can), and you'll also be standing rather than sitting, so your TV might seem smaller and lower. That's not to say you need a big honking TV, but if you're using one that's a bit small for your room in its pre-Kinect state, you might end up squinting a bit.
The Audio
Audio is a little trickier than video. The Kinect will force you to do what seems like an unnecessarily exhaustive audio setup when you first plug it in. But it is not unnecessary! The Kinect's voice recognition feature may end up being ultimately as useful as the video sensors, and it's important to get it right. The setup does a pretty good job of calibrating itself, but it's too polite to lecture you about your home theater setup. That's what I'm here for.
If you're using the speakers in your TV, stop. Don't do that anymore. Not only are they almost universally lousy, but they'll make your Kinect experience (not to mention your TV, movies, and music experiences) suffer. Go buy some kind of stereo. The Kinect works best with either a stereo (two-channel) or Dolby 5.1 surround sound setup. Don't let me pressure you into dropping an extra grand on audio equipment, but a decent used receiver and a couple of speakers, or even one of those home-theater-in-a-box setups frantically flogged on Black Friday, will do you very well here.
5.1 systems feature a center speaker that should be placed just about where the Kinect sensor should be placed. Do not place the sensor on top of the center speaker, even if it balances really nicely or matches perfectly. Having a sound source that close to the Kinect's four microphones will dramatically undermine its ability to separate human voices from other sounds, and thus make it much harder for the Kinect to understand you.
If you've decided to disobey my very clear directions to go buy a reasonable stereo and stop living like a caveman, note where your TV's speakers are and try to place the Kinect sensor away from them.
The Outfits
The optimal outfit for playing Kinect is a full-body, non-reflective leotard in a neutral color. (A scuba suit can work in a pinch.) But even though our bodies are all beautiful in their own way, they're mostly not, and there are perfectly suitable apparel alternatives that won't scar the retinas of other people in the room. Really, just try not to wear shapeless clothing–the Kinect sensor relies on being able to pick out limbs and joints, so don't wear a poncho or a cape or a garbage bag or anything else that obscures your shape.
The Kinect is also able to detect faces (which is both cool and creepy, but that's a point for another day), so don't wear anything that covers your face. If, on the other hand, you are a burglar who is breaking into a Best Buy to steal some stuff, and you want to try out the Kinect because maybe you've heard so many great things about it in such publications as PopSci, and you want to sneak into and out of said Best Buy undetected with your loot–well, without making judgments (is it wrong to steal a loaf of bread to feed your etcetera?) or assuming anything about the attire of curious technophile thieves, you both can and should wear a ski mask. Because if you don't and the Kinect recognizes your face and the police find you because of your oversight and there's a headline sometime next week reading "High-Tech Burglar Caught by Microsoft Kinect," I will definitely write about it, and I'm liable to make fun of you, which might damage your self-esteem or confidence in your illicit career choice or professional pride.
All that being said, normal clothing generally works fine.
Happy Kinecting!
Source: Popular Science
Original publication date: November 30, 2010
Kinect comparison
https://pmc.ncbi.nlm.nih.gov/articles/PMC7827245/table/sensors-21-00413-t001/
Table 1.
Comparison of the three Kinect versions.
| Kinect v1 [17] | Kinect v2 [26] | Azure Kinect | |
|---|---|---|---|
| Color camera resolution | 1280 × 720 px @ 12 fps 640 × 480 px @ 30 fps |
1920 × 1080 px @ 30 fps | 3840 × 2160 px @30 fps |
| Depth camera resolution | 320 × 240 px @ 30 fps | 512 × 424 px @ 30 fps | NFOV unbinned—640 × 576 @ 30 fps NFOV binned—320 × 288 @ 30 fps WFOV unbinned—1024 × 1024 @ 15 fps WFOV binned—512 × 512 @ 30 fps |
| Depth sensing technology | Structured light–pattern projection | ToF (Time-of-Flight) | ToF (Time-of-Flight) |
| Field of view (depth image) | 57° H, 43° V alt. 58.5° H, 46.6° |
70° H, 60° V alt. 70.6° H, 60° |
NFOV unbinned—75° × 65° NFOV binned—75° × 65° WFOV unbinned—120° × 120° WFOV binned—120° × 120° |
| Specified measuring distance | 0.4–4 m | 0.5–4.5 m | NFOV unbinned—0.5–3.86 m NFOV binned—0.5–5.46 m WFOV unbinned—0.25–2.21 m WFOV binned—0.25–2.88 m |
| Weight | 430 g (without cables and power supply); 750 g (with cables and power supply) | 610 g (without cables and power supply); 1390 g (with cables and power supply) | 440 g (without cables); 520 g (with cables, power supply is not necessary) |
Kinect in Isadora
To use Kinect in Isadora you need to download a couple of plugins from the Troikatronix page;
https://troikatronix.com/add-ons/openni-tracker/
Read the instruction with attention & follow them.
Kinect 360 works on Mac air & Mac pro (M1 with Rosetta)
Kinect V1 works on Mac pro (M1 with Rosetta)
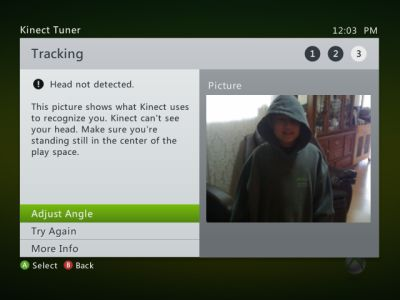
Connect your Kinect before starting Isadora.
Add the nodes in the picture below (or open the patch shared in nextcloud)
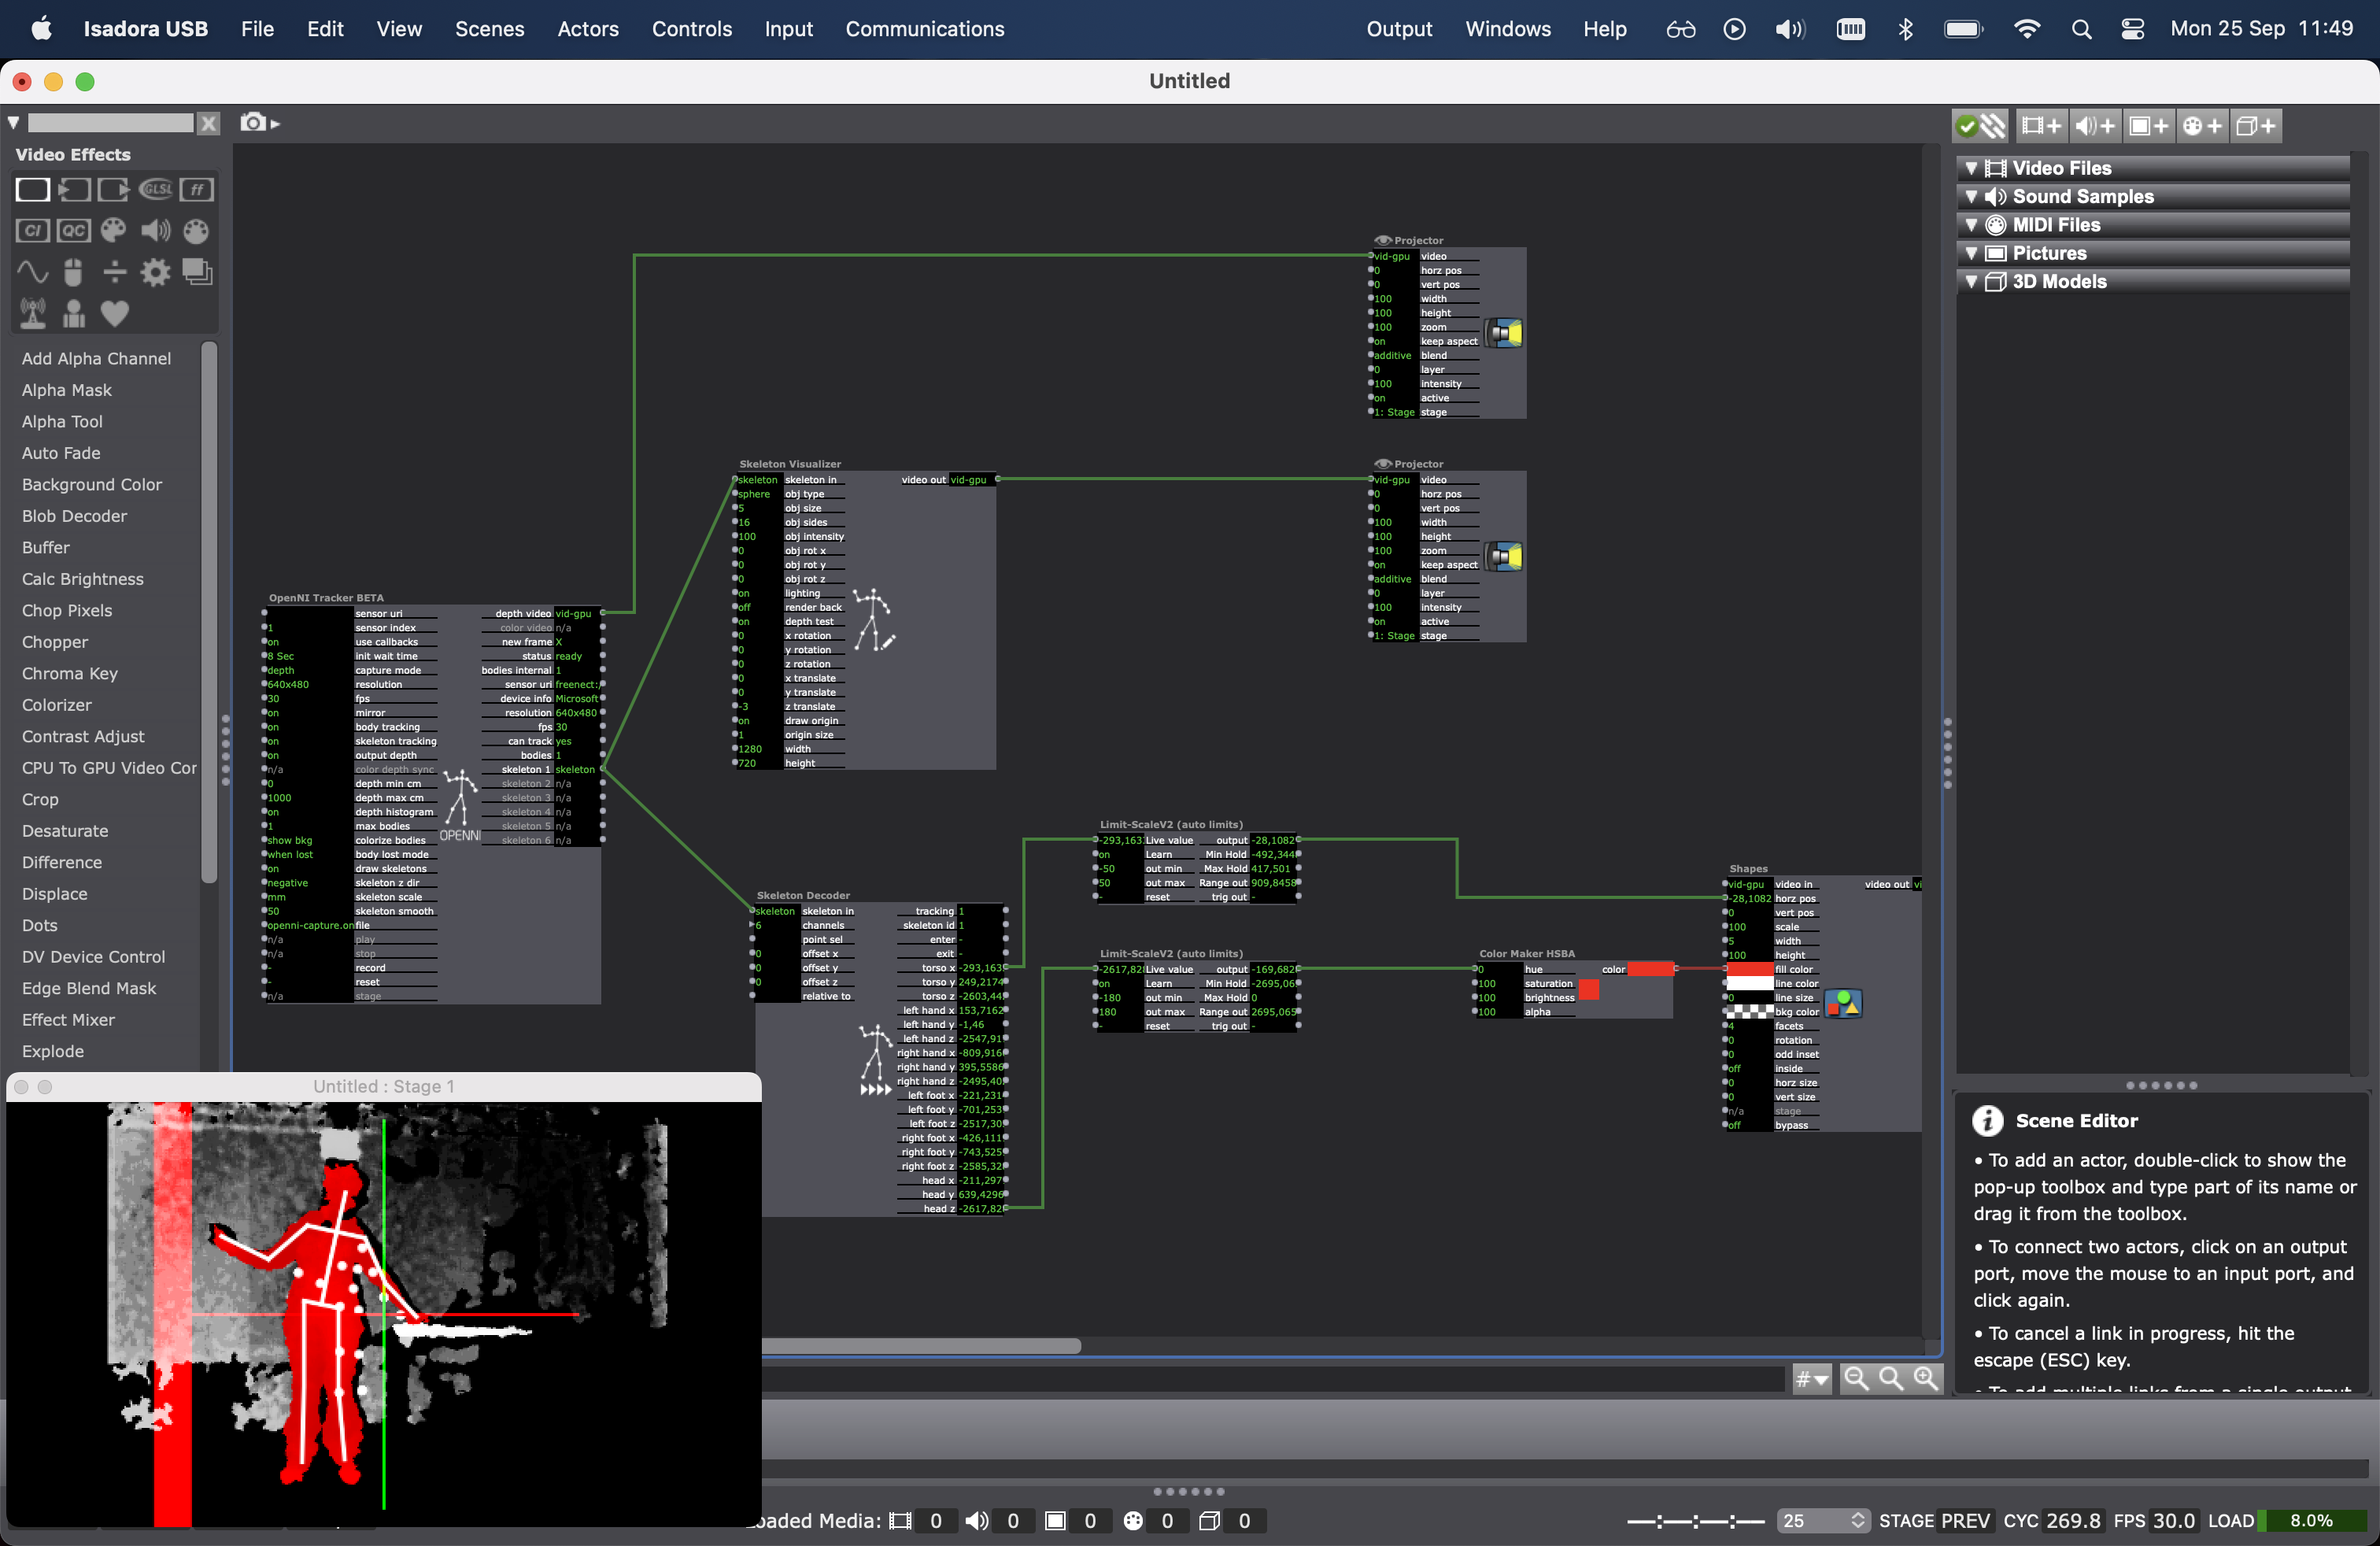
If your Kinect is not recognised by the software, try resetting or deleting the OpenNItracker or even adding it again.
Detailed explanation of the possibilities with Kinect in Isadora can be found here:
https://troikatronix.com/add-ons/tutorial-openni-tracker/
and here:
Record your movement for testing
- https://kinect.github.io/tutorial/lab11/index.html (Kinect 2 for Windows Demo App)
macOS: Kinect + Processing (M1 Monterry & Ventura)
Kinect processing MAC M1, works on Monterry & Ventura
First install Rosetta:
https://osxdaily.com/2020/12/04/how-install-rosetta-2-apple-silicon-mac/
Get the libraries for processing:
https://github.com/shiffman/OpenKinect-for-Processing
https://shiffman.net/p5/kinect/ (dead link)
https://github.com/shiffman/OpenKinect-for-Processing/releases
Open standard library to test:
File > examples > contributed libraries. Open kinect for processing > V1 , then Run code
Do you get the error: NoClassDefFoundError: /com/sun/jna/Library ?
Fix: https://discourse.processing.org/t/processing-4-openkinect/32781/9
Example codes
Warning: the code for kinect 1 and 2 is not the same..
check: https://shiffman.net/p5/kinect/ (dead link)
> Examples
Tutorials for using Kinect data in Processing:
Check out the Coding Train videos series: Introduction to Computer vision, chapter 12.1 (What is the Kinect?): https://www.youtube.com/watch?v=QmVNgdapJJM
Link to the entire series: https://www.youtube.com/watch?v=h8tk0hmWB44&list=PLRqwX-V7Uu6aG2RJHErXKSWFDXU4qo_ro
macOS: Kinect + Touchdesigner (MAC M1)
Kinect usually doesn't work on mac in Touchdesigner but people try to find ways to work around it.
https://github.com/stosumarte/FreenectTD/releases/tag/v1.0.0
Tested on mac by Blackbox employe location IBB.
No skeleton tracking only depth registration (V1 & 2), pointcloud (V2) and IR output (V2)
Windows: Drivers
Check our this dudes tutorial:
- Select the right type of driver for your kinect.
- Download & install as instructed on the pages below
- tip: only install one type of kinect a time on your pc, as things may get messy after mixing.
Kinect 360 (v1, SDK 1.8)
- Install the Kinect Runtime 1.8 and Kinect for Windows SDK 1.8 from Microsoft.
This sensor is widely available on 'marktplaats ' & doesn't cost much. Don't forget to also purchase a dedicated Kinect power/USB cable to connect it to your computer!
Kinect One (Xbox, SDK 2.0)
- Install the Kinect SDK 2.0 from Microsoft.
and Runtime 2.0
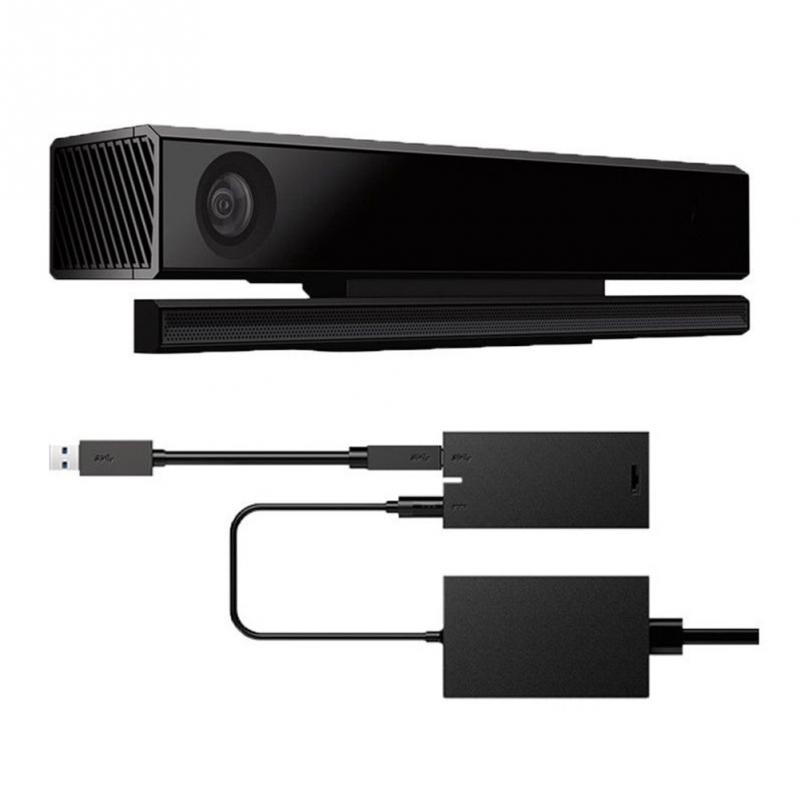
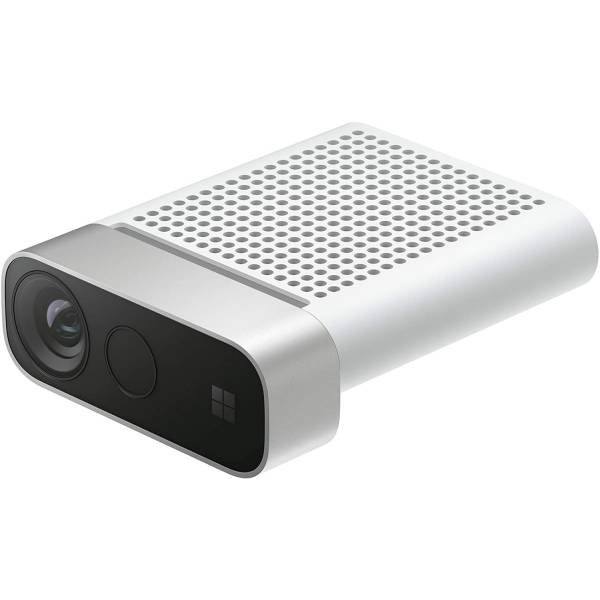
Kinect Azure
You can find installation details for Azure Kinect Sensor SDK and Firmware here.
TIPS FOR WORKING WITH ALL KINECT SENSORS
- Always connect the AC power supply that comes with the Kinect sensor. The green LED will light up under USB power, however the sensor will not function correctly unless the AC power supply is also connected.
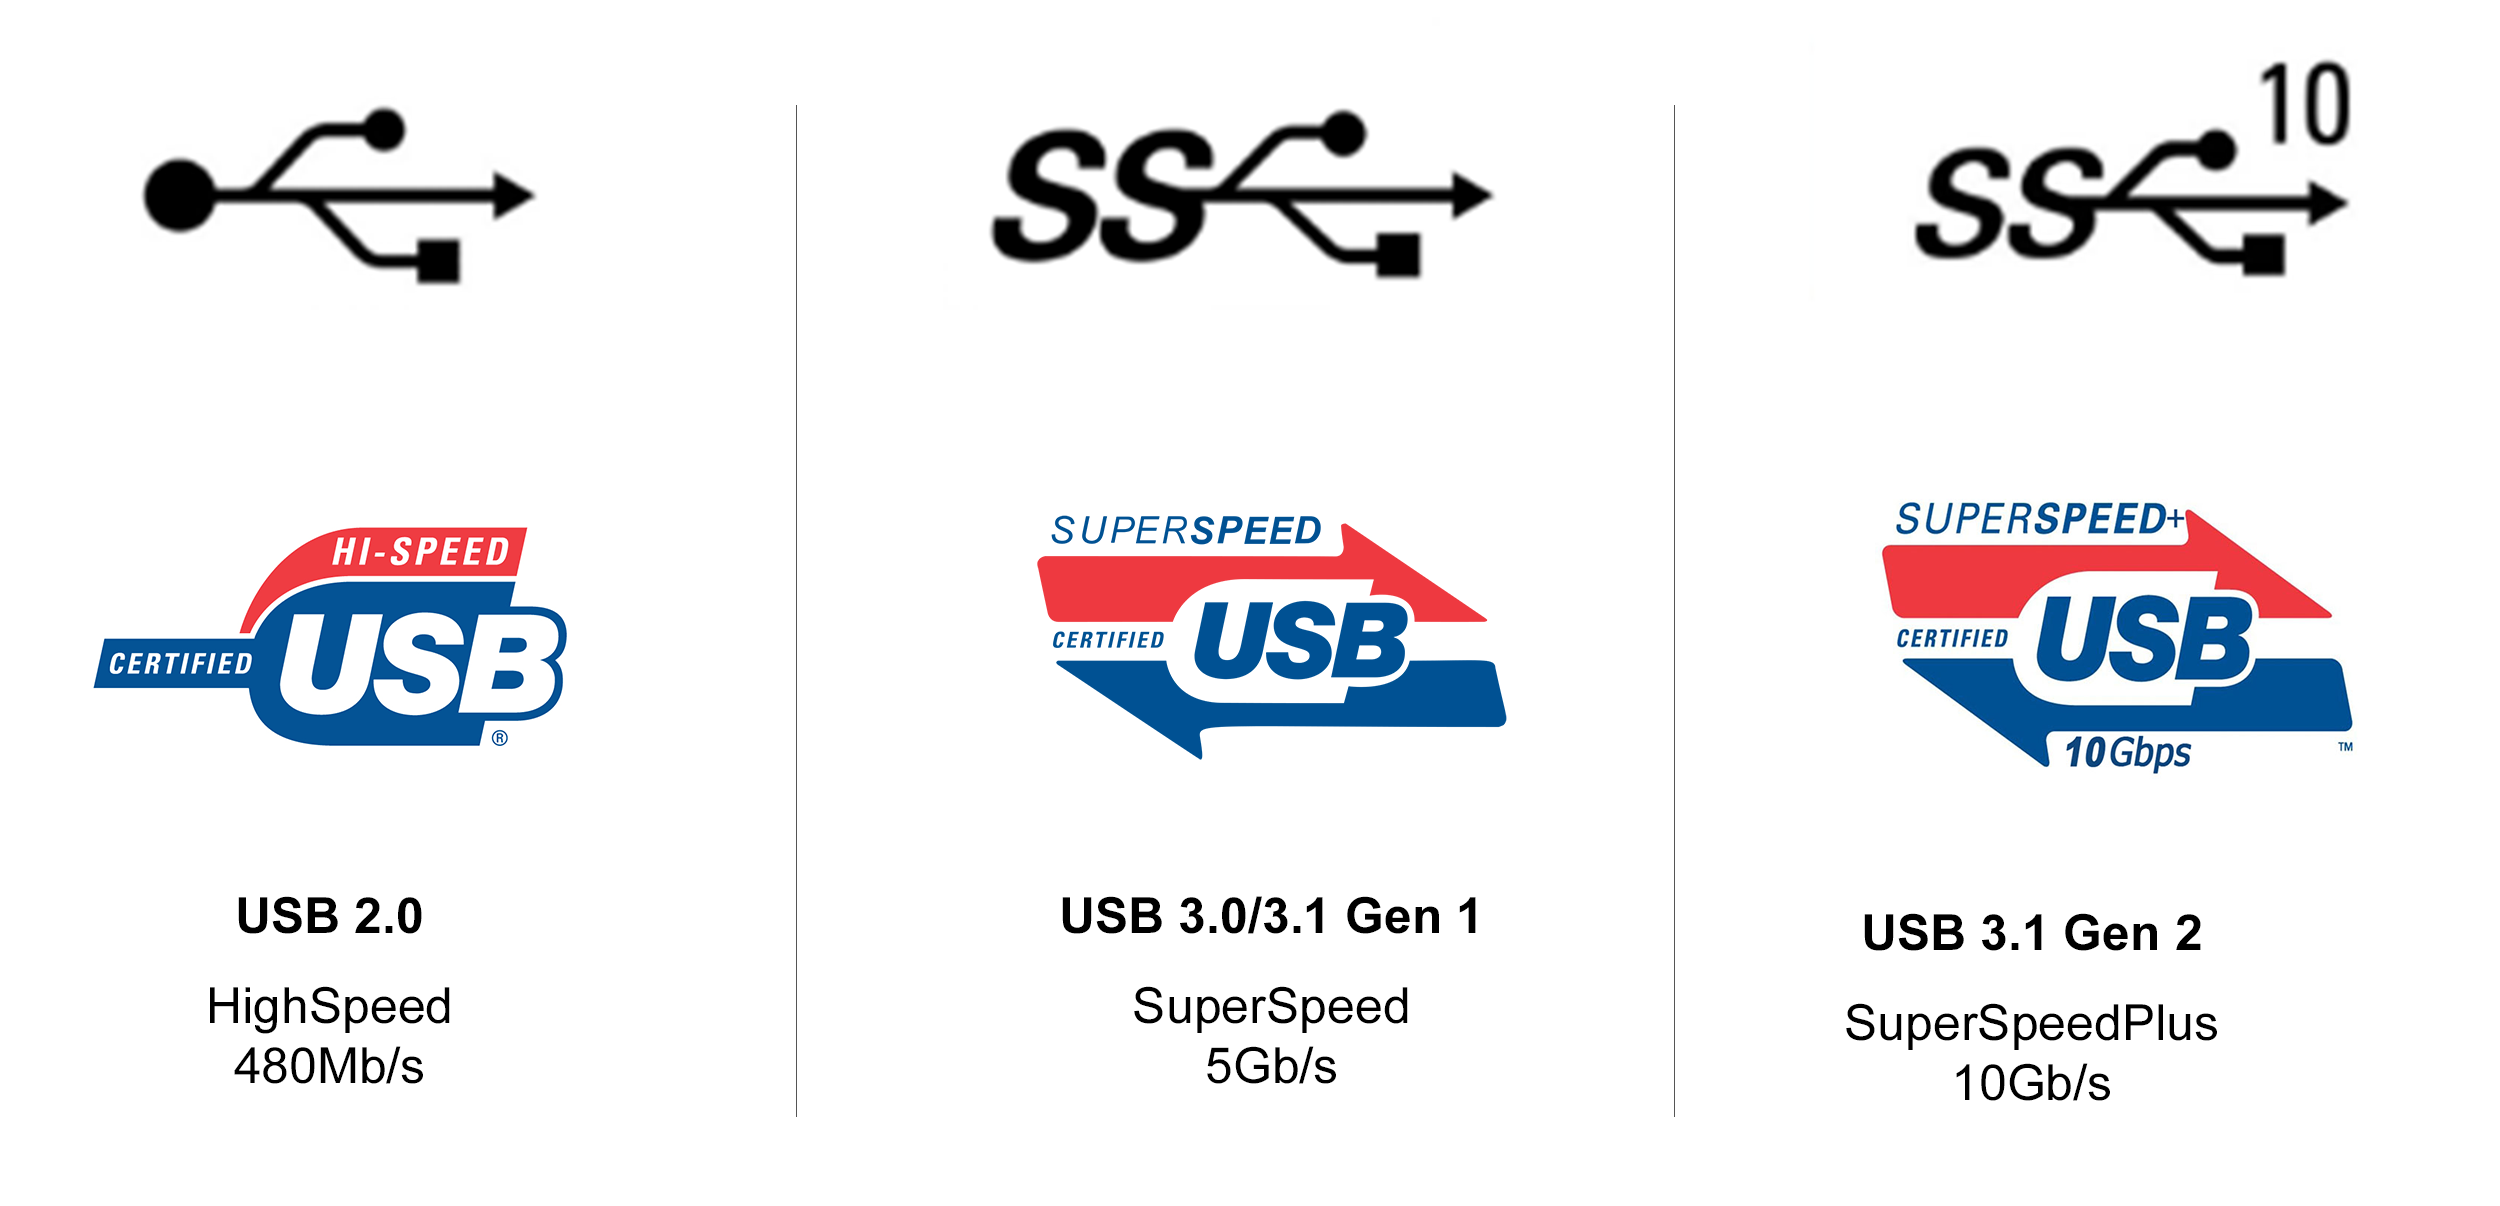
- Kinect V1 can be less stable on USB3.0 ports, try USB2.0 ports if you are experiencing problems connecting tot the device or the connection drops out after some time. Kinect V2 however only works on usb3.0 ports (see logo)

- If using multiple Kinects, each Kinect sensor must be connected to its own USB controller. On some computers multiple USB ports will be on the same USB controller, this will cause problems if two Kinects are sharing that same controller. Refer to your computer's Device Manager to inspect which ports belong to each USB controller.
- Open your Touchdesigner patch first, then add the Kinect to your USB port. Select the right version!
- remember: you need the correct driver for the kinect you are using. Uninstall the drivers you are NOT using, when switching Kinect type. How to Uninstall here
Windows: Kinect In Touchdesigner
Using any Kinect in Touchdesigner op PC is plug & play after you've installed the right drivers & SDK.
Open your Touchdesigner patch first, then add the Kinect to your USB port. Select the right version.
Ways to interface with Kinect in TouchDesigner
- Depth camera - Kinect TOP
- RGB camera - Kinect TOP
- Infrared camera - Kinect TOP
- Skeleton Point Tracking - Kinect CHOP
- Hand Interaction - Kinect CHOP
- Microphone Array Audio Capture - Audio Device In CHOP
- To control the tilt of the camera, use the Tscript
kinecttiltCommand
The Kinect Azure has the above but use specific operators hat work together:
- Kinect Azure TOP
- Kinect Azure Select TOP
- Skeleton Point Tracking - Kinect Azure CHOP NOTE: For joint orientation and bone hierarchy, see: Kinect Hierarchy
The Pallete has this interesting component: Kinect Callibration for Projection Mapping which allows for calculating the intrinsics and extrinsics of a projector in relation to a Kinect device making it possible to project onto the scene captured by the kinect.
Check out the specifics, possibilities and some example patches on the derivative site:
https://derivative.ca/UserGuide/Kinect1 for Kinect 360
https://derivative.ca/UserGuide/Kinect for Kinect One
or Kinect Azure in the search bar
Example projects
Shadowmonsters by Philip Worthington
Partycles - An Interactive Installation // Microsoft Kinect
An Interactive Mirror Installation of 450 Plush Penguins Powered by Xbox Kinect
Kinect for Windows Retail Clothing Scenario Video
Mediapipe
Realtime Body tracking on Mac & Windows with just a webcam!
MediaPipe is a cross platform Framework for building machine learning pipelines for processing time-series data like video, audio, etc. Amongst many other possibilities it turns your webcam into a depth/tracking camera.
Full documentation can be found here https://developers.google.com/mediapipe/
There are various ways to get Mediapipe set up in your computer;
When using Touchdesigner, have a look HERE
But also, be sure to check out Gazebo, a HKU built OSC tool, that also runs Mediapipe.
Oak D
Unleash Your Creativity with Oak-D and TouchDesigner
see bottom of the page for tutorials & setup.
- Introduction
- Overview of the Oak-D AI Powered Camera
- Understanding Depth AI and its Applications 3.1 Media Pipe Hand Tracking 3.2 YOLO Object Recognition Model 3.3 Gaze Estimation 3.4 Segmentation 3.5 Text Detection
- Comparing Oak-D with Other Cameras in the Market 4.1 Azure Camera 4.2 Pros and Cons of Oak-D
- Setting Up the Necessary Libraries 5.1 Installing Python and Required Libraries 5.2 Using PyCharm as the Integrated Development Environment 5.3 Working with Virtual Environments
- Exploring the Depth AI Examples 6.1 Understanding the Color Camera and RGB Video Example 6.2 Exploring the Stereo Depth Example
- Conclusion
Check out the OAKExamples.toe file for the various possibilities with OakD, native in TD.
The Oak-D AI Powered Camera: A Game Changer in Computer Vision
Artificial Intelligence (AI) is revolutionizing various fields, and one area where it is making significant advancements is computer vision. In this article, we will delve into the world of the Oak-D AI powered camera. We will explore its features, applications, and advantages over other cameras in the market. Moreover, we will guide you through the process of setting up the necessary libraries and provide an overview of the depth AI examples.
1. Introduction
AI has become a game changer in various industries, and computer vision is one domain where its impact is transformative. The Oak-D AI powered camera is a remarkable innovation in the world of computer vision. Equipped with stereo and mono cameras, as well as an RGB camera, the Oak-D camera is capable of running various AI models. In this article, we will explore the capabilities of the Oak-D camera and guide you through the process of getting it up and running.
2. Overview of the Oak-D AI Powered Camera
The Oak-D camera, developed by Luxonis, is an AI powered camera that combines hardware and software to enable advanced computer vision applications. It consists of stereo and mono cameras on the sides, along with an RGB camera in the middle. This configuration allows the camera to capture depth and color information simultaneously. Additionally, the Oak-D camera can load and run various AI models, making it versatile and suitable for a wide range of applications.
3. Understanding Depth AI and its Applications
Depth AI is the Spatial AI platform that is embedded in the Oak-D camera. It is responsible for processing the captured data and running the AI models. The Oak-D camera supports numerous AI models that enable applications such as media pipe HAND tracking, YOLO object recognition, gaze estimation, segmentation, and text detection.
3.1 Media Pipe Hand Tracking
One of the key applications of the Oak-D camera is media pipe hand tracking. This AI model allows the camera to track and recognise hand movements in real time. It has extensive applications in fields such as robotics and engineering, and is gaining popularity in the art and tech communities.
3.2 YOLO Object Recognition Model
The Oak-D camera is also capable of running the YOLO (You Only Look Once) object recognition model. This model enables real-time object detection and recognition, providing accurate and fast results. It has applications in fields such as surveillance, autonomous vehicles, and augmented reality.
3.3 Gaze Estimation
Another powerful feature of the Oak-D camera is the ability to estimate gaze direction. This AI model can accurately determine where a person is looking, enabling applications such as eye tracking, Attention analysis, and user interaction in various domains.
3.4 Segmentation
The Oak-D camera can also perform image segmentation, which involves separating an image into different regions or objects. This enables precise object identification and tracking, with applications in areas such as medical imaging, scene understanding, and image editing.
3.5 Text Detection
Text detection is another AI model that the Oak-D camera can handle effectively. It can identify and extract text from images, enabling applications such as optical character recognition (OCR), document analysis, and text-to-speech conversion.
4. Comparing Oak-D with Other Cameras in the Market
When exploring AI powered cameras, it is essential to consider the available options. One popular camera in the market is the Azure Camera. However, the Oak-D camera offers several advantages over the Azure Camera.
4.1 Azure Camera
The Azure Camera is a well-known AI powered camera in the market. While it offers impressive features, it falls short in certain areas compared to the Oak-D camera. Firstly, the Oak-D camera is more affordable, making it an attractive option for various applications. Additionally, the Oak-D camera has the ability to load and run multiple AI models, providing greater flexibility compared to the limited options of the Azure Camera.
4.2 Pros and Cons of Oak-D
Pros:
- Affordability: The Oak-D camera offers a cost-effective solution for AI powered computer vision applications.
- Versatility: With the ability to load and run multiple AI models, the Oak-D camera caters to a wide range of applications.
- Depth Sensing: The stereo and mono cameras of the Oak-D camera enable accurate depth sensing in well-lit environments.
Cons:
- Limited Depth Sensing in Low-Light Environments: The depth sensing capabilities of the Oak-D camera are limited in poorly lit environments, unless the AI infrared (IR) illumination feature is used.
- Integration Challenges: While the Oak-D camera offers extensive capabilities, integrating it into existing systems might require technical expertise.
5. Setting Up the Necessary Libraries
Before diving into the world of the Oak-D camera, it is important to set up the necessary libraries and dependencies. This section will guide you through the process step by step.
5.1 Installing Python and Required Libraries
Python is the language used for this project and requires the latest version of Python 3 to be installed. The depth AI examples use the OpenCV library for computer vision tasks. To install OpenCV, simply run the command python3 -m pip install opencv-python.
5.2 Using PyCharm as the Integrated Development Environment
PyCharm is an integrated development environment that simplifies the process of writing and running Python code. It is recommended to use PyCharm for this project. Download and install PyCharm from the JetBrains Website.
5.3 Working with Virtual Environments
To ensure project isolation and avoid conflicts between different versions of libraries, it is best to work with virtual environments. PyCharm automatically creates a virtual environment for each project, allowing you to install project-specific libraries without affecting other projects. This practice ensures a smooth development experience.
6. Exploring the Depth AI Examples
The depth AI examples provided with the Oak-D camera are a great starting point for understanding its capabilities. This section will provide an overview of two examples: the Color Camera RGB Video and the Stereo Depth Video.
6.1 Understanding the Color Camera and RGB Video Example
The Color Camera and RGB Video example demonstrates how to capture RGB video using the Oak-D camera. It opens an OpenCV window showing the live video feed from the camera. This example allows users to gain Insight into the camera's color capabilities and serves as a baseline for further exploration.
6.2 Exploring the Stereo Depth Example
The Stereo Depth example showcases the Oak-D camera's depth sensing capabilities. It creates a 3D depth map by using the stereo and mono cameras. The example visualizes the depth map by rendering multiple views, providing a comprehensive understanding of the camera's depth Perception.
7. Conclusion
The Oak-D AI powered camera is a remarkable tool for computer vision applications. Its versatility, affordability, and support for various AI models make it a valuable asset in fields such as robotics, engineering, and art. By understanding the setup process and exploring the provided depth AI examples, you can unleash the full potential of this powerful camera and dive into the world of AI powered computer vision.
Highlights
- The Oak-D AI powered camera combines hardware and software to enable advanced computer vision applications.
- Depth AI, the spatial AI platform embedded in the Oak-D camera, allows for the execution of various AI models.
- The Oak-D camera supports applications such as media pipe hand tracking, YOLO object recognition, gaze estimation, segmentation, and text detection.
- When compared to the Azure Camera, the Oak-D camera offers affordability, versatility, and the ability to load multiple AI models.
- Setting up the necessary libraries, using PyCharm as the IDE, and working with virtual environments are essential steps in utilizing the Oak-D camera.
- Exploring the provided depth AI examples, such as the Color Camera RGB Video and Stereo Depth Video, allows users to grasp the capabilities of the Oak-D camera.
FAQ
Q: Can the Oak-D AI powered camera be integrated into existing systems easily?
A: While the Oak-D camera offers extensive capabilities, integrating it into existing systems might require technical expertise due to its advanced features and dependencies.
Q: How does the depth sensing of the Oak-D camera work in poorly lit environments?
A: The stereo and mono cameras of the Oak-D camera rely on well-lit environments for accurate depth sensing. However, the Oak-D Pro version, equipped with AI infrared (IR) illumination, can provide depth sensing in poorly lit environments.
Q: Are there alternative cameras to the Oak-D for AI powered computer vision applications?
A: Yes, the Azure Camera is a popular alternative. However, the Oak-D camera offers advantages such as affordability, versatility, and the ability to load multiple AI models.
Q: What software is required to run the Oak-D camera?
A: The Oak-D camera requires the installation of Python, OpenCV, and the depth AI library. The PyCharm IDE is recommended for managing the project and running the examples.
Alternatively use a tool like Touchdesigner. Explore the example-file : OAKExamples.toe
Another resource, found at a comparable university in Londen: Arts.Ac.Uk
Tutorials when taking the PyCHharm toute:
At HKU we have an OakD Lite in the Blackbox. This works best in well lit envoirnments (no IR)
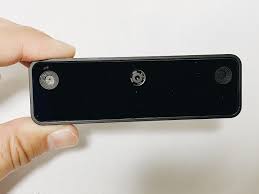
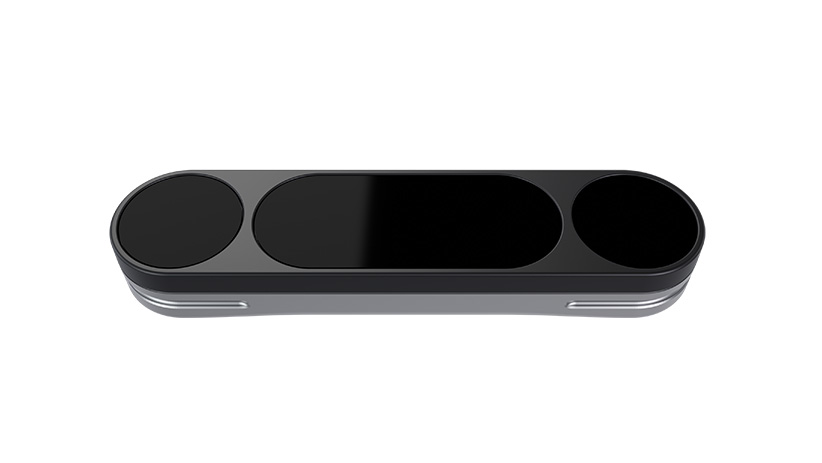
Zed 2i
ZED 2i is an IP66-rated Rolling Shutter camera built for spatial analytics and immersive experiences, powered by Neural Depth Engine 2. Ready to deploy, it has a robust aluminum enclosure, high-performance IMU and USB 3.1 connection.
ALL the info on ZED camera's
Works on PC only
How to install: https://www.stereolabs.com/docs/installation/windows
Main Features
- Dual-Lens Stereo Vision: Provides advanced depth perception and 3D mapping capabilities.
- Spatial Understanding: Offers a detailed understanding of the surrounding environment.
- Motion Tracking: Tracks objects and people in real-time with high accuracy.
- High-Resolution Imaging: Captures high-quality images, essential for detailed visual work.
- Robust Build: Designed for a variety of environments, enhancing versatility.
- Integrated Sensors: Includes IMU, barometer, and magnetometer for comprehensive data collection.
- Flexible Connectivity: USB 3.1 connection for easy integration with various systems.
Here are the links to the TouchDesigner documentation regarding ZED TOP, CHOP and SOP:
TOP: https://docs.derivative.ca/ZED_TOP
CHOP: https://docs.derivative.ca/ZED_CHOP
SOP: https://docs.derivative.ca/ZED_SOP
Also, if this is a topic of your interest, it might come in handy to have a look at the official ZED documentation:
https://www.stereolabs.com/docs
more info on https://interactiveimmersive.io/blog/touchdesigner-integrations/updated-zed-camera-features-in-touchdesigner/
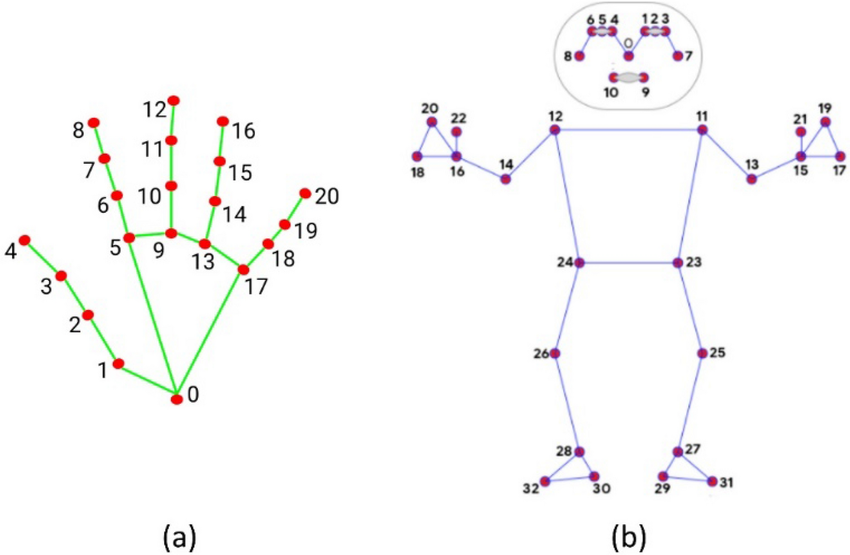
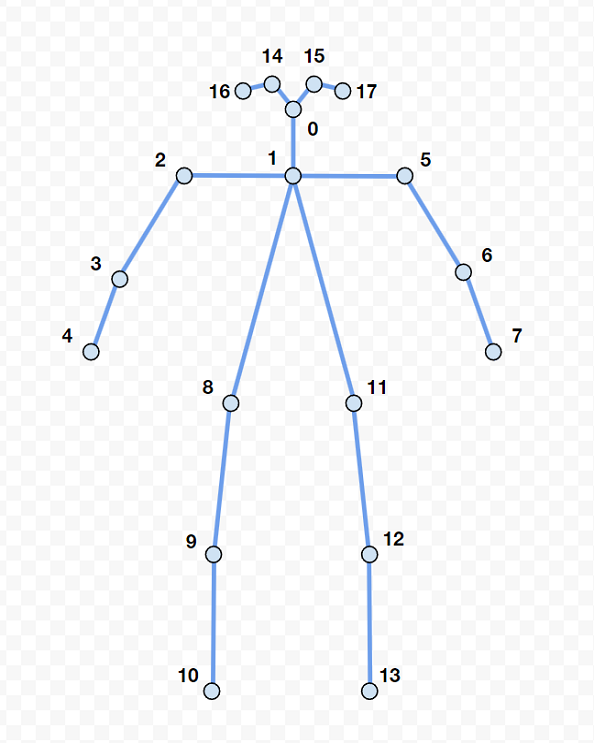
Skeleton tracking keypoints (there are various options)
Various Plugins & tutorials
Touchdesigner:
Orbec Astra : not natively supported because of being discontinued, this Touchdesigner plugin by Nuitech does the work for pc. Needs to be pulsed every 10 minutes (or buy Nuitech software).
OakD : OakD runs software called Depth Ai, info found here, check it out to see more info on the specs
Support in TD is native.
https://www.toolify.ai/ai-news/unleash-your-creativity-with-oakd-and-touchdesigner-208402
Check out these tutorials to get started:
Apps & alternatives to 3D camera's
Apps that can do body tracking for your mobile devices
| ZIGSim an app that turns your phone/tablet into a depth sensor & tracking camera (over OSC) |
iKeleton OSC an app that turns your phone into body tracking camera (over OSC) sending X&Y coordinates |
Media Pipe* MediaPipe is a cross platform Framework for building machine learning pipelines for processing time-series data like video, audio, etc. Amongst many other possibilities it turns your webcam into a depth/tracking camera. |
| PhyPhox acces all the sensors in your phone in various ways. Export data (not realtime) |
||
| Mocap: optitrack The Blackboxes at HKU are equipped with High End Mocap systems: using Infrared Cameras & mocap suits (reflective elements) |
Mocap Vive: Vive trackers Vive Ultimate trrackers |
|
|
Software for real-time, interactive machine learning,
|
Yoha is a handtracking engine software that detects and locates your hand within a video stream such as the one from your webcam. Ai based. |
Depths camera's & apps for 3d scanning
the 3d depth camera's mentioned in this book can often also be used for 3d scans.
Check out info on this function in the book on 3d scanning