Sensors
In the Blackbox we have a whole range of sensors you can hook up to your computer to read, interpret and manipulate data. In this book we dive in to some of them
- wearable sensors
- position tracking
- Full body mocap
- Vive trackers
- LiDAR scanners
- 3D depth camera's
- Leap Motion
- Motion Tracking with Sensors for Microcontrollers
- conduction sensors, trigger controllers
- makey makey
- IPAC
- Bare conductive
- Playtronica BIOTRON midi controller touchboard
- Playtronica TOUCHME midi controller touchboard
- Adafruit MPR121 12-Key Capacitive Touch Sensor Breakout
- MIDI MADNESS MAKER
- ATARI PUNNIK CONSOLE
- Spad_Electronics synth biodata sonification midisprout
- t-t-t-t (textile touch to tones)
wearable sensors
Muse 2 EEG headband
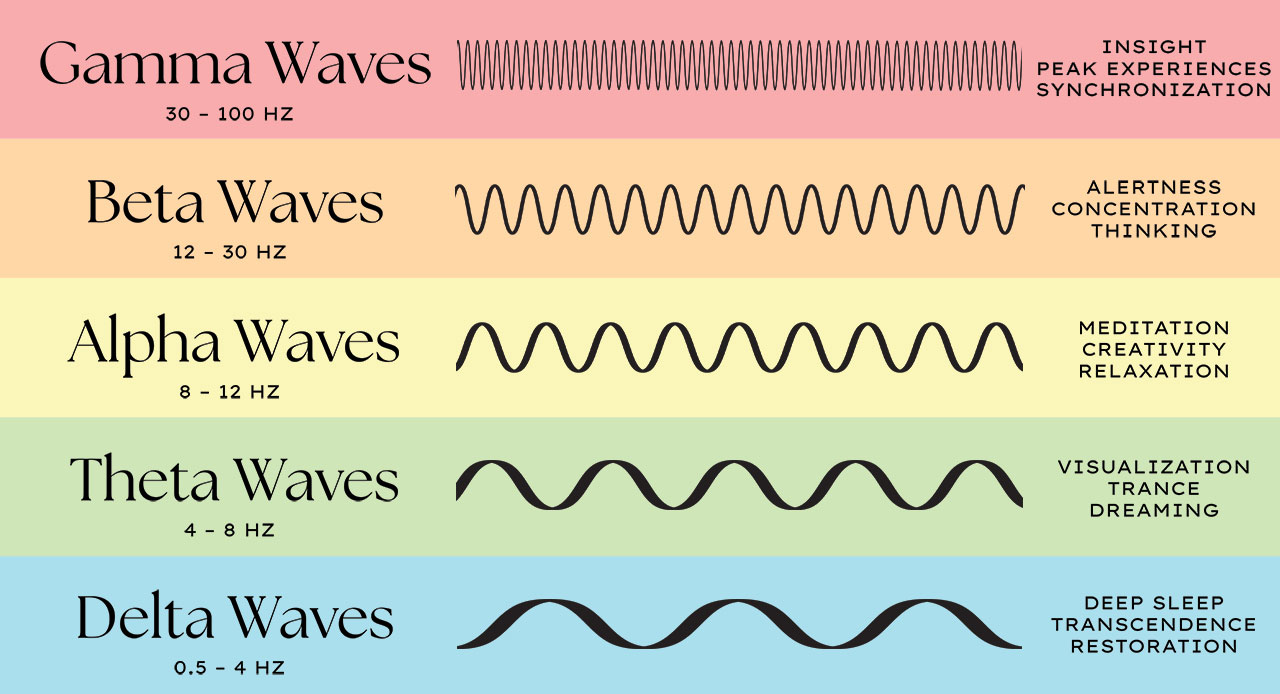
Muse is a smart headband that acts as your personal meditation coach. Using advanced EEG brain sensors, Muse can detect your brain activity and provide you with real-time feedback in the form of gentle audio sounds through your headphones (regular use in the Muse app). Primarily advertised as a neurofeedback tool, the headband tracks heart rate (PPG + Pulse Oximetry), angular velocity (gyroscope), proper acceleration (accelerometer), and electroencephalography (dry electrodes) to assist you in your meditation sessions.
| The Muse can be connected to your computer using Petal Metrics: https://petal.tech/downloads This tool allows you to send the EEG data to your computer through OSC. Update 2024: this app is no longer free. |
 |
Brain waves are measured in hertz (Hz), which refers to cycles per second.
Muse 2 in Touchdesigner:
This video covers how to connect the Muse 2 device into TouchDesigner.
Using OSC ports (muse app, paid) to get the data, we will build a simple generative animation controlled with the mind.
The connected app is Mind Monitor (paid)
>> OSC specs for Mind Monitor : https://mind-monitor.com/FAQ.php#oscspec
This app is available in the Blackbox JK (ipad)
Download muse_data.tox for touchdesigner use with and OSC app connected to the headset & get named channels (check out de RAW oscIn operator inside the .tox to see the other possibly usefull data being streamed).
more TD examples using the Mind monitor app:
- Mind-Monitor-TouchDesigner-MultiDisplay.toe
- Mind-Monitor-TouchDesigner-Audio.toe
- Mind-Monitor-TouchDesigner-Relative.toe
- Mind-Monitor-TouchDesigner-RAW.toe
--------------------------------
Do you have developer skills : https://choosemuse.my.site.com/s/article/Muse-Software-Development-Kit-SDK-FAQs?language=en_US >> to apply for the SDK
Working in Python: check out: https://github.com/alexandrebarachant/muse-lsl
if you create a workaround to convert this LSL data to OSC, please let us know
Also, a high end tool that will take some effort to use, but seems to be free: https://openvibe.inria.fr/discover/
--------------------------------
Extra reads:
Interesting article on Medium : Muse 101 — How to start Developing with the Muse 2 right now
Genki Wave
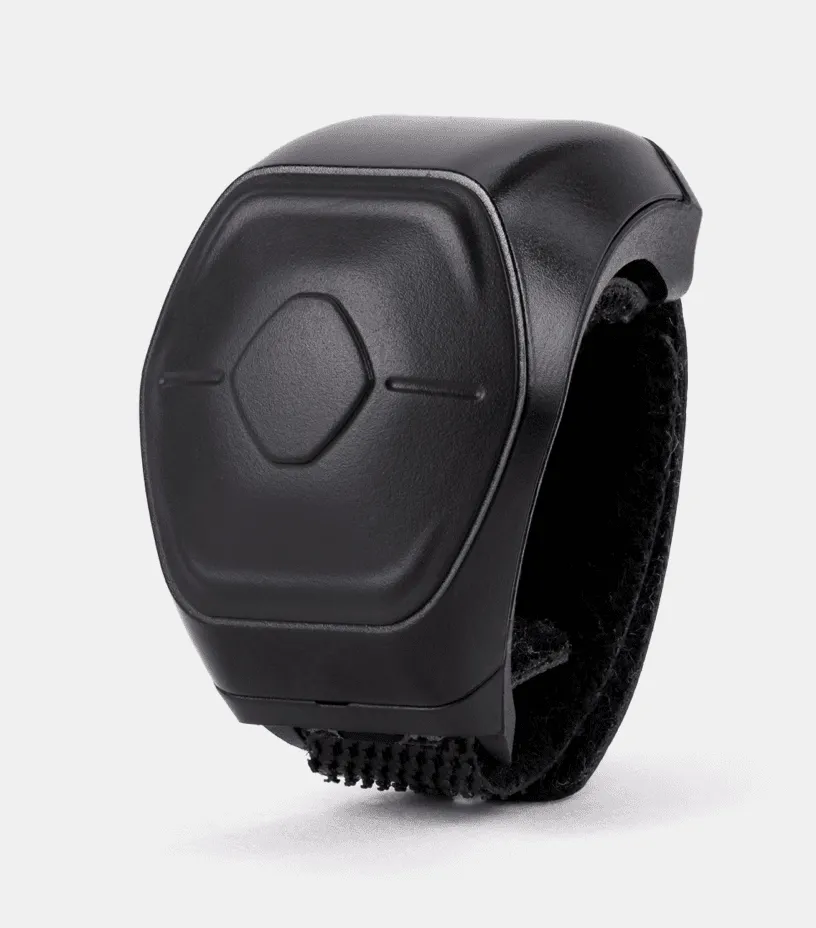
Wave Midi Ring : This MIDI controller can add dynamic effects with the tap of a finger, the click of a button, the wave of your hand.
connect to your computer via Softwave
Download the manual here
Working with the Wave in Isadora:
Softwave software comes with presets on the left side in the interface. Preset 15 is already set to MIDI with channel 15. Go to Menu > Audio/MIDI settings. Here you can choose MIDI output. When you start Isadora it will show "Isadora Virtual In"
In Isadora you receive MIDI by setting your input channel in the Communications > Midi Setup window
Input ports:
Port 1: Wave
Use the Actor Control Watcher: Set Controller to the number of the channel you send MIDI to from Softwave. Like channel 15.
In Softwave you can make your own presets and choose your own channel numbers.
Make a new preset by clicking + next to "Default Preset Blank" at the top of the presets list. Choose "add function" and a function. In the bottom right of the new function press the MIDI icon > CC to choose a channel like 3.
In Isadora change yout control watcher controller channel to 3 to receive tha values.
Sometimes Isadora looses communication to the Wave, go to midi setup window change the port to none and choose wave again. Connection should be back.
Apple watch , iphone
TBD
available sensors:
-
Proximity sensor
-
Ambient light sensor
-
Accelerometer
-
Magnetometer
-
Gyroscopic sensor
-
Barometer
ZigSimPro
DIY projects
start here:
https://www.instructables.com/Beginner-Tips-for-DIY-Wearable-Tech/
https://www.wearabletutorials.com/how-to-use-led-lights-for-wearables-beginners-guide/
https://www.instructables.com/Wearable-Tech-1-2/
https://www.instructables.com/circuits/wearables/projects/
position tracking
Full body mocap
Full body mocap (motion capture) is a technology used to record the movements of a person or an object and translate them into digital data. This data can then be used to animate digital characters or objects in 3D environments. In full-body mocap, sensors are attached to various points on the body (e.g., joints like knees, elbows, and shoulders), and as the person moves, the system records the motion in real-time. These sensors can be optical (using cameras) or inertial (using gyroscopic sensors).
How Full Body Mocap Works:
- Suit & Sensors: The performer wears a suit with sensors placed on key points across the body. These sensors track the movement of the limbs, torso, and other body parts.
- Cameras or Inertial Sensors: Optical systems use multiple cameras to capture the position of the sensors in space. Inertial systems use built-in sensors in the suit to measure movement directly.
- Software: The captured data is processed by software to create a virtual skeleton that mirrors the movements of the performer in real-time.
- Animation & Rendering: The data is used to animate digital characters or avatars in 3D software, which can then be used in films, video games, or virtual environments.
Application in Audiovisual Arts and Theatre:
- Film & Animation: In filmmaking and animation, full-body mocap is widely used to create realistic movement for digital characters, especially in VFX-heavy movies. Think of characters like Gollum in The Lord of the Rings or the Na'vi in Avatar. This allows filmmakers to blend live action with digital environments or characters seamlessly.
- Virtual Reality & Immersive Art: Mocap is used in creating immersive virtual reality (VR) experiences, allowing performers to interact with virtual environments in real-time. In audiovisual art, this can involve live performances where the artist’s movements control or generate digital visuals and sound.
- Theatre Performances: Full-body mocap has also been incorporated into theatre productions to explore new ways of storytelling. For instance:
- Actors' movements are captured and projected onto screens as avatars or animated forms, blending live performance with digital art.
- Interactive set designs: Mocap can control virtual sets that respond dynamically to the actors’ movements, adding layers to the performance.
- Dance and Performance Art: Mocap is used to create interactive audiovisual installations where dancers’ movements trigger or manipulate projected visuals, sounds, or lighting in real time. This enables artists to combine physical performance with digital creativity, offering audiences an integrated multimedia experience.
In these applications, mocap enhances the creative possibilities of performance by merging physical and digital spaces, allowing for innovative storytelling and audience engagement.
avaibale at HKU:
Motive/Optitrack : camera system in the Blackboxes
Rokoko : Inertia Smartsuit for full body mocap, anywhere.
alternatives:
Xsens Bodysuit (not at HKU)
Vive Ultimate trackers
and more....
Als see https://bookstack.hku.nl/books/3d-depth-cameras/page/types-of-depth-cameras-alternatives-for-position-tracking
for 3d camera's, mediapipe and apps that allow body tracking through camera
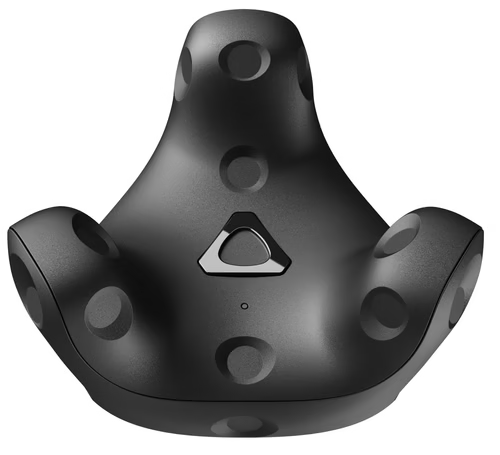
Vive trackers
Check out: Vive trackers website
Also: https://bookstack.hku.nl/books/motion-capture-motion-tracking/chapter/vive-tracking
 .
. 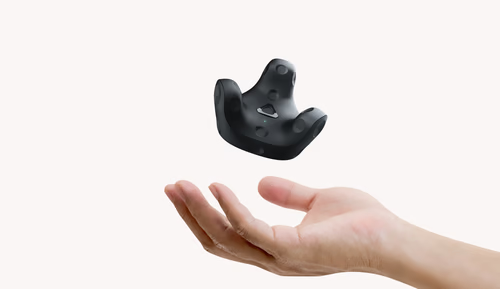
Track movement and bring objects from the real world into the virtual universe.
Connect to Vr,, Resonite, Touchdesigner,, Unity etc through Steam.
The Vive VR trackers function by using laser sweeps from base stations (vive Lighthouses) to detect their position and orientation in 3D space (approx 5x5 mtrs.) They provide highly accurate real-time tracking of body movements or objects, making them essential for immersive VR experiences, motion capture, and virtual production.
Vive VR Trackers are devices developed by HTC as part of their VR (virtual reality) ecosystem, designed to capture the precise movements of objects or body parts in a 3D space. These trackers allow for more immersive and interactive VR experiences by bringing real-world objects or additional body movements into the virtual environment. They are commonly used in VR gaming, simulations, and creative applications like motion capture and virtual production.
How Vive VR Trackers Work:
- Base Stations (Lighthouses): Vive trackers rely on base stations, also known as Lighthouse tracking systems, to function. These base stations emit laser sweeps across the room, creating an invisible grid of light that the trackers use to determine their position and orientation in 3D space. The base stations typically sit on opposite sides of the play area, providing full coverage.
- Sensors in the Trackers: The Vive trackers have built-in photo-sensors that detect the laser sweeps from the base stations. When the lasers pass over the tracker, the sensors detect the timing of the sweep. By comparing this timing across multiple sensors, the tracker can accurately calculate its position (location in space) and orientation (angle and direction it’s facing) within the virtual environment.
- Wireless Communication: The trackers communicate wirelessly with the VR system, transmitting their positional data back to the central processing unit (often the VR headset or a connected computer). This data is then used to place the object or body part being tracked into the virtual world with precise accuracy.
- Real-Time Positional Tracking: Once the position and orientation data are transmitted, the VR software interprets this information in real time, reflecting the movements of the trackers within the virtual environment. This allows users to see and interact with real-world objects (such as tools, props, or body parts) in the VR world.
Applications of Vive VR Trackers:
- Full-Body Tracking: Vive trackers can be attached to different parts of the body (such as feet, hips, or hands) to enable full-body tracking in VR. This creates a more immersive experience by allowing the VR system to replicate the user’s entire body movements in the virtual world. It's popular in VR fitness applications, dance simulations, and social VR platforms where users can see and interact with each other’s full body movements.
- Object Tracking: The trackers can be attached to physical objects (like a tennis racket, a gun, or a prop in a VR game). This allows users to manipulate real objects and see their counterparts in the virtual world, enhancing the realism and interactivity of the experience.
- Motion Capture: In VR-based motion capture setups, the Vive trackers can be placed on key points of a performer’s body, allowing for detailed recording of their movements. This data can be used to animate digital characters in real time for virtual production or performance capture in gaming and film.
- Mixed Reality (MR): In mixed reality setups, the Vive trackers allow users to integrate real-world objects into virtual experiences. For instance, a camera operator could use a tracked real-world camera to shoot within a virtual environment, creating a seamless blend of real and digital footage.
- VR Sports and Simulations: Vive trackers are used in simulations that require precise replication of physical movements, such as VR sports (e.g., baseball, boxing) or industrial training simulations, where users need to interact with virtual tools or equipment.
alternatives:
Vive Ultimate trackers
Fancy having a try at building your own tracker?
Check out this Teensy project or this Hivetracker
LiDAR scanners
There are many different types, brands and models of LiDAR scanners on this page you find an overview of three brand/models that we came across our research how to do position tracking with LiDAR scanning
Slamtec RPlidar
Slamtec RPlidar S3 360° Laser Scanner (40 m) link as mentioned in this Touchdesigner tutorial
SICK LiDAR Scanner
These are apparently the same brand as used by Ars Electronica. The model I found was the SICK LMS100-10000 which is used at the Leonardo da Vinci Museum of Science and Technology (MUST )in Milan, Italy. The use it with an custom app and send the data through with OSC to Processing for their applications.
Hokuyo LiDAR Scanners
Hokuyo sensors are LiDAR (Light Detection and Ranging) sensors that are used for scanning and mapping environments. They work by emitting laser beams and measuring the time it takes for the beams to return after hitting an object, allowing the sensor to calculate the distance to that object. Hokuyo sensors are widely used in robotics, automation, autonomous vehicles, and various industrial applications due to their precision and reliability in detecting and mapping objects.
How Hokuyo Sensors Work:
- Laser Emission: The Hokuyo LiDAR sensor emits a laser pulse that travels through the environment. When the laser hits an object or surface, the light is reflected back to the sensor.
- Time of Flight: The sensor measures the time it takes for the laser pulse to return, known as the time of flight (ToF). By calculating this time, the sensor determines the distance between itself and the object that reflected the laser.
- Rotating Mirror (for 2D and 3D Scanning): Some Hokuyo sensors use a rotating mirror mechanism to scan the environment in a wide, 2D or 3D field of view. As the mirror rotates, the sensor continuously emits laser pulses, creating a detailed point cloud or map of the surroundings based on the distances measured.
- Data Processing: The sensor processes the distance data in real-time, producing a map or a set of coordinates representing the locations of objects in the environment. This data can be used by various systems, such as robots, to navigate or interact with the environment.
- Output: The sensor outputs the scanned data to a connected computer, robotic system, or control unit. This data can be used for applications such as obstacle avoidance, navigation, environment mapping, and more.
Key Features of Hokuyo Sensors:
- High Accuracy: Hokuyo LiDAR sensors provide highly accurate distance measurements, which is critical for applications like robotics and automation.
- Wide Field of View: Many Hokuyo models offer a wide scanning area, allowing them to capture data across large sections of an environment.
- Compact and Lightweight: Hokuyo sensors are designed to be compact, making them easy to integrate into small robotic systems or vehicles.
- Real-Time Data: They provide real-time scanning and data processing, which is essential for dynamic applications such as autonomous navigation and obstacle avoidance
Hokuyo sensors are also employed in interactive and new media art. They allow artists to create dynamic, responsive environments by tracking the movements of viewers or objects in real-time. These sensors are used in interactive installations, where artwork changes based on the audience’s presence, in performance art, to trigger digital projections and soundscapes, and in generative art, where movement data is transformed into visual or auditory compositions. Hokuyo sensors enable artists to blend physical and digital spaces, enhancing the immersive and interactive nature of art.
Types Hokuyu Lidar scanners
There are different types of Hokuyu Lidar scanners for various applications it is important to choose the right one for what you want!
Hokuyu URG-04LX-UG01
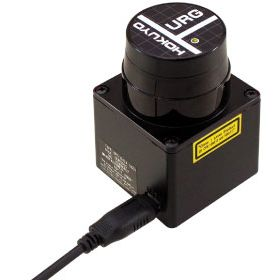
This model has an USB connection and has a scanning frequency of 10Hz (600rpm). You can relieve the data in Touchdesigner, but the scanning frequency is to slow for position tracking.
- https://reserveren.hku.nl/#equipment/189673
- specifications & https://acroname.com/store/r325-urg-04lx-ug01
Hokuyo UST-10LX
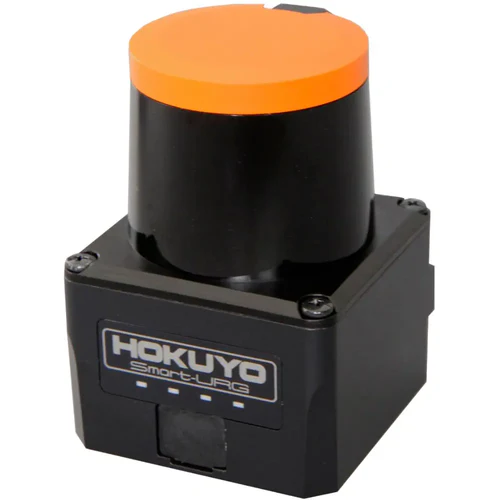
This model has a ethernet connection a detection range of 10 meter and a 40Hz scanning rate this is fast enough to do reliable position tracking. Often you would use 2 or 4 to get de position of a person(s) on the floor.
- You can buy it: here
- The manufacturing site is: here
- Tutorial in Japanese: https://www.youtube.com/watch?v=opDVtyOQIeY
There is also a Hokuyo UST-20LX (link) with 20m range and the UTM-30LX-EW LiDAR (link) with 30m range. The UTM-30LX-EW is also the model that was used by Ars Electronica Futurelab (link) as mentioned here (link)
Extra Documentation:
- https://docs.derivative.ca/index.php?title=Hokuyo_CHOP (Hokuyo CHOP touch designer documentation)
- https://miwa-maroon.medium.com/super-introduction-hands-on-interactive-content-with-hokuyo-sensors-and-touchdesigner-46e24f051a2 (mini touchdesigner tutorial)
- https://interactiveimmersive.io/blog/touchdesigner-resources/blob-tracking-tricks-in-touchdesigner/
- https://derivative.ca/UserGuide/Hokuyo_CHOP
- https://www.youtube.com/watch?v=opDVtyOQIeY
- https://github.com/STARRYWORKS-inc/HokuyoUtil
- https://www.youtube.com/watch?v=Xxw_gUPUcy8
- https://alltd.org/hokuyo-sensor-touchdesigner-tutorial/
- https://github.com/huskyroboticsteam/urg-lidar (driver)
- https://ars.electronica.art/futurelab/en/pharus/ (Ars Electronica Futurelab tracking system)
- https://ars.electronica.art/futurelab/en/projects-deep-space-evolution/ (more about the projection in the Ars Electronica Futurelab)
3D depth camera's
see this page: https://bookstack.hku.nl/books/3d-depth-cameras
Leap Motion
With the Leap Motion you can track the movement of your hands.
You can buy Leap version 2 since 2023, the Leap 1 is still relevant.
Here you can find information on how to install the software for Leap1 and use it in Isadora and Touchdesigner
Leap1 + 2 work with the same driver since the last time we updated this bookstack So this should not be relevant (if anyone is able to test this please let us know so we can delete following statement definately):
software Gemini v5.20 should work with PC and Isadora. (tested in blackbox IBB 25-06-25)
This should also work with Touchdesigner and Apple Silicon Macs, provided the SDK file “libLeapC.5.dylib” is in the correct folder.
Mac & windows:
Desktop/Laptop Computers > Choose the new versionFor Mac M1 & M2, Direct link v5.17.1 – Beta
Use Leap motion in Isadora on PC & Mac
For more info on how to use the Leap Motion read this and download and install the Leap Motion user actor.
Isadora mentions in the README file bij de user actor: If you want to run this plugin on an Apple Silicon (ARM/M1) based Mac, you'll have to enable Intel emulation (Rosetta) mode on the Isadora application. But if you work with Sonoma (Mac OS) this might not be the case. I found this online:
Does Rosetta work on Sonoma?
A major macOS Sonoma update cuts the compatibility of an array of software, resulting in all of them not working properly on a brand-new environment, such as apps designed for Intel Mac stop working on Apple Silicon Macs. This issue happens because of Rosetta 2 support incompatibility on macOS Sonoma.
More info about Leap motion and Isadora can be found here and here, also here.
Preperations to use Leap Motion with Touchdesigner on Mac (not yet tested on PC)
https://docs.derivative.ca/Leap_Motion_TOP
This info is not complete,
the SDK files are located in: /Library/Application Support/Ultraleap/LeapSDK
For Sonoma users: /Library/Applications/Ultraleap Hands Tracking (right mouse click > show package contents)/Contents/LeapSDK
Copy the files mentioned on this page toTouchDesigner.app/(right mouse click > show package contents)contents/frameworks
Motion Tracking with Sensors for Microcontrollers
Tis page can be found here!
conduction sensors, trigger controllers
Makey Makey, I-PAC, and Bare Conductive are all trigger controllers: devices that let you turn everyday actions into digital inputs, connecting the real world to your computer. They are often used because they make interaction tangible and playful.
-
Makey Makey works like a keyboard or gamepad. By connecting alligator clips to conductive objects (fruit, foil, people), touching those objects completes a circuit. Each touch becomes click on the computer.
-
I-PAC (Interface for PC to Arcade Controls) is like a MakeyMakey but with all the options your keyboarrd has.
-
Bare Conductive lets surfaces themselves become interactive — conductive paint, materials or objects objects -Touching or even approaching the area sends signals that can be used to trigger sounds, visuals, or other digital outputs.
BC sends values whereas MakeyMakey & Ipac send trigegr signals (0/1).
What they share is the principle of conductivity: the body or a conductive material closes a circuit, creating a trigger.
Other touchboard added to this list, go to their page for description and information on where to get them and how to use them.
makey makey
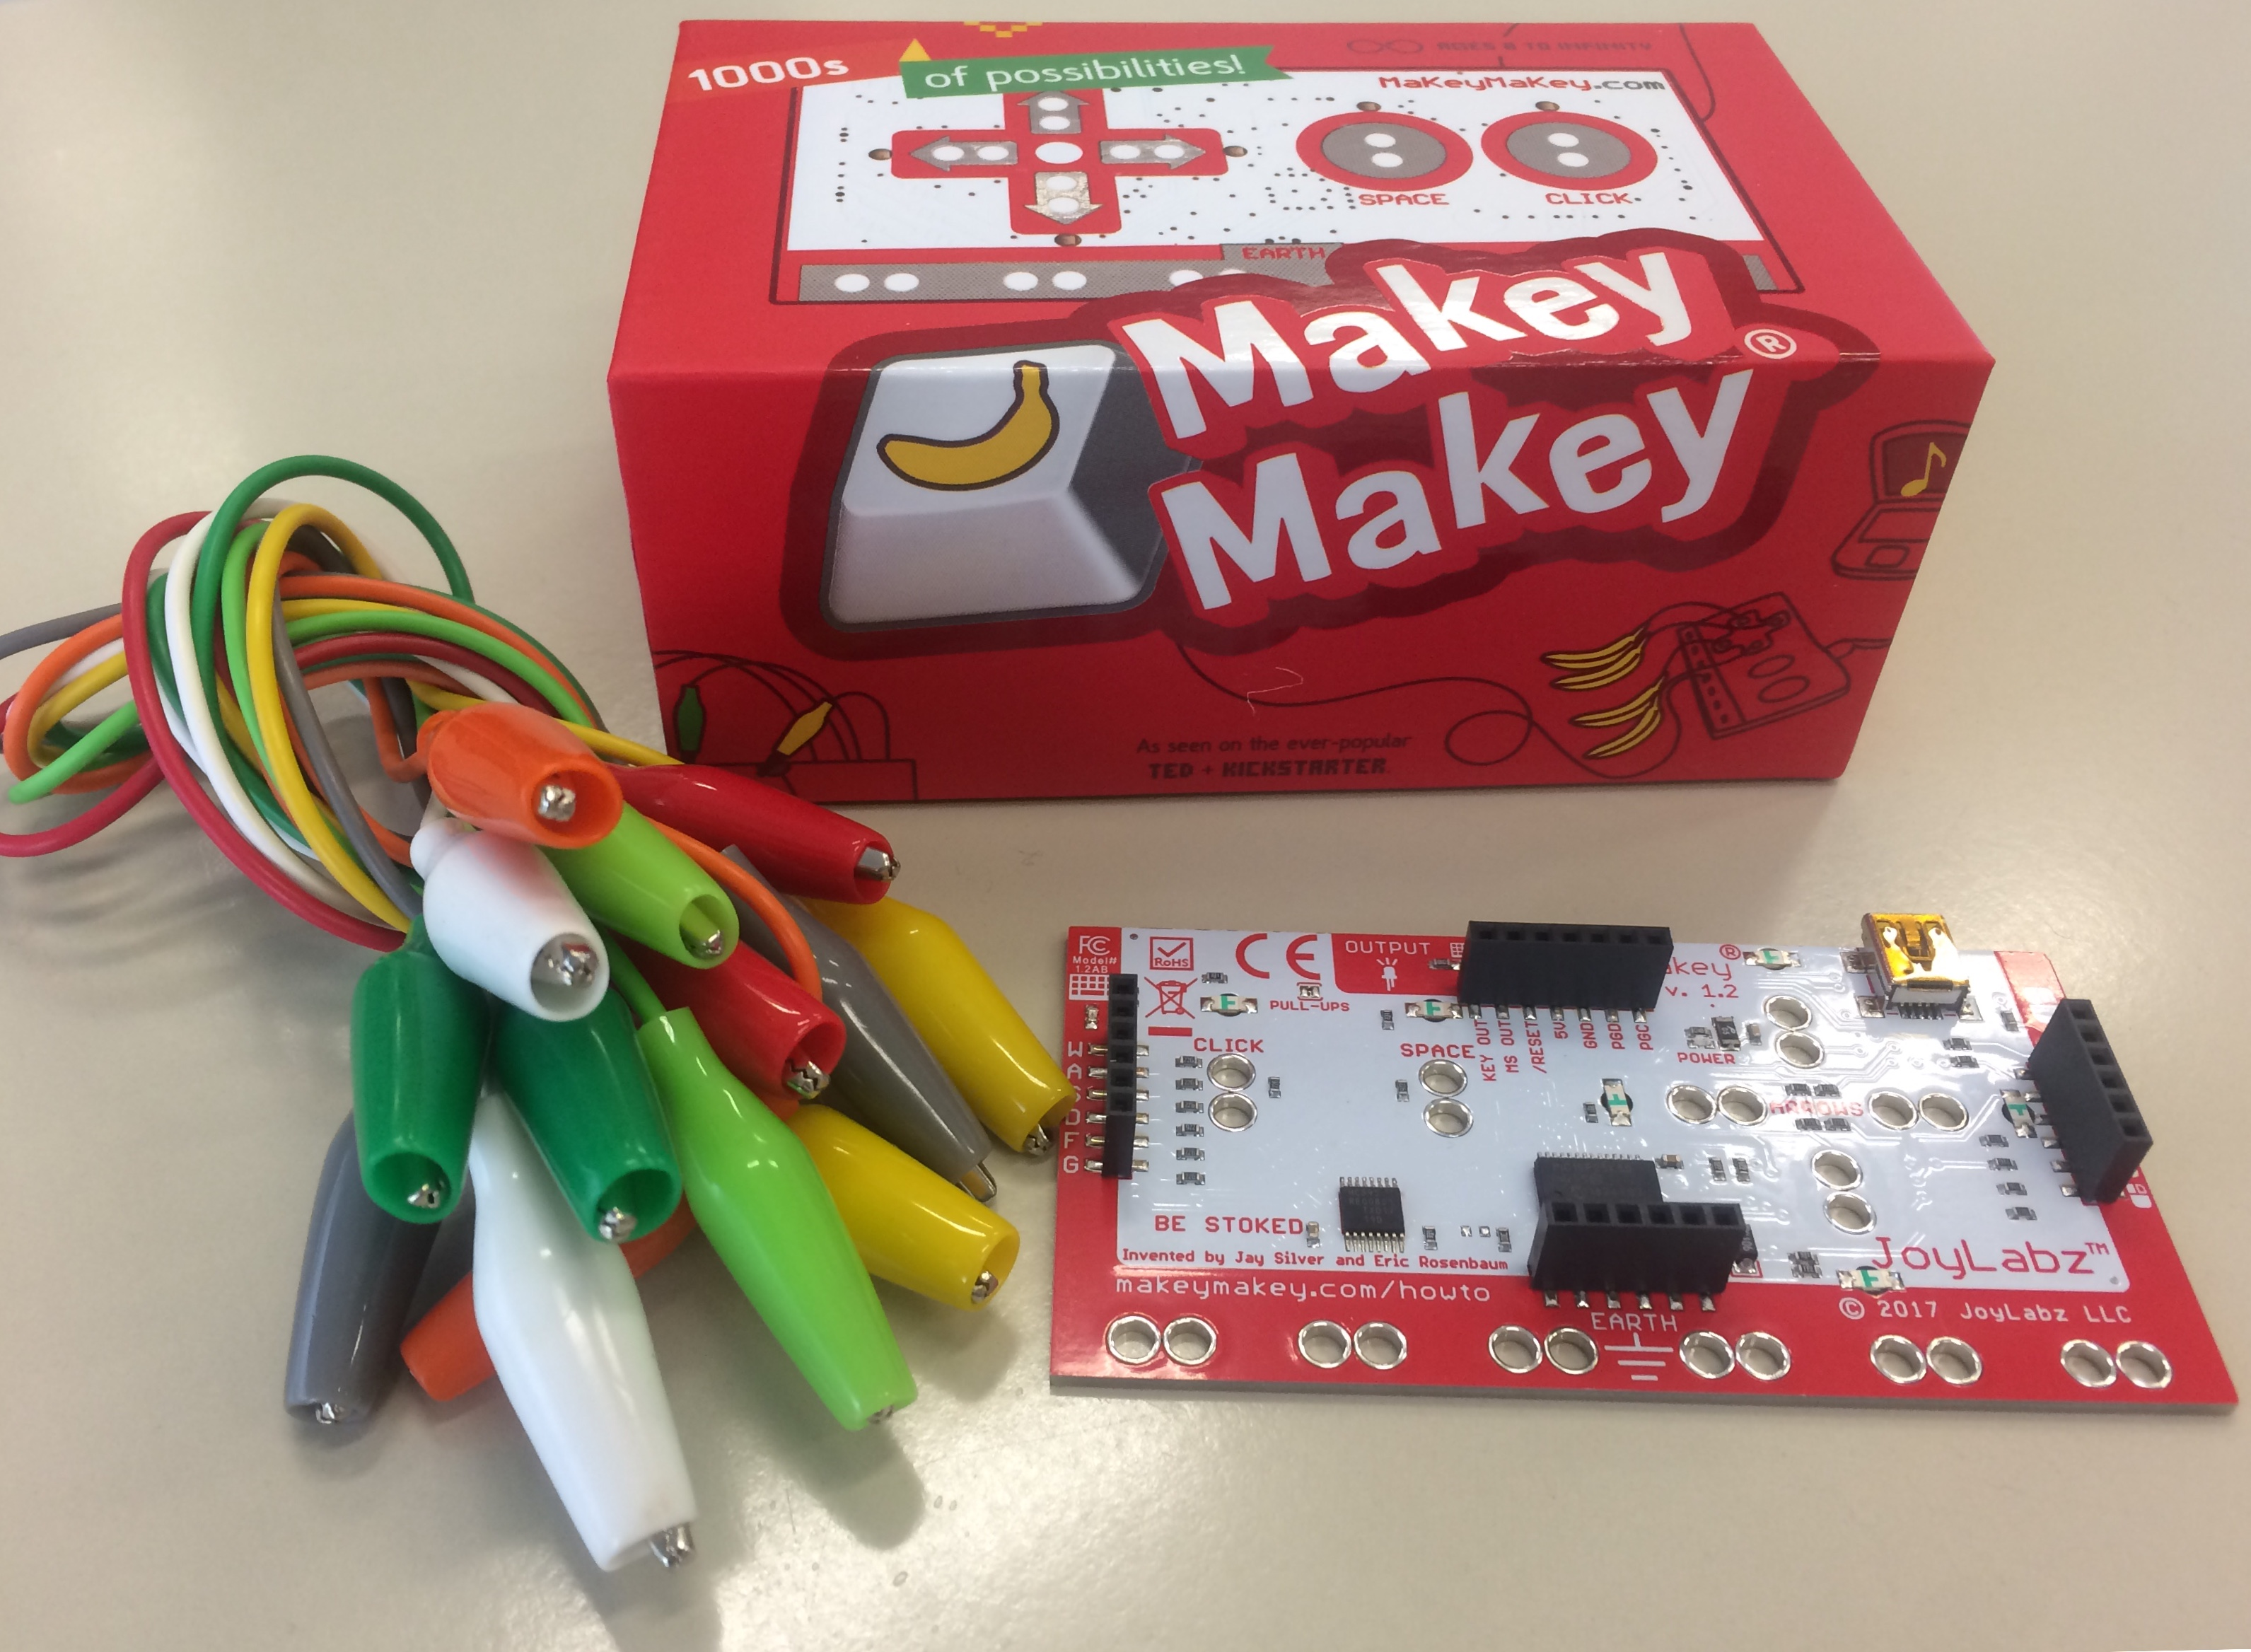
Design your own controller with everyday materials like foil, velostat, playdough, graphite pencils, water or any other conductive material. Lots of info and examples on their own site: https://makeymakey.com
No need to install drivers , makey makey is plug and play.
Attach it through usb to your computer, close a circle of conduction bij connecting 'ground' and 'another trigger' & it shows up to be an external keyboard. Read the signal in an app like wordpad/texteditor to make sure you have the right connection.
In data flow software (like Isadora & touchdesigner) the makey is read through nodes like a 'keyboard In watcher' or 'KeyBoardIn'
Remember to always playtest your setup, as using a keyboard as input may also lead to unexpected/unwished results (like you interface being all over the place :)
Also see this page: aan-de-slag-met-makey-makey
Borrow Makey from the uitleen at IBB of PASTOE
or the Blackbox @ JK
Or in a tech case!
see ipac for a makey on steroids
IPAC
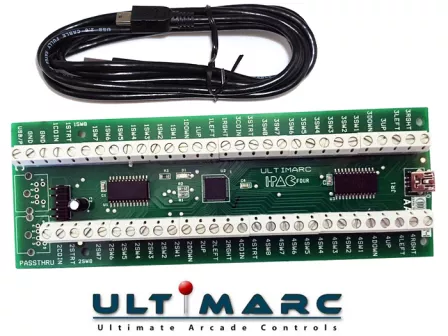
your external keyboard, made of anything conductive
aka the makey makey on steroids :)
The I-PAC2 has 32 inputs which are all programmable and are marked as 2 joysticks, 8 buttons each, plus coin1, coin2, start1, start2 and MAME control keys. Any inputs can be assigned as a shift key to access an alternate code set. I-PAC is the ONLY keyboard encoder where each input inputs has it's own dedicated microprocessor pin. No interaction or delays, vital for multi-button games such as fighting games. I-PAC is much more than a keyboard encoder! Pins can be configured as mouse buttons or game controller buttons, plus power and volume control. I-PAC is the ONLY keyboard encoder which emulates a USB keyboard and yet breaks through the USB simultaneously-pressed-switch limit of 6 switches (plus ctrl,alt,shift) which afflicts all USB keyboard devices. I-PAC is the ONLY device to have a shift function which allows ANY input to be assigned to a shifted secondary keycode and the shift button can have it's own function too so no need for a dedicated extra control panel button. I-PAC is the ONLY device to have a self-test LED which not only gives an instant visible check of your installation but also can indicate which connection (if any) is causing a problem. I-PAC retains it's programming after power off. Not all keyboard encoders do this!
read up on specs here or here:
https://www.ultimarc.com/control-interfaces/i-pacs/i-pac4-board/
download custon software: https://www.ultimarc.com/download.html
mapping:
| INPUT | NORMAL CODES | CODES WITH SHIFT (hold 1 player start) |
|---|---|---|
| COIN 1 | 5 | |
| COIN 2 | 6 | |
| START 1 | 1 | |
| START 2 | 2 | ESC |
| 1 RIGHT | R arrow | Tab |
| 1 LEFT | L arrow | Enter |
| 1 UP | U arrow | Key Below ESC (Volume, gamma, etc ) |
| 1 DOWN | D arrow | P (pause) |
| 1 SW 1 | L-ctrl | 5 (Coin A) |
| 1 SW 2 | L-alt | |
| 1 SW 3 | space | |
| 1 SW 4 | L-shift | |
| 1 SW 5 | Z | |
| 1 SW 6 | X | |
| 1 SW 7 | C | |
| 1 SW 8 | V | |
| 1 A | P | |
| 1 B | ENTER | |
| START 1 | 1 | |
| START 2 | 2 | Esc |
| 2 RIGHT | G | |
| 2 LEFT | D | |
| 2 UP | R | |
| 2 DOWN | F | |
| 2 SW 1 | A | |
| 2 SW 2 | S | |
| 2 SW 3 | Q | |
| 2 SW 4 | W | |
| 2 SW 5 | I | |
| 2 SW 6 | K | |
| 2 SW 7 | J | |
| 2 SW 8 | L | |
| 2 A | TAB | |
| 2 B | ESC |
Bare conductive
we have a separate page for that! https://bookstack.hku.nl/books/bare-conductive
Playtronica BIOTRON midi controller touchboard
General info
Play with your favorite plant and let nature compose your music. As the plant's natural electrical properties change, the sound evolves, creating a unique musical experience every time.
You can also connect this to software like Isadora or Touchdesigner to activate other outputs.
https://help.playtronica.com/plant-sound
you don't need to update the firware, this is already done by the Blackbox employe
https://shop.playtronica.com/products/biotron
How to use it
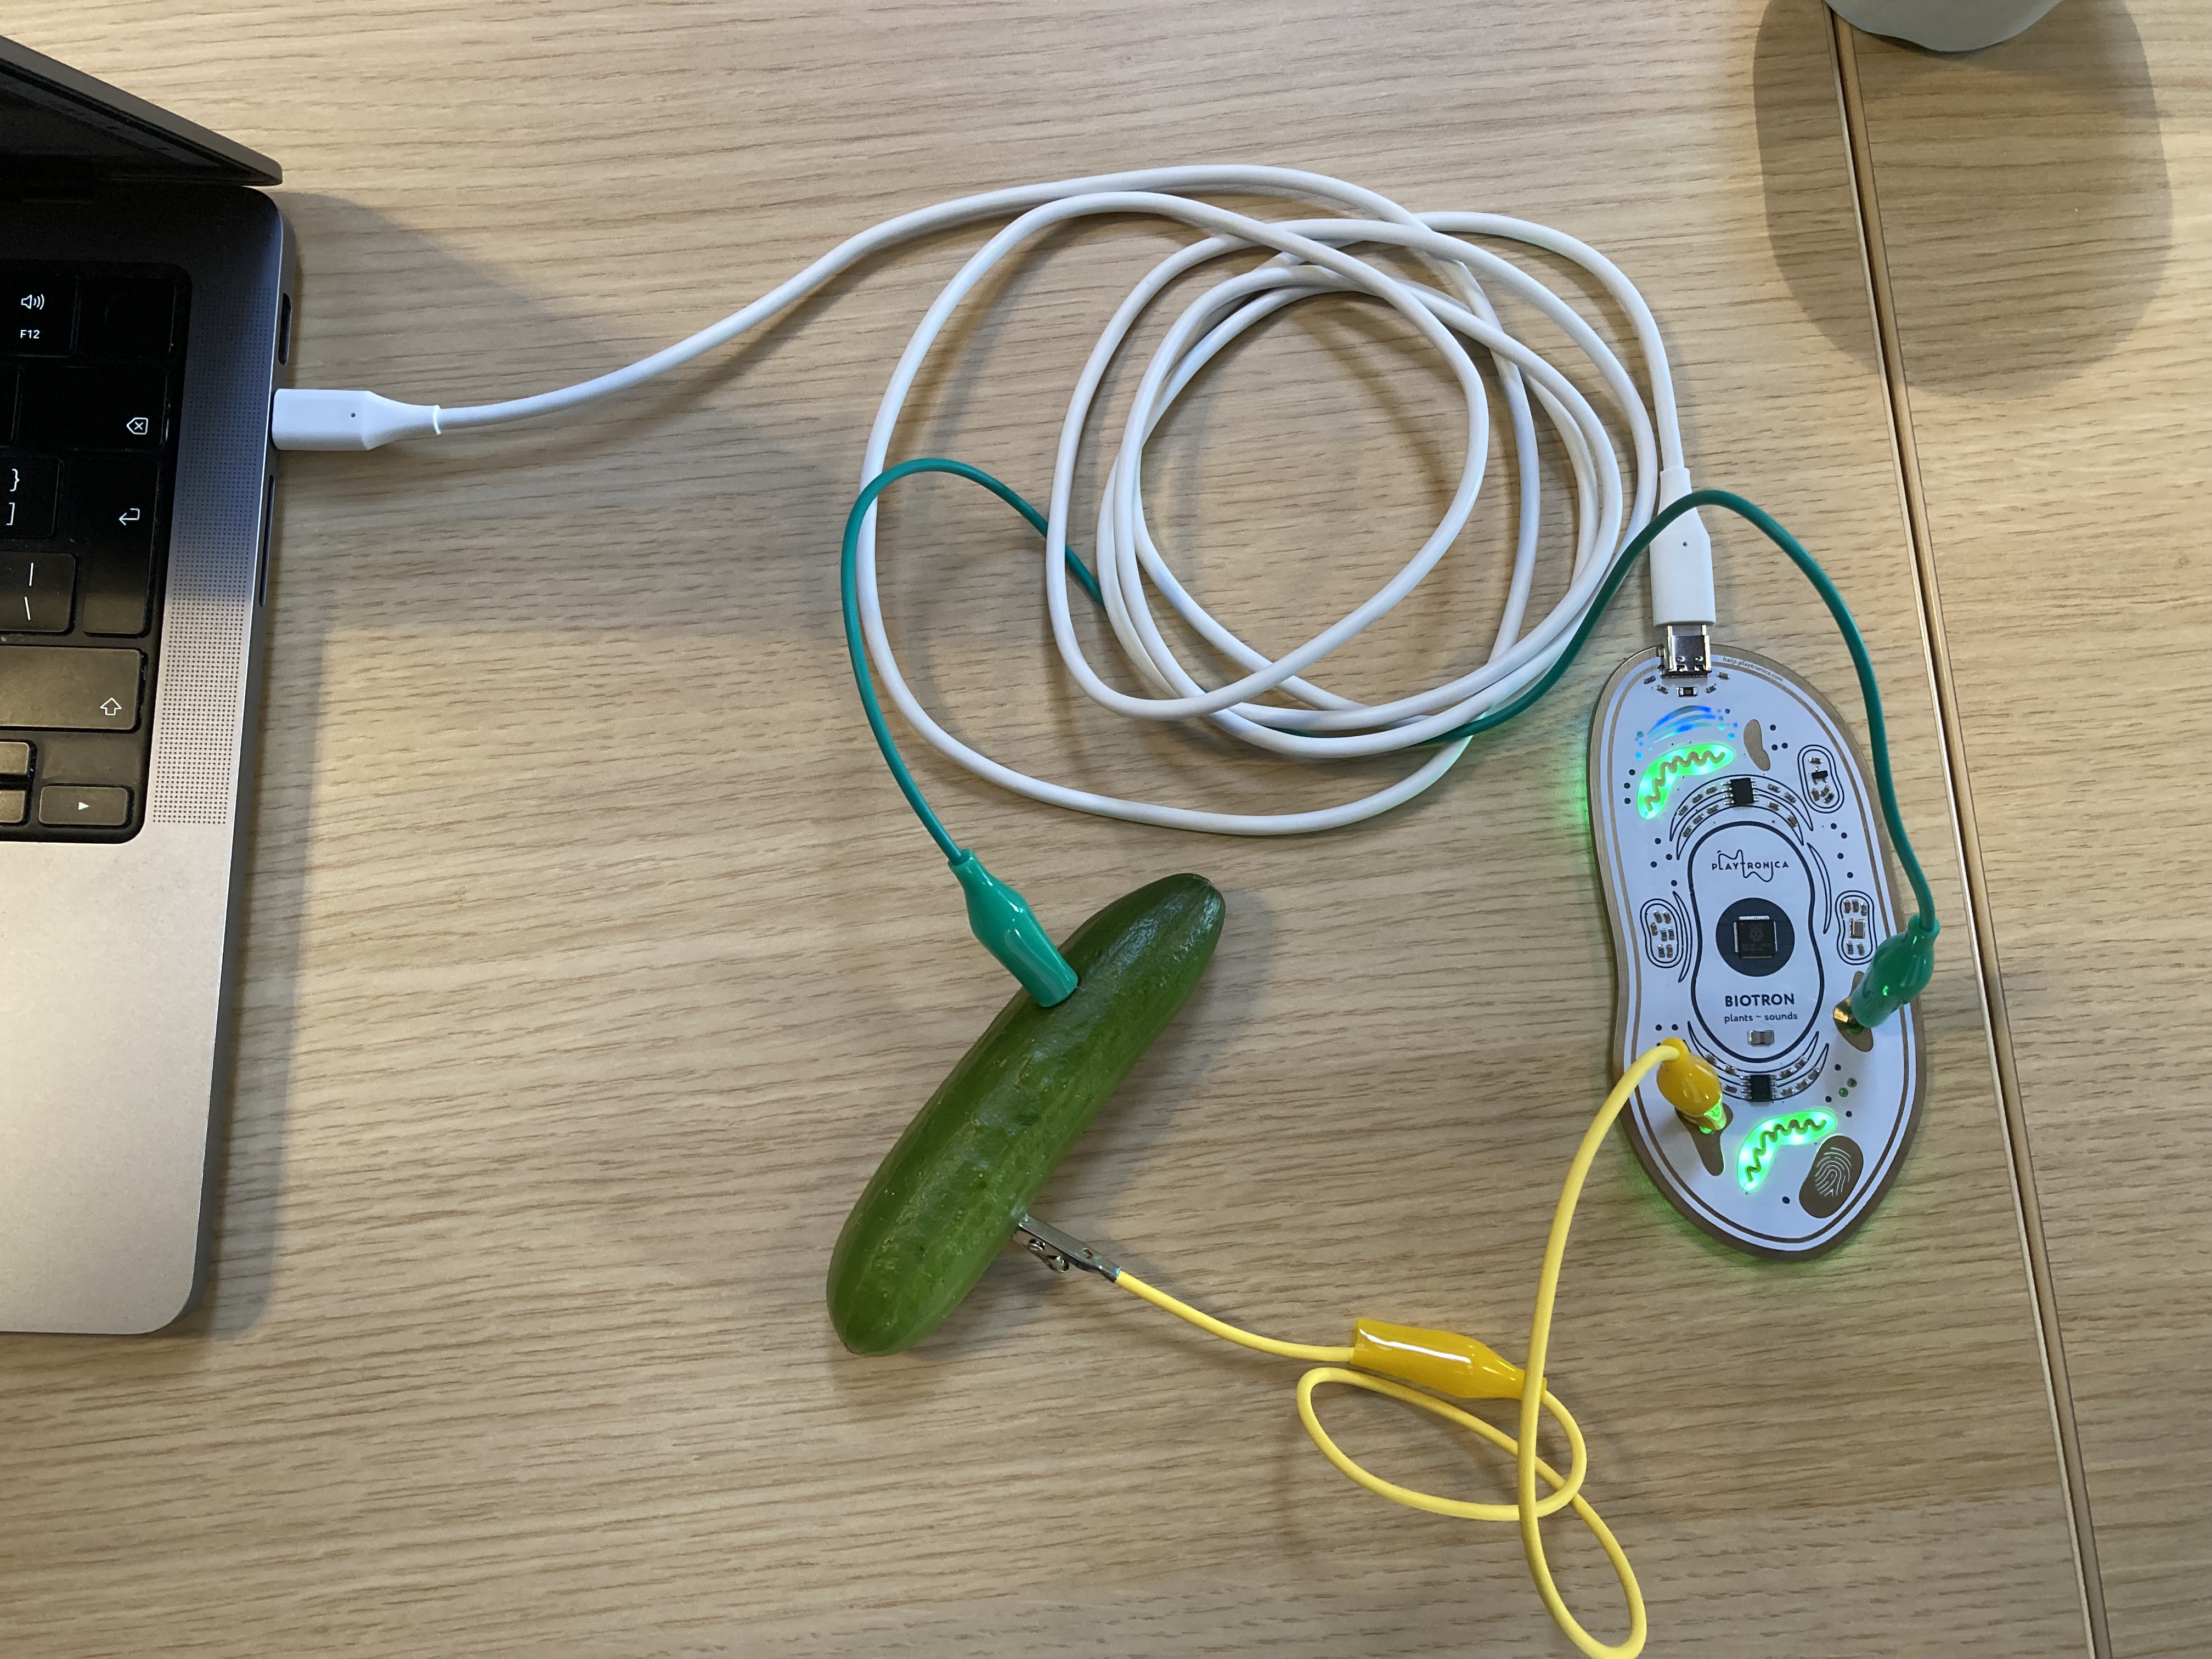
- Connect the Usb C cable with the Biotron and your computer
- Connect two cables with alligator clips to a plant, vegetable or something else organic and juicy.
- Wait a few seconds until the green lights in the Biotron start to pulsate...... remember to be patient
- Select the Biotron device (Biotron (Port 1)) as your midi device within your favourite audio program or other piece of midi munching software
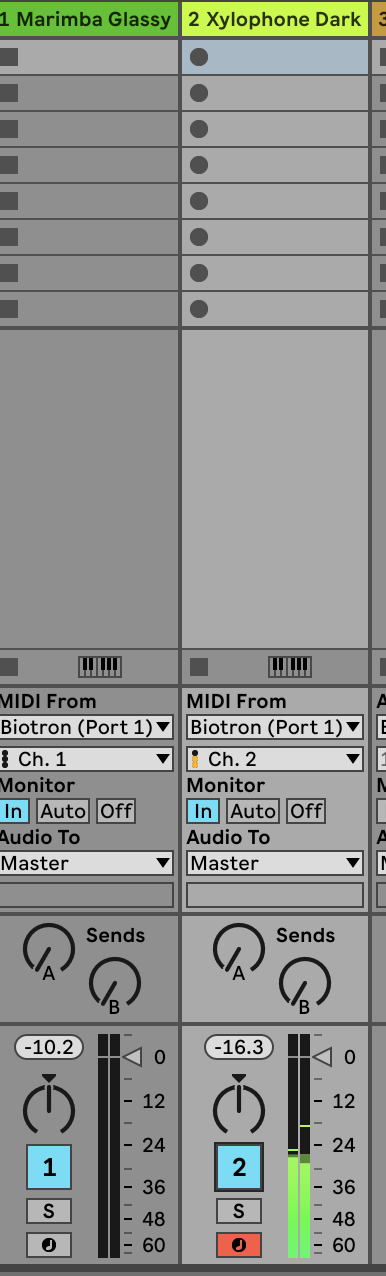
- Set one synth to midi channel one for generated notes from the plants
- Set another synth to midi channel two for pulsating notes
- Other then Audio software like Ableton you can also use online tool like midi.city(chrome only) to test the connection or play with your plant, vegetable or juicy organics.
This Bookstack is WIP...
for now Contact Blackbox employe to borrow this device and for help: blackbox.ibb-pastoe@hku.nl
Playtronica TOUCHME midi controller touchboard
Get your hands on TouchMe, the musical instrument that turns skin, water, or flowers into sound.
Play with friends or alone. As the area of touch and intensity changes, the sound changes too.
You can also connect this to software like Isadora or Touchdesigner to activate other outputs.
https://shop.playtronica.com/products/touchme
Summary:
1: connect TouchMe through mini usb cable to your computer.
2: open synth.playtronica.com in google chrome browser (other browser doesn't work) after connecting the TouchMe to your computer.
3: choose a synth (not WebSID Commodore 64 , Playtronica Sampler or Viktor NV-1)
4: grab both of the conductive sides of TouchMe.
apply some pressure,
variations of this pressure will trigger higher pitch notes or lower pitch notes.
Touchme stuurt op 1 poort uit
Biotron stuurt op 2 poorten uit
All other settings: https://help.playtronica.com/touchme
Contact Blackbox employe to borrow this device and for help: blackbox.ibb-pastoe@hku.nl
Adafruit MPR121 12-Key Capacitive Touch Sensor Breakout
Add lots of touch sensors to your next microcontroller project with this easy-to-use 12-channel capacitive touch sensor breakout board, starring the MPR121. This chip can handle up to 12 individual touch pads.
https://learn.adafruit.com/adafruit-mpr121-12-key-capacitive-touch-sensor-breakout-tutorial/overview
You can also connect this to software like Isadora or Touchdesigner to activate other outputs.
Tutorial follows later. This Bookstack is WIP...
for now Contact Blackbox employe to borrow this device and for help: blackbox.ibb-pastoe@hku.nl
MIDI MADNESS MAKER
The MIDI MADNESS MAKER, is a standalone DIY syntheseizer and MIDI controller interface you can make yourself with a focus on capacitive touch data. With Midi Madness Maker you can create your own tactile controller translating touch to MIDI control and CC messages over TRS-Midi jack- 5 pin DIN or Wireless over Bluetooth.
https://acidsolderclub.com/2025/05/29/midi-madness-maker/
You can also connect this to software like Isadora or Touchdesigner to activate other outputs.
Tutorial follows comes later. This Bookstack is WIP...
for now Contact Blackbox employe to borrow this device and for help: blackbox.ibb-pastoe@hku.nl
ATARI PUNNIK CONSOLE
The Atari Punnik Console is based on the famous and well known “Atari Punk Console” diy beginner synth, and works the exact same way accept it is modded and redesigned to work with touch and conductive materials as well such as E-textiles, conductive yarn, nails, screws, copper, random dead electronics and body contacts.
https://acidsolderclub.com/2025/05/29/atari-punnik-console/
You can also connect this to software like Isadora or Touchdesigner to activate other outputs.
Tutorial follows later. This Bookstack is WIP...
for now Contact Blackbox employe to borrow this device and for help: blackbox.ibb-pastoe@hku.nl
Spad_Electronics synth biodata sonification midisprout
Unlock the full potential of plants with Symbiotic - the ultimate plant-based musical instrument. Based on the open-source MidiSprout Biodata Sonification project, our device captures plants' micro electrical variations and transforms them into MIDI, CV, gate, and trigger signals for synthesizers. A perfect fit for makers and DIY enthusiasts, Symbiotic allows you to create truly unique and organic sounds using the natural world. Whether you're a musician, artist, or just a nature lover, Symbiotic is the perfect addition to your studio or home. Features: - Captures plants' micro electrical variations - Transforms them into MIDI, CV, gate, and trigger signals - Available as both a DIY kit and fully assembled - Create truly unique and organic sounds - Open source project
https://bookstack.hku.nl/books/bio-data-sonification-using-midi
https://www.tindie.com/products/spadelectronics/diy-synth-biodata-sonification-midisprout/
You can also connect this to software like Isadora or Touchdesigner to activate other outputs.
This Bookstack is WIP...
Contact Blackbox employe to borrow this device and for help: blackbox.ibb-pastoe@hku.nl
t-t-t-t (textile touch to tones)
https://v0ss3n.github.io/tttt/
https://www.instagram.com/michellevossen_/reel/DJ_U-vNND_K/
https://www.instagram.com/reel/DM7G3G_Ngbl/?utm_source=ig_web_copy_link&igsh=MzRlODBiNWFlZA%3D%3D
https://v0ss3n.github.io/tttt/update.html
You can also connect this to software like Isadora or Touchdesigner to activate other outputs.
This Bookstack is WIP...
for now Contact Blackbox employe to borrow this device and for help: blackbox.ibb-pastoe@hku.nl