# wearable sensors

# Muse 2 EEG headband

Muse is a smart headband that acts as your personal meditation coach. Using advanced EEG brain sensors, Muse can detect your brain activity and provide you with real-time feedback in the form of gentle audio sounds through your headphones (regular use in the Muse app). Primarily advertised as a neurofeedback tool, the headband tracks heart rate (**PPG + Pulse Oximetry**), angular velocity (**gyroscope**), proper acceleration (**accelerometer**), and electroencephalography (**dry electrodes**) to assist you in your meditation sessions.

<table border="1" id="bkmrk-the-muse-can-be-conn" style="border-collapse: collapse; width: 116.296%; height: 213px;"><colgroup><col style="width: 70.41%;"></col><col style="width: 29.59%;"></col></colgroup><tbody><tr><td>The Muse can be connected to your computer using Petal Metrics: [https://petal.tech/downloads](https://petal.tech/downloads)  
This tool allows you to send the EEG data to your computer through OSC.   
  
Update 2024: this app is no longer free.
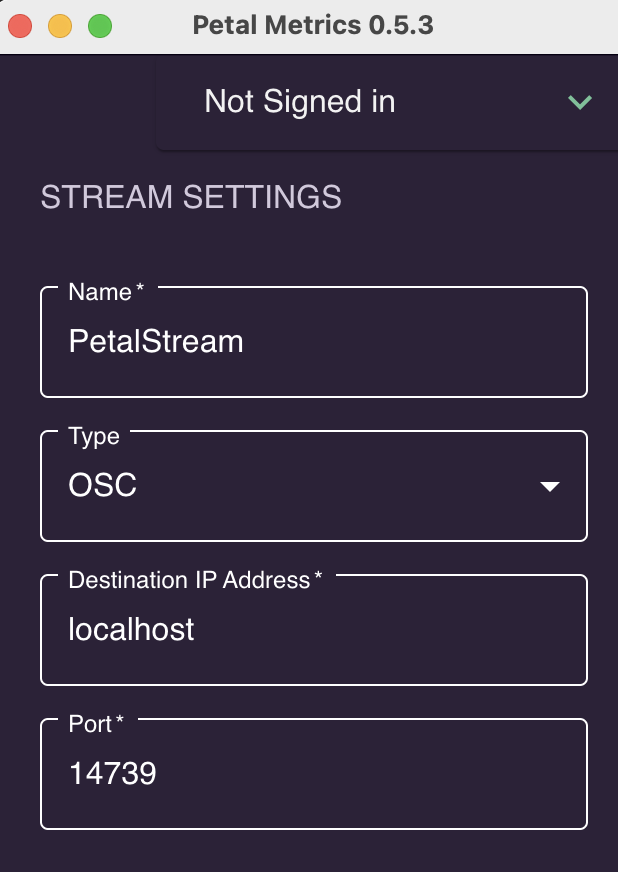
 </td><td>![Screenshot 2024-02-26 at 15.19.55.png](https://bookstack.hku.nl/uploads/images/gallery/2024-02/scaled-1680-/screenshot-2024-02-26-at-15-19-55.png)</td></tr></tbody></table>

[Brain waves](https://www.diygenius.com/the-5-types-of-brain-waves/ "more info on these 5 types of brainwaves") are measured in hertz (Hz), which refers to cycles per second.

[![image.png](https://bookstack.hku.nl/uploads/images/gallery/2024-02/scaled-1680-/NGpimage.png)](https://bookstack.hku.nl/uploads/images/gallery/2024-02/NGpimage.png)

#### Muse 2 in Touchdesigner:

<iframe allowfullscreen="allowfullscreen" height="314" src="https://www.youtube.com/embed/Br0JXvuzWEI" width="560"></iframe>

This video covers how to connect the Muse 2 device into TouchDesigner.   
Using OSC ports (muse app, paid) to get the data, we will build a simple generative animation controlled with the mind.  
The connected app is *[Mind Monitor ](https://mind-monitor.com/ "mind monitor app")(paid)* <span class="oo">&gt;&gt; OSC specs for Mind Monitor : </span><span class="oo">[https://mind-monitor.com/FAQ.php#oscspec](https://mind-monitor.com/FAQ.php#oscspec)  
This app is available in the Blackbox JK (ipad)  
</span>

<span class="oo">Download [muse\_data.tox](https://bookstack.hku.nl/attachments/47) for touchdesigner use with and OSC app connected to the headset &amp; get named channels (check out de RAW oscIn operator inside the .tox to see the other possibly usefull data being streamed).</span>

<span class="oo">  
more TD examples using the Mind monitor app:</span>

- [Mind-Monitor-TouchDesigner-MultiDisplay.toe](https://mind-monitor.com/misc/Mind-Monitor-TouchDesigner-MultiDisplay.toe)
- [Mind-Monitor-TouchDesigner-Audio.toe](https://mind-monitor.com/misc/Mind-Monitor-TouchDesigner-Audio.toe)
- [Mind-Monitor-TouchDesigner-Relative.toe](https://mind-monitor.com/misc/Mind-Monitor-TouchDesigner-Relative.toe)
- [Mind-Monitor-TouchDesigner-RAW.toe](https://mind-monitor.com/misc/Mind-Monitor-TouchDesigner-RAW.toe)

\--------------------------------

Do you have developer skills : [https://choosemuse.my.site.com/s/article/Muse-Software-Development-Kit-SDK-FAQs?language=en\_US](https://choosemuse.my.site.com/s/article/Muse-Software-Development-Kit-SDK-FAQs?language=en_US) &gt;&gt; to apply for the SDK  
  
Working in Python: check out: [https://github.com/alexandrebarachant/muse-lsl](https://github.com/alexandrebarachant/muse-lsl)   
if you create a workaround to convert this LSL data to OSC, [please let us know](mailto:astrid.vandervelde@hku.nl "email me")   
  
Also, a high end tool that will take some effort to use, but seems to be free: [https://openvibe.inria.fr/discover/](https://openvibe.inria.fr/discover/)

\--------------------------------

#### Extra reads:

[Interesting article on Medium](https://anushmutyala.medium.com/muse-101-how-to-start-developing-with-the-muse-2-right-now-a1b87119be5c) : Muse 101 — How to start Developing with the Muse 2 right now

# Genki Wave

[![image.png](https://bookstack.hku.nl/uploads/images/gallery/2024-02/scaled-1680-/sttimage.png)](https://bookstack.hku.nl/uploads/images/gallery/2024-02/sttimage.png)

[Wave Midi Ring](https://reserveren.hku.nl/#equipment/189504 "for loan @ Blackbox IBB") : This MIDI controller can add dynamic effects with the tap of a finger, the click of a button, the wave of your hand.

connect to your computer via [Softwave ](https://genkiinstruments.com/products/softwave "softwave download")  
Download the [manual](https://bitbucket.org/genki_instruments/software_releases/downloads/Softwave_quickstartguide.pdf "softwave manual") here   
  
<iframe allowfullscreen="allowfullscreen" height="314" src="https://www.youtube.com/embed/TB789hiIJfA" width="560"></iframe>

**Working with the Wave in Isadora:**

Softwave software comes with presets on the left side in the interface. Preset 15 is already set to MIDI with channel 15. Go to Menu &gt; Audio/MIDI settings. Here you can choose MIDI output. When you start Isadora it will show "Isadora Virtual In"

In Isadora you receive MIDI by setting your input channel in the Communications &gt; Midi Setup window  
Input ports:  
Port 1: Wave  
  
Use the Actor Control Watcher: Set Controller to the number of the channel you send MIDI to from Softwave. Like channel 15.

In Softwave you can make your own presets and choose your own channel numbers.   
Make a new preset by clicking + next to "Default Preset Blank" at the top of the presets list. Choose "add function" and a function. In the bottom right of the new function press the MIDI icon &gt; CC to choose a channel like 3.  
In Isadora change yout control watcher controller channel to 3 to receive tha values.

Sometimes Isadora looses communication to the Wave, go to midi setup window change the port to none and choose wave again. Connection should be back.

# Apple watch , iphone

<span style="color: rgb(224, 62, 45);">TBD</span>

available sensors:

- <div class="vector-toc-text">Proximity sensor</div>
- <div class="vector-toc-text">Ambient light sensor</div>
- <div class="vector-toc-text">Accelerometer</div>
- <div class="vector-toc-text">Magnetometer</div>
- <div class="vector-toc-text">Gyroscopic sensor</div>
- <div class="vector-toc-text">Barometer</div>

ZigSimPro

# DIY projects

start here:

[https://www.instructables.com/Beginner-Tips-for-DIY-Wearable-Tech/](https://www.instructables.com/Beginner-Tips-for-DIY-Wearable-Tech/)

<iframe allowfullscreen="allowfullscreen" height="314" src="https://www.youtube.com/embed/lTuubuYL0Gw" width="560"></iframe>

<iframe allowfullscreen="allowfullscreen" height="314" src="https://www.youtube.com/embed/XsYXhQDBolc" width="560"></iframe>


[https://www.wearabletutorials.com/how-to-use-led-lights-for-wearables-beginners-guide/](https://www.wearabletutorials.com/how-to-use-led-lights-for-wearables-beginners-guide/)

[https://www.instructables.com/Wearable-Tech-1-2/](https://www.instructables.com/Wearable-Tech-1-2/)

[https://www.instructables.com/circuits/wearables/projects/](https://www.instructables.com/circuits/wearables/projects/)