Projection Dome
The 360 Dome workspace facility is designed for experimenting with immersive projection and audio. The Projection Dome is only operational during Blackbox IBB opening hours and is used for classes, seminars, and standalone student projects.
- 1. Introduction
- 2. Prepare your source files
- 3. OBS and Dome
- Other usefull stuff...
- 8 speaker system
- Connection issues
1. Introduction
Introduction
The HKU Projection Dome
The 360 Dome workspace facility is designed for experimenting with immersive projection and audio. The Projection Dome is only operational during Blackbox IBB opening hours and is used for classes, seminars, and standalone student projects.
Some quick specs about the Projection Dome:
- 4 m diameter
- 4 projectors
- 8 speakers & audio system
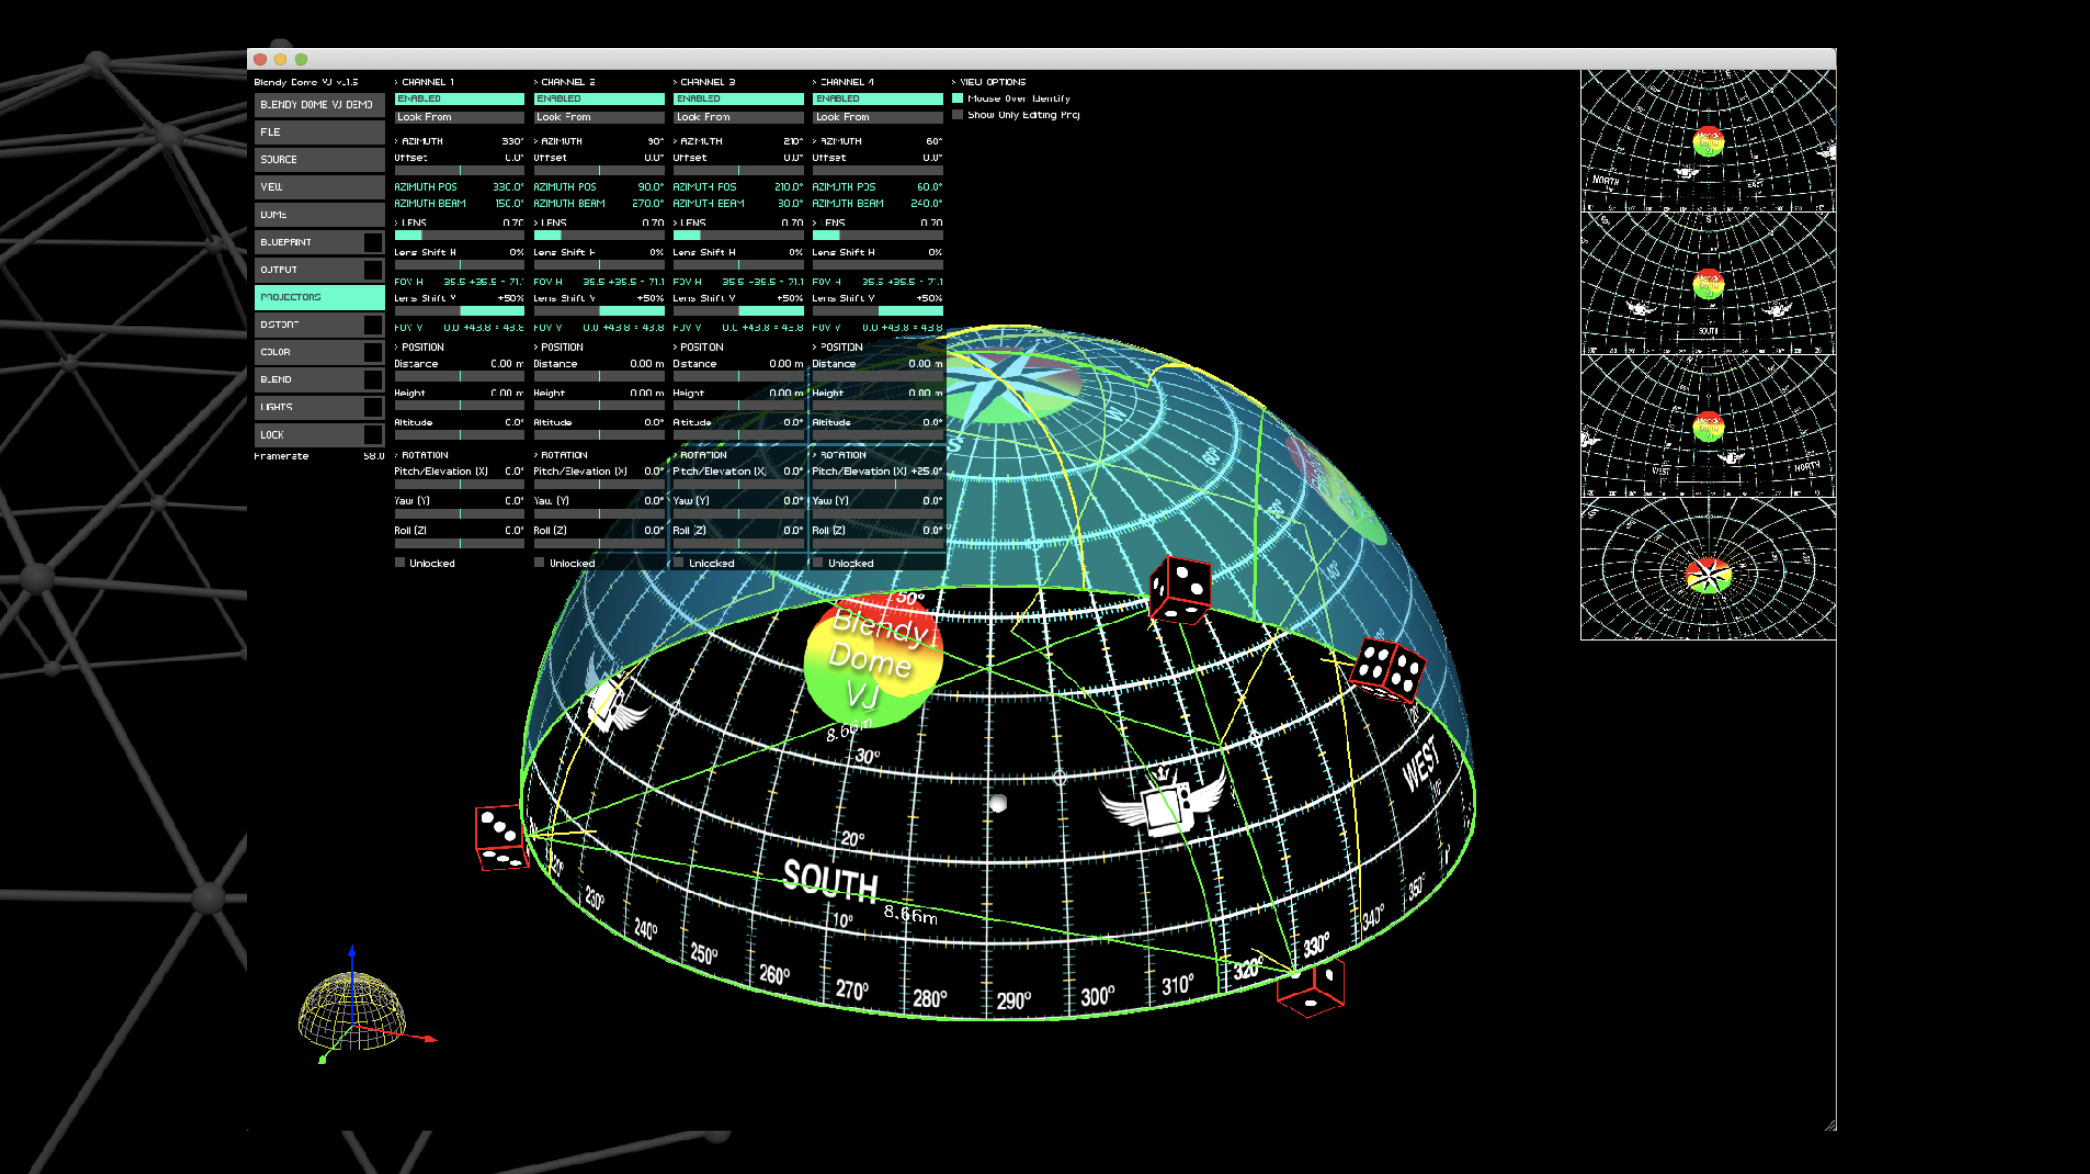
- 2 computers, one for media and one with projection dome software called BlendyDomeVJ.
The Dome media computer is used for storing your files and/or running the program you want to use for making or sending your media. This media computer sends the video and sound over a network cable (using NDI protocol, more about that later!) to the second (MAIN DOME) computer where the Projection Dome software called BlendyDomeVJ is running. This makes sure the computer stays clean of student files and its full potential can be used for running the BlendyDomeVJ software. So you can use the other media computer next to it to play your files or you can use your own laptop/pc!
What is a Projection Dome?
Why would we design in a Dome instead of a normal projection? The spherical shape of the Dome creates an immersive experience for the visitor. Projection Domes have a powerful impact on the senses and can transport you into a whole different world.
2. Prepare your source files
Manuals
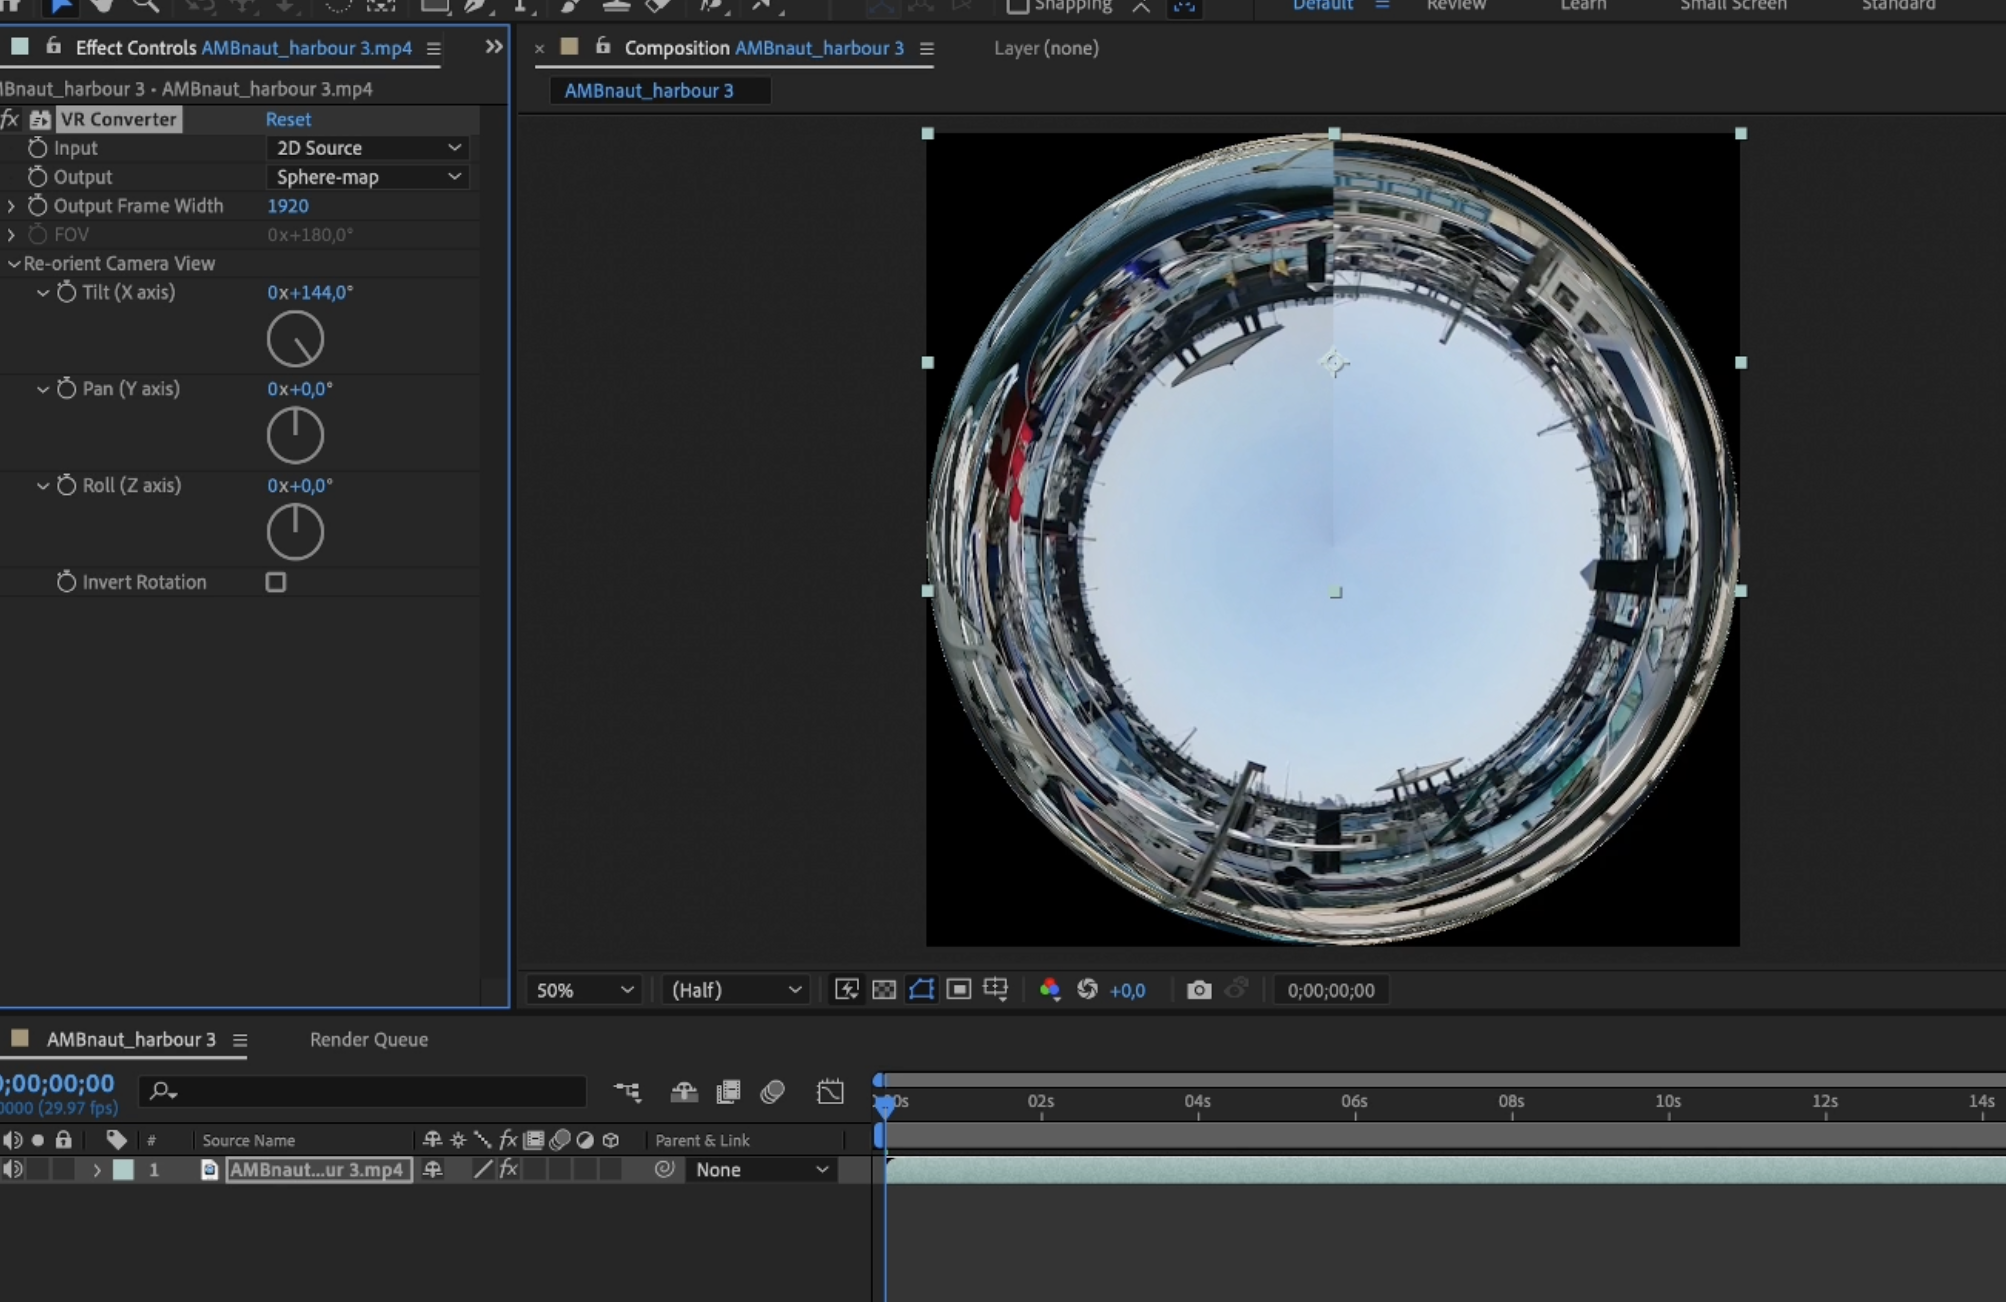
Manual convert 2D video to sphere map
Convert 2D video to sphere map with after effects
https://youtu.be/fQPeUuhEXdg
3. OBS and Dome
Example for sending media over NDI using OBS
Installing OBS
Download OBS from the official website If you're using OBS from your own laptop/pc, make sure to install the NDI Drivers. If your working on the Blackbox Dome Media computer, you don't need to install anything.
Adjusting the Canvas Size
in case of lag on the line, change resolution to 2000 x 2000 px (canvas & scaled)
equirectangular: 2000x1000
Other usefull stuff...
NDI output vanuit Max/MSP https://cycling74.com/forums/jit-ndi-externals-for-sending-videoaudio-over-the-network
Spatial audio tools
Een reeks links naar bruikbare tools voor spatial audio (van blackbox collega Tjerk!):
https://www.ableton.com/en/packs/surround-panner/ http://spatialaudio.net/ssr/ https://www.envelop.us/software https://www.ambisonictoolkit.net https://www.flux.audio/2021/04/14/introducing-spat-revolution-essential-the-power-of-spat-revolution-for-everyone/ https://freshmania.at/portfolio/spatial-audio-sound-mixer/ https://ruipenha.pt/spatium/ https://sourceforge.net/projects/wfscollider/
NDI plugin voor OBS
https://github.com/obs-ndi/obs-ndi/releases
en vergeet niet ook de NDI runtime te installeren:
https://ndi.palakis.fr/runtime/ndi-runtime-4.5.1-Windows.exe
movie convertor voor Ricoh Theta https://support.theta360.com/uk/download/
8 speaker system
The Dome setup has an audio setup containing 8 speakers, 1 amplifier, 1 sound interface.
On the MAIN Dome computer the sound interface software can be used to controll the audio system. A configuration template is available File > load > snapshot …
The Sub speaker is located at monitor output 1. You can find this speaker behind the Dome in the corridor next to Texspace. Turn it on manually, remember to turn it off when finished working ;)
To play audio through this system make sure your audio file is configured the right way. Depending if you want to play audio over 2 or 8 channels. Also if you play your video and audio from the 1st computer make sure the usb cable from the sound interface is plugged in that computer and use the sound interface software on that computer.
Connection issues
Tips for wired connection with Windows laptop:
Turn off WIFI connection
Turn off all firewalls!
Firewall can switch back on after change to ethernet connection, make Shure its off.
Change IPv4 settings
IP assignment IPv4: Manual
IPv4 address: same range as Dome mac, change last number (like 192.168. 1.11 or 20 something)
IPV4 subnet prefix length: 16 or 24
IPv4 gateway: 192.168.1.10 (same as Dome mac)
In case you need to fill in subnet mask, make it the same as the Dome mac: 255.255.0.0
Check resolution match!
Lag in image transfer can be caused by resolution & frame rate miss match.
Source Resolution should be 4000 x 4000 (or try 2000 x 2000 if lag stays)
60 fps
Lag can also be caused by Syphon receiver. Turn off Syphon and acces your NDI stream directly through Blendydome > Source > NDI > choose source..