# Machine knitting
This book collects approaches to machine knitting, from useful basics to uncommon experiments.
# About machine knitting
Domestic knitting is mainly done on flat bed knitting machines. These machines have a single bed of needles that are horizontally aligned, working together to make your knit. The ribber, an extra bed of needles positioned opposite of the main bed, is an addition that can be attached to many flat bed machines. These two beds can collaborate to create e.g. ribbing and other double-sided knits. Other types of knitting machines are circular, where the needles are positioned in a circle to create tubular knits, and V-bed machines, where two beds are positioned similar to flat bed + ribber, but more in a more balanced, symmetrical way.
Knitting machines have a gauge, which refers to the spacing between the needles. The less space between the needles, the finer the knit
# Flat/single bed machine knitting
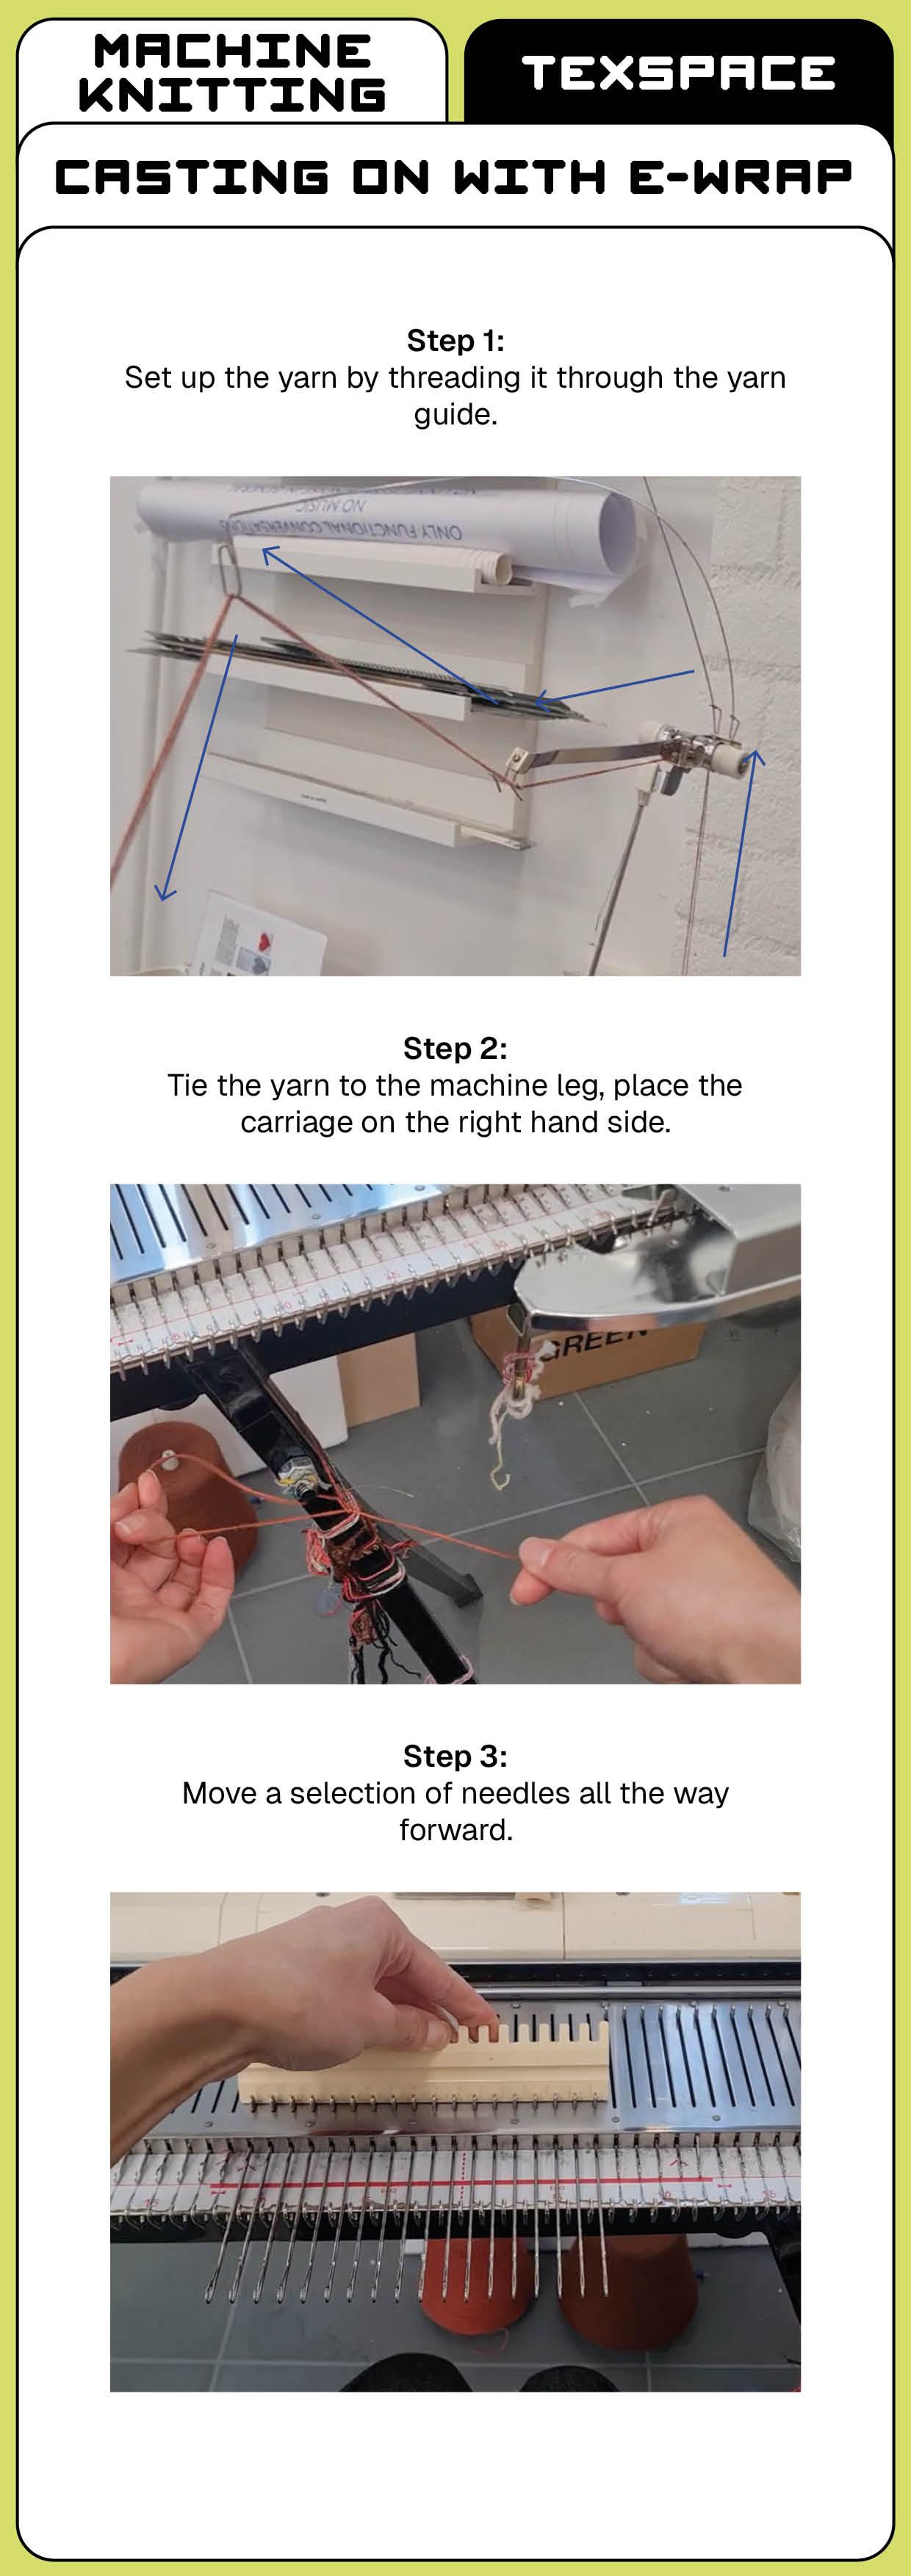
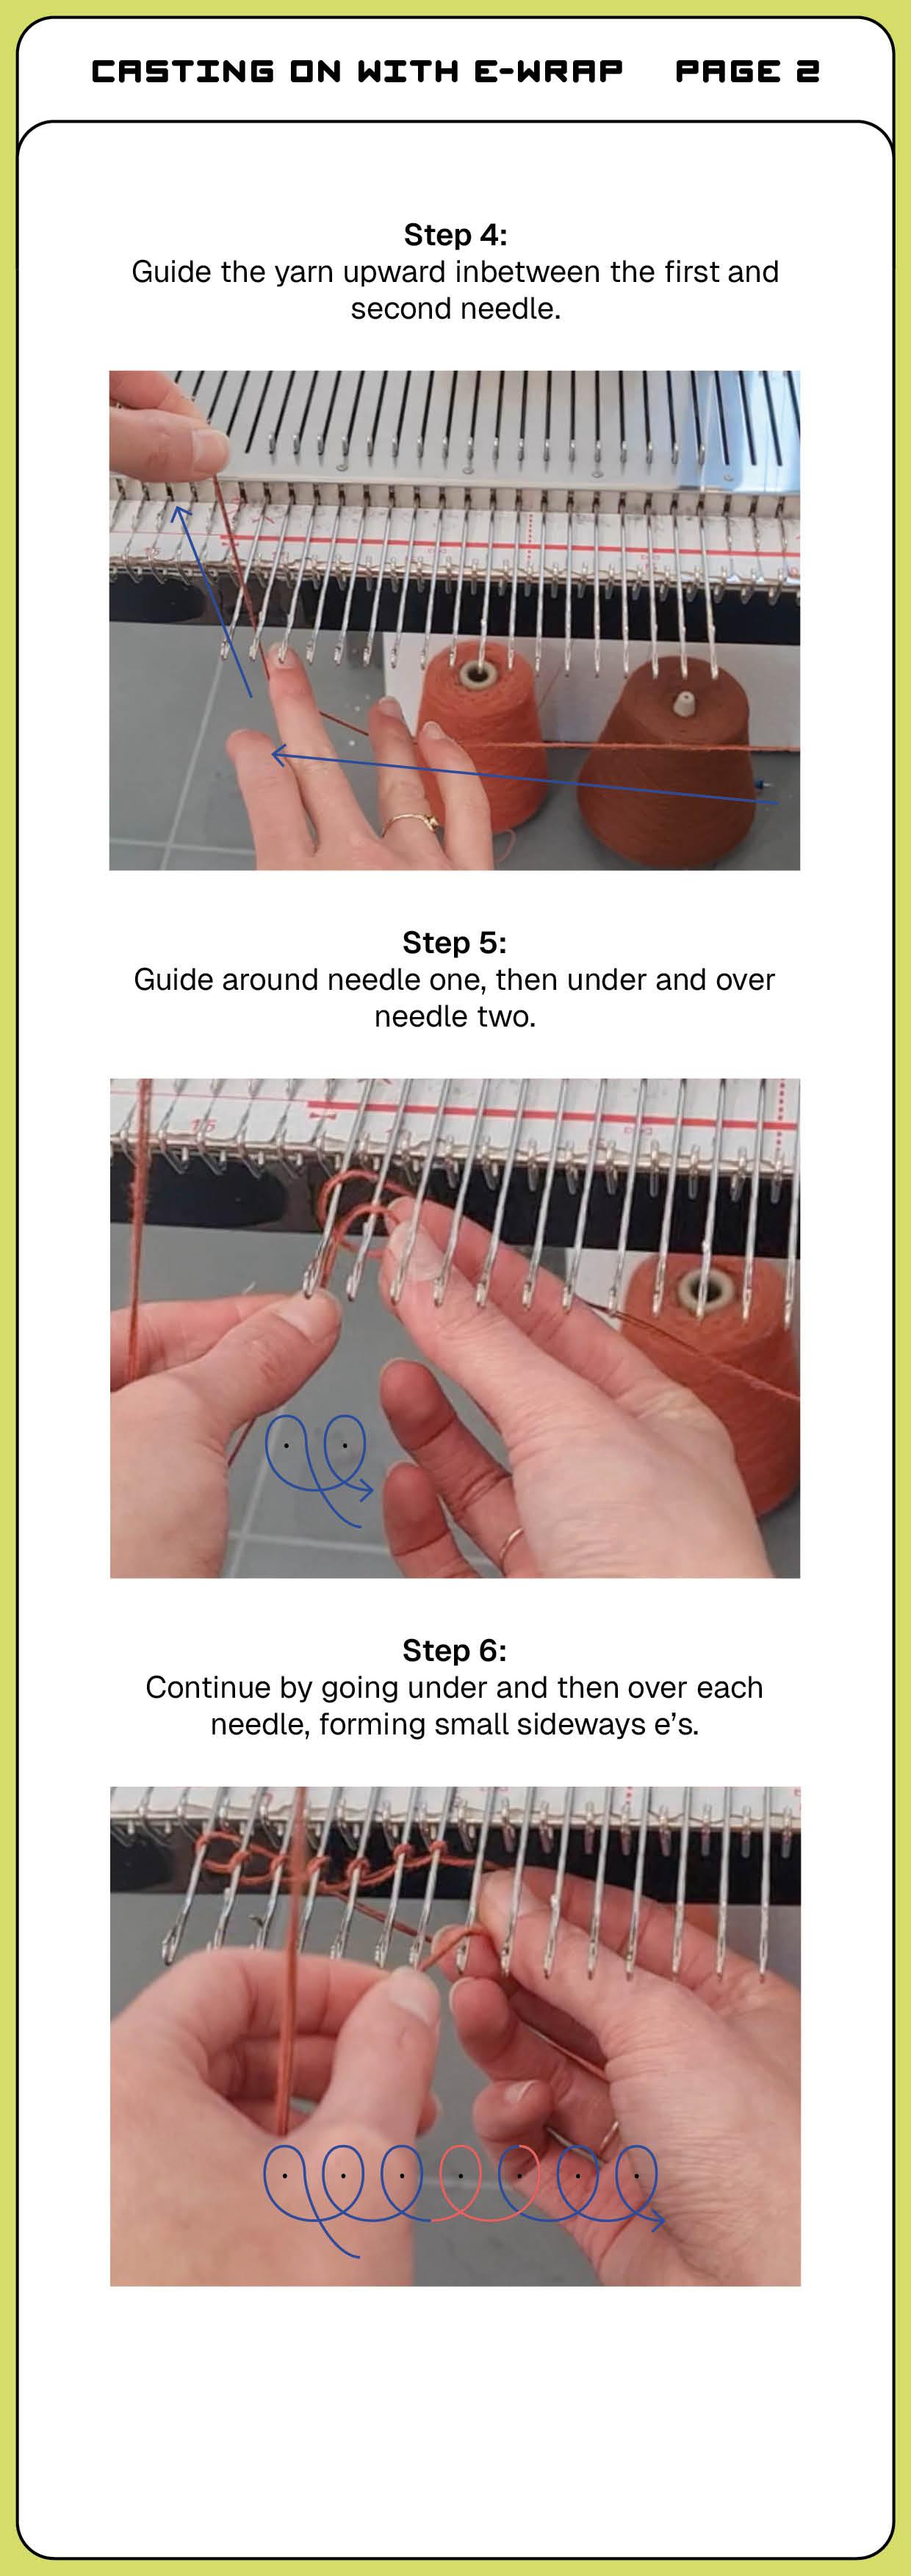
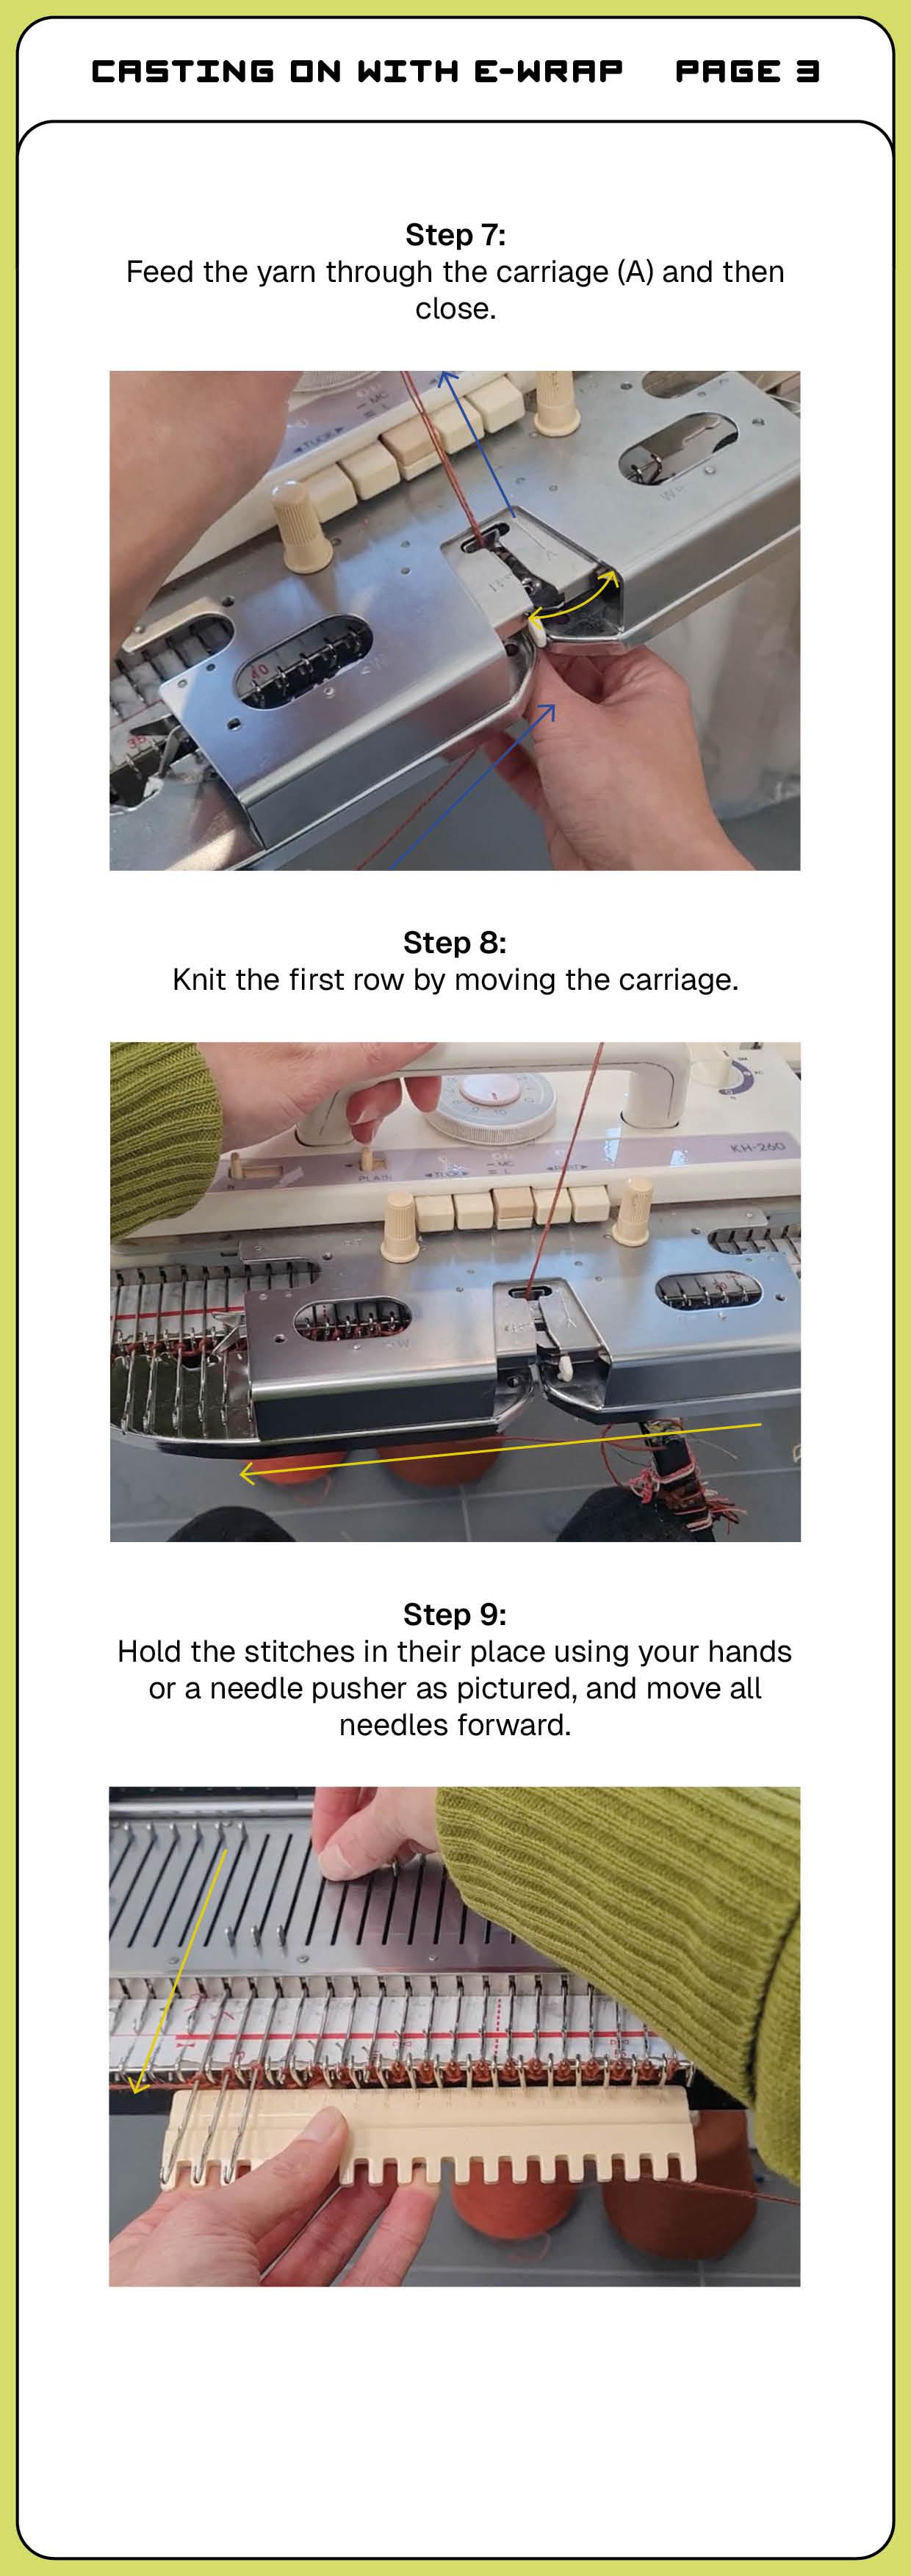
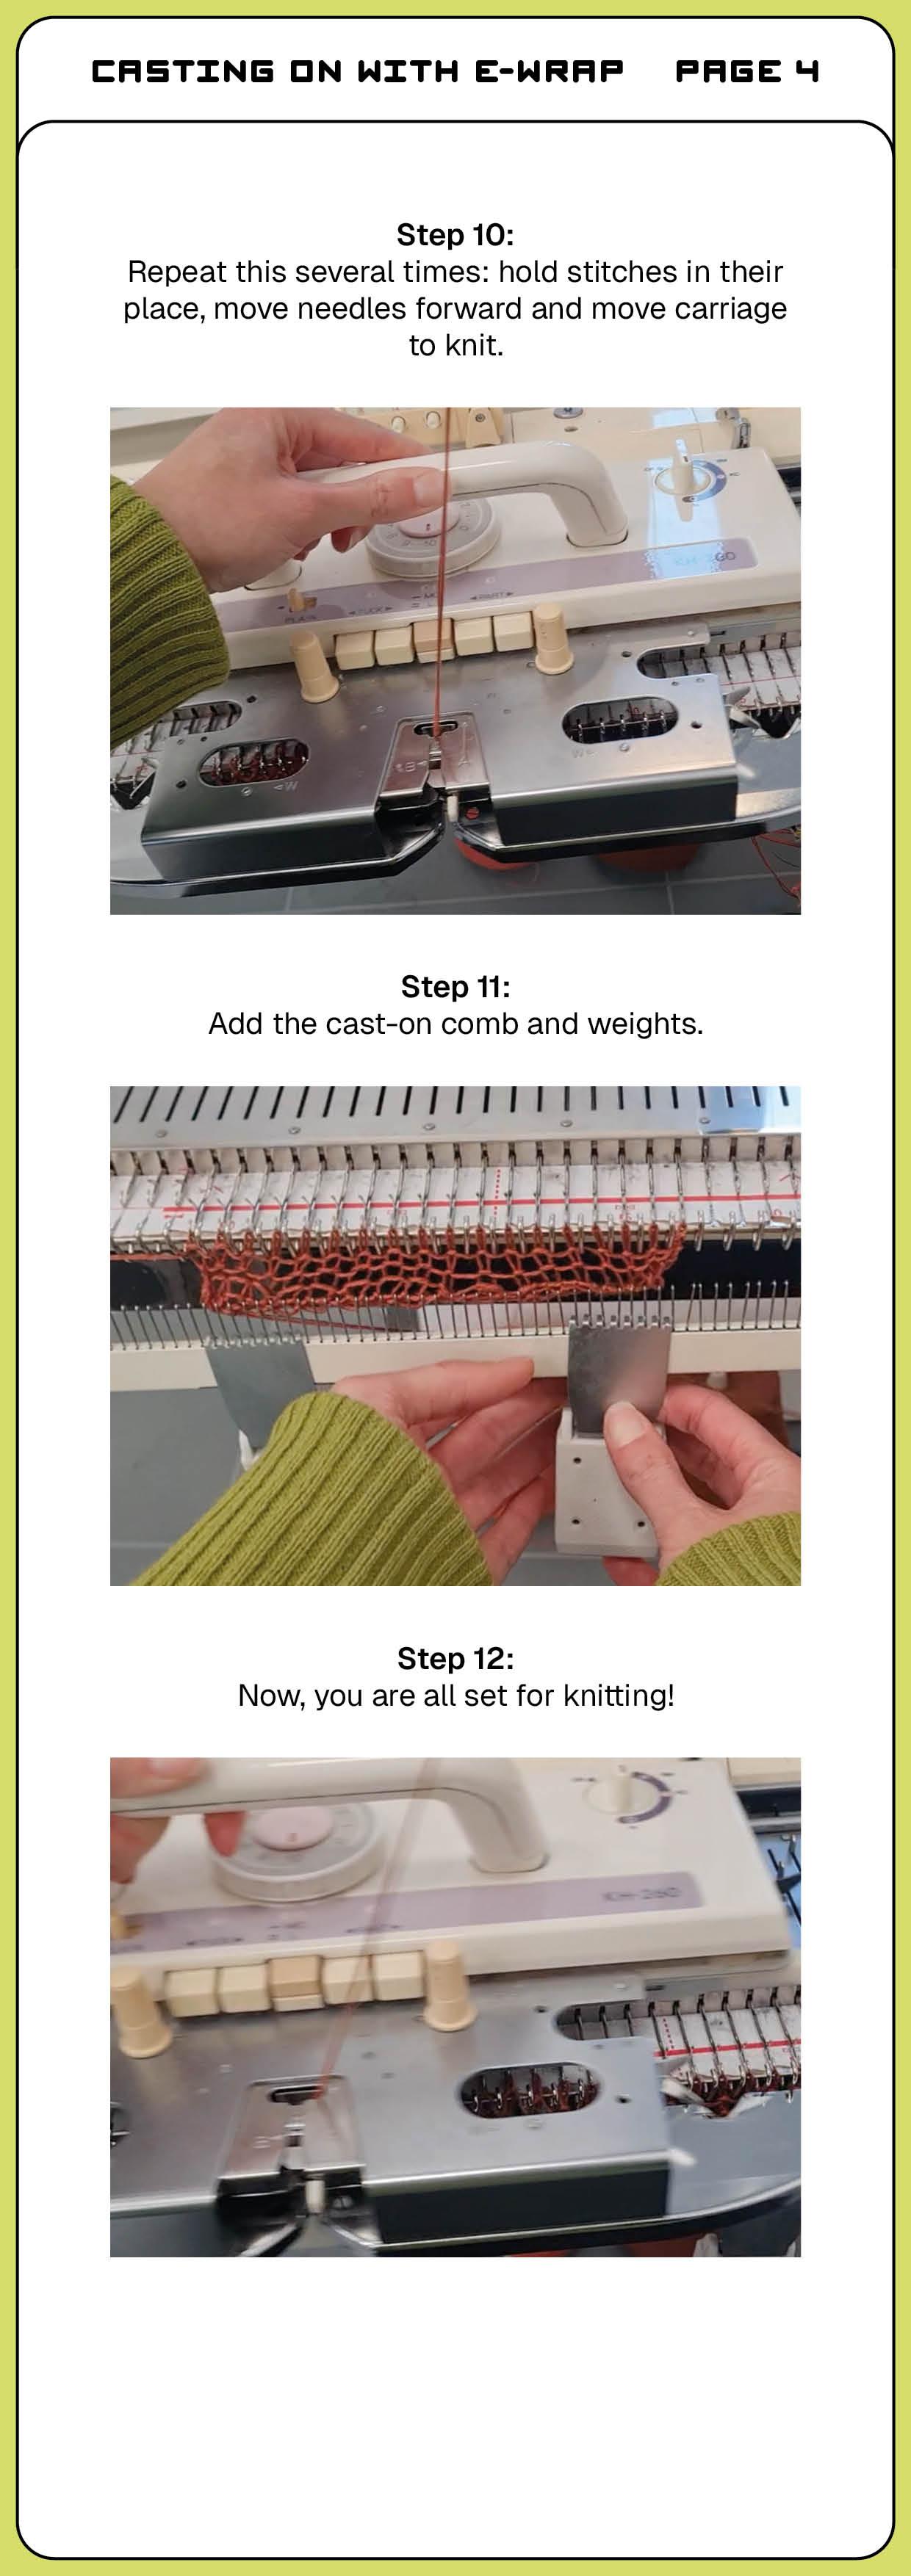
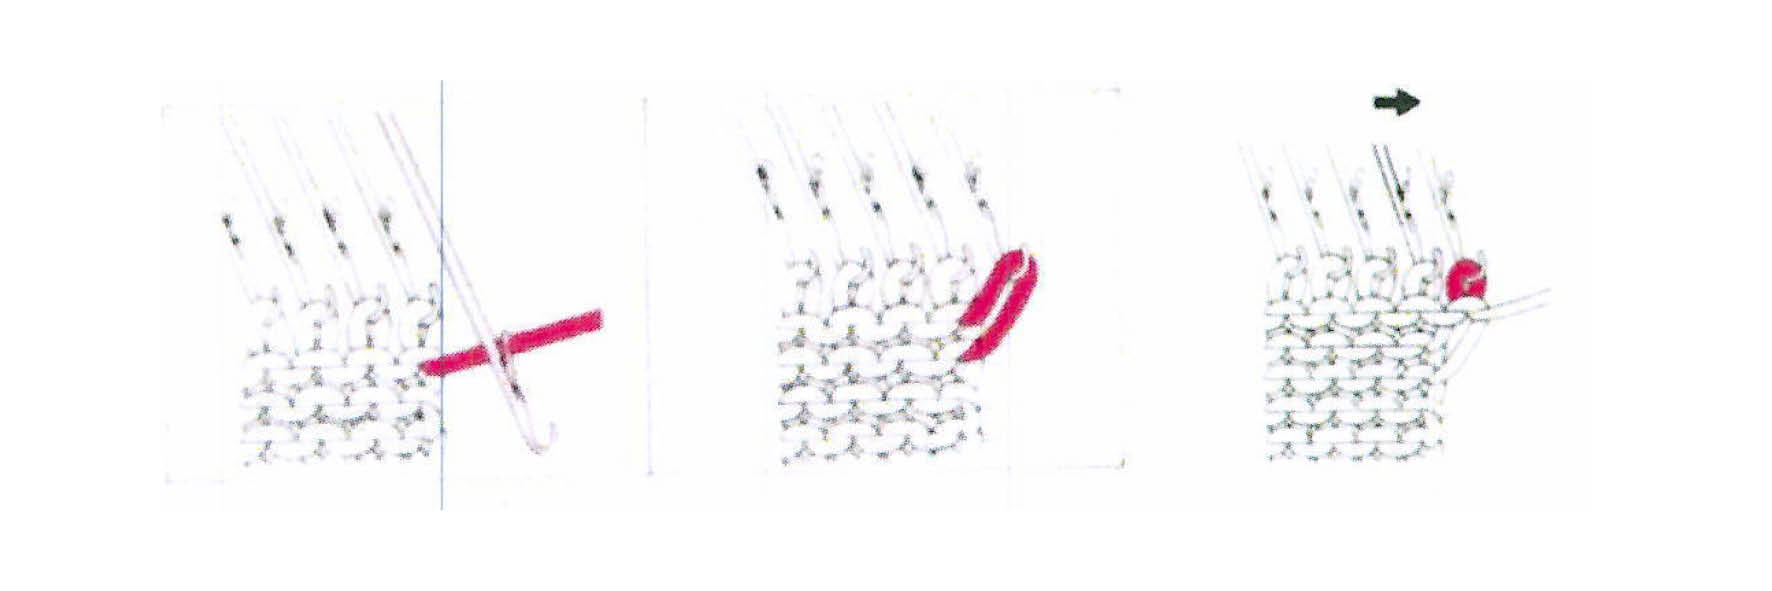
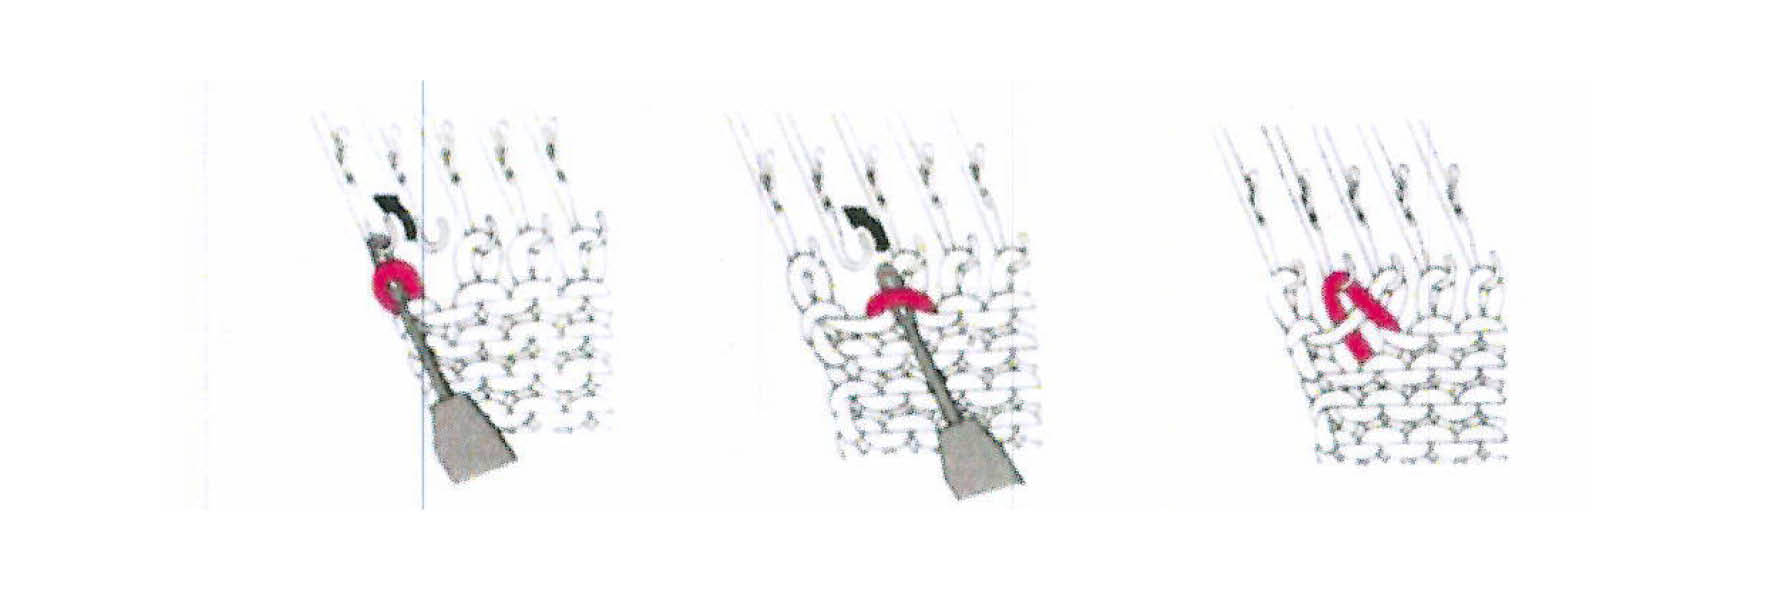
# Casting on with e-wrap: PDF manual
Download: [Machine knit - Cast on with e-wrap.pdf](https://bookstack.hku.nl/attachments/143)
[](https://bookstack.hku.nl/uploads/images/gallery/2026-06/machine-knit-cast-on-with-e-wrap.jpg)
[](https://bookstack.hku.nl/uploads/images/gallery/2026-06/machine-knit-cast-on-with-e-wrap2.jpg)
[](https://bookstack.hku.nl/uploads/images/gallery/2026-06/machine-knit-cast-on-with-e-wrap3.jpg)
[](https://bookstack.hku.nl/uploads/images/gallery/2026-06/machine-knit-cast-on-with-e-wrap4.jpg)
# Casting on, binding off and knitting: Video's
This page lists a selection of how-to's to help you get started on domestic single bed knitting machines.
---
How to cast on
- How to cast on with an e-wrap:
- How to do a quick and easy cast on
---
### How to knit, a few basics
- How to increase one stitch at a time
- How to decrease one stitch at a time (two techniques)
- How to increase or decrease with multiple stitches at a time
- How to pick up a dropped stitch
- How to knit stripes/change out colours
---
### How to bind off
- How to bind off (two techniques)
# Knitting irregular shapes by increasing, decreasing and partial knit
On a (domestic) knitting machine, you knit row by row, using all selected needles. However, by increasing and decreasing the amount of needles you can adjust the shape of your knitted piece. You are then editing the width of the piece. You can also do partial knit, which means that some needles will stay on hold while other needles continue knitting. You some parts of your piece then become longer than other parts.
These techniques create irregular and non-rectangular shapes. These techniques are used in garment knitting, to create pattern pieces without any waste (as no cutting is required). On a single bed knitting machine, you can do a sleeve, for example. On double bed machines (often digital and industrial ones), full garments are knitted at once.
Below you will find the steps of increasing, decreasing and partial knit. If you prefer video manuals, there are some useful video's on the page [Casting on, binding off and knitting: video's](https://bookstack.hku.nl/books/machine-knitting/page/casting-on-binding-off-and-knitting-videos) as well.
##### Increasing a single stitch
1. Increase on the side of the carriage: push the first needle next to your knit from A to E.
2. Knit one row, the empty needle will pick up the thread
3. Knit another row and the stitch will form.
[](https://bookstack.hku.nl/uploads/images/gallery/2026-01/UApincreasing.jpg)
##### Increasing a single stitch, the "fully fashioned method"
1. Pick up and move the outer stitch to the next empty needle, leaving an open needle inbetween your stitches.
2. Pick up the loop underneath the empty needle and lift it onto the empty needle.
[](https://bookstack.hku.nl/uploads/images/gallery/2026-01/ff-1.jpg)
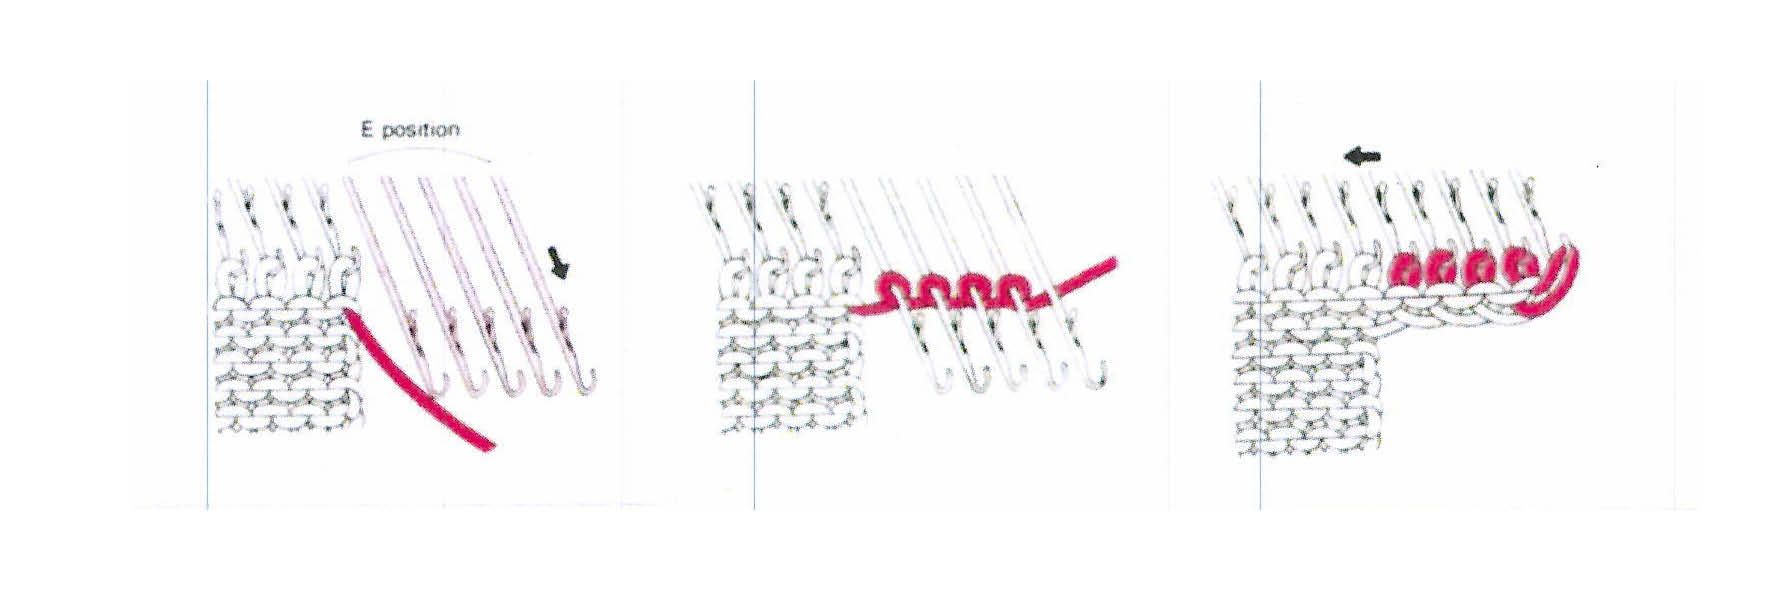
##### Increasing several stitches at a time
1. Increase on the side of the carriage: push several needles next to your knit from A to E.
2. Wind the yarn (loosely!) around the needles, using a similar technique to the [e-wrap](https://bookstack.hku.nl/books/machine-knitting/page/casting-on-with-e-wrap-pdf-manual). Important: leave the last needle empty: pass the yarn underneath. Then knit.
[](https://bookstack.hku.nl/uploads/images/gallery/2026-01/increase-multiple.jpg)
##### Decreasing a single stitch
1. Pick up an outer stitch.
2. Latch your tool onto the next needle with a stitch and add your picked up stitch.
3. Move the empty needle backwards, to position A.
[](https://bookstack.hku.nl/uploads/images/gallery/2026-01/decrease.jpg)
##### Partial knitting
-coming soon-
# Punch cards
On some knitting machines you can work with punch cards. These cards contain a grid with holes that together form a pattern. When holding the card vertically, each horizontal row of the grid from represents one knitted row. A hole means "skip this needle", while a grid-block without a hole means "knit this needle". Using these cards, you can create jacquard designs on the domestic knitting machine.
Punch cards communicate in a language of 0's (no hole) and 1's (hole), which is binary code. Interestingly, this punch card system and binary language actually stems from another textile technique, weaving, which later also inspired the first digital computing machine and like this, much of the technology we now depend on.
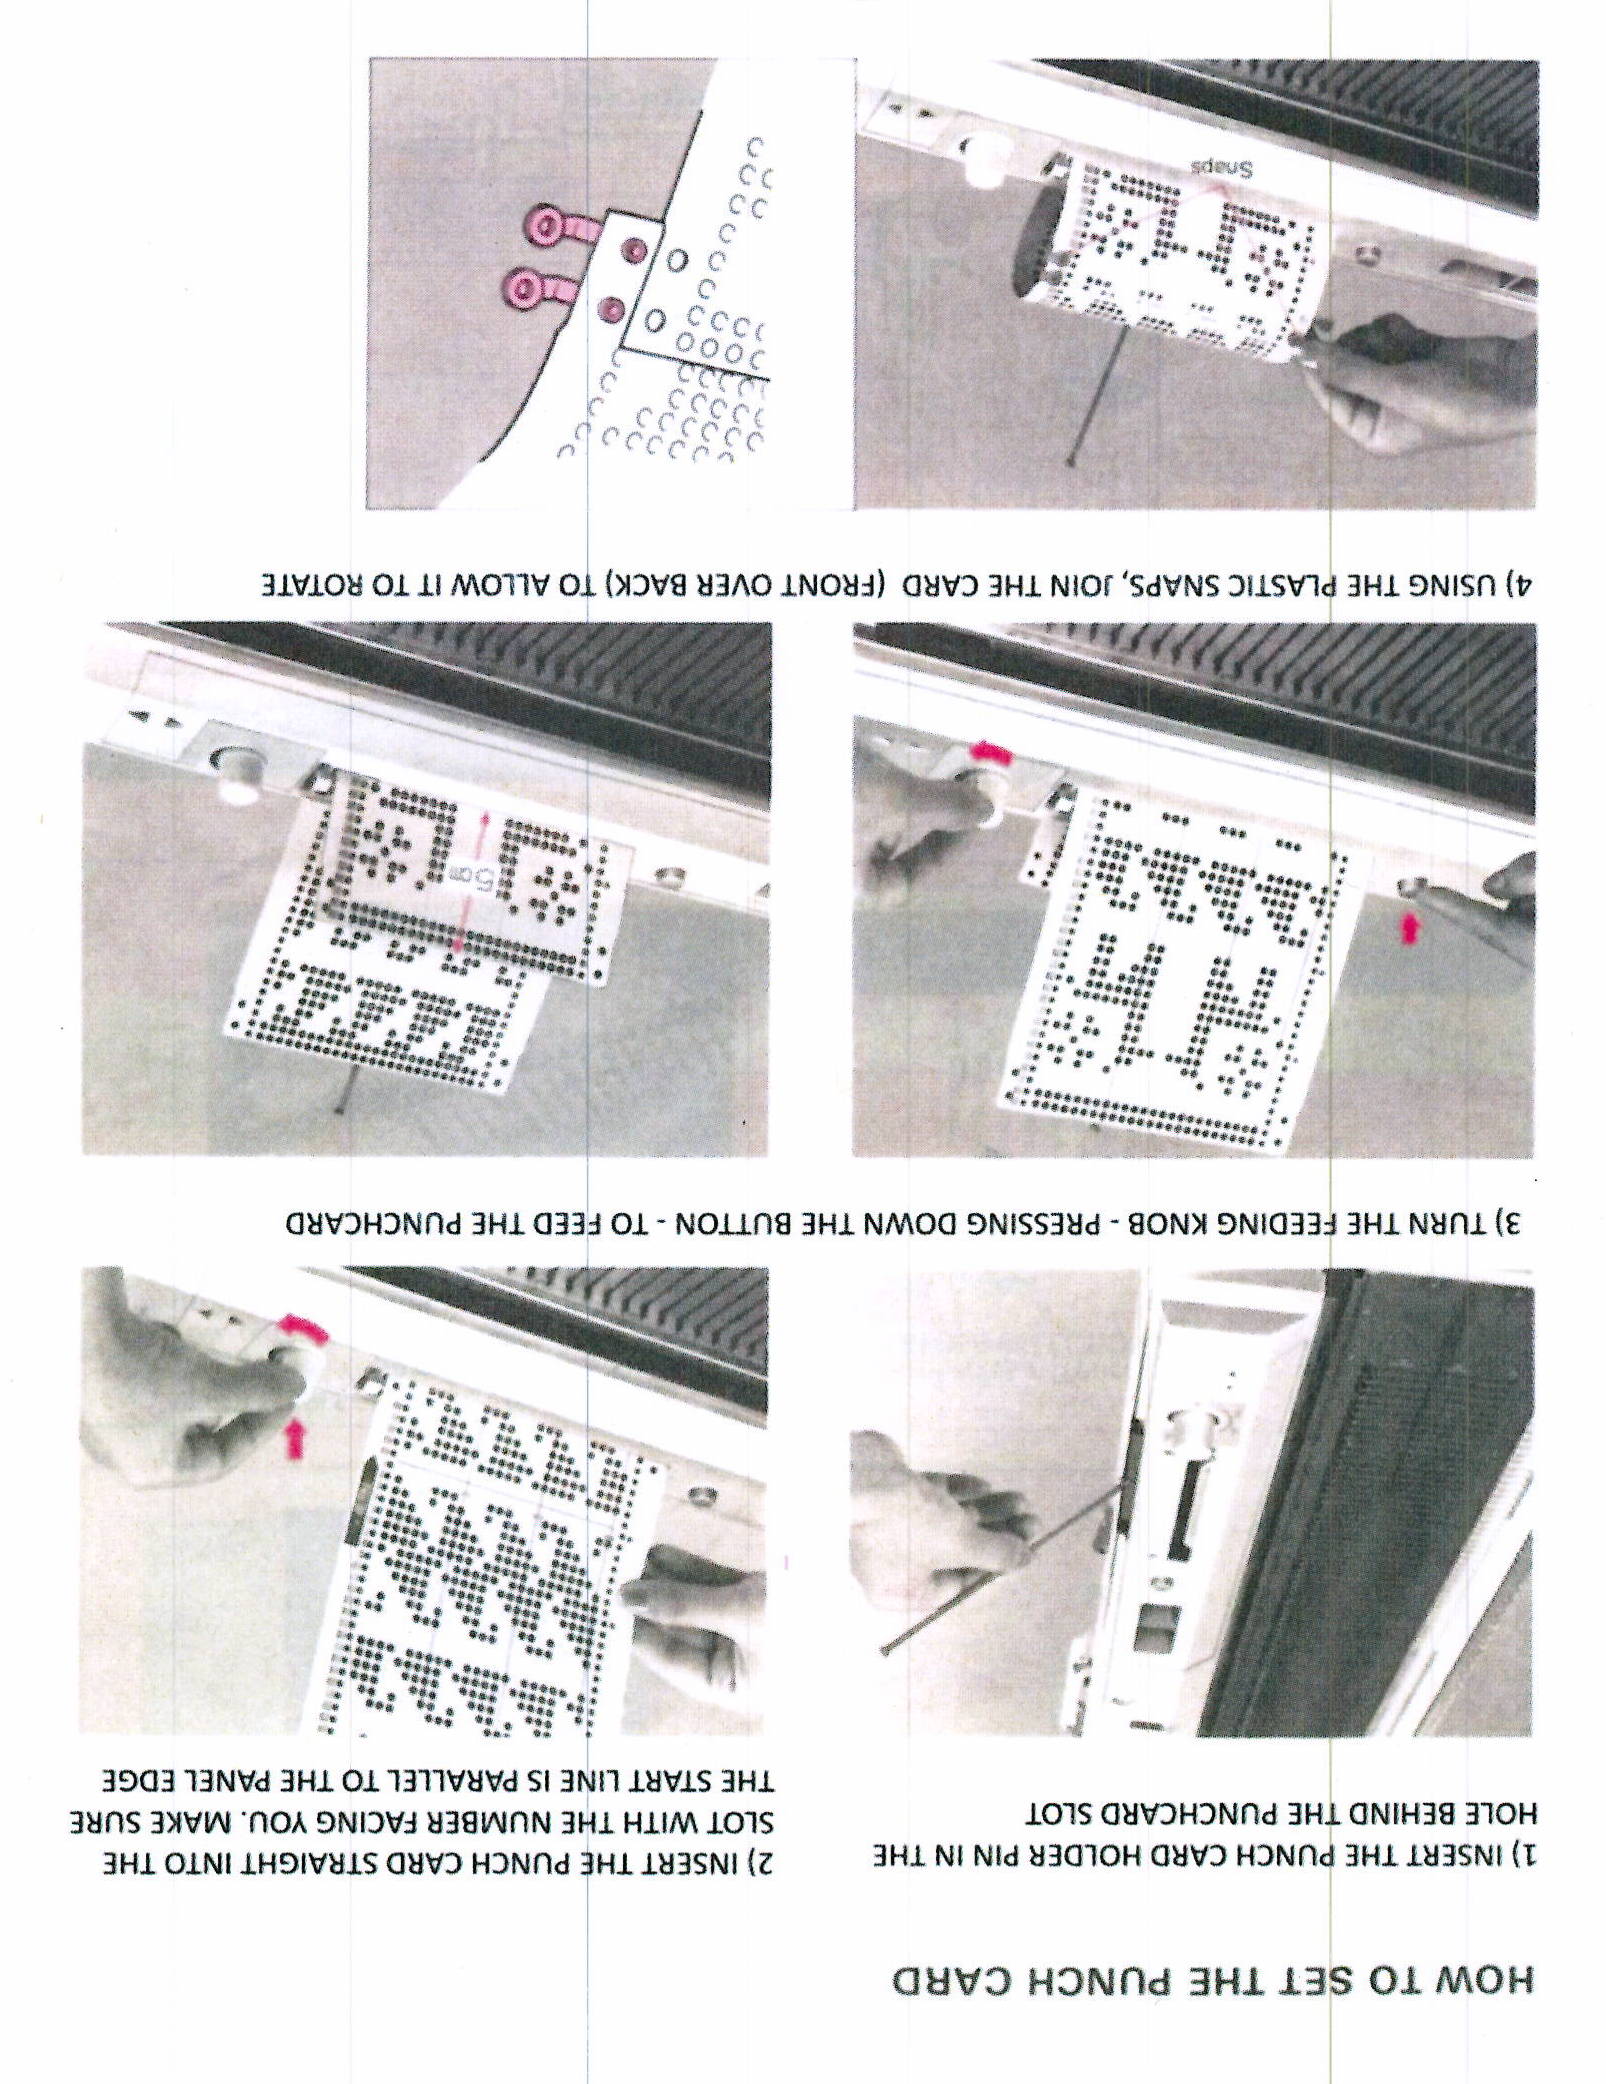
# How to use a punch card: step-by-step
- First, select or [design your own](https://bookstack.hku.nl/books/machine-knitting/page/designing-your-own-punch-card) punch card and set the punch card on the machine:
- [ ] [](https://bookstack.hku.nl/uploads/images/gallery/2026-01/20260115-132137-0002.JPG)
- Then, set up the machine:
[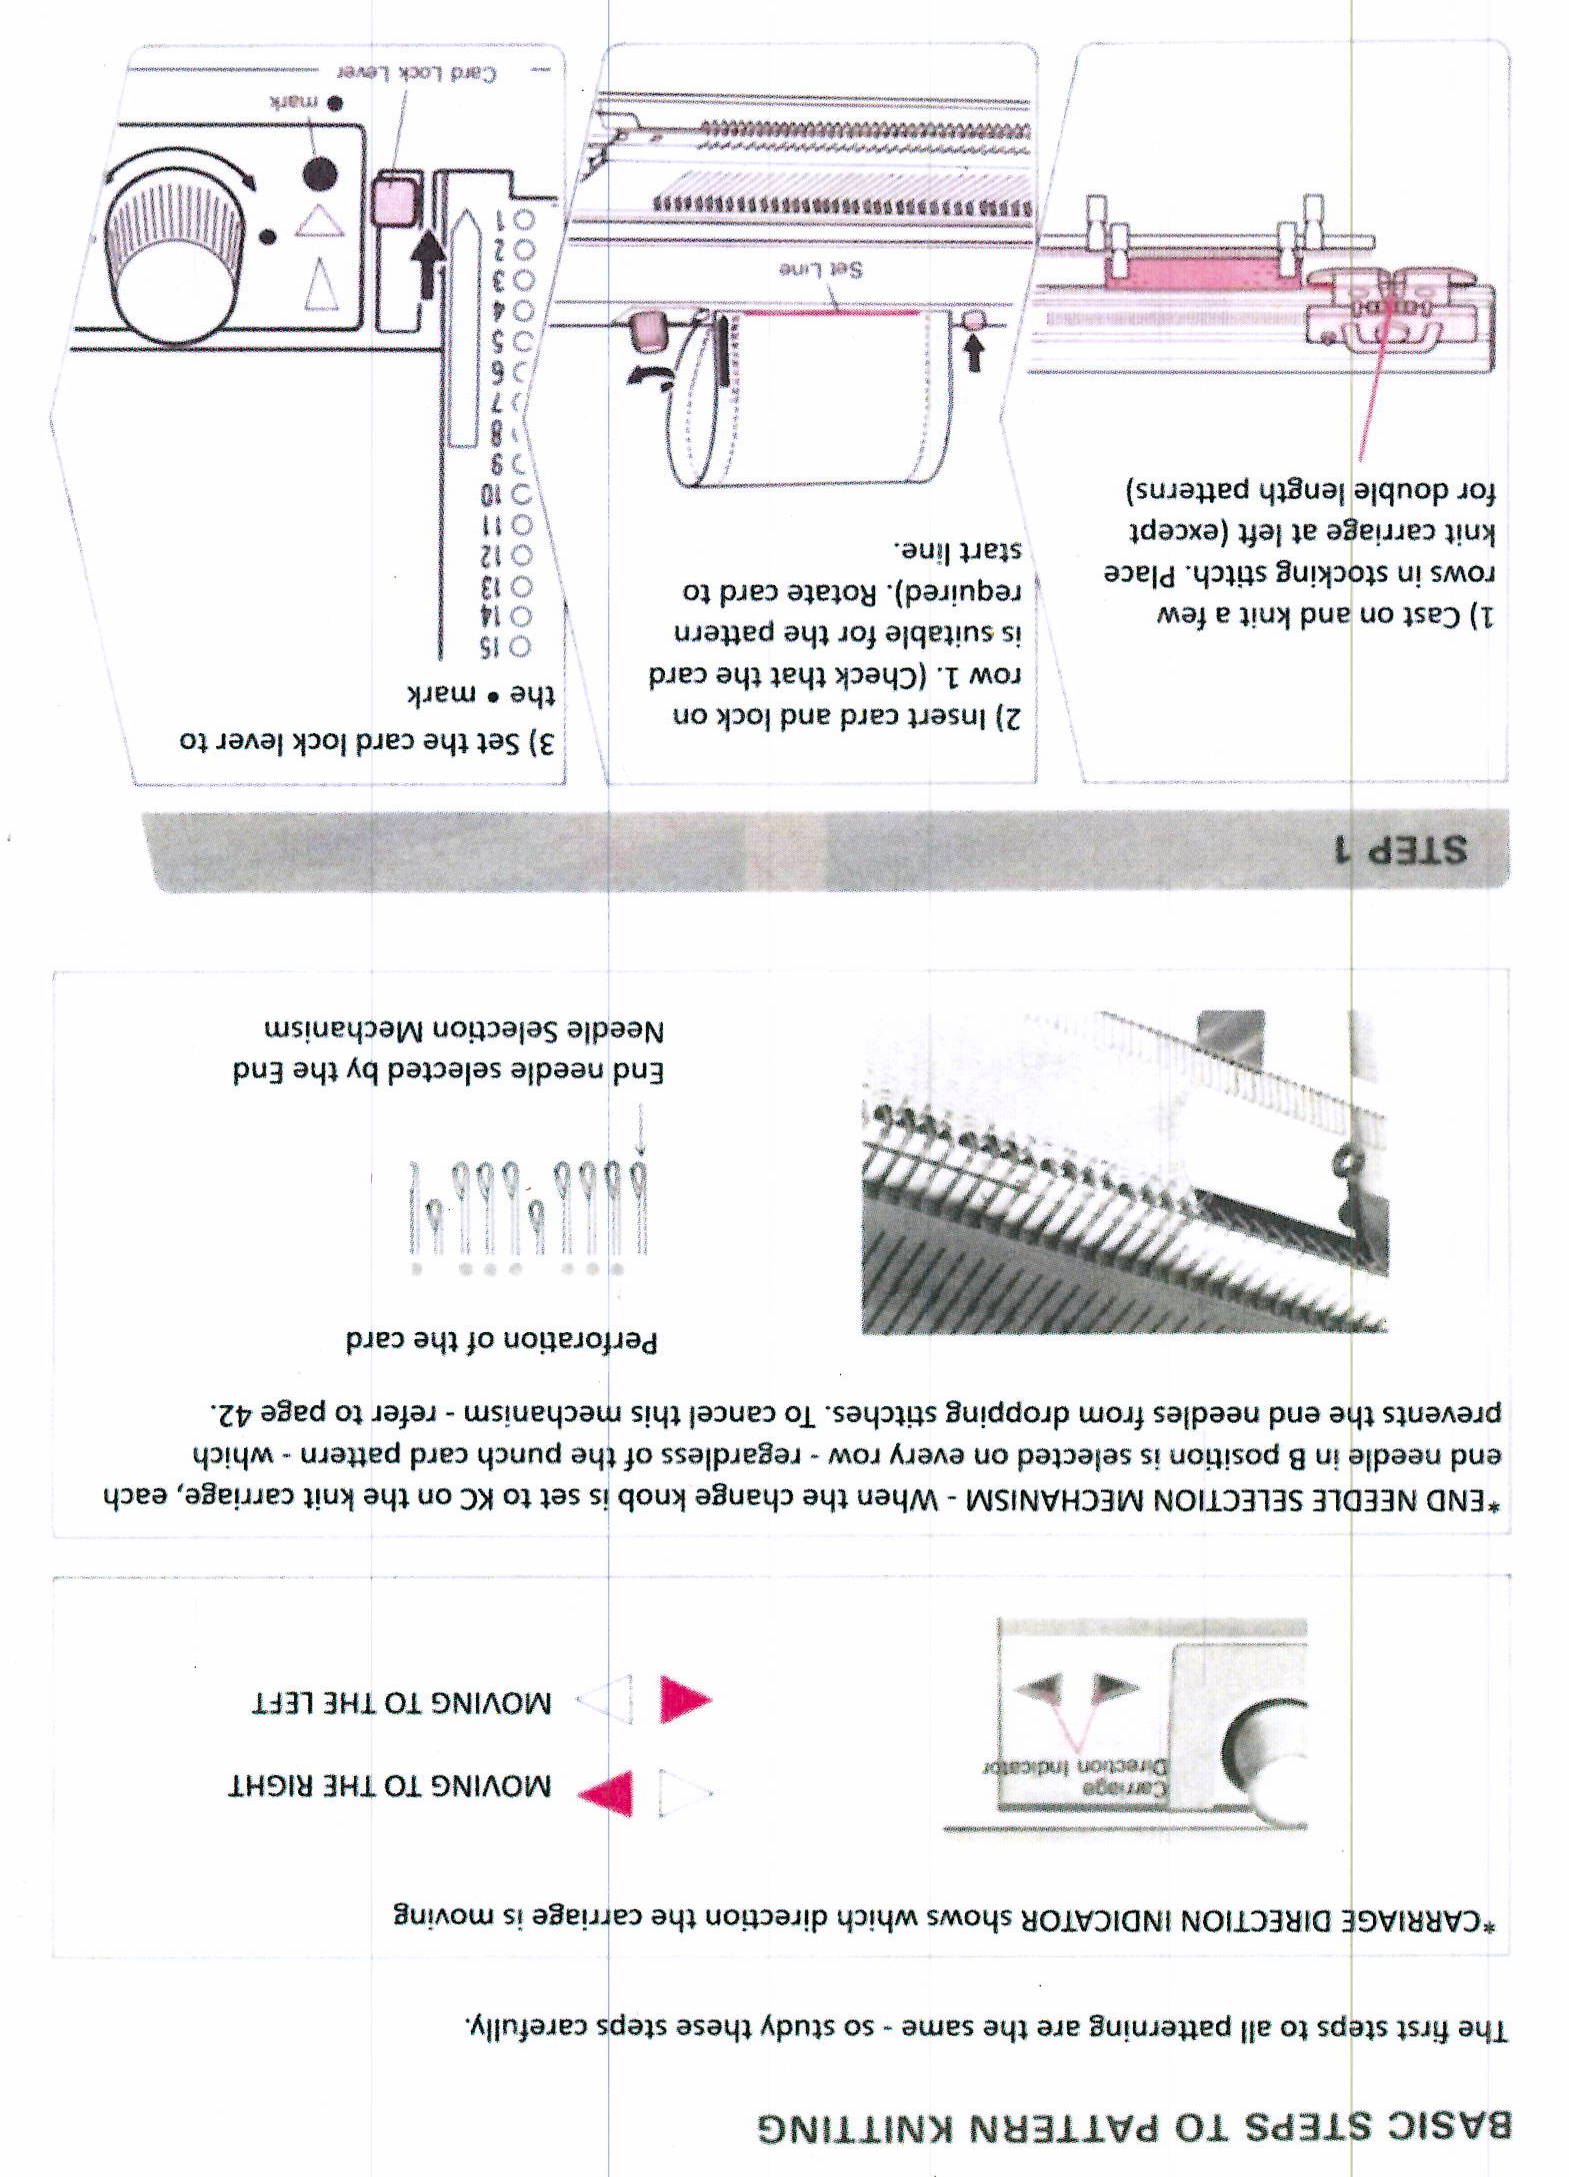 ](https://bookstack.hku.nl/uploads/images/gallery/2026-01/20260115-132137-0001.JPG)[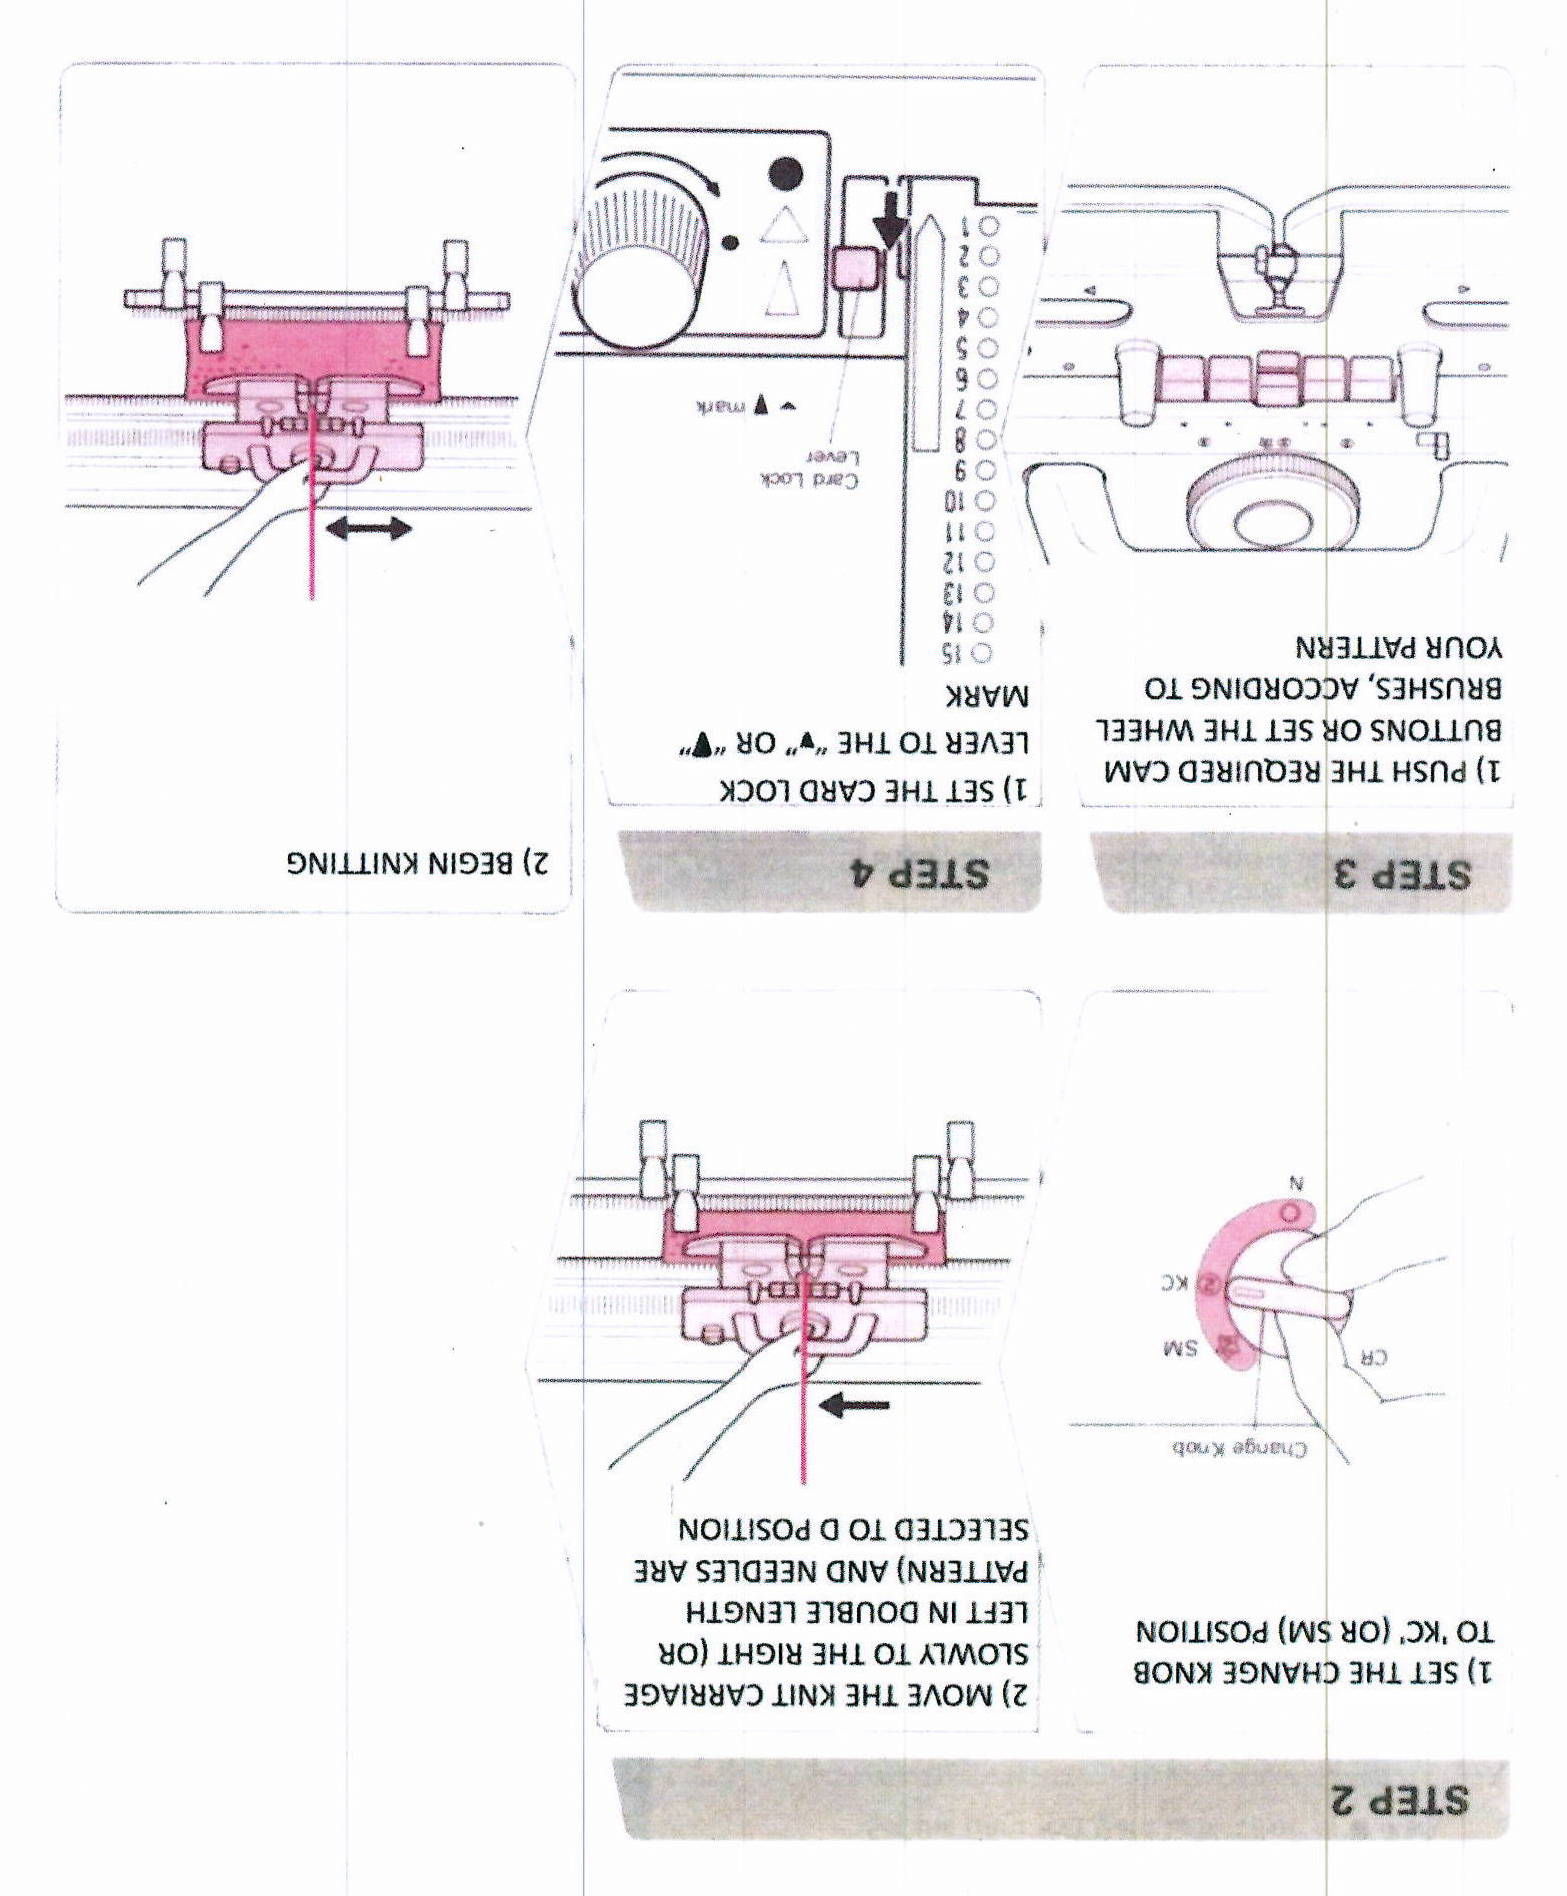](https://bookstack.hku.nl/uploads/images/gallery/2026-01/20260115-132014-0005.JPG)
# How to use a punch card: video
The page [How to use a punch card: Step-by-step](https://bookstack.hku.nl/books/machine-knitting/page/how-to-use-a-punch-card-step-by-step) provides the most comprehensive overview. However, if you prefer a video format, the video below provides for when you first start using a punch card on the single bed knitting machine. The video is quite long: jump to 3:30 and watch until approx. 10:00 to see the essentials.
# Designing your own punch card
[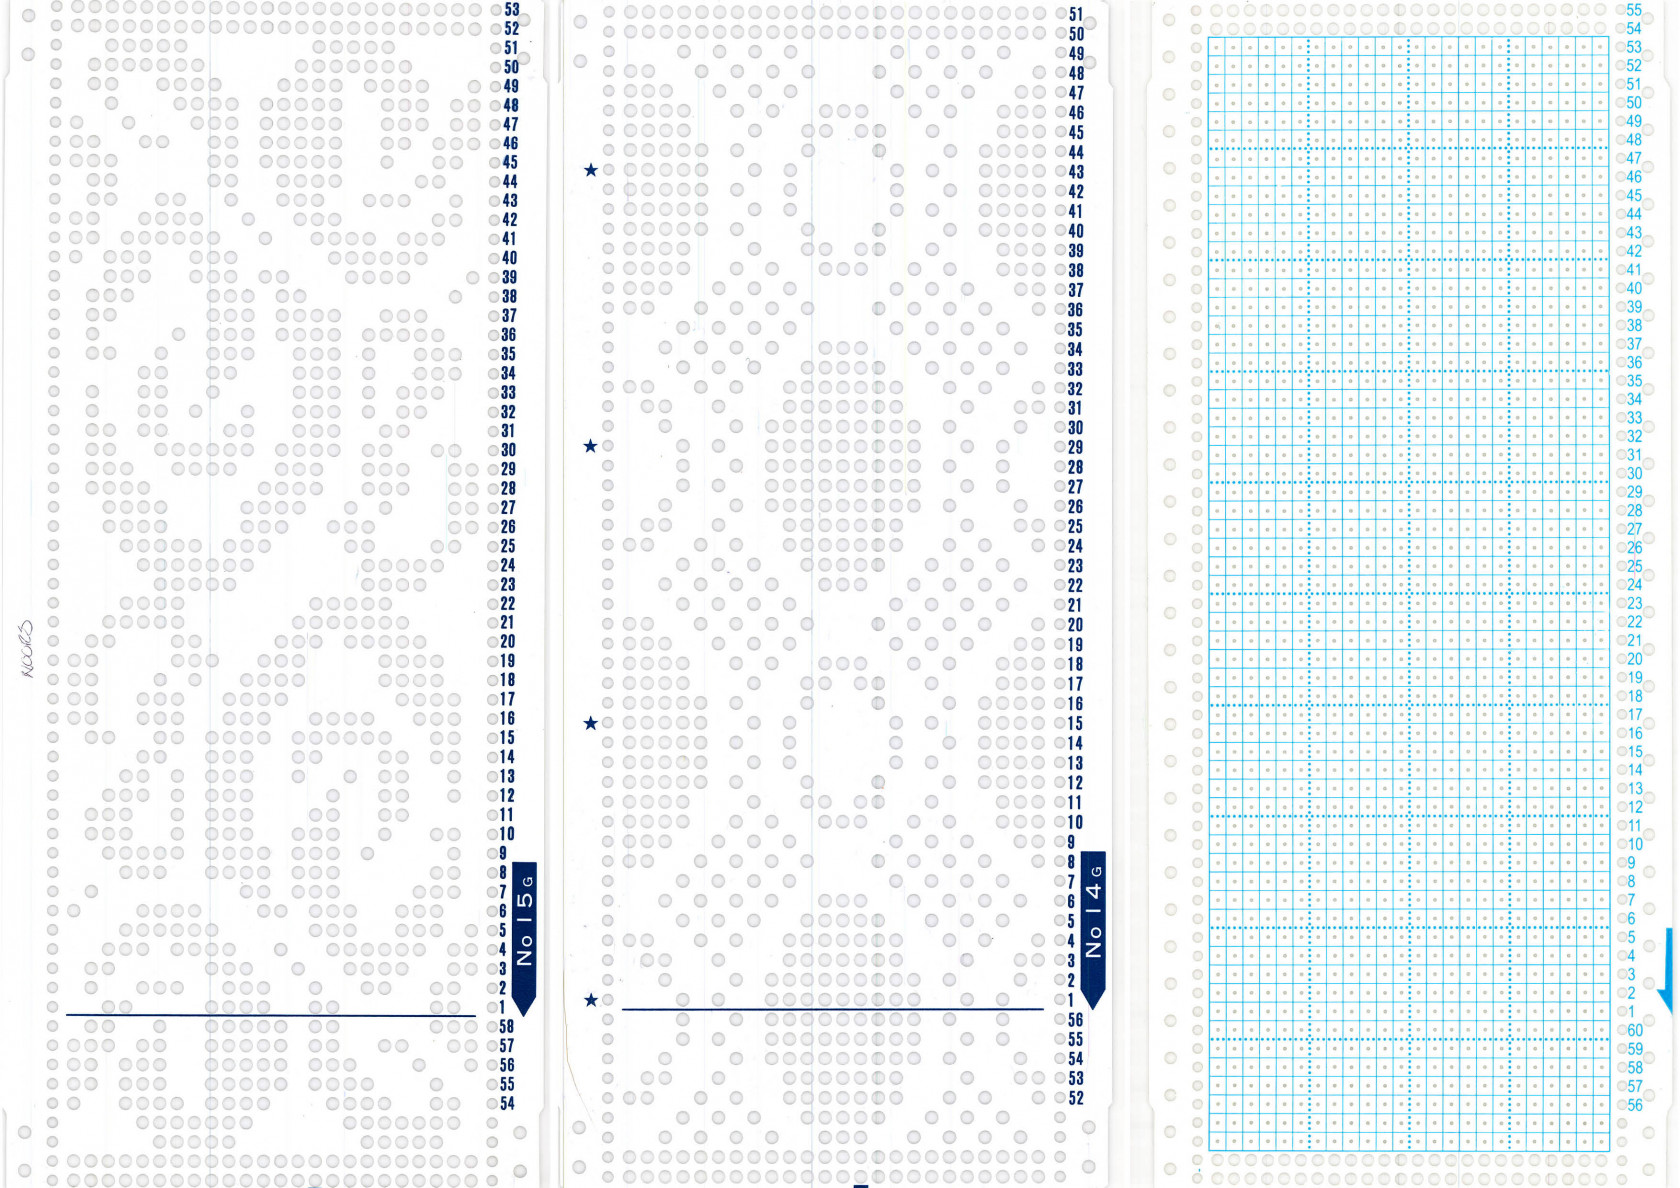](https://bookstack.hku.nl/uploads/images/gallery/2026-01/punchcards.jpg)*Two pre-designed punch cards and one blank punch card*
You can use pre-made punch cards or create your own design using a blank punch card. With a special tool, you'll punch holes in the blank card. Make sure to pre-plan your design, as mistakes are easily made. Our tips for planning your design:
- Grid paper and a pencil
- Excel (scale the cells to be square)
- *Adacad*, an open source program for weaving. As weaving and knitting design both use binary code, you can use the program for this purpose as well. Link: [https://adacad-4-1.web.app/](https://adacad-4-1.web.app/). Steps:
- Select "add draft" on the left top, enter the amount of vertical under "warps" and the amount of horizontal rows under "weft".
- Click on the draft that appears, select "draft" at the top of the page.
- Under "loom type", on the left of the page, select "jacquard". Click on a square in your draft now and it turns black.
- Make your design. Save it by pressing the house icon --> "export as" --> the file type you want.
---
##### Reading the punch card:
[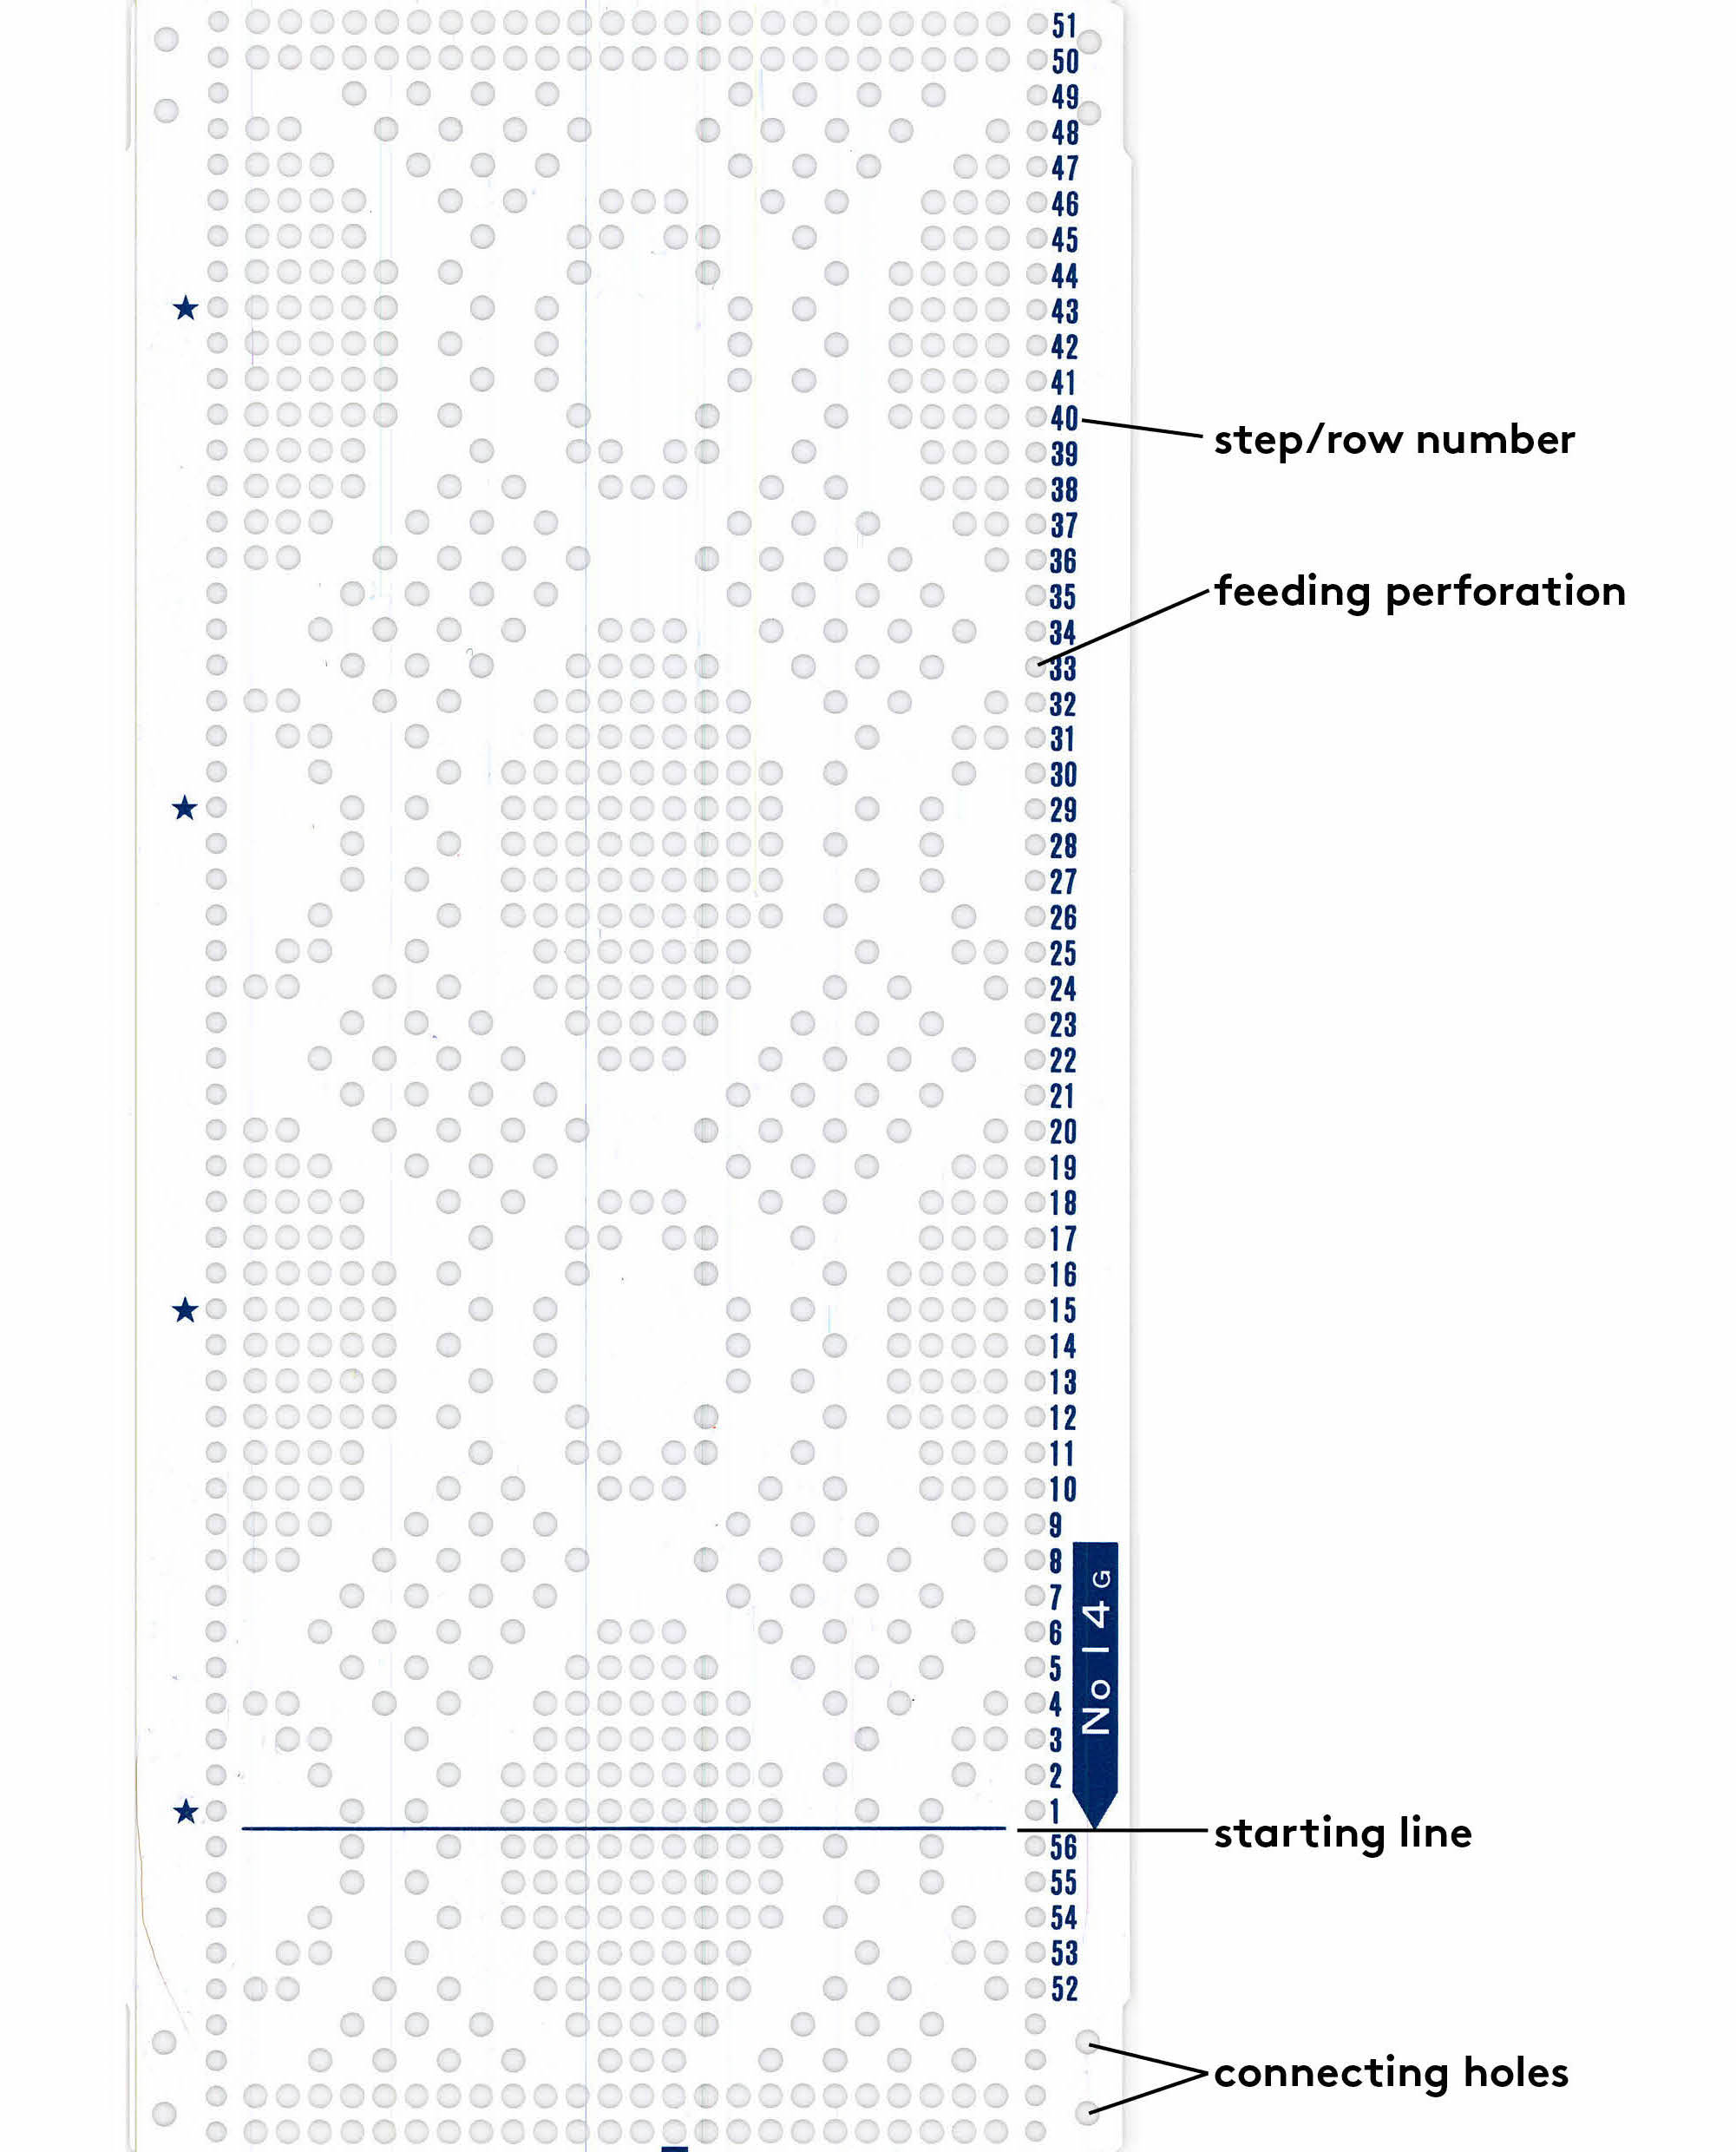](https://bookstack.hku.nl/uploads/images/gallery/2026-01/punch-card-info.jpg)