Controlling Lights
How to control lights using consoles, software, apps etc...
Of course this bookstack is under construction, more items will be added in the future as our knowledge grows and the bookstack is used more by colleagues.
- Light Consoles
- DMX Controllers
- Controlling Aputure and Nanlite lights with IOS and Android app's
- Software
- Led strips
- Everything you need to know about ledstrips
- smart LED string & app (phone)
- WLED
- Controlling LEDstrips with Arduino
- Other related stuff to dive into
- Remote control of Lights through TouchOSC
- Visualizing shows
- Combining Software
- MagicQ : lighting software mimicking a light console
- Pixel mapping
- Creating a QLC+ file from scratch, and controlling lights with your own laptop
- RDM (Remote Device Management)
- Lights in HKU Blackboxes
Light Consoles
There is a wide variety of consoles in the world. In this chapter we only mention the ones that we at HKU have some experience with.
ColorSourceAV 20
![Fader Mode; Bumps; Crossfader - ETC ColorSource 20 User Manual [Page 10] | ManualsLib](https://static-data2.manualslib.com/product-images/bb3/1288630/etc-colorsource-20-music-mixer.jpg)
Information about the device
Basic use In channel mode
Make sure the console works in channel mode by choosing the mode on the touchscreen.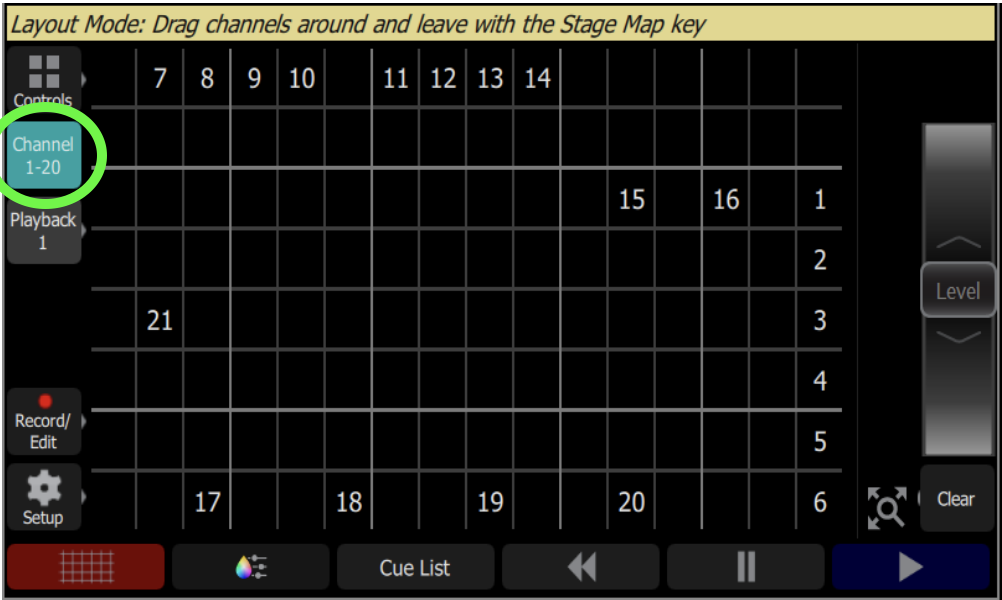

Use the faders to turn on lights that are programmed under the channels that correspond with the faders.
Cuelist
A cue is a recorded stage look that can include channel settings for intensity and other
parameters, effects, and media
Interface start position:
Select Channel mode (left display)
Cuelist
Move Cues slider up (sliders above display, 3rd slider)
Controls > cue list
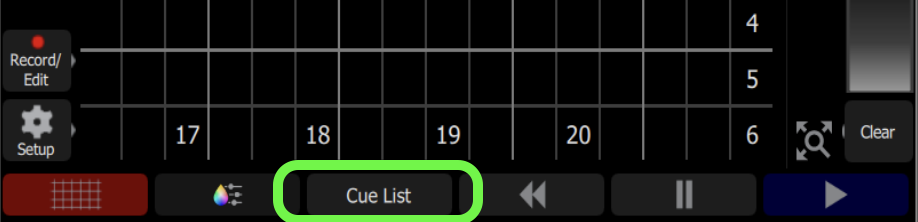
Explanation cues (scene) list:
The top line is the previous scene,
2nd line is the current scene
3rd line is the next scene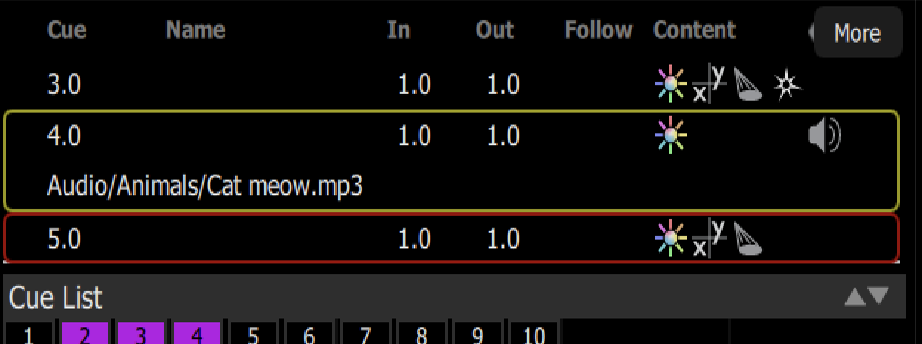
Interface operation:
Play button to advance through cues
More > gotoO = go to start scene (black)
More > goto cue (3) = go to scene 3

More > flag, give current cue a flag so you recognize it as important
Record Edit > Cue list = delete, adjust, copy, etc. from the list or individual cues.
Record cues
Make a picture: turn on lights and choose colors
Record/edit > record > cue > name (press the input box above "name" on the touchscreen)
Adjust time by pressing the input boxes and adjusting time.
Store
Clear>all
Move all light buttons down
Create new image etc...
Adjust cues:
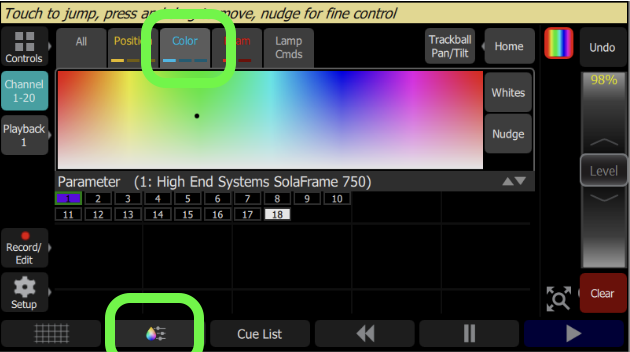
record/edit > cue list > select cue (cue fader down) > edit cue (cue fader up) > select lamp by pressing buttun under fader of the lamp > adjust color (controls > color > choose color) > Store or store & next and choose check mark (green button on the left bottom of screen) > Exit
DMX Controllers
In order to send DMX from your computer to your fixtures, you need a hardware controller or converter.
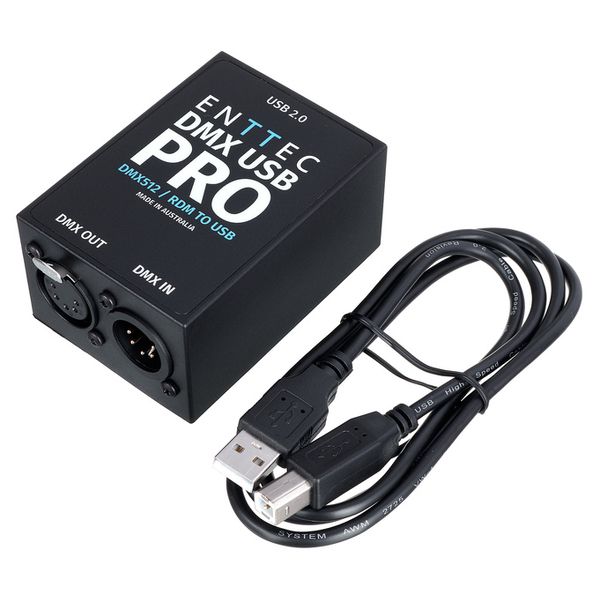
ENTTEC
A piece of hardware to control your fixtures/daisychain through USB.
HKU students can borrow this at the uitleen JK, uitleen PT and uitleen ON.
For you computer to recognise the hardware you need to install a driver
Quick & dirty way is to install EMU : https://www.enttec.co.uk/en/downloademu185639027/
EMU info & download
EMU (the software by ENTTEC) is designed for musicians, DJs and live artists with live performances in mind. The interface is quick to learn and easy to use. EMU allows for the synchronisation of lighting and music with oscillators in real time, though MIDI. Whether you want to control LED washes, moving heads, dimmer packs, smoke machines, scanners, moonflowers… You name it, you can control them using EMU’s audio to DMX or Art-Net output.
Installing EMU will also function as a driver for your ENTTEC device.
Download EMU here (register first)
A tutorial on getting started with EMU:

ArtNet
Art-Net uses ethernet for transmitting lighting data, making it easy to transfer of large amounts of DMX512 data over a wide area using standard networking technology. It is an implementation of DMX512-A protocol over UDP. This can be done through a LANcable or wireless to a receiver/converter.
To receive ArtNet data & convert it to DMX you need a hardware converter. *
For HKU students the Blackbox JK is equipped with ArtNet, not for loan.
more info: https://art-net.org.uk/
*Do you have some Arduino experience? Build your own!
https://www.instructables.com/Arduino-Artnet-Node/
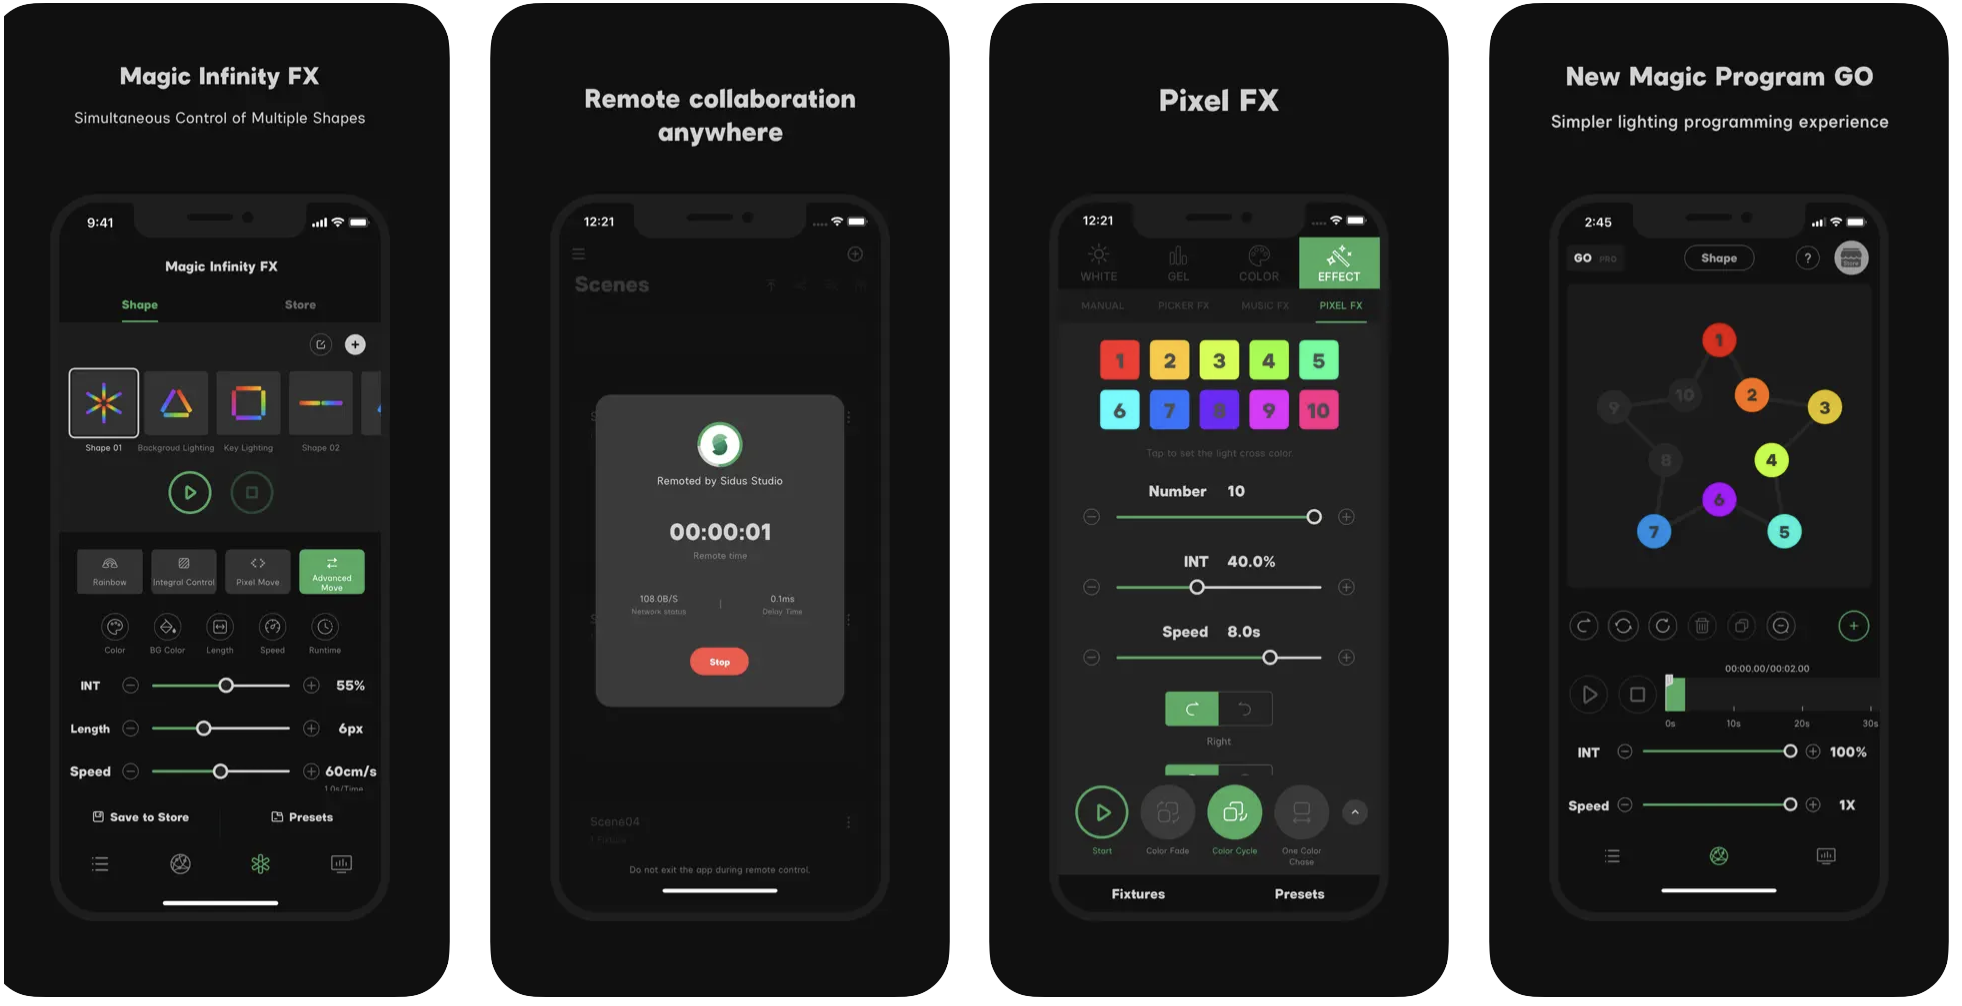
Controlling Aputure and Nanlite lights with IOS and Android app's
This page gives a short summation different light brands and the available applications to control the light parameters with a smartphone through bluetooth connection or, if possible, with a DMX connection
Aputure
The Aputure brand has a number of models on the market that can be controlled with the Sidus Link application using a Bluetooth connection. Below you can find links to OS and device specific downloads, and a range of tutorials how to use Sidus Link in conjunction with Aputure lights.
For IOS Iphone: https://apps.apple.com/us/app/sidus-link/id1471951977
For Android: https://play.google.com/store/apps/details?id=creativity.intelligence.application.sidus.link&hl=nl
For IOS iPad: https://apps.apple.com/us/app/sidus-link-pro/id1574126730
How to:
Mobile app walkthrough:
Sidus Link Pro User Guide Series
(playlist on youtube)
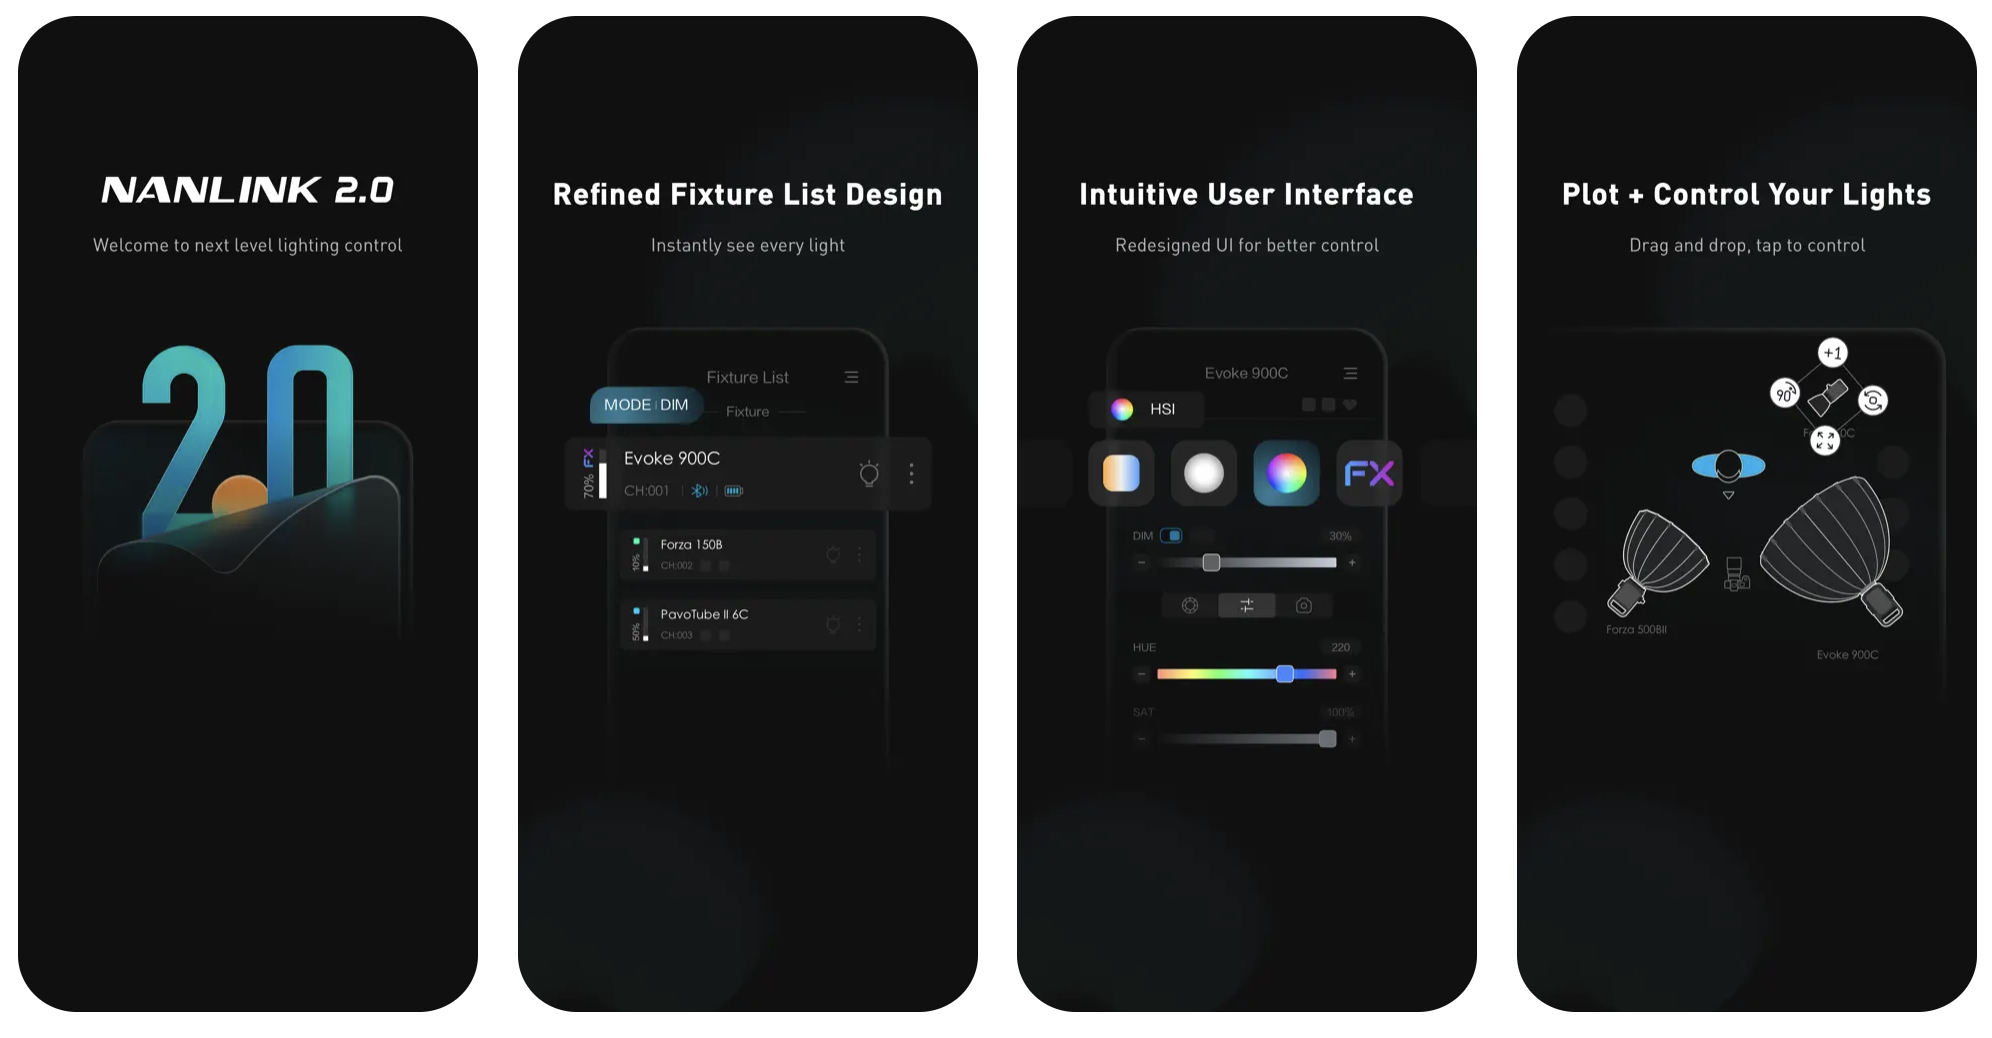
Nanlite
Nanlite has numerous of models on the market that can be controlled with the Nanlink application using a Bluetooth connection. Below you can find links to OS specific downloads, and a range of tutorials how to use Nanlink in conjunction with Nanlite.
Nanlink for IOS: https://apps.apple.com/us/app/nanlink/id1584085006
Nanlink for Android: https://play.google.com/store/apps/details?id=com.nanlink.nanlink&hl=nl
How to:
Software
How to control lights using the free software QLC+, Resolume or Data flow software etc
QLC+
QLC+ is designed to streamline and simplify the process of controlling DMX or analog lighting systems.
QLC+ is open source, compatiblte with most fixtures & dmx hardware. Can be triggered with midi, audio & osc. Runs on Windows, MacOS or Linux.
Check out: https://www.qlcplus.org/ for in depth info.
Download QLC here
Go for the stable 4.x.x version if you are practising to use this tool in the Blackbox @ HKU
Use this startup guide when working with a pre-programmed version of QLC (template), like installed in the Blackboxes. The added fixtures and virtual console will be different in every Blackbox, depending on the facilities.
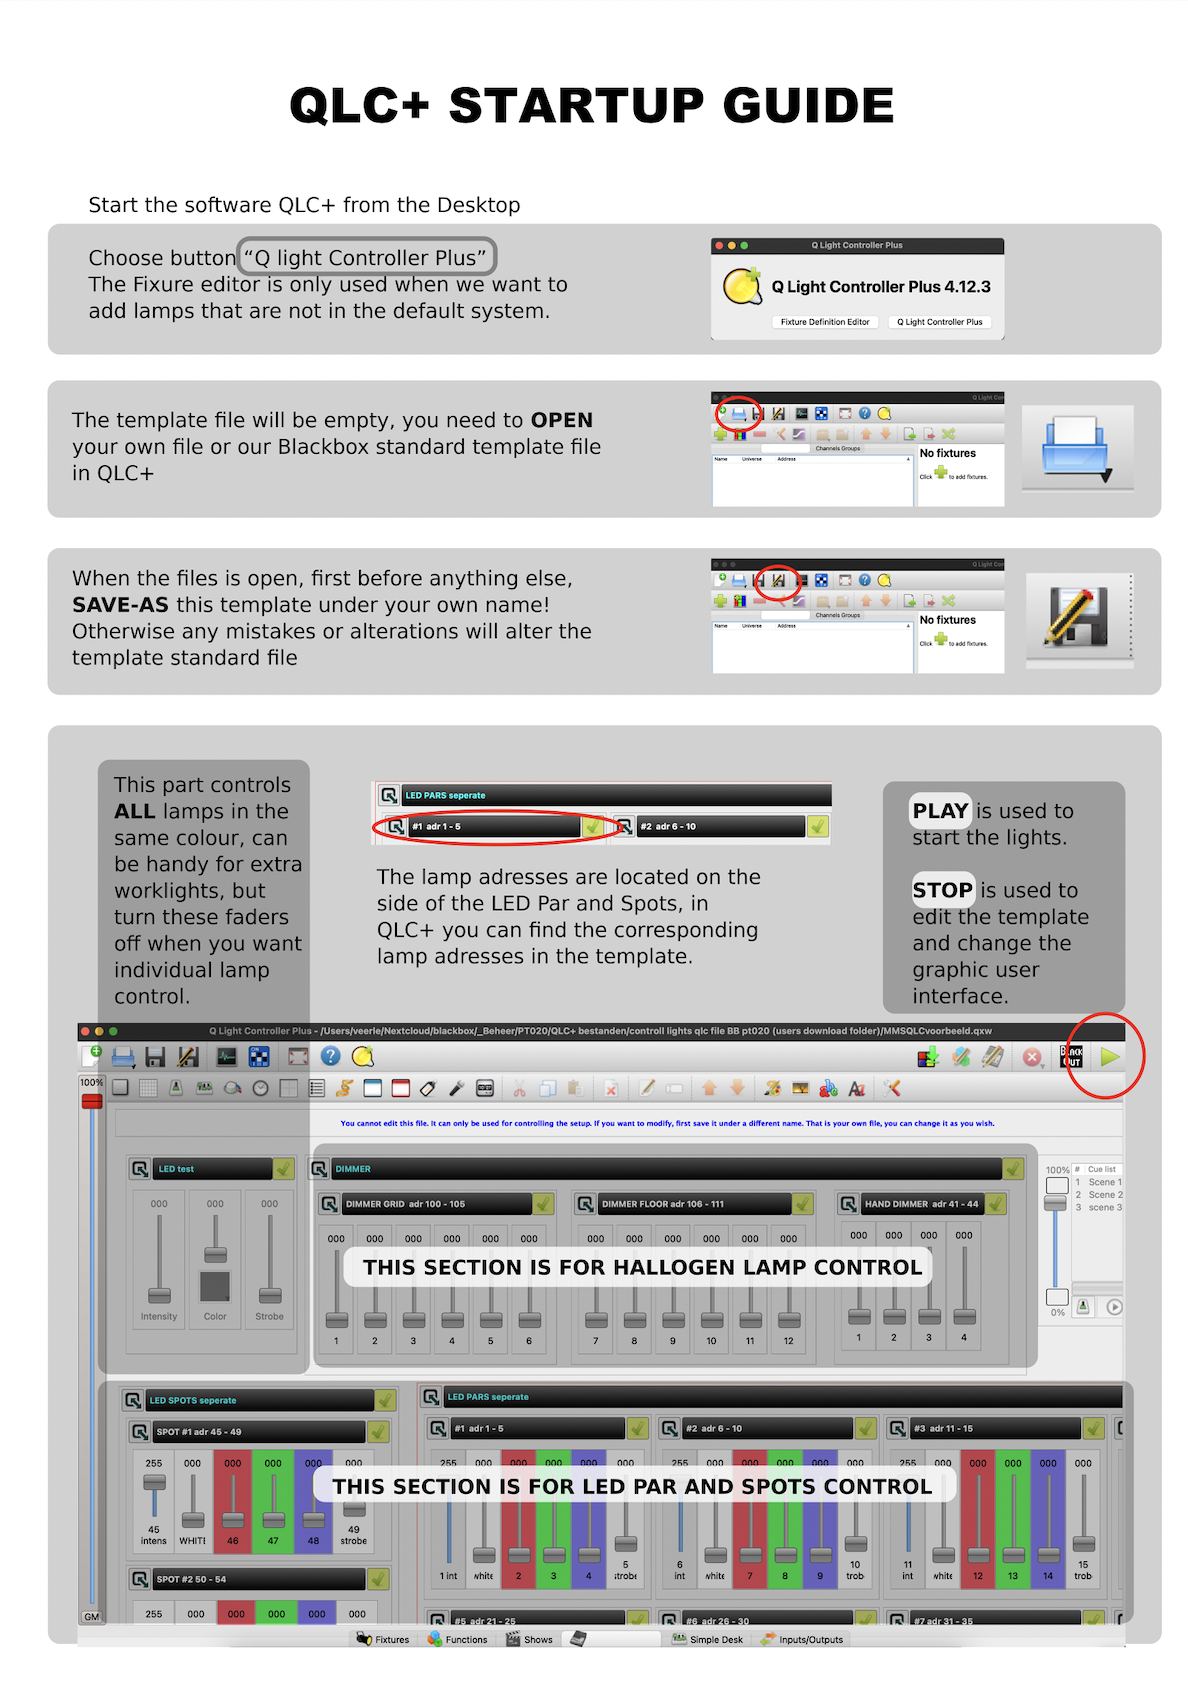
To start working on a scene in QLC+ and make a que list, follow this guide:
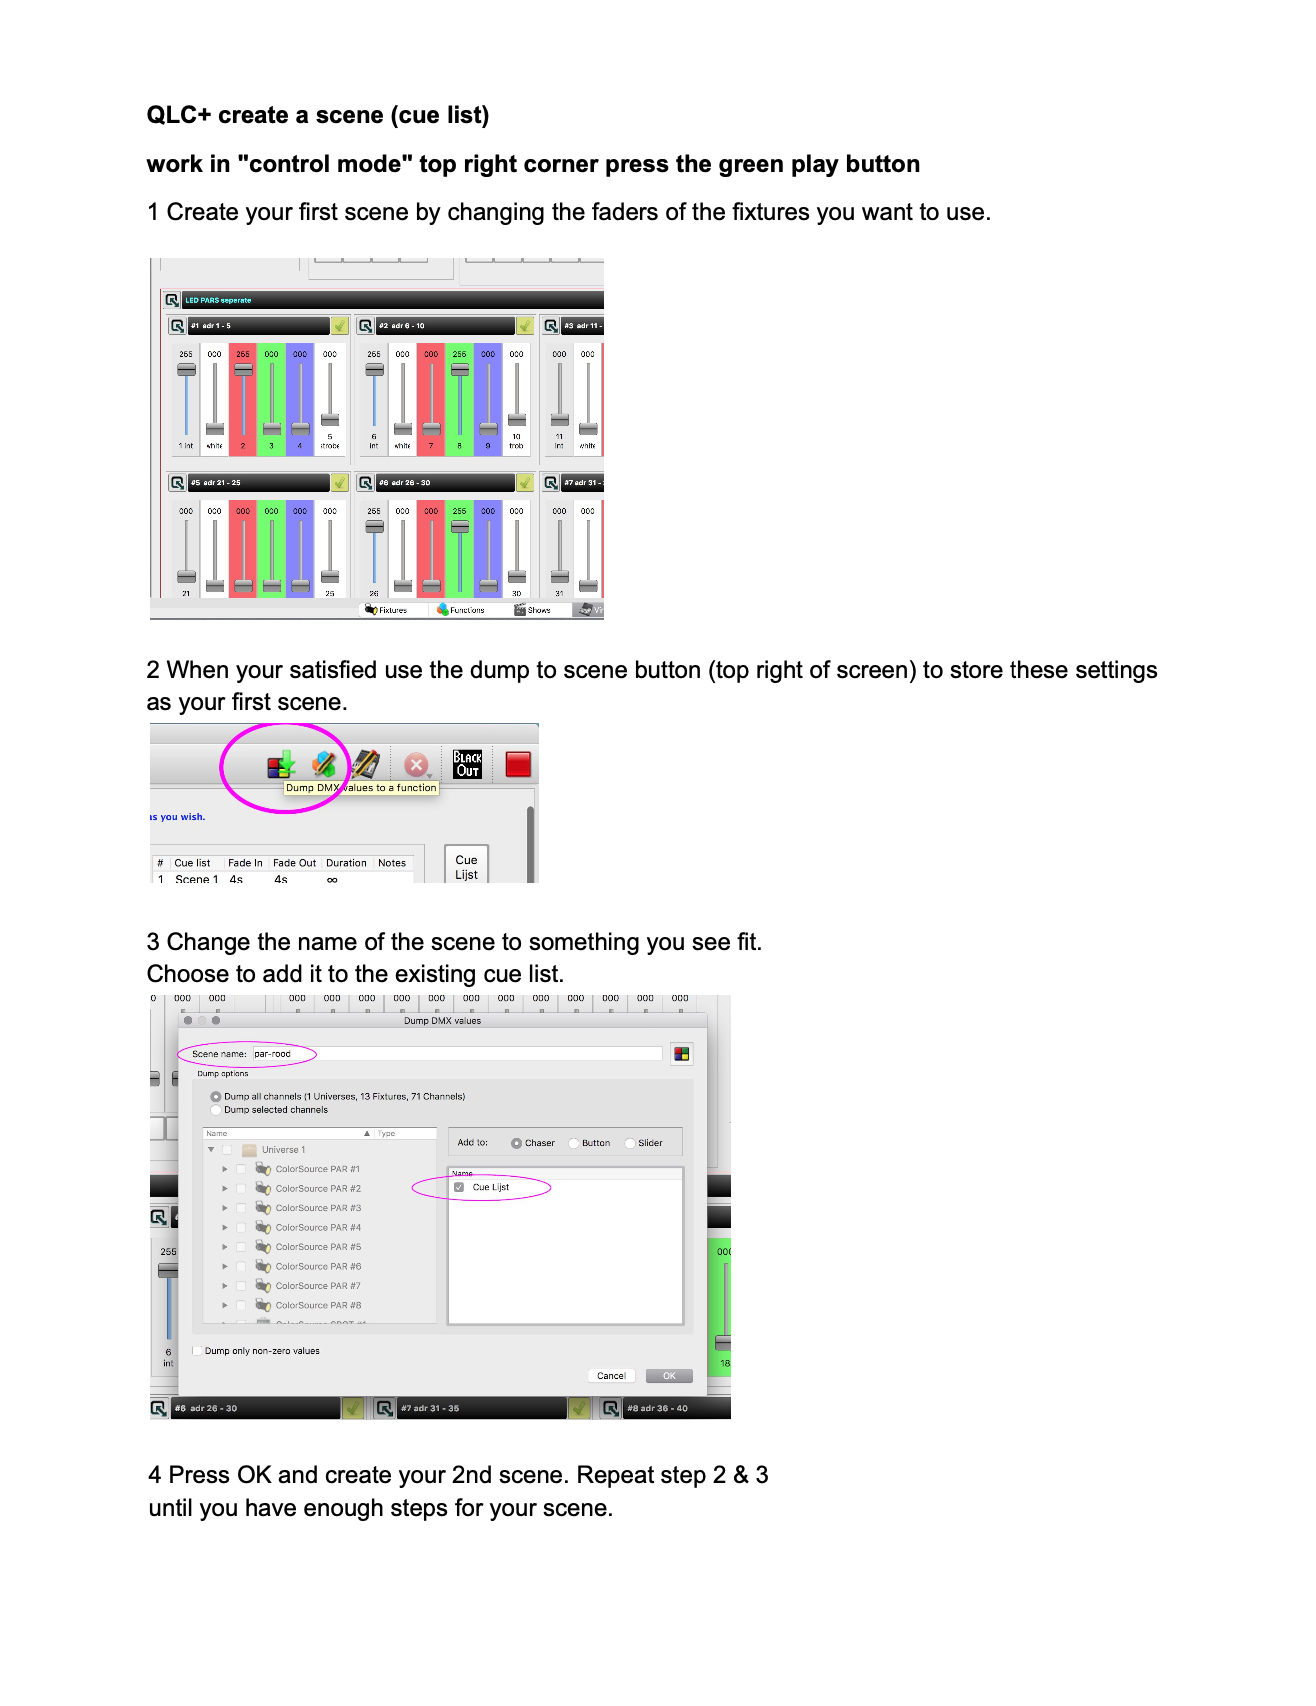
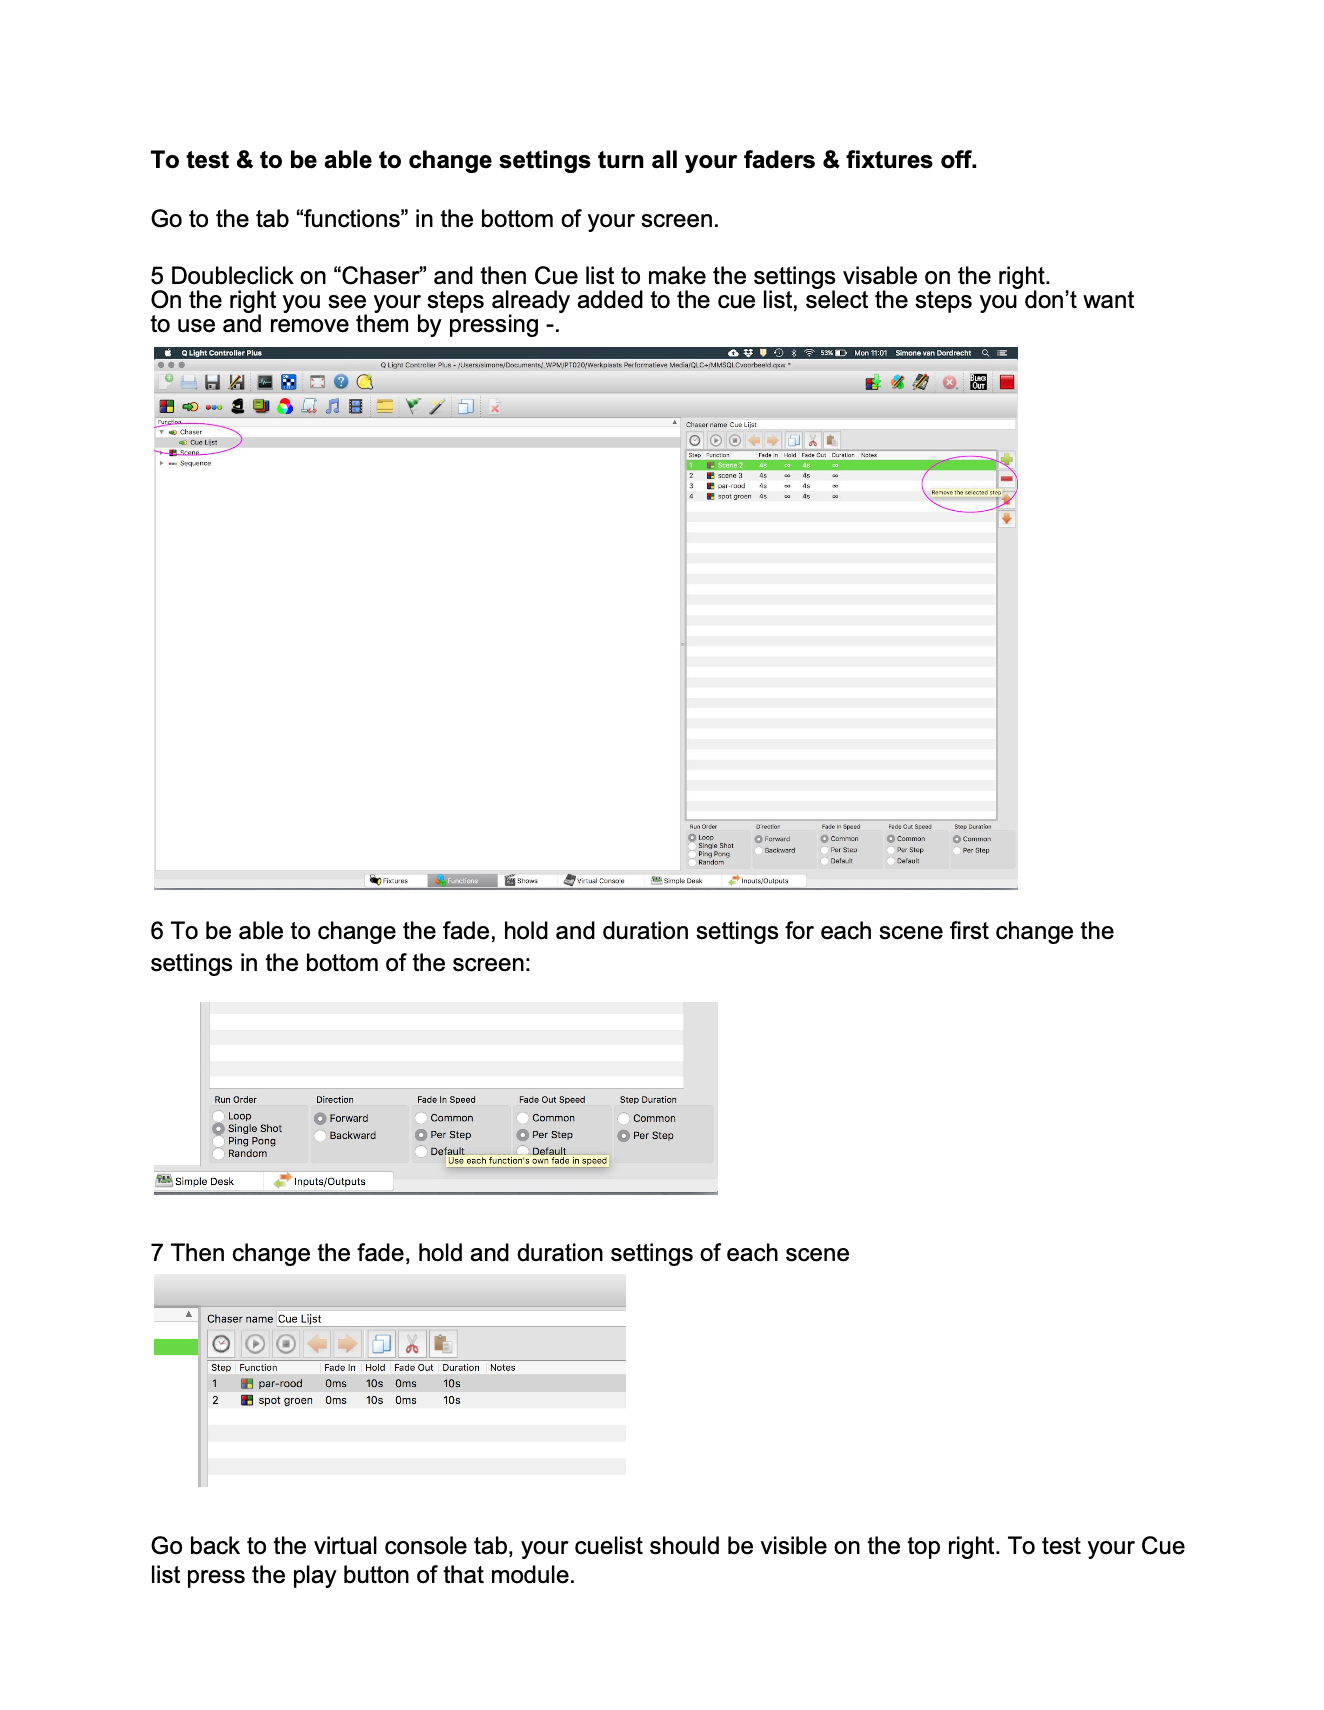
Touchdesigner
In Touchdesigner DMX data is sent to the daisy-chain of fixtures through USB (via an ENTTEC available at the uitleen) or ArtNet.
Sometimes, the DMX Out in TD won't work. Solution: adding dummy channels to the universe, so all 512 get 'a signal'
This tox should work. Choose Serial/Artnet (then also set artnet adres, preset = Blackbox JK)
In Touchdesigner you can create 'presets' called Toxes. You can save these on your computer for easy acces:
| DMX Config | TOX | Example fixtures |
|
5 channels: Intensity |
ETC_Colorsource_Par.tox ETC_Colorsource_Junior_6ch.tox
|
ETC ColorSource Spot jr (inventory Blackboxes & klein Zaal)
ETC ColorSource Par (inventory Blackboxes)
ColorSource Spot Deep Blue (inventory Kleine Zaal) 
|
| 6 channels: Red Green Blue White Amber Uv |
|
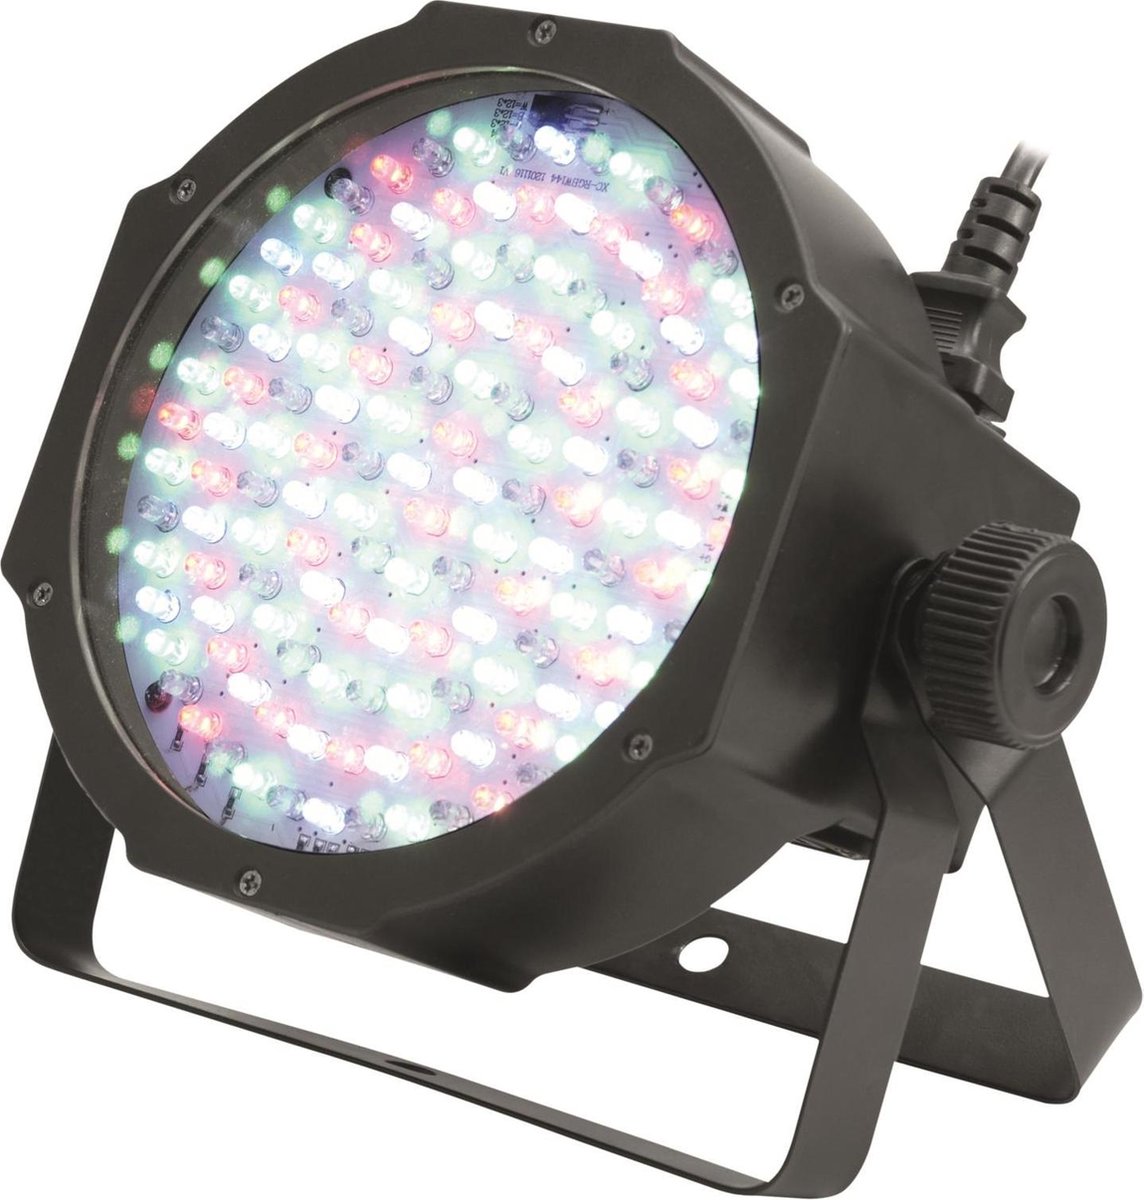
High End PAR uitleen Theater : >>
Mid Range PAR uitleen Theater |
|
6 channels: Red Green Blue |
Eurolite Basic PAR uitleen theater manual & dmx traits : Eurolite
|
|
| 7 channels: Red Green Blue White Amber Uv Master Dimmer |
7CH_Par_RGBWAUI.tox |
High End PAR uitleen Theater :
Mid Range PAR uitleen Theater >> |
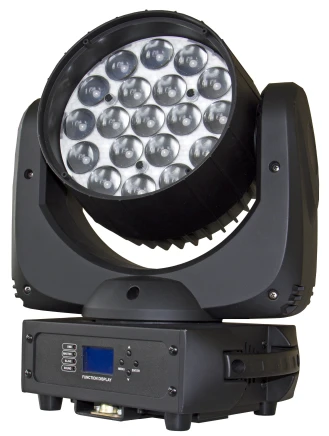
| 14 channels (see Briteq manual) |
Moving_Head_Briteq_BT_W19L10ZOOM_14ch.tox
|
Briteq BT-W19L10 Zoom (uitleen Oudenoord) |
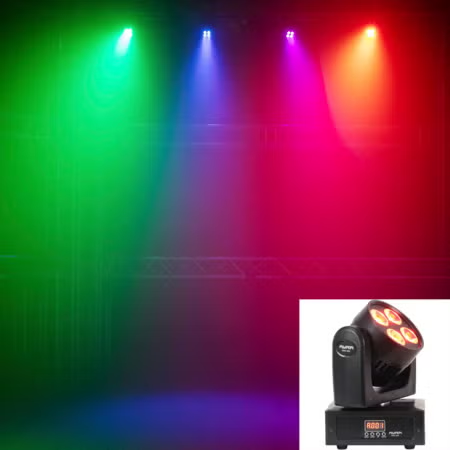
| 16 channels |
MH_Varytec_340FX_16ch.tox |
https://www.manualslib.com/manual/2561032/Varytec-Hero-Wash-340fx-Rgbw-Zoom.html |


 .
. 

Example patch how to use tox files:
Easy DMX_Out for Artnet (use a merge to connect multiple fixtures, dive in & adjust de DMX out to use another interface)
dmx_out_Artnet.tox
Patch for the Blackbox @ Janskerkhof (to connect with OSC via ipad)
Check out the WLED page to connect TD to LEDstrips
Resolume Arena.
Resolume Arena is Vj software, normally used for sending visuals to screens. But can also can output the color or brightness of your pixels to LED strips or other light fixtures via DMX. Beware that you need a hardware controller to covert you signal to DMX, NOT an Enttec..... (see below)
Control lights using visuals as input, straight from within the software.
Check out the explanation of the basics on the Resolume Website it's really clear & helpfull. https://resolume.com/support/en/dmx
Creating custom fixtures in Arena:
The basic explanation for creating fixtures can be found here : https://resolume.com/support/en/fixture-editor#creating-a-new-fixture
Use the fixture editor to create fixtures as output in Arena. Remember, a Par or Spot is 1 x1 pixel, so if you select a bigger input, it wil still output one color. Choose the Color Format that matches your fixture (see the dmx traits when you do a search for the brand & model)
Many of the (theater)lights you can use or borrow at HKU can be put in RGB mode. But in some cases you may want to acces a fixture without changing the mode even if it is set to 5 or 6 channels including intensity and strobe, which cannot be used by Resolume. The fix for this is to work with dummy channels/custom parameters, like in this picture:
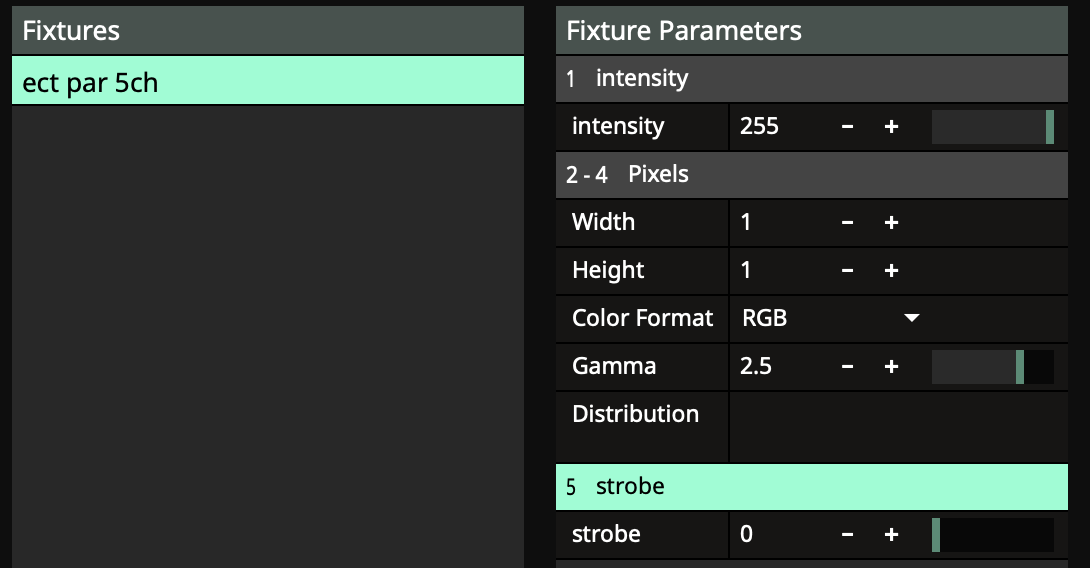
Intensity is set to a fixed 100 (else the colours won't be visible) & strobe to a fixed 0. The rest will be done n RGB mode.
Add these parameters with the + icon blow & drag them to the right order.
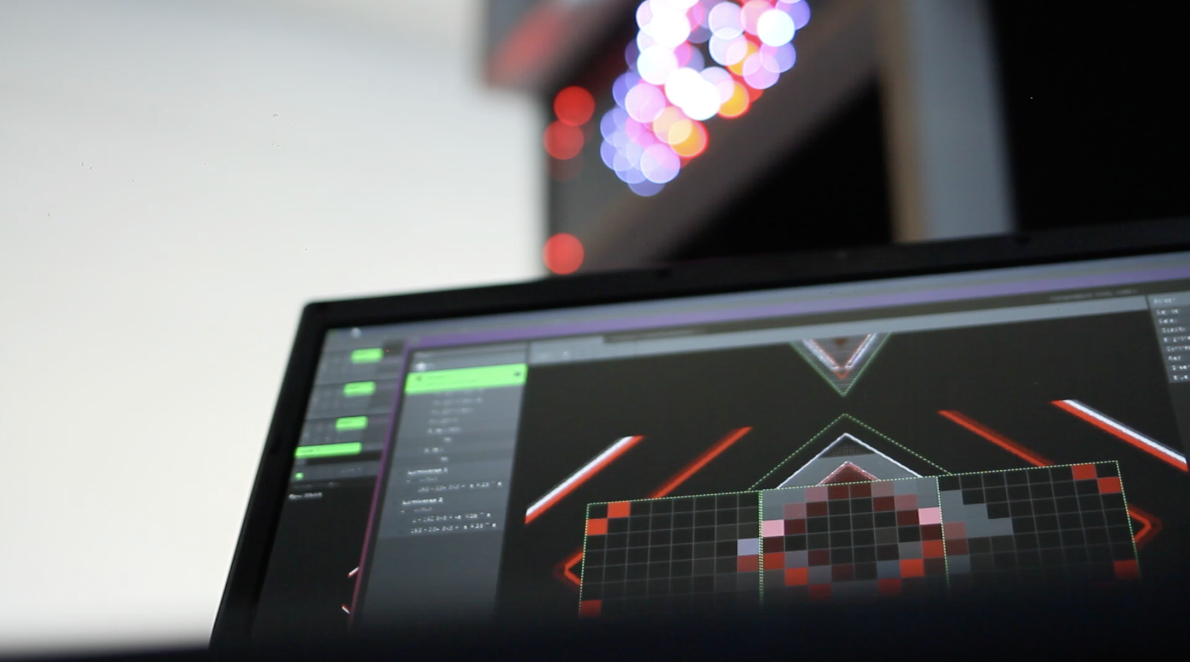
Tutorial about Mapping Pixels with DMX
In this tutorial, Resolume Arena is used to create and control various DMX Light fixtures.
Every dmx light has its own specifications, pixel mapping possibilities and/or channel modes. Learn how to make your own light fixture layout for your personal lights in Resolume. Also how to decide what animations run over your fixture(s).
https://www.youtube.com/watch?v=LKtKUMT4ZOs screenshot from YouTube video:
![]() example of fixture output in Arena:
example of fixture output in Arena:
example of a pixelstrip as output in Arena: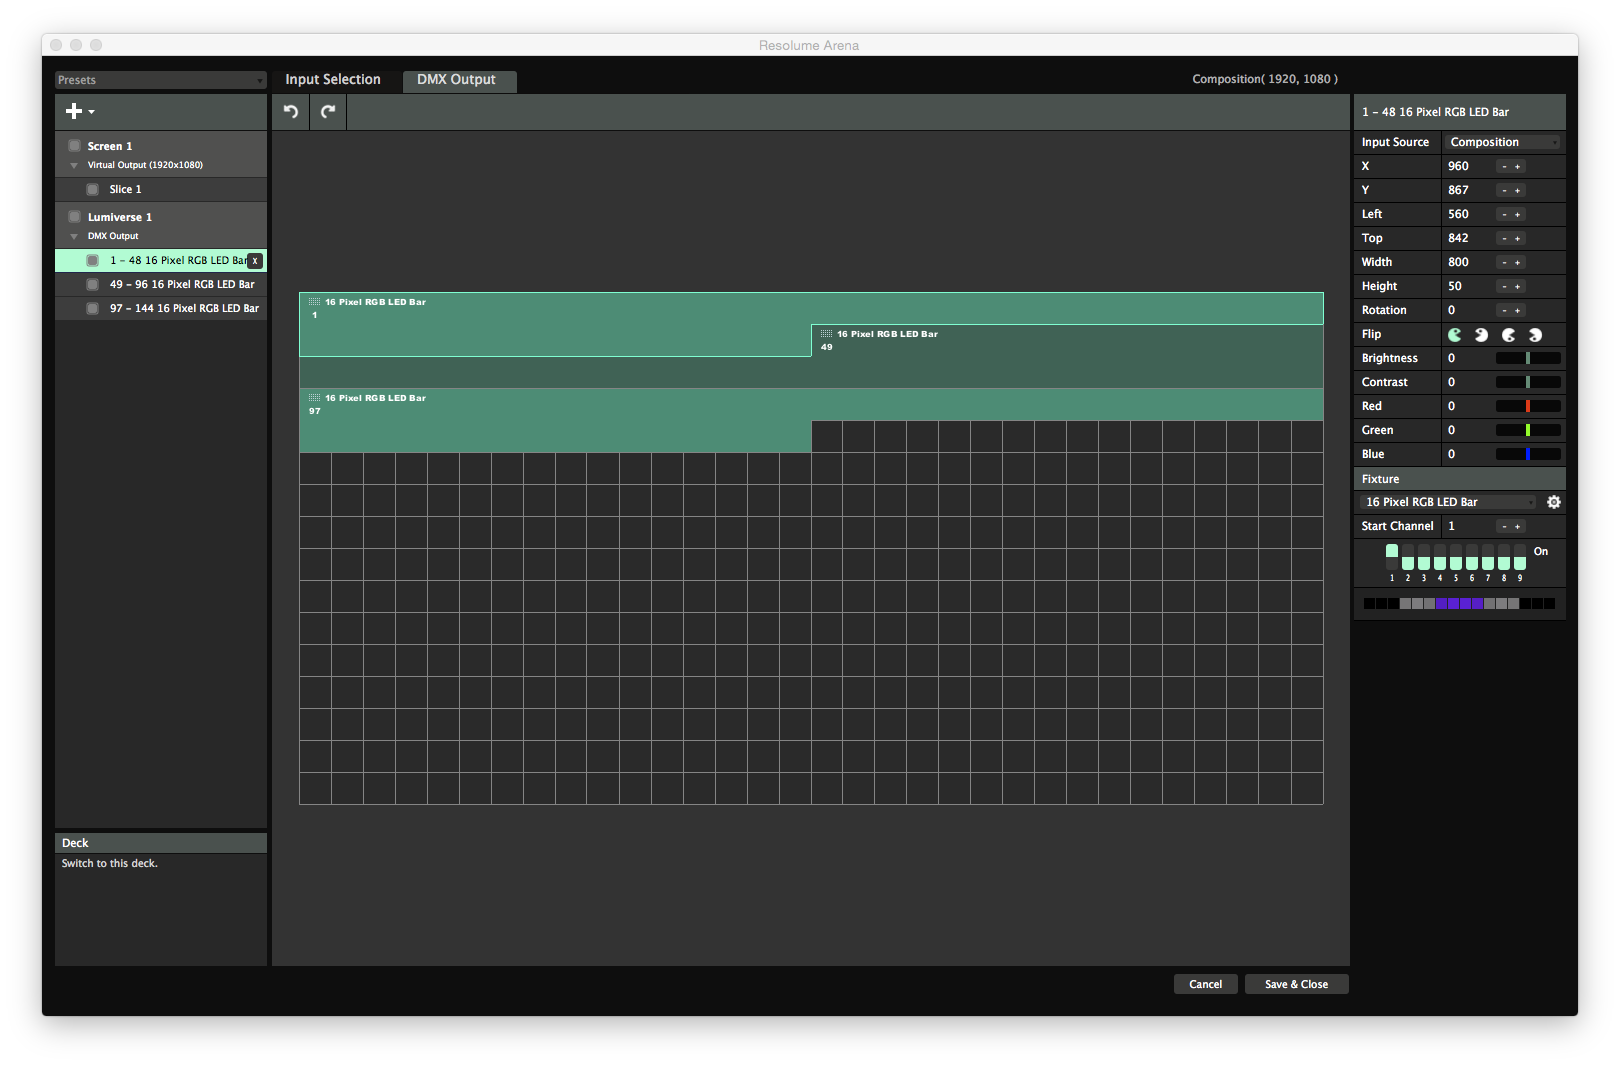
ArtNet Devices supported by Resolume Arena.
Resolume Arena 6 and up do not support Enttec DMX USB devices! If you'd like to use an Enttec DMX USB device, your only option is to stick with Arena 5. Or to use a different USB to DMX device.
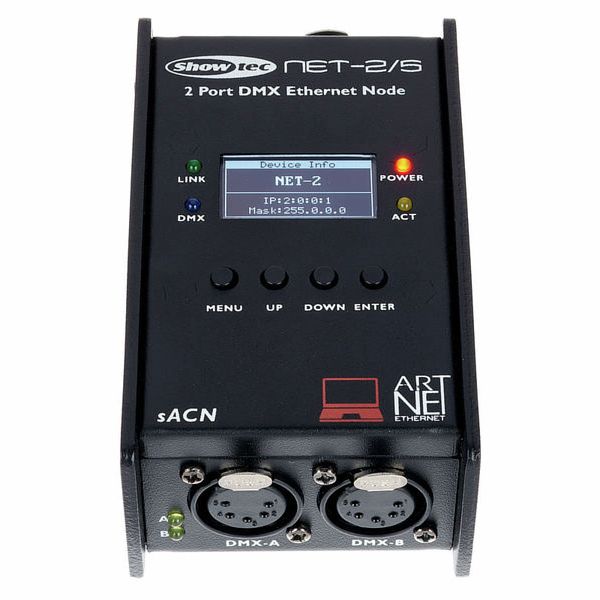
At the HKU Blackbox we use a LanBuddy or Showtec NET 2/5 or Showtec NET 2/3, as output device for sending DMX information from the PC to the lights.
What is convenient about this setup vs using Enttec DMX USB (MKII and such), is that we can extend the Showtec NET 2/5 by use of network cable, instead of USB cable. Example: if you want your lamps all the way at the far end of a large room, you can connect the PC and dongle via 30m network cable without signal loss, vs having to extend DMX cables/usb cables.
These ArtNet converters can also be used wireless, over Wifi, when plugged in to your router (ethernet). Bye bye cables :)
Manual about the NET 2/3 https://www.huss-licht-ton.de/images/products_download/Manual_34954_1.pdf
Manual about the NET 2/5 https://www.highlite.com/en/mwdownloads/download/link/id/17428216
Lanbuddy MAnual https://www.elclighting.com/wp-content/uploads/2022/09/Buddy-quickstart.pdf
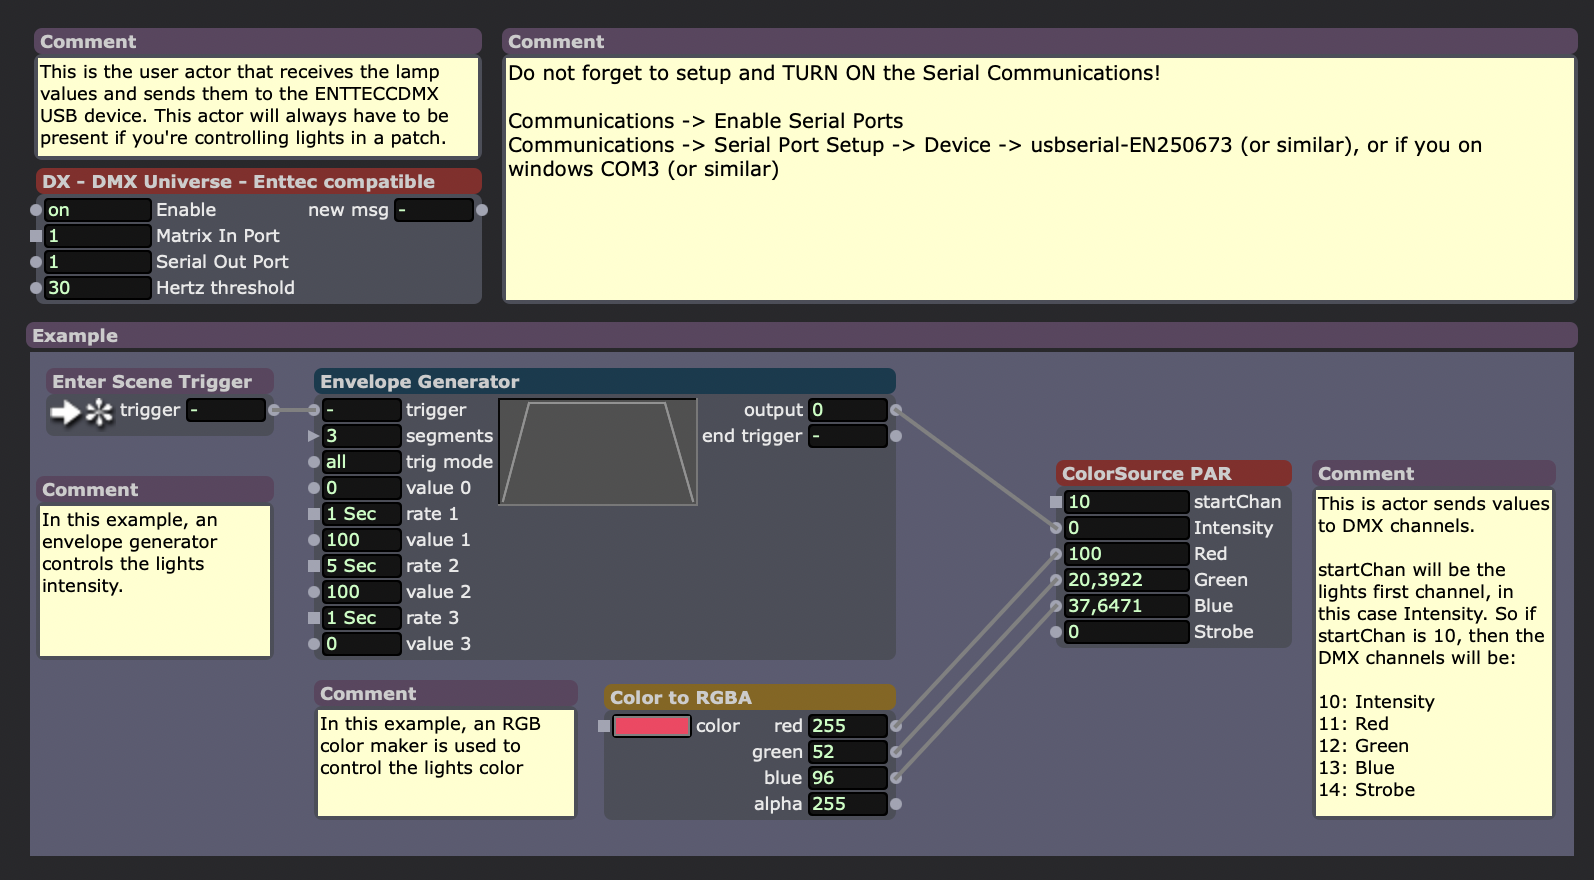
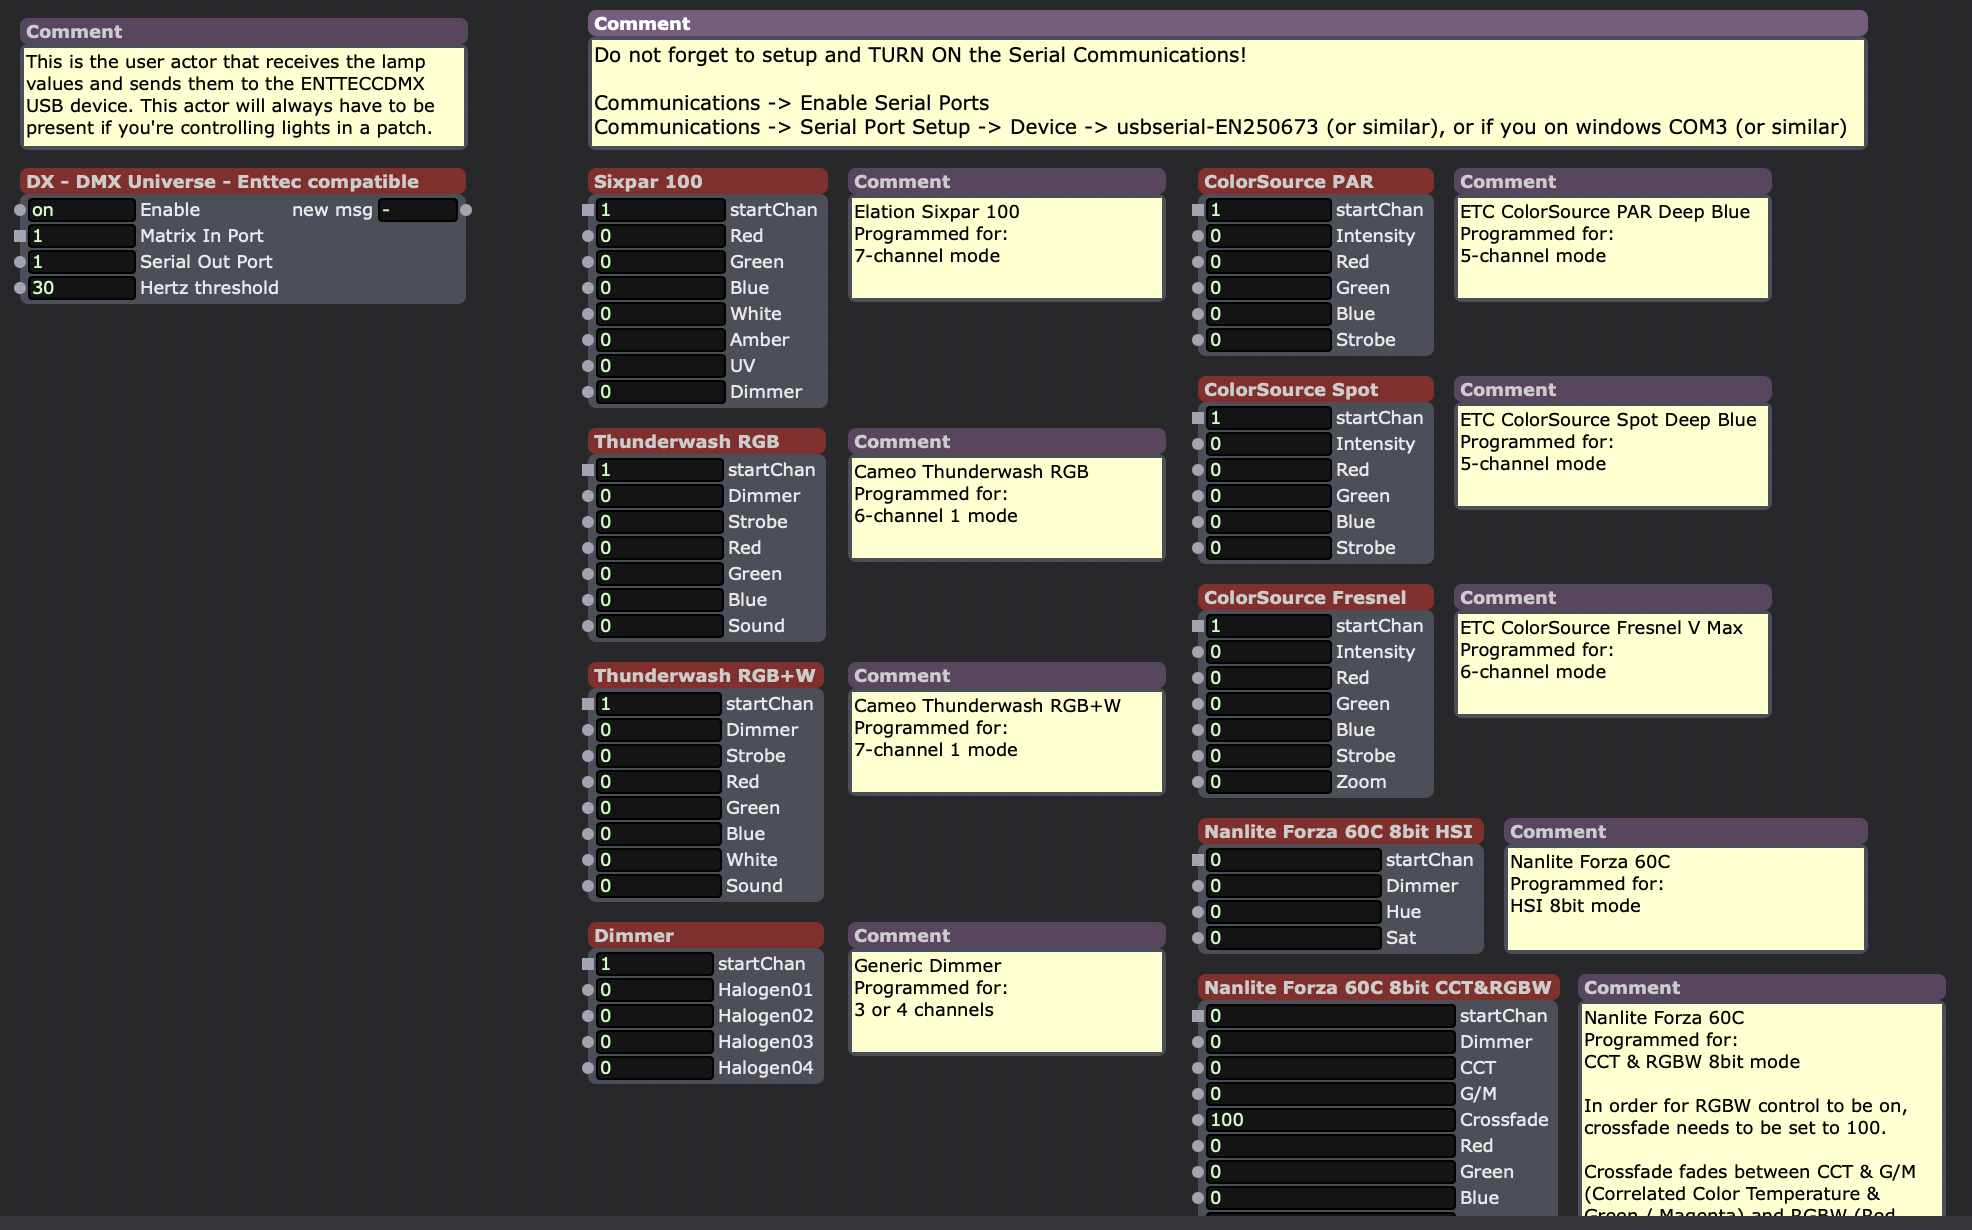
Control lights from Isadora
Control lights from Isadora with ENTTEC-DMX
With this Isadora file you can control DMX lighting directly using an ENTECC DMX USB PRO
Download this file to get access to the user actors that control lights: Fixtures and Light Control ENTTEC-DMX.izz
Here you'll find some examples and also a scene with user actors for many of the lights that can be found at HKU.
EMU
EMU intuitive sound-to-light controller designed for professional live musicians and DJs.
Easy to use software, EMU allows you to run automated or responsive DMX light shows, leaving you to focus on your show.
@Hku we use EMU mainly to get a dependable install of the drivers for ENTTEC
Led strips
An LED is the acronym for Light Emitting Diode. Unlike a regular incandescent light bulb, there is no filament that produces the light. Almost all of the electricity is used for making light, which makes the LED more efficient. On the other hand, think of an incandescent light as a heater that happens to emit light as well. Incandescents and fluorescents emit light with very high beam angles. Since LEDs are small and powerful with a definite beam angle, it is important when using them to have them arranged in a way that the emitted light is even upon the surface you desire to light.
An LED strip, tape, or ribbon light is a flexible circuit board populated by surface-mount light-emitting diodes (SMD LEDs) and other components that can come with an adhesive backing. Traditionally, strip lights had been used solely in accent lighting, backlighting, task lighting, and decorative lighting applications and art.
Everything you need to know about ledstrips
LED strip lights are new and versatile forms of lighting. Unlike regular LED strips, addressable LED strips allow you to control each individual LED, creating a wide range of color and animation possibilities. There are many variants and exceptions, but for the most part, they have the following characteristics:
- Consist of many individual LED emitters mounted on a narrow, flexible circuitboard.
- Each LED (or each group) on the strip has its own integrated circuit that communicates with the control circuit, allowing for precise control over the color and brightness of each LED.
- Operate on low-voltage DC power
- Are available in a wide range of fixed and variable color and brightness
- Bought in a long reel (typically 5 meters), can be cut to length, can include double-sided adhesive for mounting
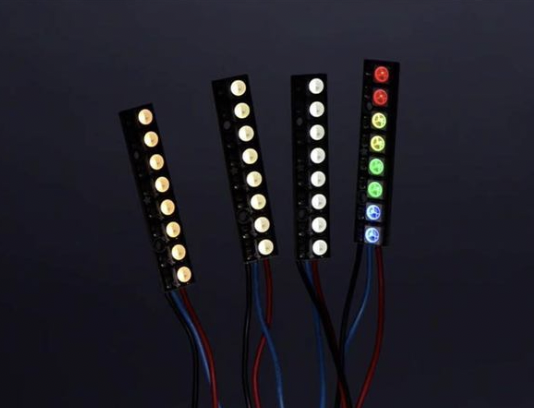
- LEDstrips can be tints of 'white' , RGB(W), various colours controlled with an app/remote or even (individually) addressable & controlled by software.
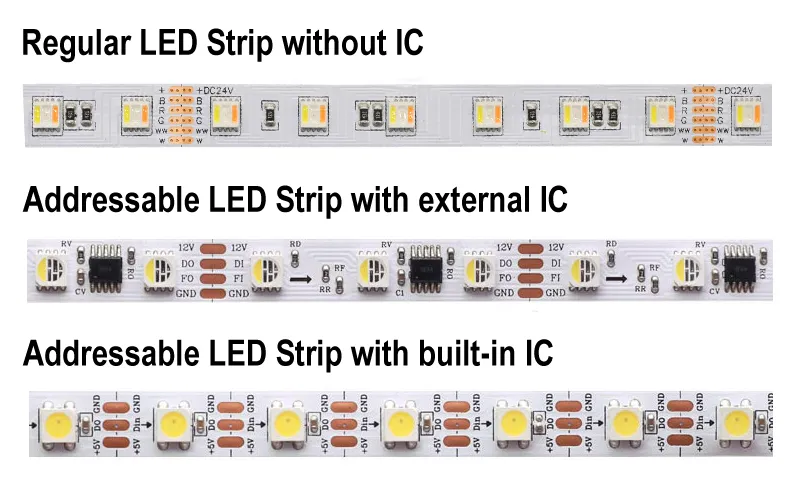
How do I know if my LED strips are addressable?
1) Check whether there is IC or not. There are two kinds of IC, external IC, and internal IC. If has IC, then it is an addressable LED Strip Light.
2) Check the cable, if there are signal data cable, then it is addressable LED Strip Light.
 Educate yourself before buying the wrong strip!
Of course there is much more to learn and know about LED strips check out these resources for in-depth info:
https://aidiwattlighting.com/the-ultimate-guide-to-addressable-led-strip/
everthing you need to know about the various kinds of ledstrips, controllers and drivers
https://www.waveformlighting.com/led-strip-lights
another great, comparable, source of info on led strips
COB ledstrips:
https://www.aliexpress.com/p/wiki/article.html?keywords=aliexpress-leds
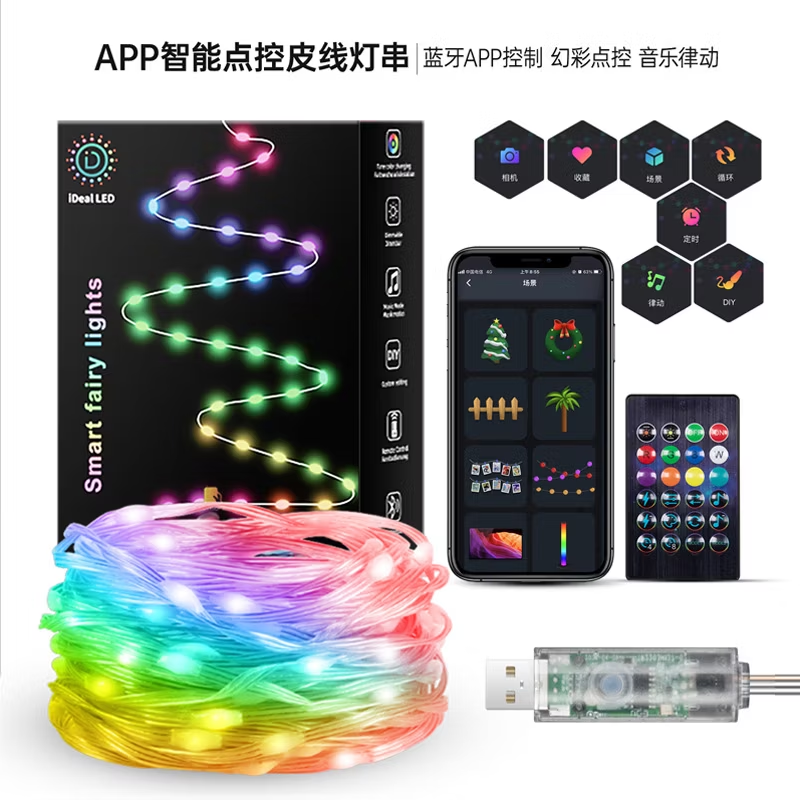
smart LED string & app (phone)
At the BBox Jk you can borrow LED strings that connect to a powerbank through USB
The lights (5/10 meters, 50/100 LEDS) can be individually controlled through an app. (multiple strings simoutaneously)
android: https://play.google.com/store/apps/details?id=com.tech.idealled&hl=nl
iphone: https://apps.apple.com/us/app/idealled/id1568029498
WLED

WLED is one of the most popular packages for controlling LED
strips with, or example, the WS2812B through cable & wifi.
The software also supports some other types, such as the WS2811 and WS2815, both on 12 volts. The first step is to flash the software on, for example, an ESP32.
The ULTIMATE WLED Beginners Guide!
Resources
website: https://kno.wled.ge/
community: https://wled.discourse.group/
A tool to stream video to WLED matrix displays: https://github.com/fieldOfView/WLED-video :
A Python application to stream videos, images, and animations directly to your WLED-powered LED video wall: https://github.com/BradyMeighan/WLED-Studio :
WLED & Touchdesigner:
Another instruction for connecting a WLED controller and TouchDesigner
The following instruction below wil walk you through the steps to connect TouchDesigner with a WLED LEDstrip controller.
WLED installation: https://wled-install.github.io/
For the tinytronics Universal Digital LEDstrip Controller V1.1:
Board type / software version:
ESP32-S3 (4MB Flash, with Audio reactive Usermod)
(Connect the controller to USB-C while holding down the 'Boot' button. Otherwise, it won't enter update mode and the WLED installation won't be able to upload.)
After installation, manually use the RST button to reset.
WLED-AP (AP = Access Point) will appear under Wi-Fi networks. The default password is wled1234.
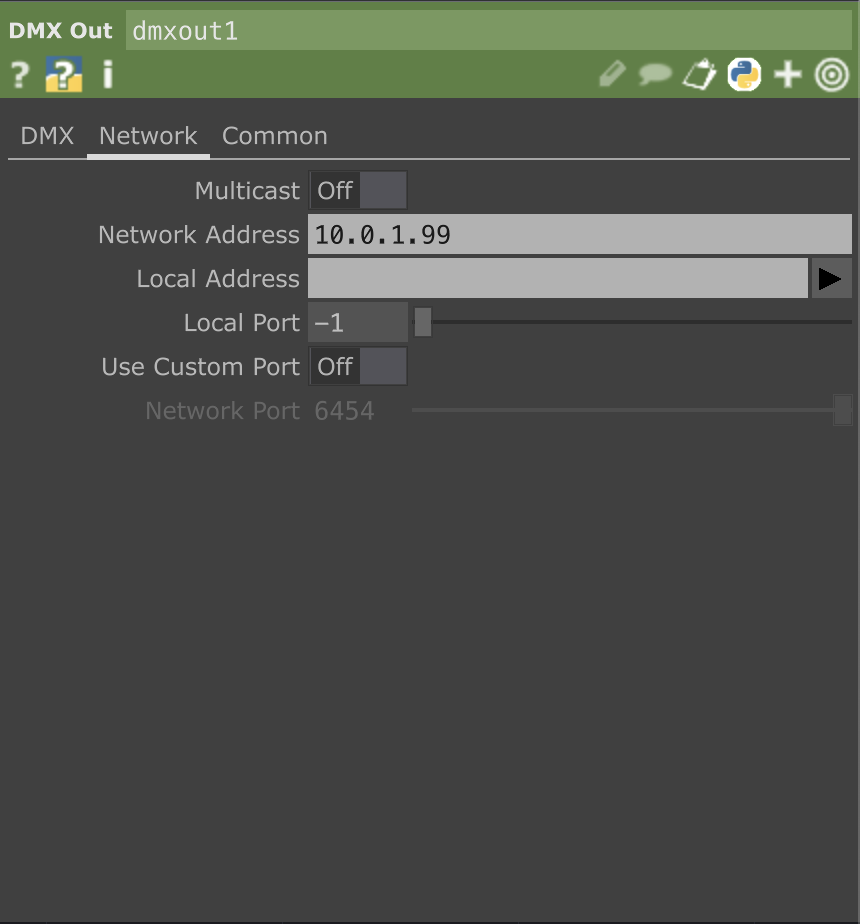
The WLED console will open automatically. You can change the settings here to your local AP. (for example the workshop is in the 10.0.1.xx range, so it's useful to set a fixed IP to, for example, 10.0.1.99.)
Continuing to use the dedicated AP mode directly also works, of course.
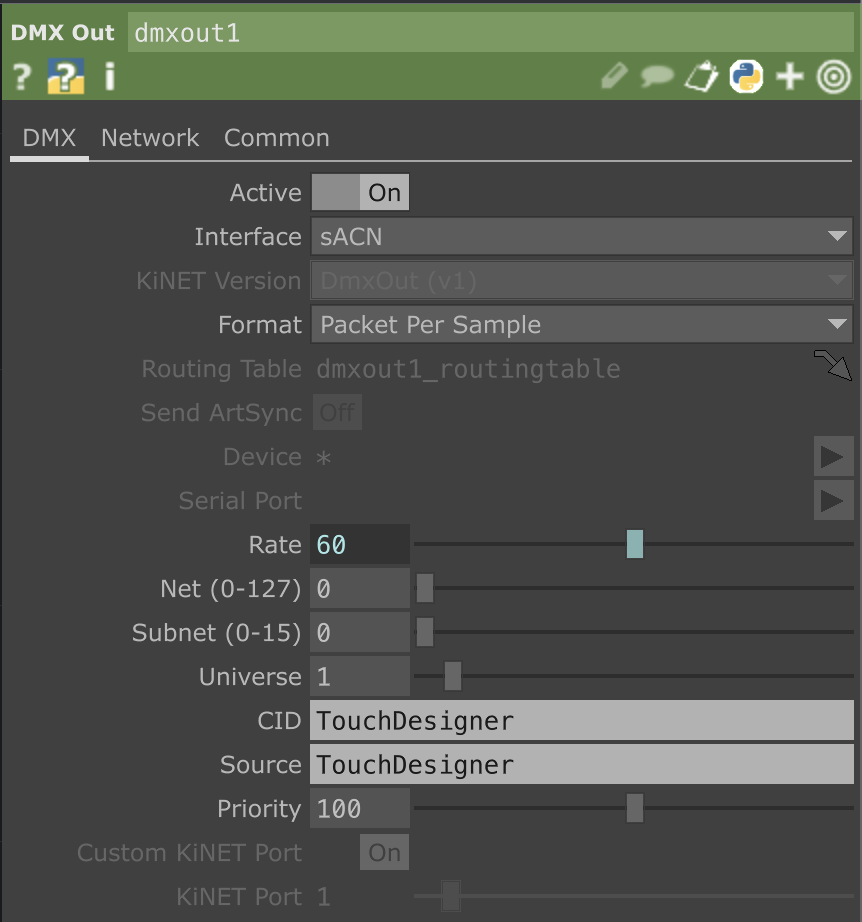
TouchDesigner, DMX Out CHOP Interface on sACN, in the network tab Multicast Off and set the IP address of the WLED controller.
Here's a preset for Touchdesigner WLED.tox
Controlling LEDstrips with Arduino
LED Strips and Arduino
With the Adafruit Neopixel library, it is very easy to work with controlling different types of LED's using Arduino. Adafruit has a very extensive "Adafruit NeoPixel Überguide" available online, where you can follow a step-by-step guide for controlling LED strips, panels and individual led's.
NeoPixel options:
 |
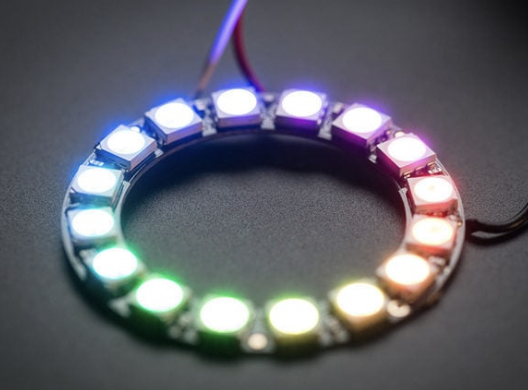 |
| Strips | Rings |
|
|
|
|
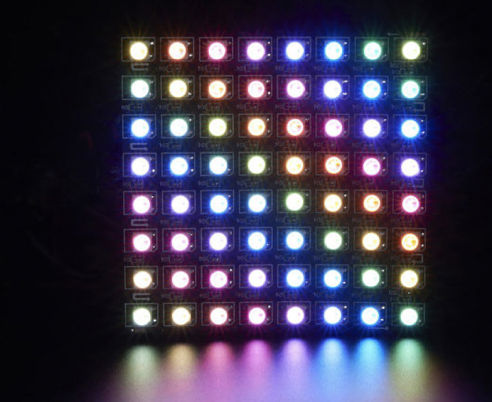
Matrices |
Pins |
|
|
^^ link to more options available via kiwi electronics |
|
Neon-Like Stips |
Images from Adafruit |
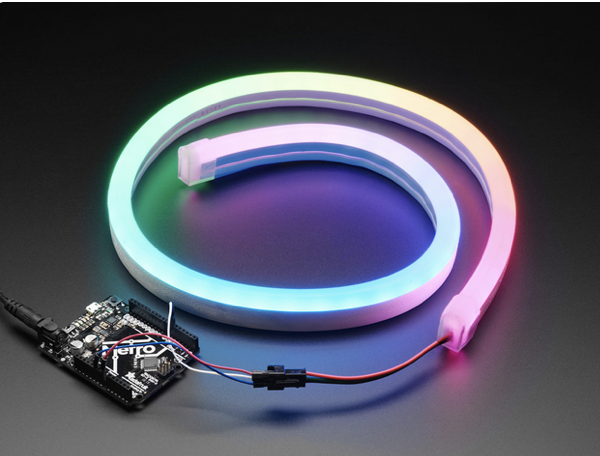
Basic NeoPixel LED strip setup
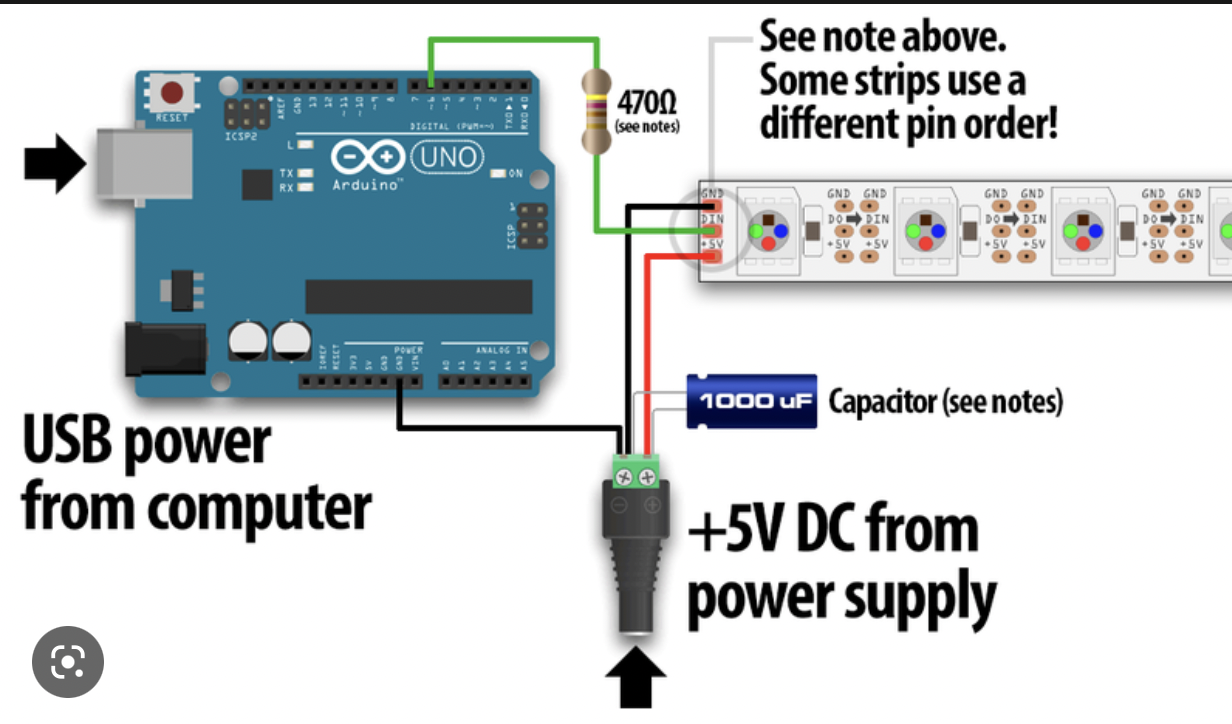
HARDWARE
Materials needed:
- Arduino Uno (or other available Arduino, but Nano is most beginner friendly)
- 1x 300 to 500 Ohm Resistor
- 5V power supply (this type is recommended for simple setup)
- 1x 500–1000 µF Capacitor
For controlling LED strips and Arduino you can build the following hardware:
SOFTWARE
Launch the Arduino IDE.
If you have not installed the NeoPixel Library for Arduino, first make sure to do that first.
https://learn.adafruit.com/adafruit-neopixel-uberguide/arduino-library-installation
If you want to understand more about Arduino and Libraries? Read more here...
Examples→Adafruit NeoPixel→strandtest
Powering NeoPixels in different ways
Other methods for powering ledstrips beside the simple standard power supply are:
- DC wall wart adapters (5v)
- lithium-polymer battery (Lithium Ion Polymer Battery - 3.7v 2500mAh)
- Three alkaline cells (such as AA batteries)
- Four nickel-metal hydride (NiMH) rechargeable cells
You must use a 3-5V DC power supply to power these strips, do not use higher than 6V or you can destroy the entire strip– yikes!
Example 1 AA or AAA = 1,5 V
When choosing any option for powering the ledstrips, always take into account that you have enough amperage provided for the strips. Checkout the Adafruit page for more details regarding power options.
Powering Arduino in different ways
If you want to use a powerbank in some cases depending on how much power the arduino needs from the bank it might turn off after 1 - a few minutes even though the powerbank is fully charged. It depends on the kind of powerbank. Some have a safety built in. But most of the time it is not mentioned in the description.
Try different types of powerbanks or use info from these links:
https://www.youtube.com/watch?v=I7MrL5Q7zvY
https://forum.arduino.cc/t/simplest-battery-power-to-arduino-nano-solution/530242
Im still experimenting with this myself once i find more info i add it to this book.
At the moment i have tried 2 powerbanks (5000 & 10000 mAh) for Arduino Nano with seperate power for my small Neopixel Jewel (7 leds). Both dont work. Using batterypack 4xAA atm.
Other related stuff to dive into
Remote control of Lights through TouchOSC
TouchOSC is a modular control surface toolkit for designing and constructing custom controllers that can be used on a multitude of operating systems and devices. An easy way of designing your own OSC controls. Use the old version of TouchOSC Editor or new version to design custom sliders, faders and buttons, control other software through OSC using the app TouchOSC
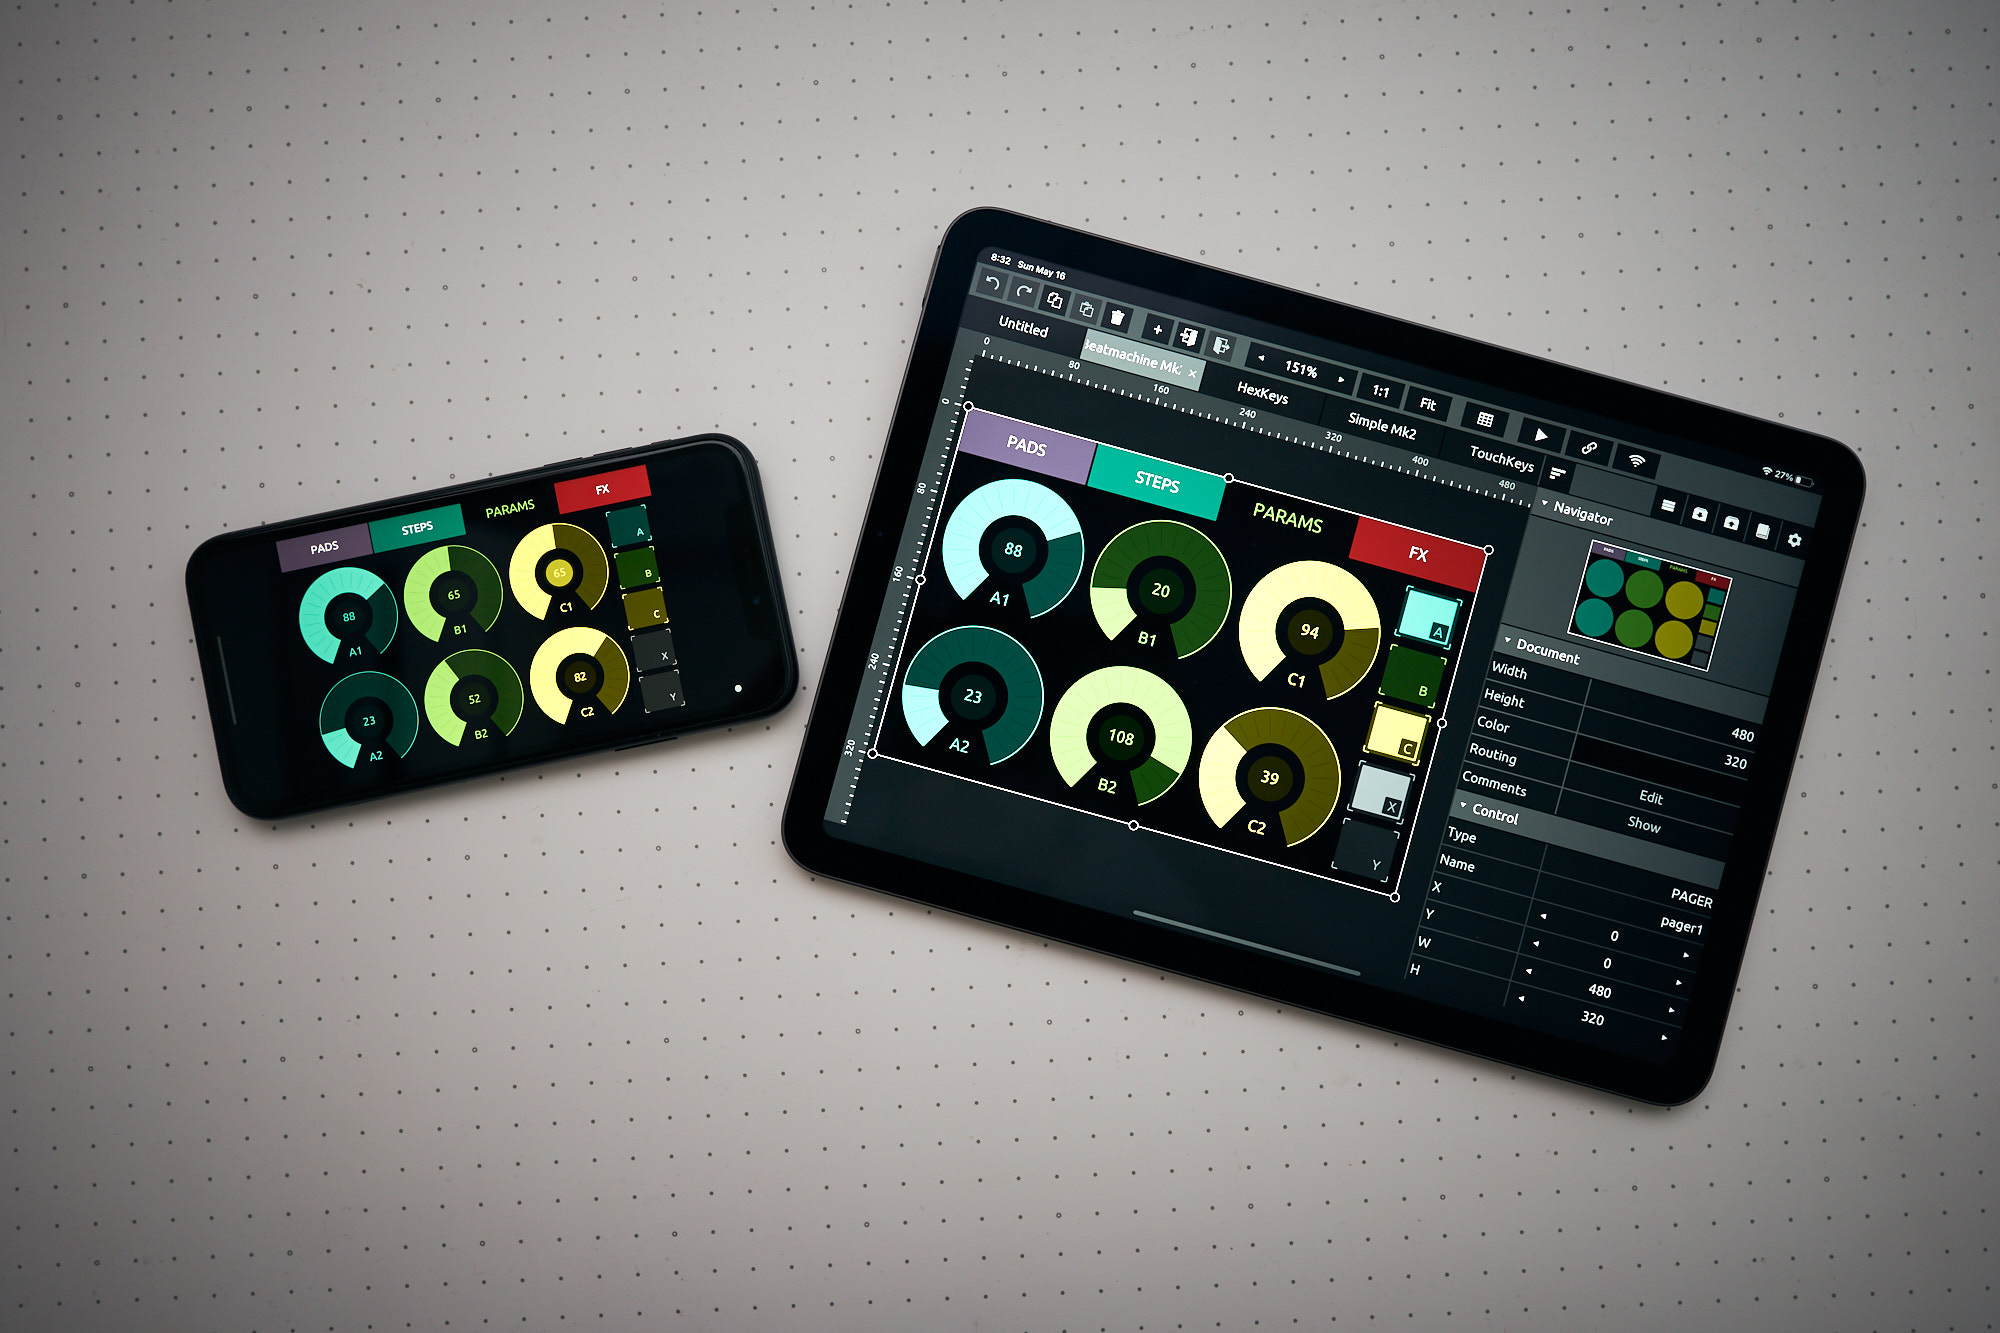
| Simple TouchOSC template to control 8 pars & 3 spots (5 channels). Open this patch in TouchOSC Editor to upload to your device. Any software that receives OSC massages can be connected. | Controlling LightPars&Spots.touchosc |
How to use the templates:
-
Download and install the TouchOSC App on your tablet or smartphone
-
Download and install the TouchOSC desktop editor on your computer
-
Start the desktop editor and load a template
- Check to make both devices on the same WiFi Network. Set the computer ipadres in the app.
-
In the App go to LAYOUT & tap ADD. Select your host (computer name running the desktop editor) Click on “sync” and the template will be sent to your tablet or smartphone.
-
The template will now appear on your tablet or smartphone list of templates
TouchOSC & Touchdesigner:
| Control the lights* remotely with Touchdesigner & TouchOSC on Ipad with these 2 patches & ArtNet. |
|
| Open this patch in TouchOSC Editor to upload to your device. | |
| Open this patch in Touchdesigner, check OSC port & ArtNet connection. | |
| After connecting, slide all the faders once to refresh the connection with Touchdesigner & remove errors. This connection also works when TD is running in perform mode in the background. * these patches were designed for the fixtures in the Blackbox @Janskerkhof (8 pars & 3 spots) but can easily be adapted. |
TouchOSC & QLC
| tbd add example patch |
Visualizing shows
Combining Software
Sending DMX data from Touchdesigner over Artnet to Resolume.
Sending OSC data from Isadora to QLC
Connecting EMU & Abelton
MagicQ : lighting software mimicking a light console
MagicQ software offers powerful lighting control with loads of features that lighting designers have come to rely on, such as full lighting visualisation, pixel mapping, and HD media playback on up to 8 different layers, all integrated smoothly to streamline workflows, save time, and shorten learning curves on even the most complex lighting systems.
- MagicVis Visualiser
- Magic HD Pixel-Mapper
- Morphing
- Cloning
- Patch Offsetting
- Group and Palette FX
Chamsys MagicQ supports an extensive array of features to enable lighting designers to quickly and easily realise their innovative and imaginative designs. MagicQ offers lighting control on up to 256 universes with full lighting visualisation, pixel mapping, and HD media playback on up to 8 different layers, all integrated smoothly to streamline workflows, save time, and shorten learning curves on even the most complex lighting systems.
MagicQ PC is available free of charge for use on Windows, Mac and Linux with 64 universes of output fully enabled (via Art-net, sACN, Pathport) - no hardware required!
Magic Q software to download MagicQ
https://chamsyslighting.com/pages/video-tutorials to learn MagicQ
Pixel mapping
(under construction)
Pixel mapping is the use of software to map video imagery to an array of individual lighting fixtures.
the setup is:
1. in: A source of video.
2. in between: The software to map the video to the fixtures. (Resolume, Touchdesigner a.o.)
3. out: An array of RGB LED fixtures.
Exploring further, think of the software as a piece of paper that you have cut a geometric series of small holes in. When you hold that paper up to your computer screen, you only see what is let through by the holes. If you send what you see in each hole to a dedicated fixture, or pixel, you have pixel mapping.
Pixel Mapping is often used to create dynamic and creative lighting effects. You can programme intricate patterns, colour changes, and animations that respond in real-time to the mood or theme of the performance.
This short tutorial looks at the concept of pixel mapping as part of lighting and visuals for live performance such as concerts, clubs and theatre. Pixel mapping is the application of still or moving images to a lighting system, often an array of RGB LEDs and shouldn't be confused with projection mapping. The tutorial doesn't explain HOW to set up pixel mapping as part of a lighting control system but uses the example of the ChamSys MagicQ to explain the fundamental principle.
Creating a QLC+ file from scratch, and controlling lights with your own laptop
Introduction
This is a guide on how to control lights on the go, using your own laptop, outside of the blackbox, with QLC+
In this guide, we will use a device called a DMX interface to communicate with an LED light and/or dimmerpak, using the free software called QLC+. We will need to download a driver for the DMX interface, and install a fixture profile for the light you wish to use. We'll learn what channel modes and DMX addresses are, and we'll also cover some safety measures for halogens, and how to daisy chain your lights. I will guide you through these simple steps.
1. Materials needed
We will need a couple of ingredients for this to work. You should be able to find all of these in one of HKU’s uitleens. You'll need a:
- Working laptop or computer
- If you’re on Mac, a usb-c dongle to connect the USB device
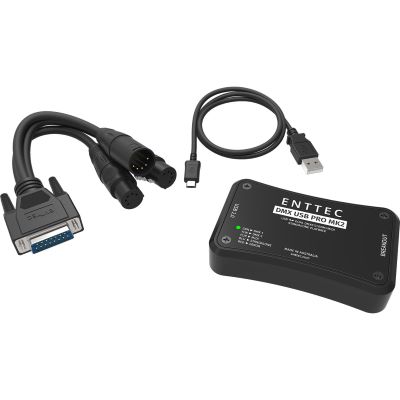
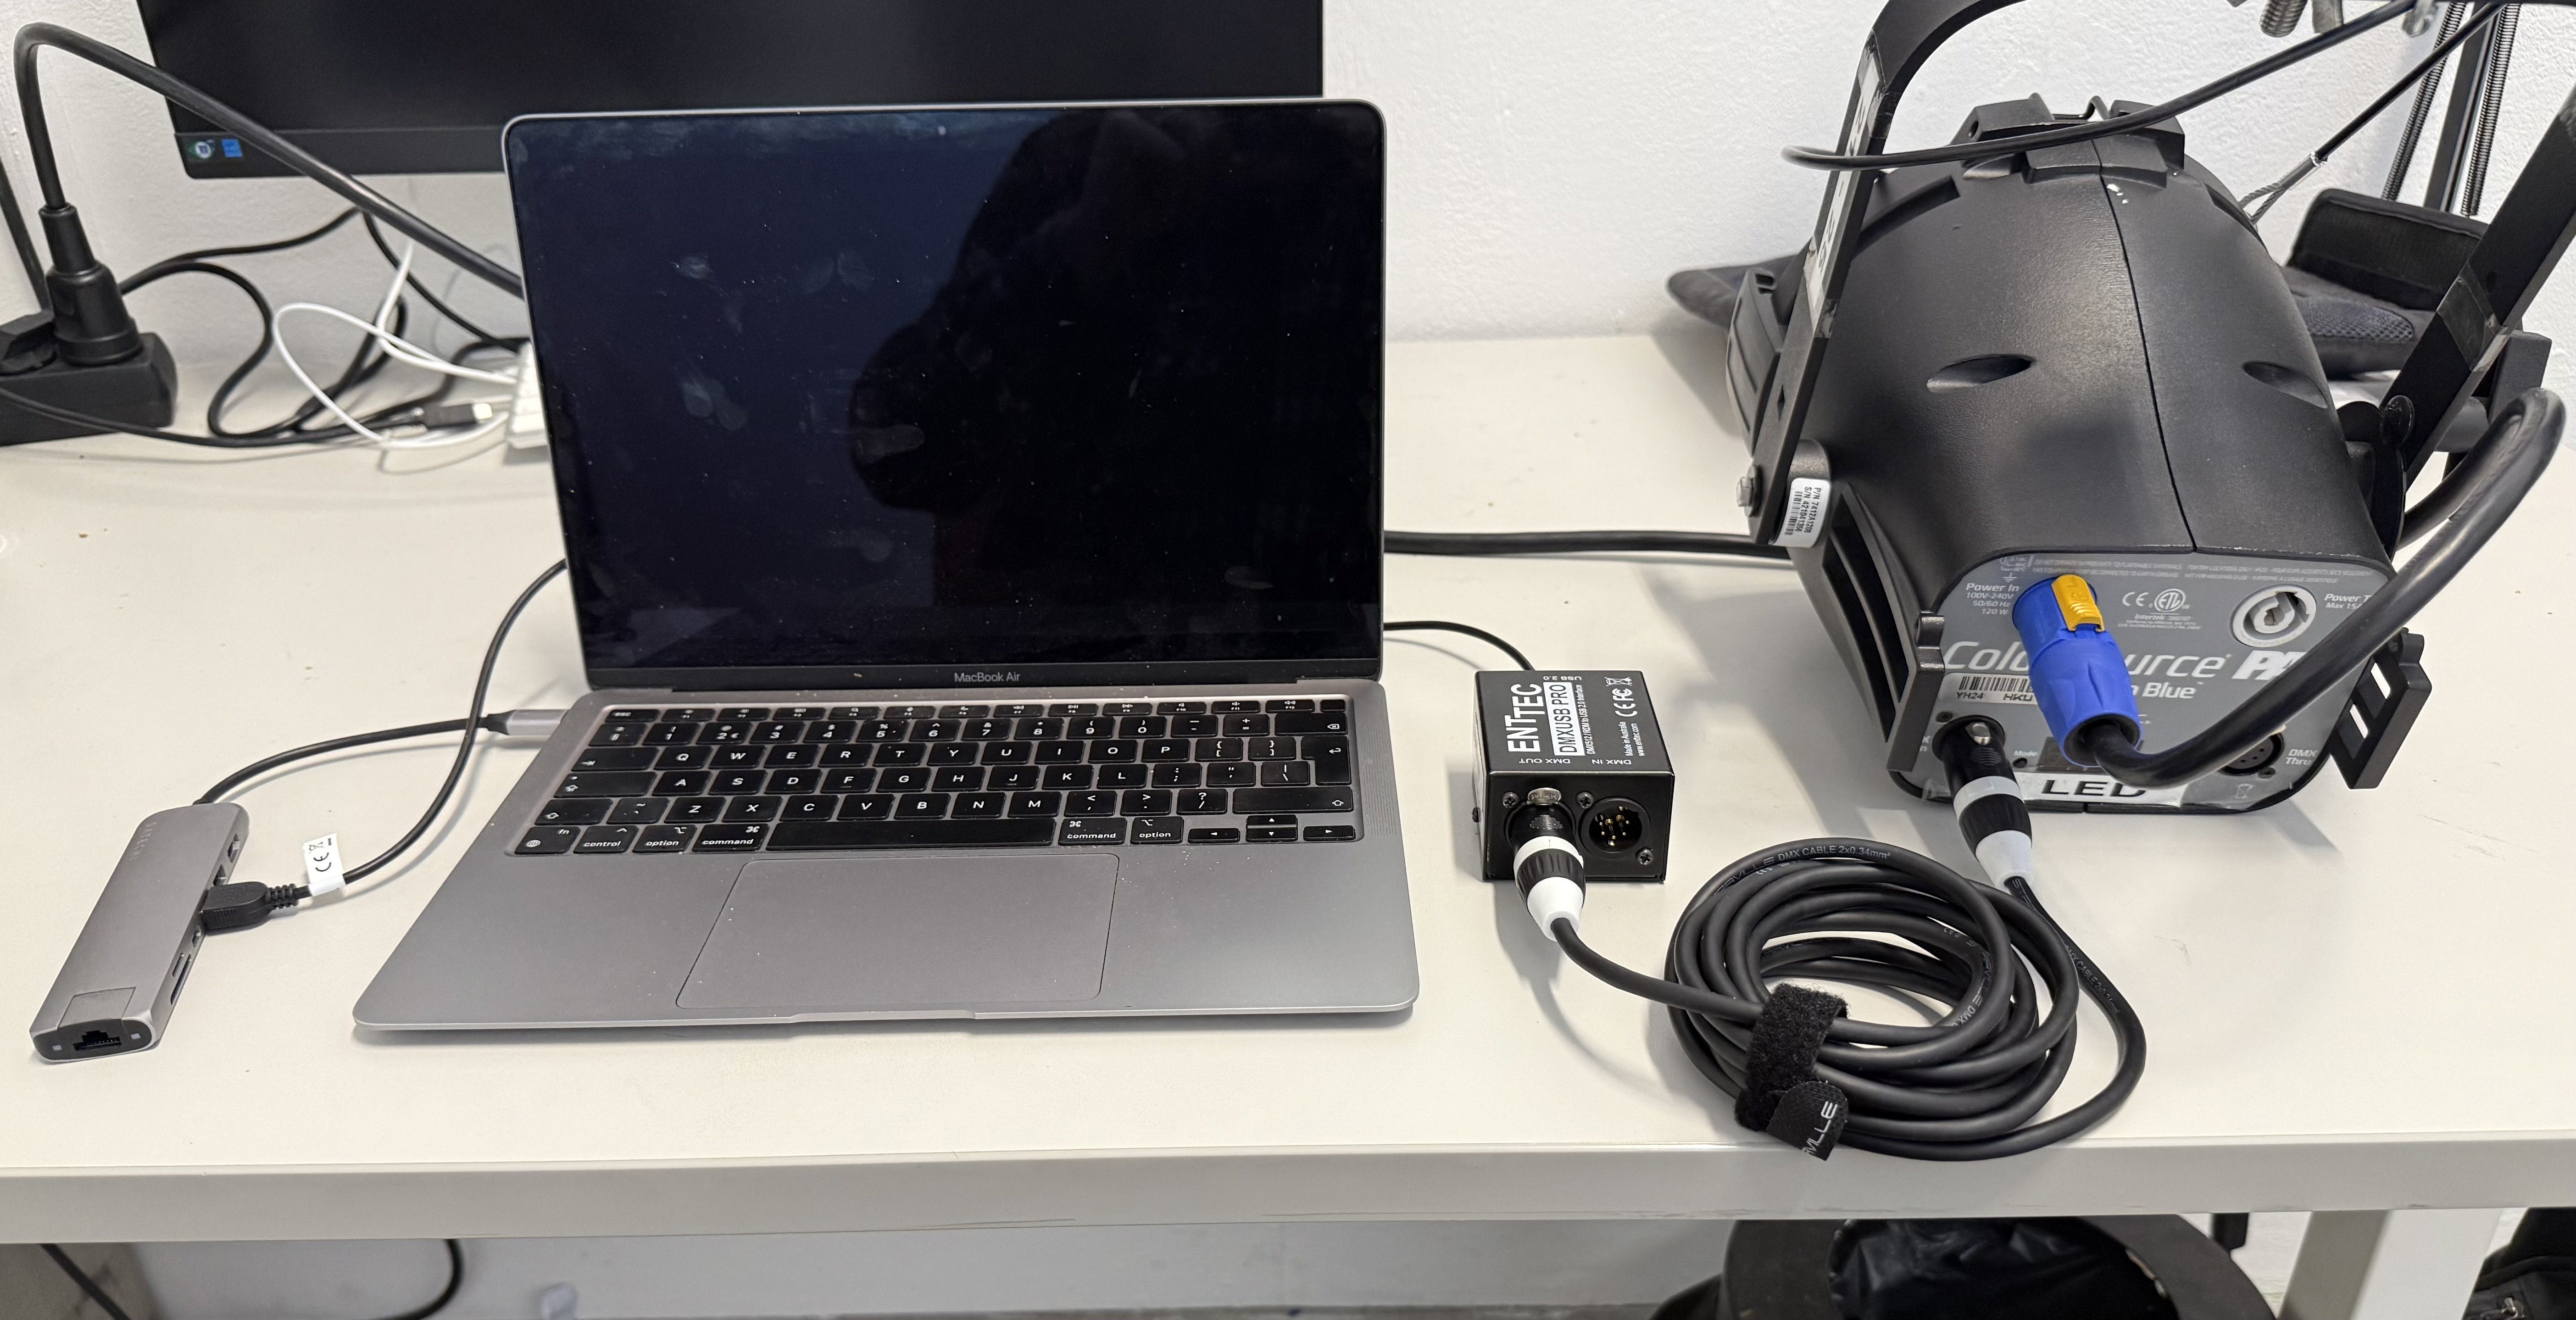
- DMX interface (ENTTEC USB Pro MK1 or 2)
- 5-pin DMX cable
- LED light with DMX input (or a dimmerpack with DMX input + a halogen light)
- Idealy, a lighting stand (tripod) to put your lights on
Controlling LED lights:
2. DMX interface & driver
Before connecting the DMX interface, we need to install the driver for it. The company that makes the interface is called ENTTEC, and they also make their own light control software. We need to install this software so our computer can communicate with the interface. The software is called EMU, you can download it here.
You need to make an account to download the file (any email will work, no verification needed). If you a re opposed to this, a blackbox employee can give you the file if you want.
After installing the driver, we can now start connecting our devices. The DMX interface we connect with a USB cable to our computer, and using a DMX cable we connect the DMX interface to our light. Pay extra attention that you connect the cable to the 'DMX OUT' of the interface to the 'DMX IN' of the light. See pictures below.
Laptop -> (USB-C dongle ->) DMX interface -> LED light
3. DMX interface in QLC+
The software we use to control lights in the blackbox is QLC+ (among other softwares, for different use cases).
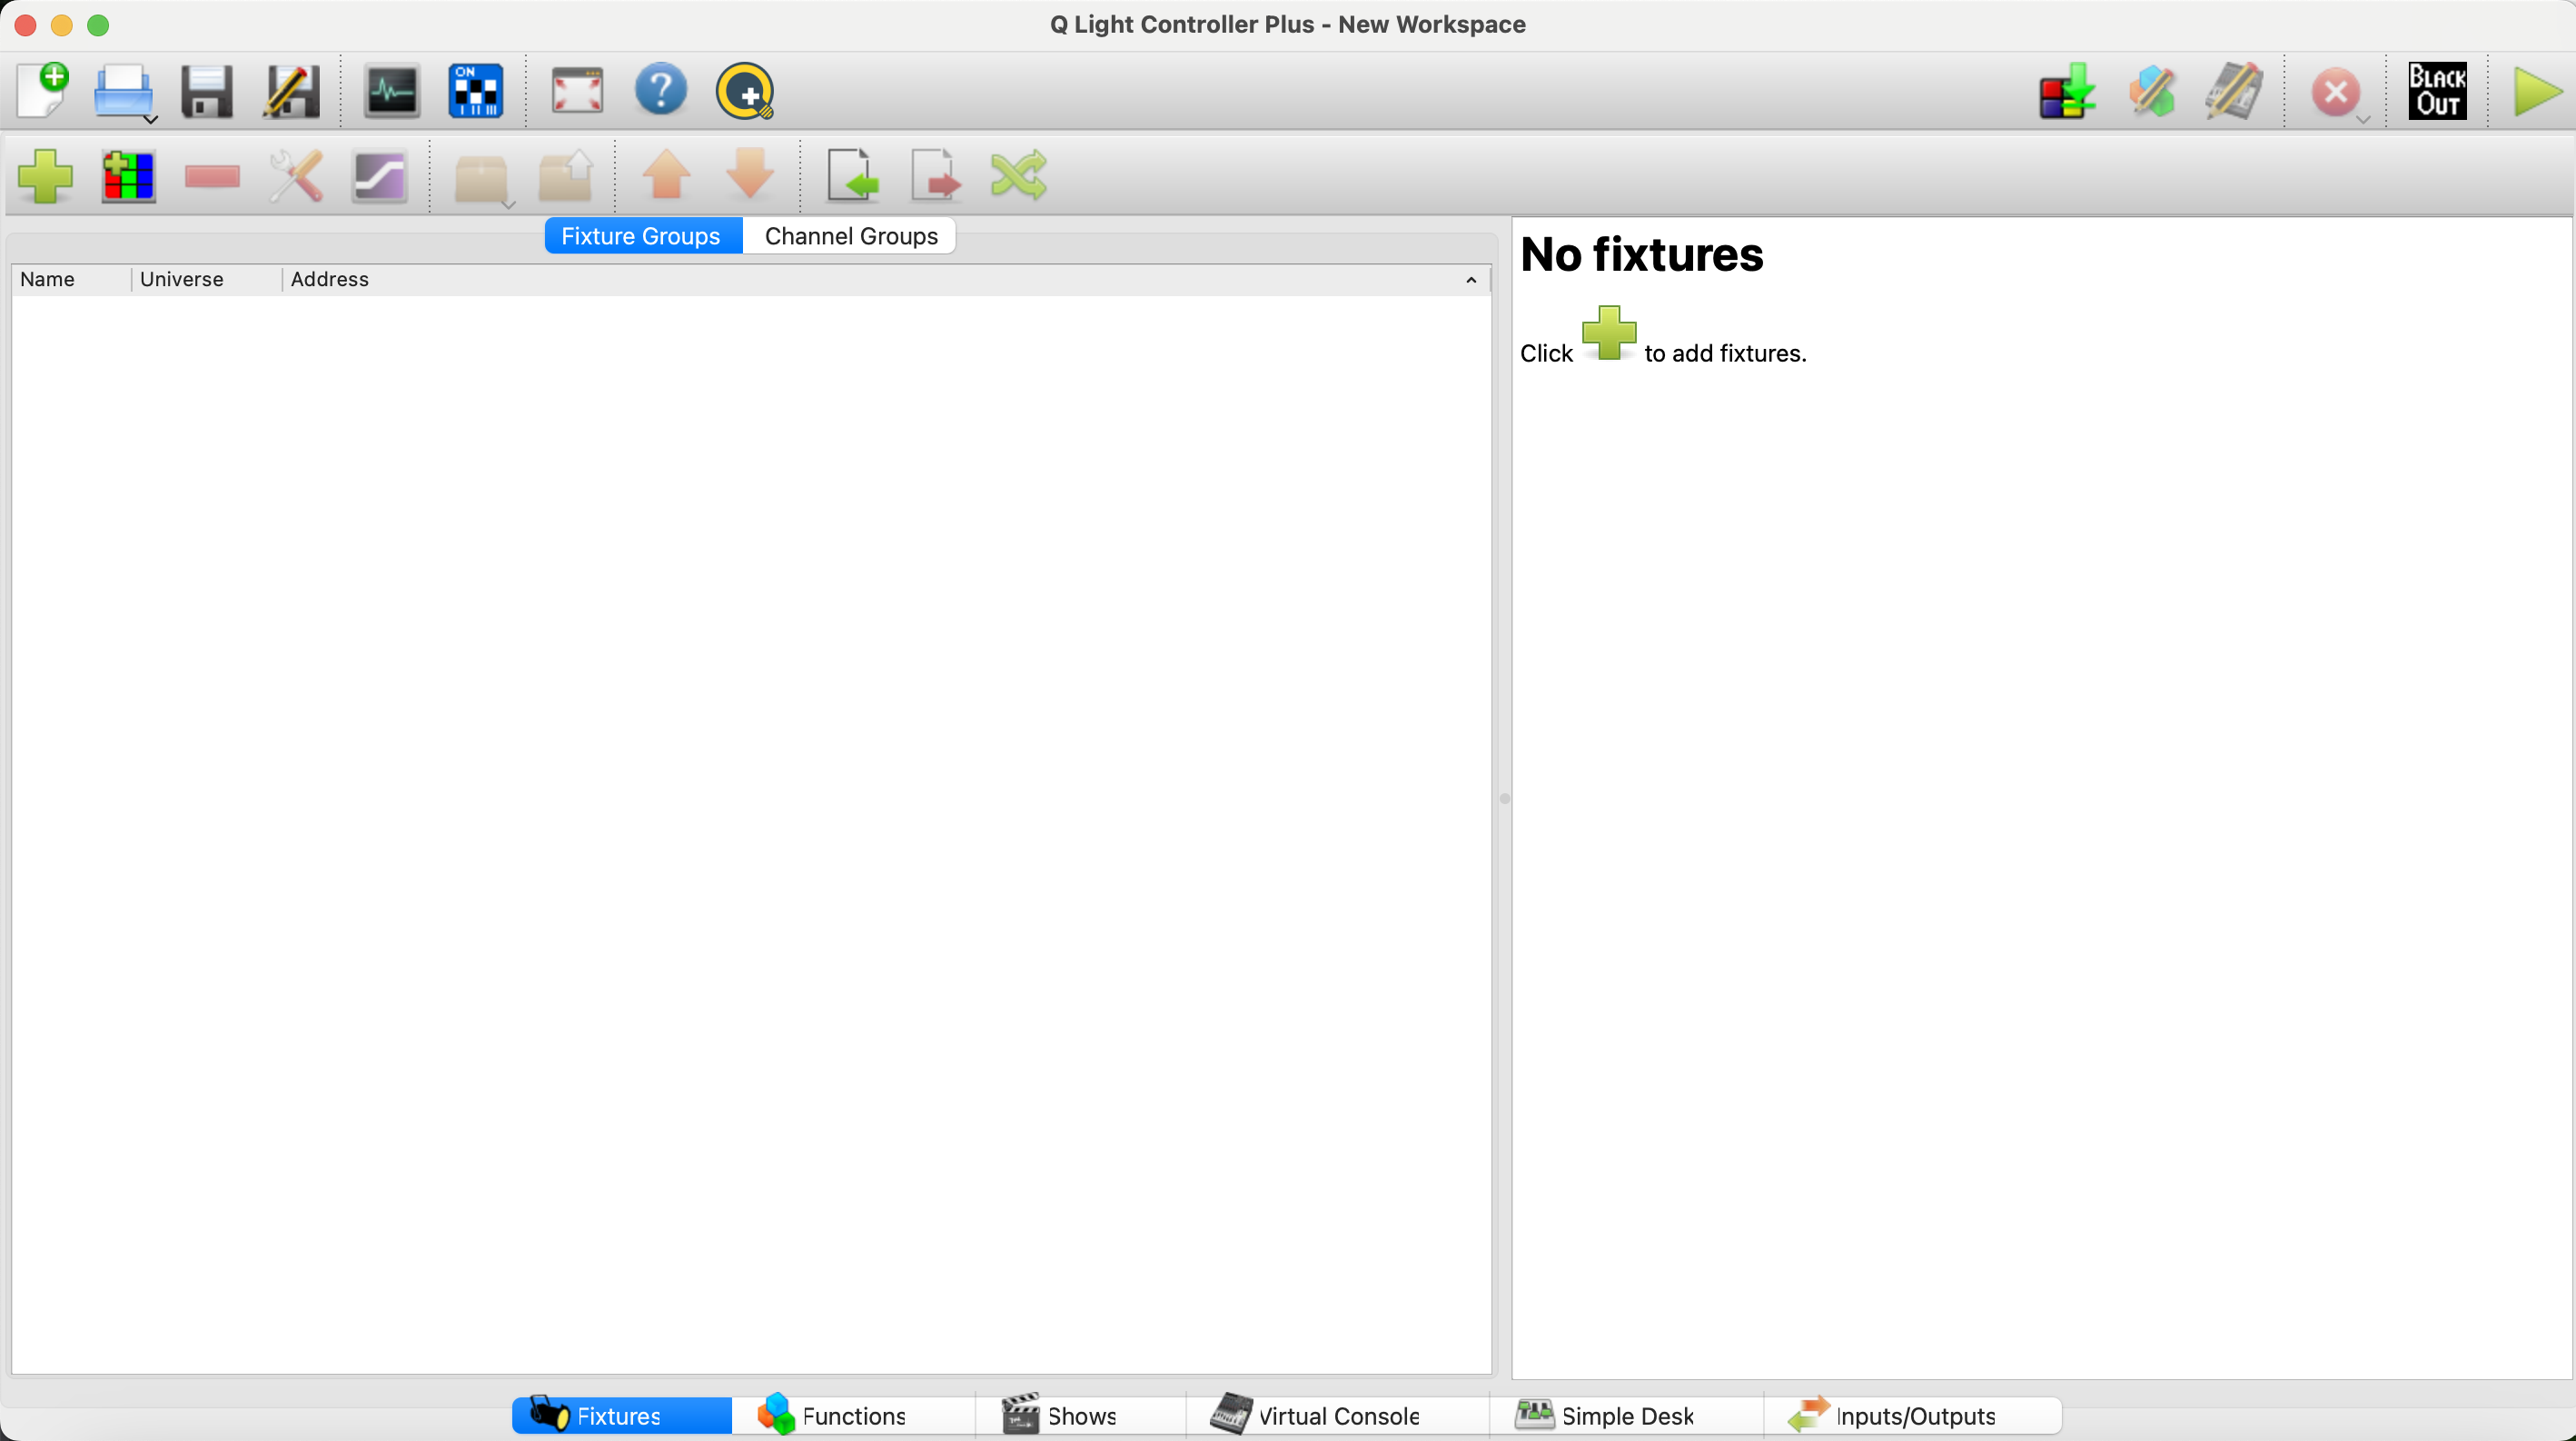
IMPORTANT: For this tutorial we're working with QLC+ 4, not 5! Make sure to download the right one. You can download QLC+ here. When you open QLC, this window will pop up:
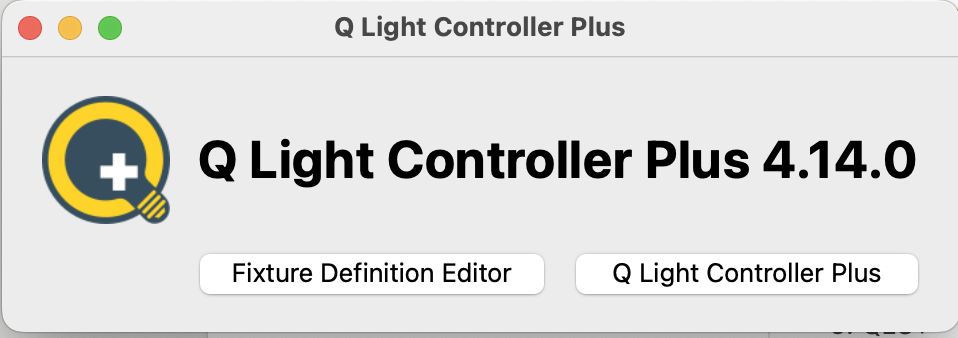
Click on Q Light Controller Plus. An empty QLC file will pop up.

In the bottom we see a bar with several options, including fixtures, functions, shows, etc. The first step is to check if QLC is recognising our DMX interface. To do this, in the bottom bar, navigate to the inputs/outputs tab.
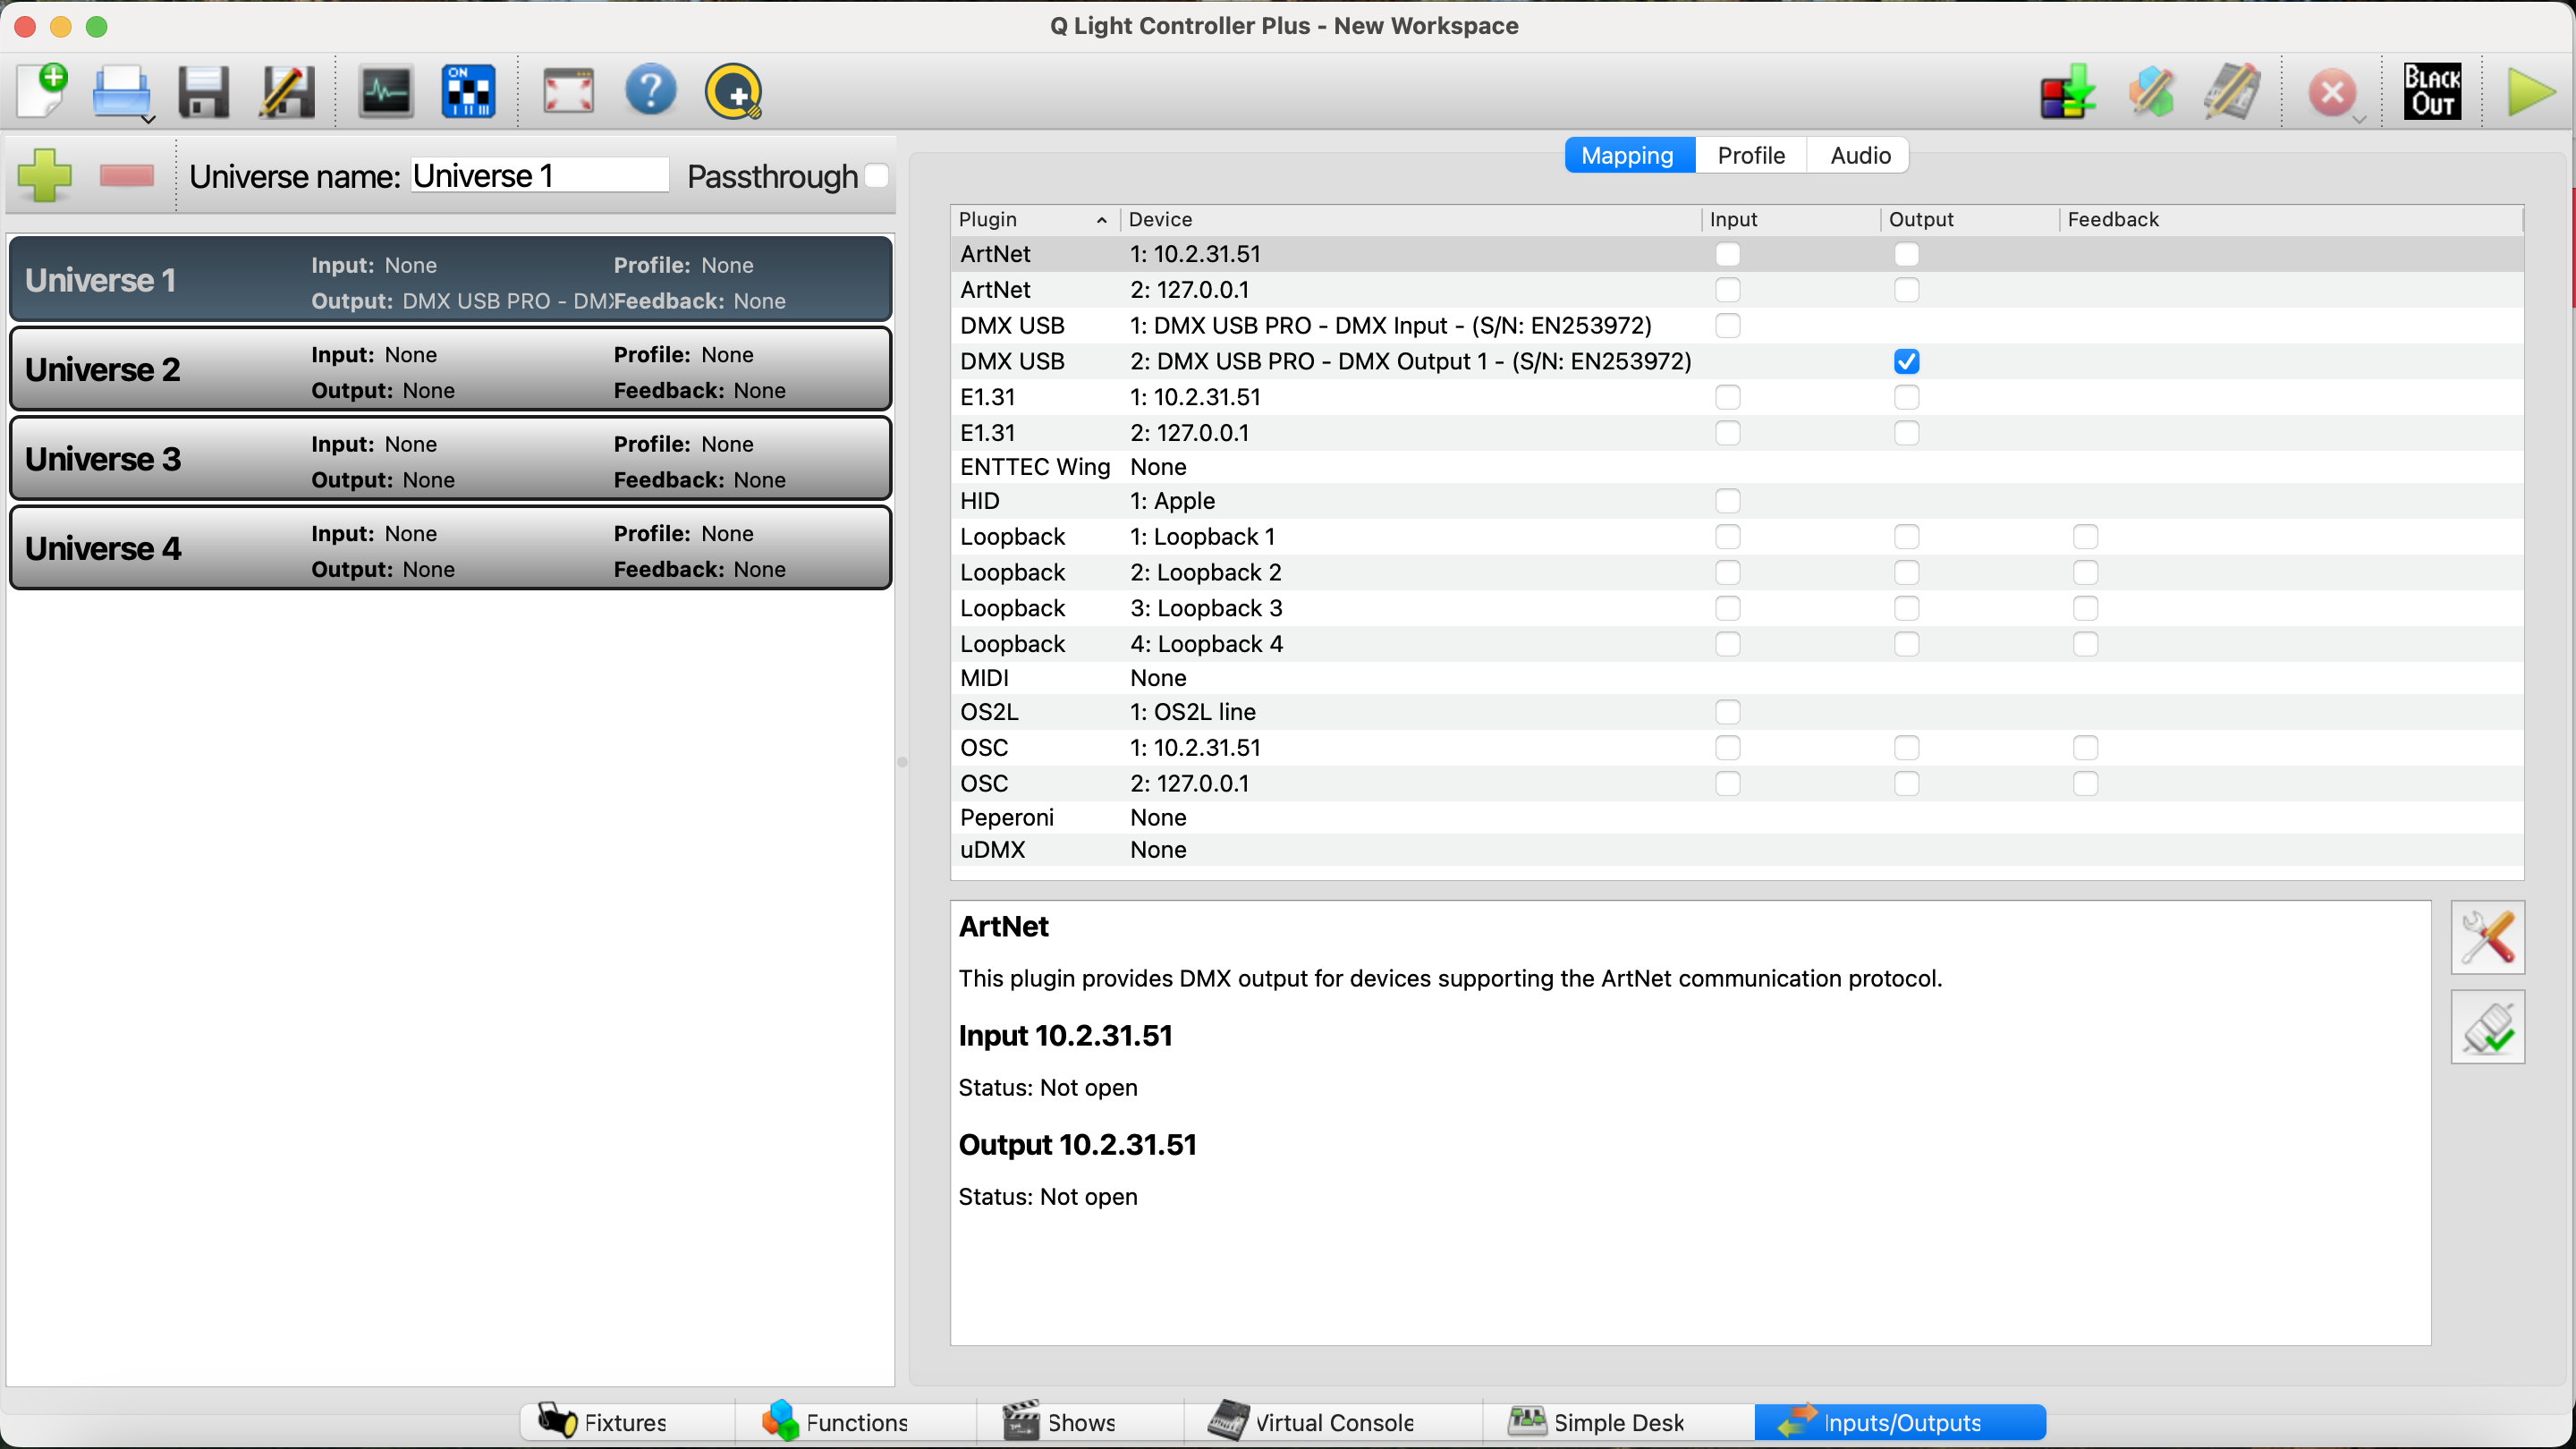
Here we should see our DMX USB Pro interface. If it's not yet visible for you and the output box is not checked like in the picture above, make sure your DMX interface is connected. If it is, and it's not showing up, in the list under 'plugin', click DMX USB in the list and then press this icon:
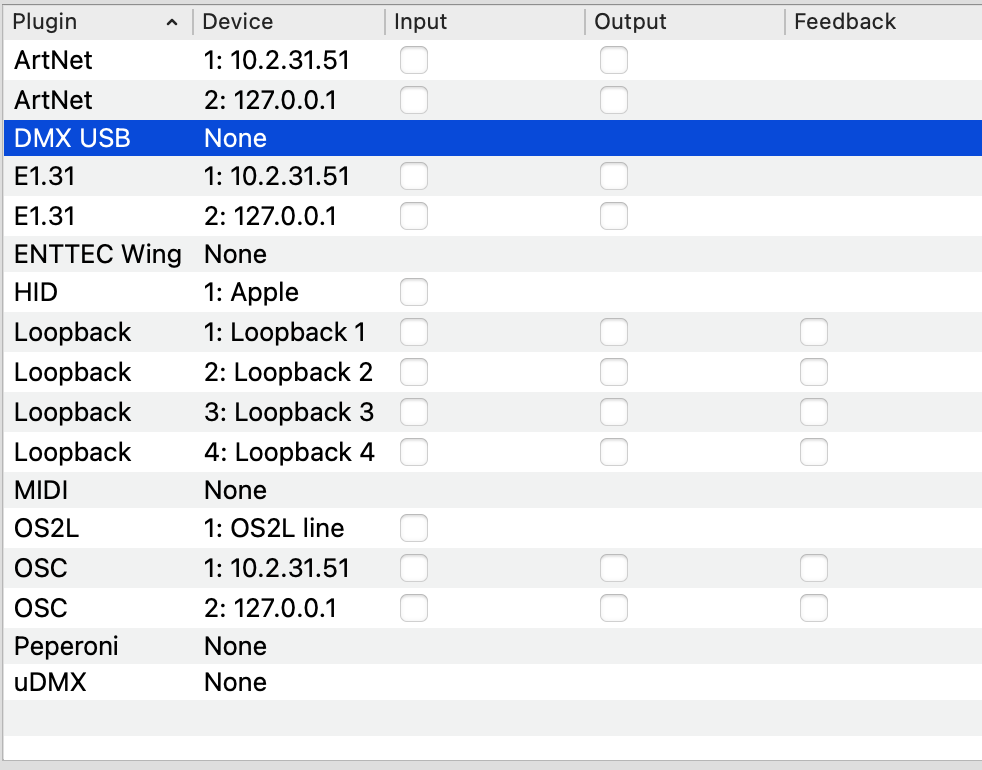

The list should now refresh and the DMX interface should become visible and connected.
After you've confirmed this, navigate back to the 'Fixtures' tab.
4. Configuring our LED light
Before we can communicate with our light, we need to understand how our light is configured. The settings we enter in our light need to correspond with how we set our light in QLC. For this there are two terms to understand. Channel Mode, and DMX Address. We'll start with Channel Mode.
Channel Mode
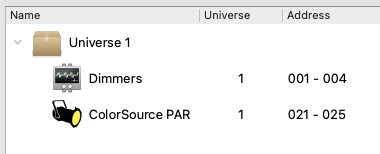
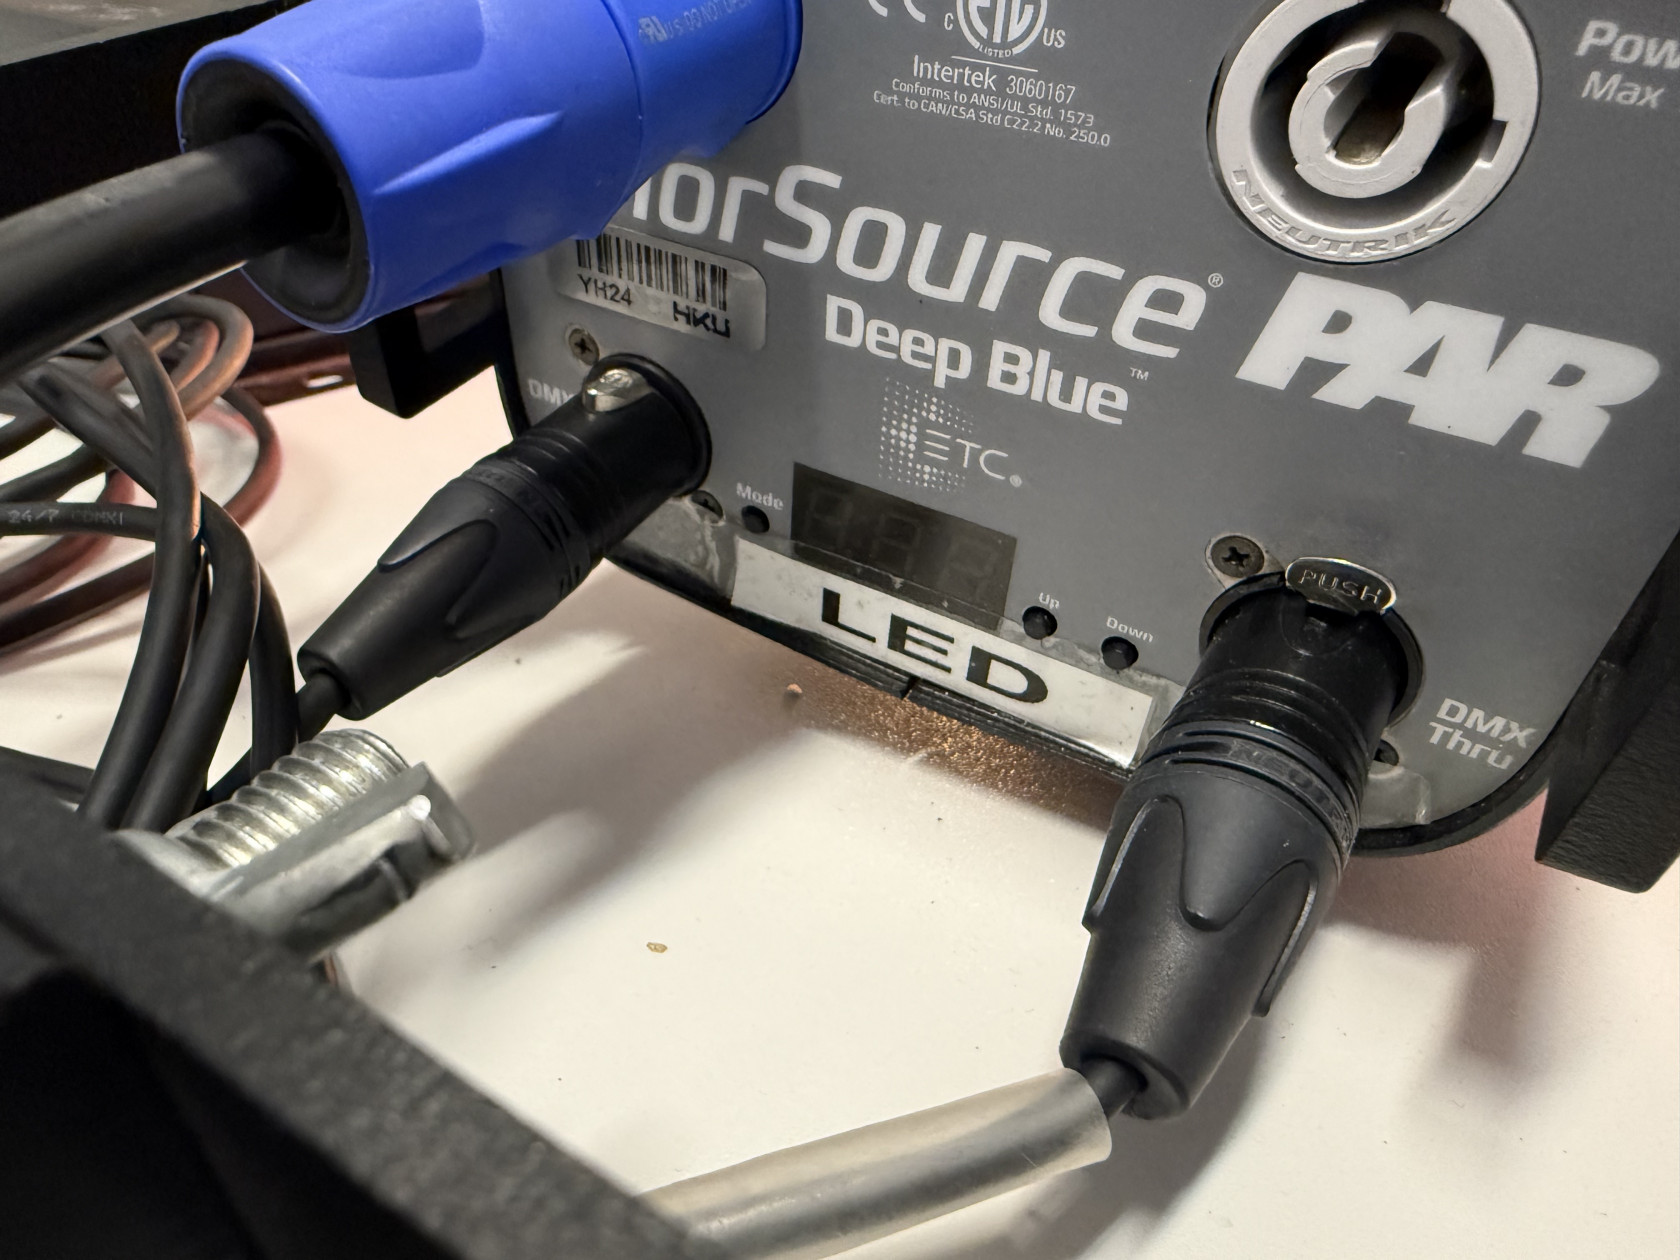
To understand what a light's channel mode is, it's a good idea to look up your light in the Open Fixture Library. Once in the library, look up your light, which in my case is a ColorSource PAR Deep Blue by ETC.
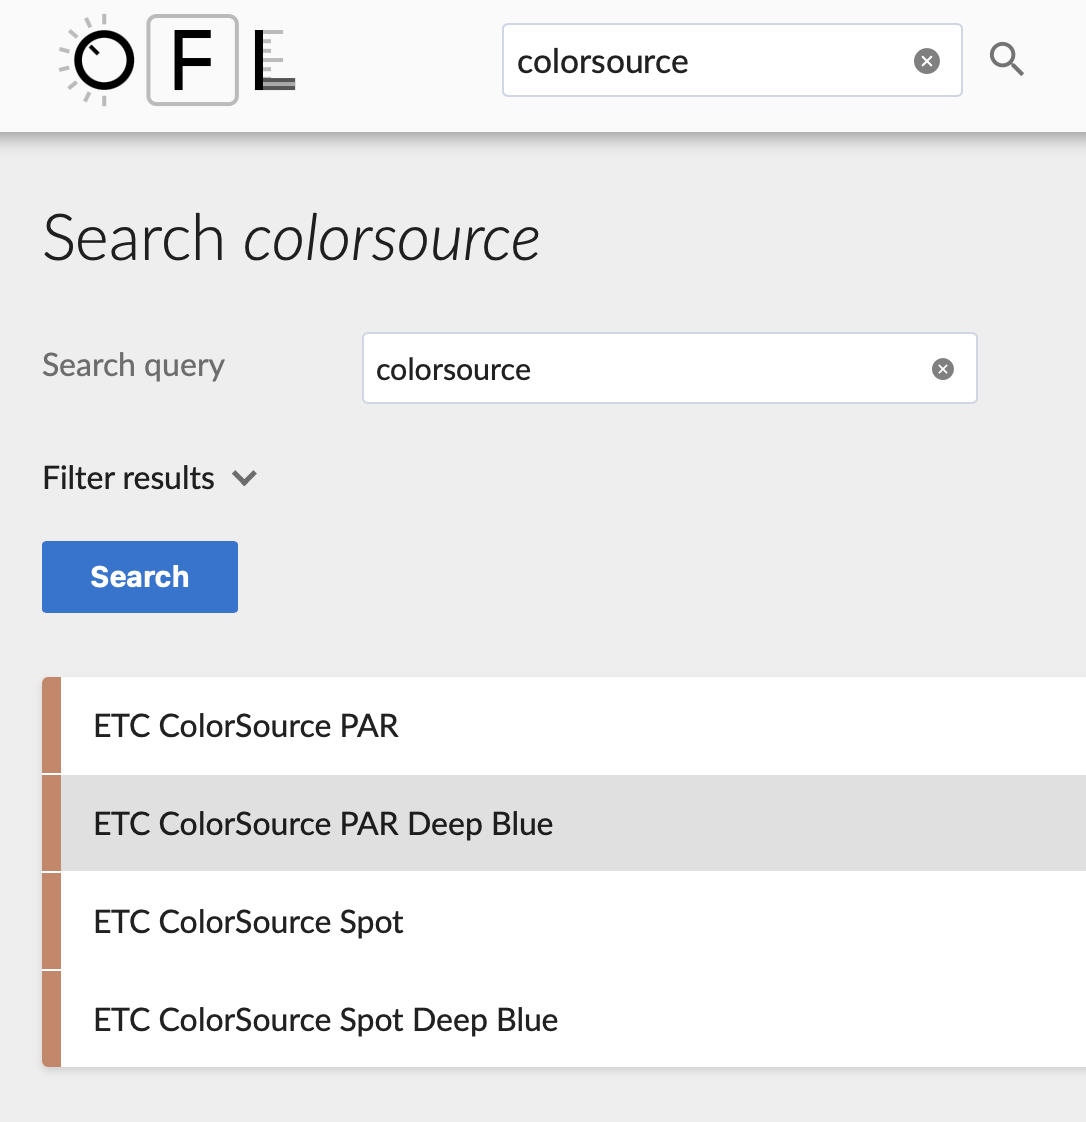
This page gives an overview of the different channel modes your light can be programmed in. Each channel mode gives us access to a different set of parameters to edit, like intensity, red, green, blue, or strobe. Use the small buttons on your light to figure out which channel mode your light is set to (you might have to keep the 'mode' button pressed for a couple of seconds to acces this menu, depending on the light you're using).

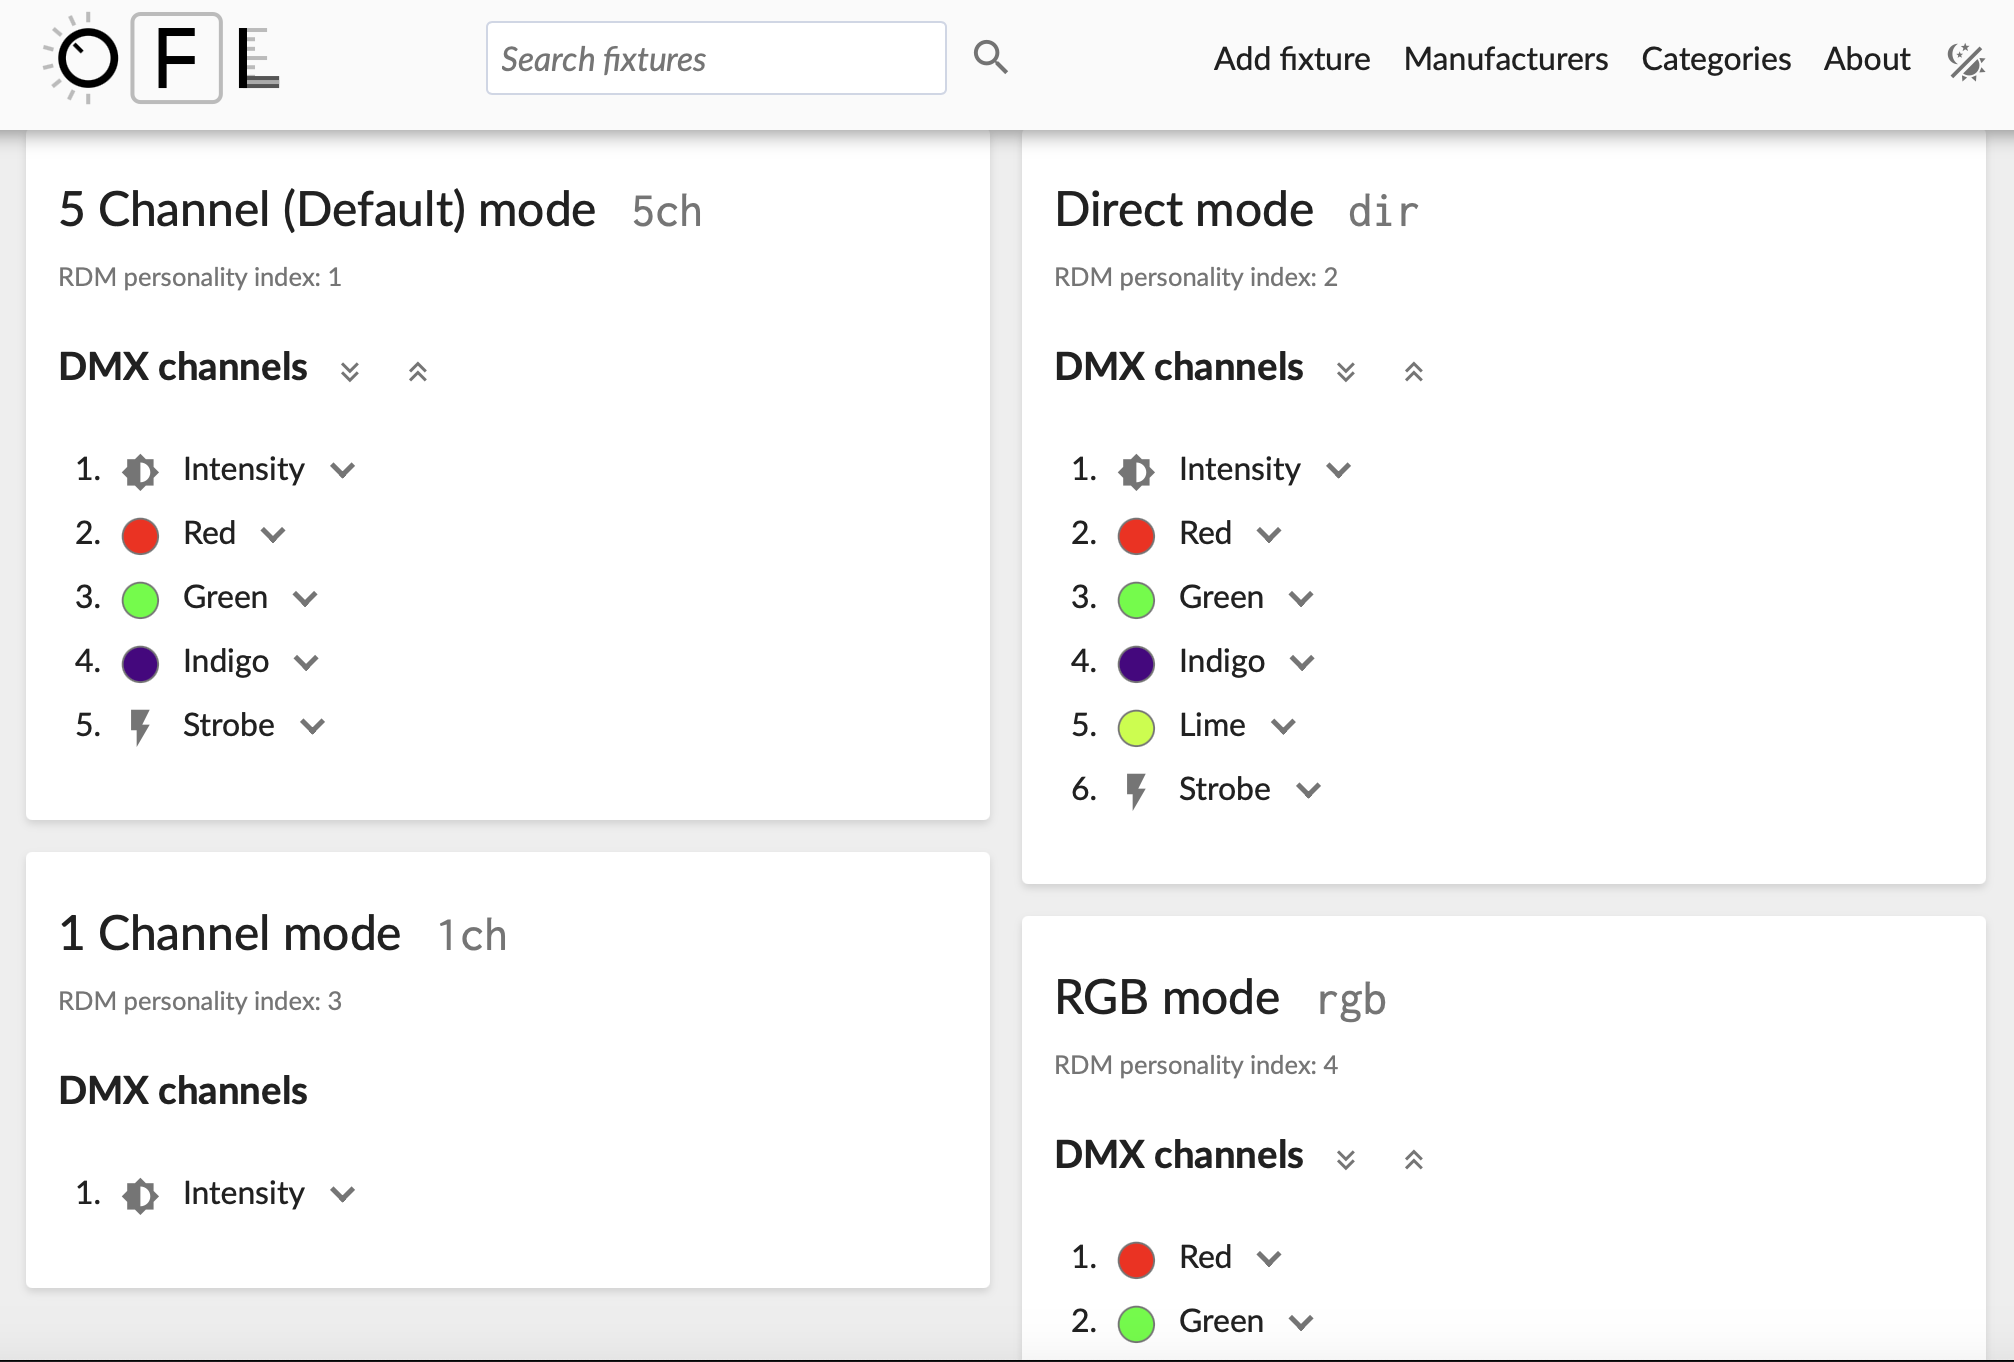
My light is telling me that it's set to '5ch' mode. Looking back at the Open Fixture Library, I can see that the 5 Channel mode gives me access to:
- Intensity
- Red
- Green
- Indigo (Blue)
- Strobe
This channel mode is fine for now, as it gives me access to a lot of different parameters. It's import to note the order that the parameters are listed in. This has to do with the DMX Address of the light.
DMX Address
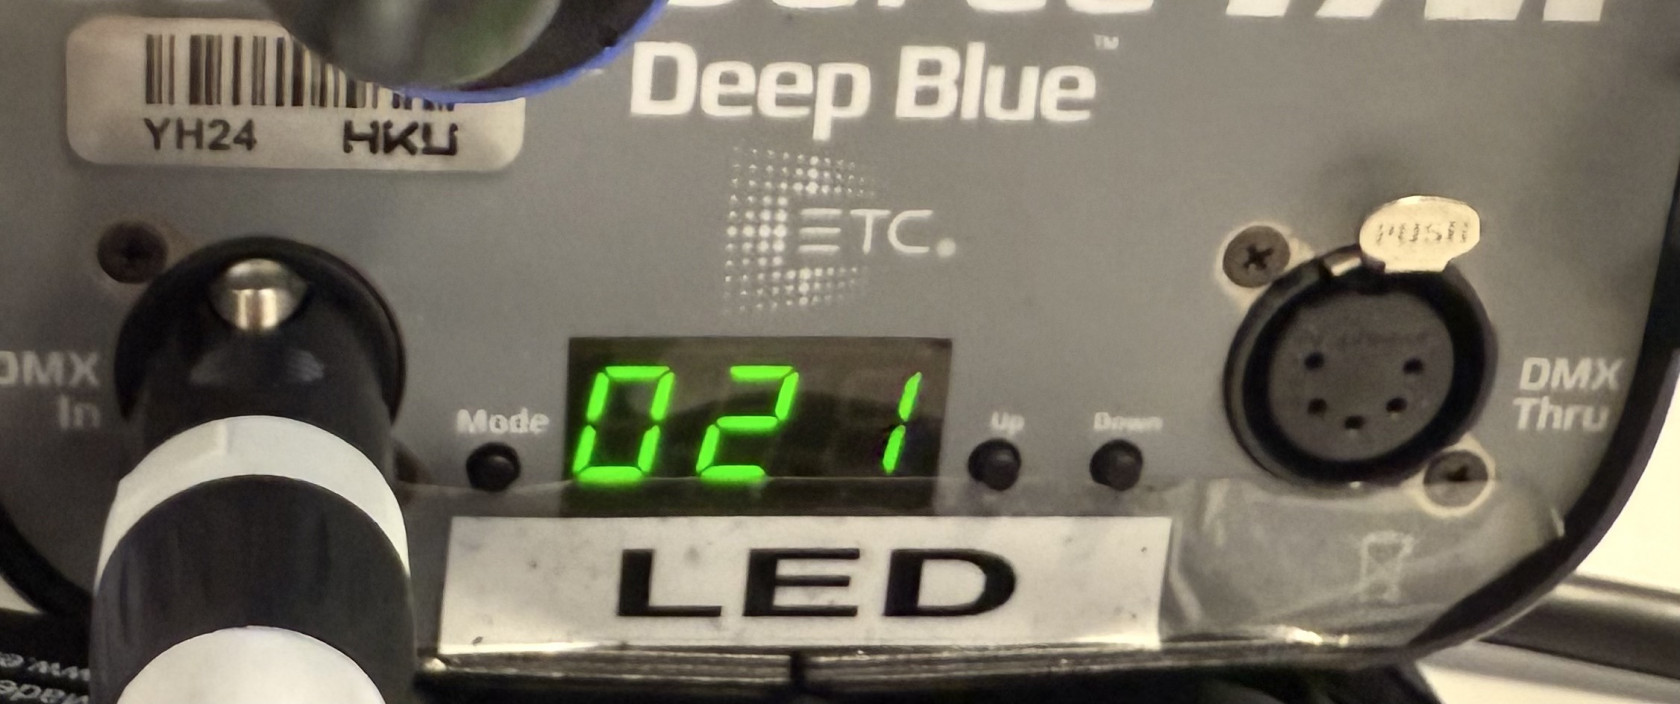
Each light can be assigned its own DMX address. Think of the DMX address as the lights house number. We can send a letter to this address, and the letter wil contain a command to turn on for example. My light is set to number 21, which can be found on the lights display (make sure the light is set to DMX mode which displays a number, like in the image below, not the standalone mode which displays something like P:01 or similar)
By knowing the lights address, we can send a command to this address. This command is a value, usually ranging from 0 to 255. If we send '0' to address number 21, we are sending a value of zero to the first parameter, which in case of the 5 Channel mode, is 'Intensity'. By sending it a value of 0, it means the light is turned all the way off. By sending it a value of 255, the light is turned all the way on. How to send values to different channels in QLC+, we'll get to in a bit. First, we need to input the light's parameters into QLC+, by creating a fixture profile.
5. Adding a fixture to QLC+
Going back to QLC+, look in the bottom bar where we also found inputs/outputs, but this time click on the 'Fixtures' tab.
Press the green + button. This will open up the Add Fixture menu:
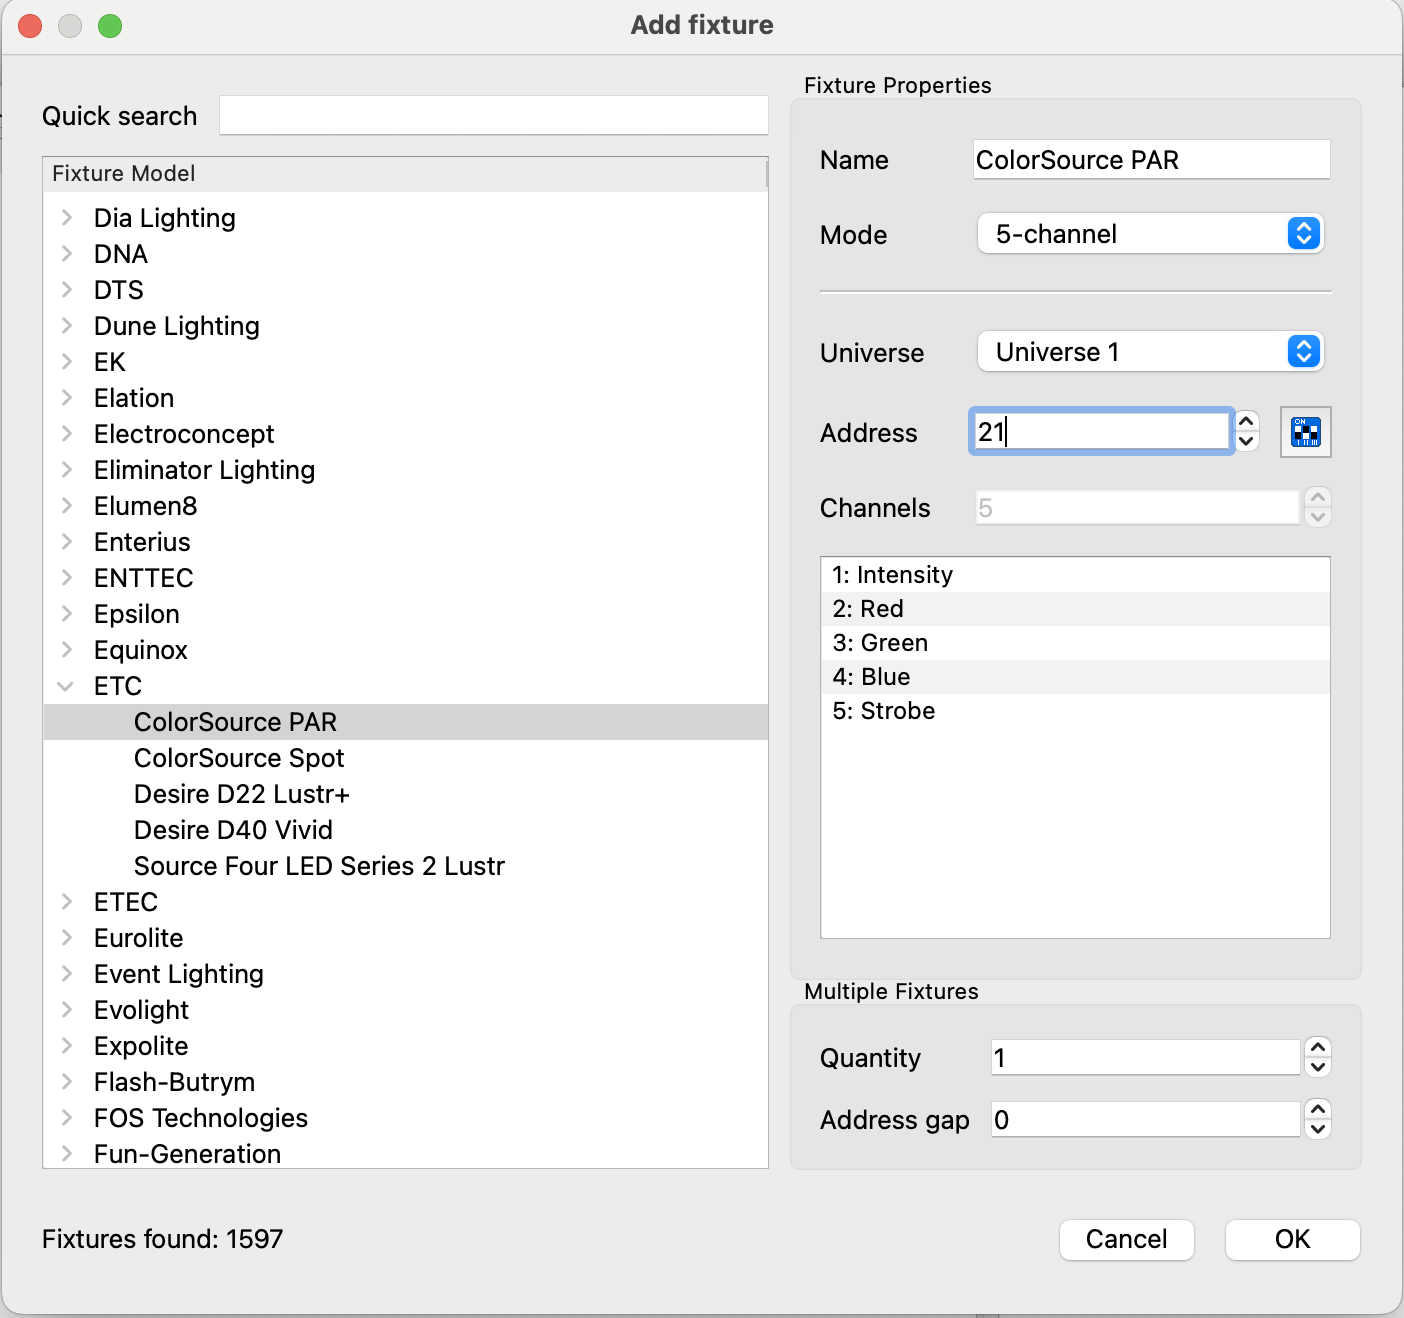
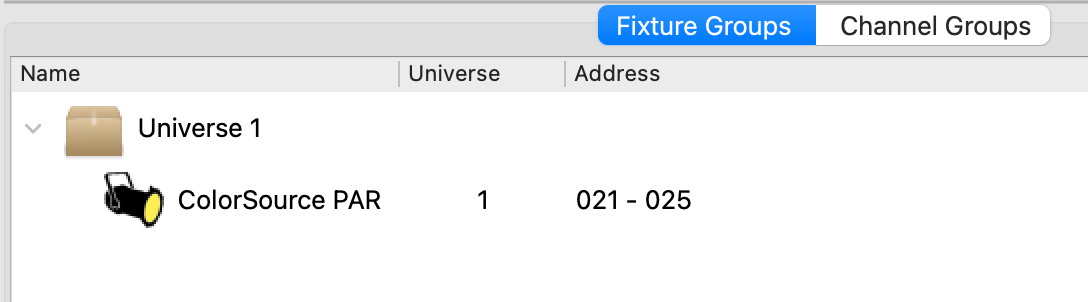
On the right side of this menu, we now see the tab 'Fixture Properties'. It's important that the settings that we input here, correspond to the settings that were input into the light. So, my light was set to 5 Channel mode, and its DMX address was 21. Make sure these settings correspond, otherwise we end up sending values to the wrong addresses (making your light blue instead of red for example, or your light not turning on at all). Press OK, and then we should see our light in our list of fixtures.
6. Controlling lights!
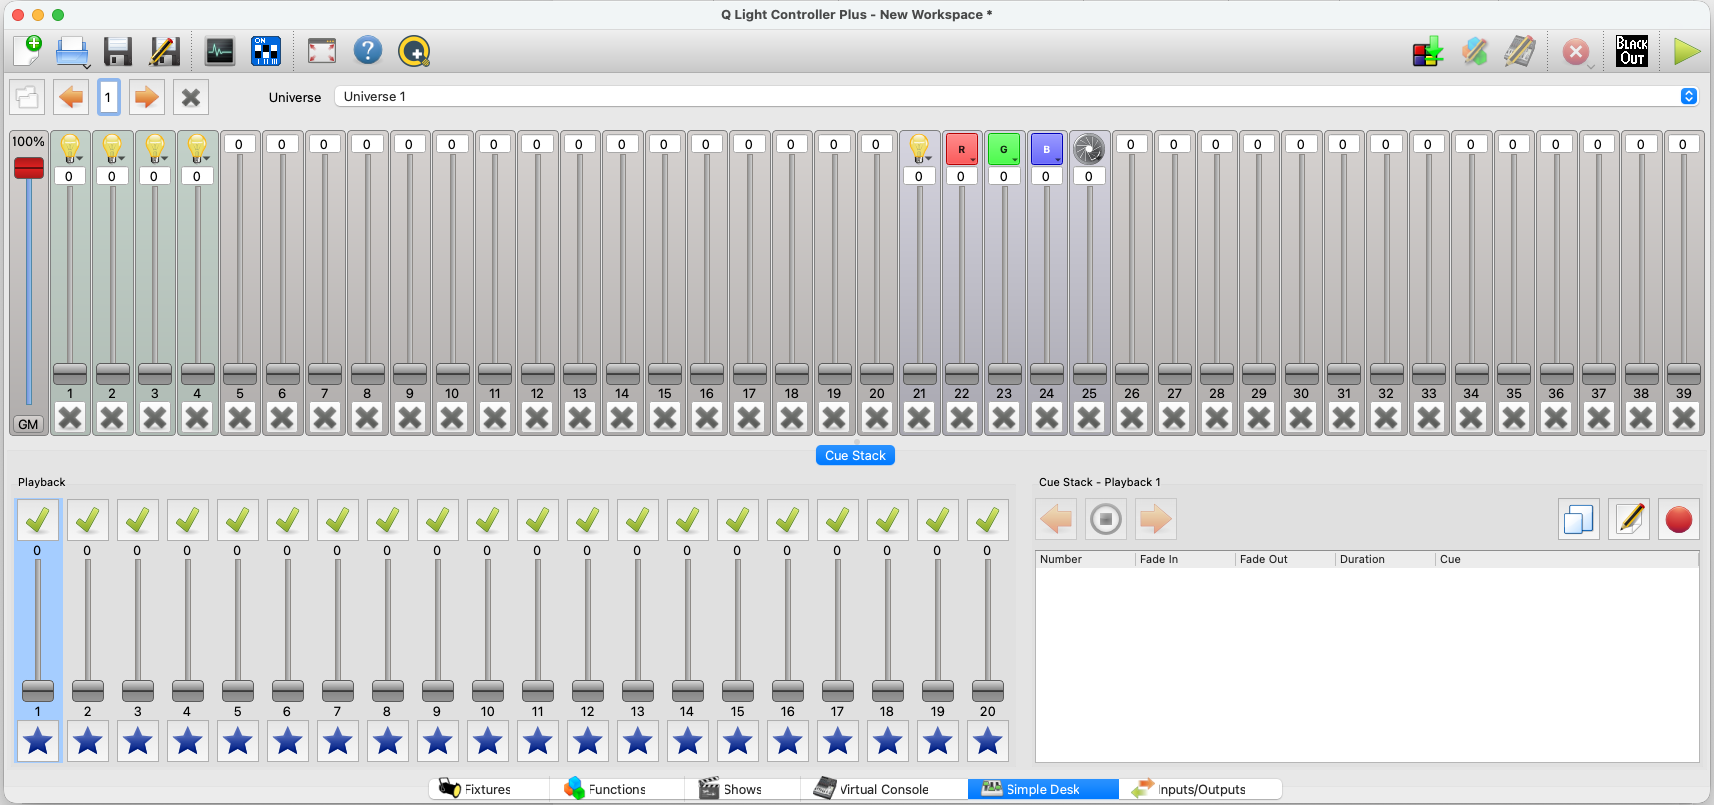
Now finally onto actually controlling lights. To see if we if we set up everything correctly, in the bottom bar, navigate to the 'Simple Desk'.
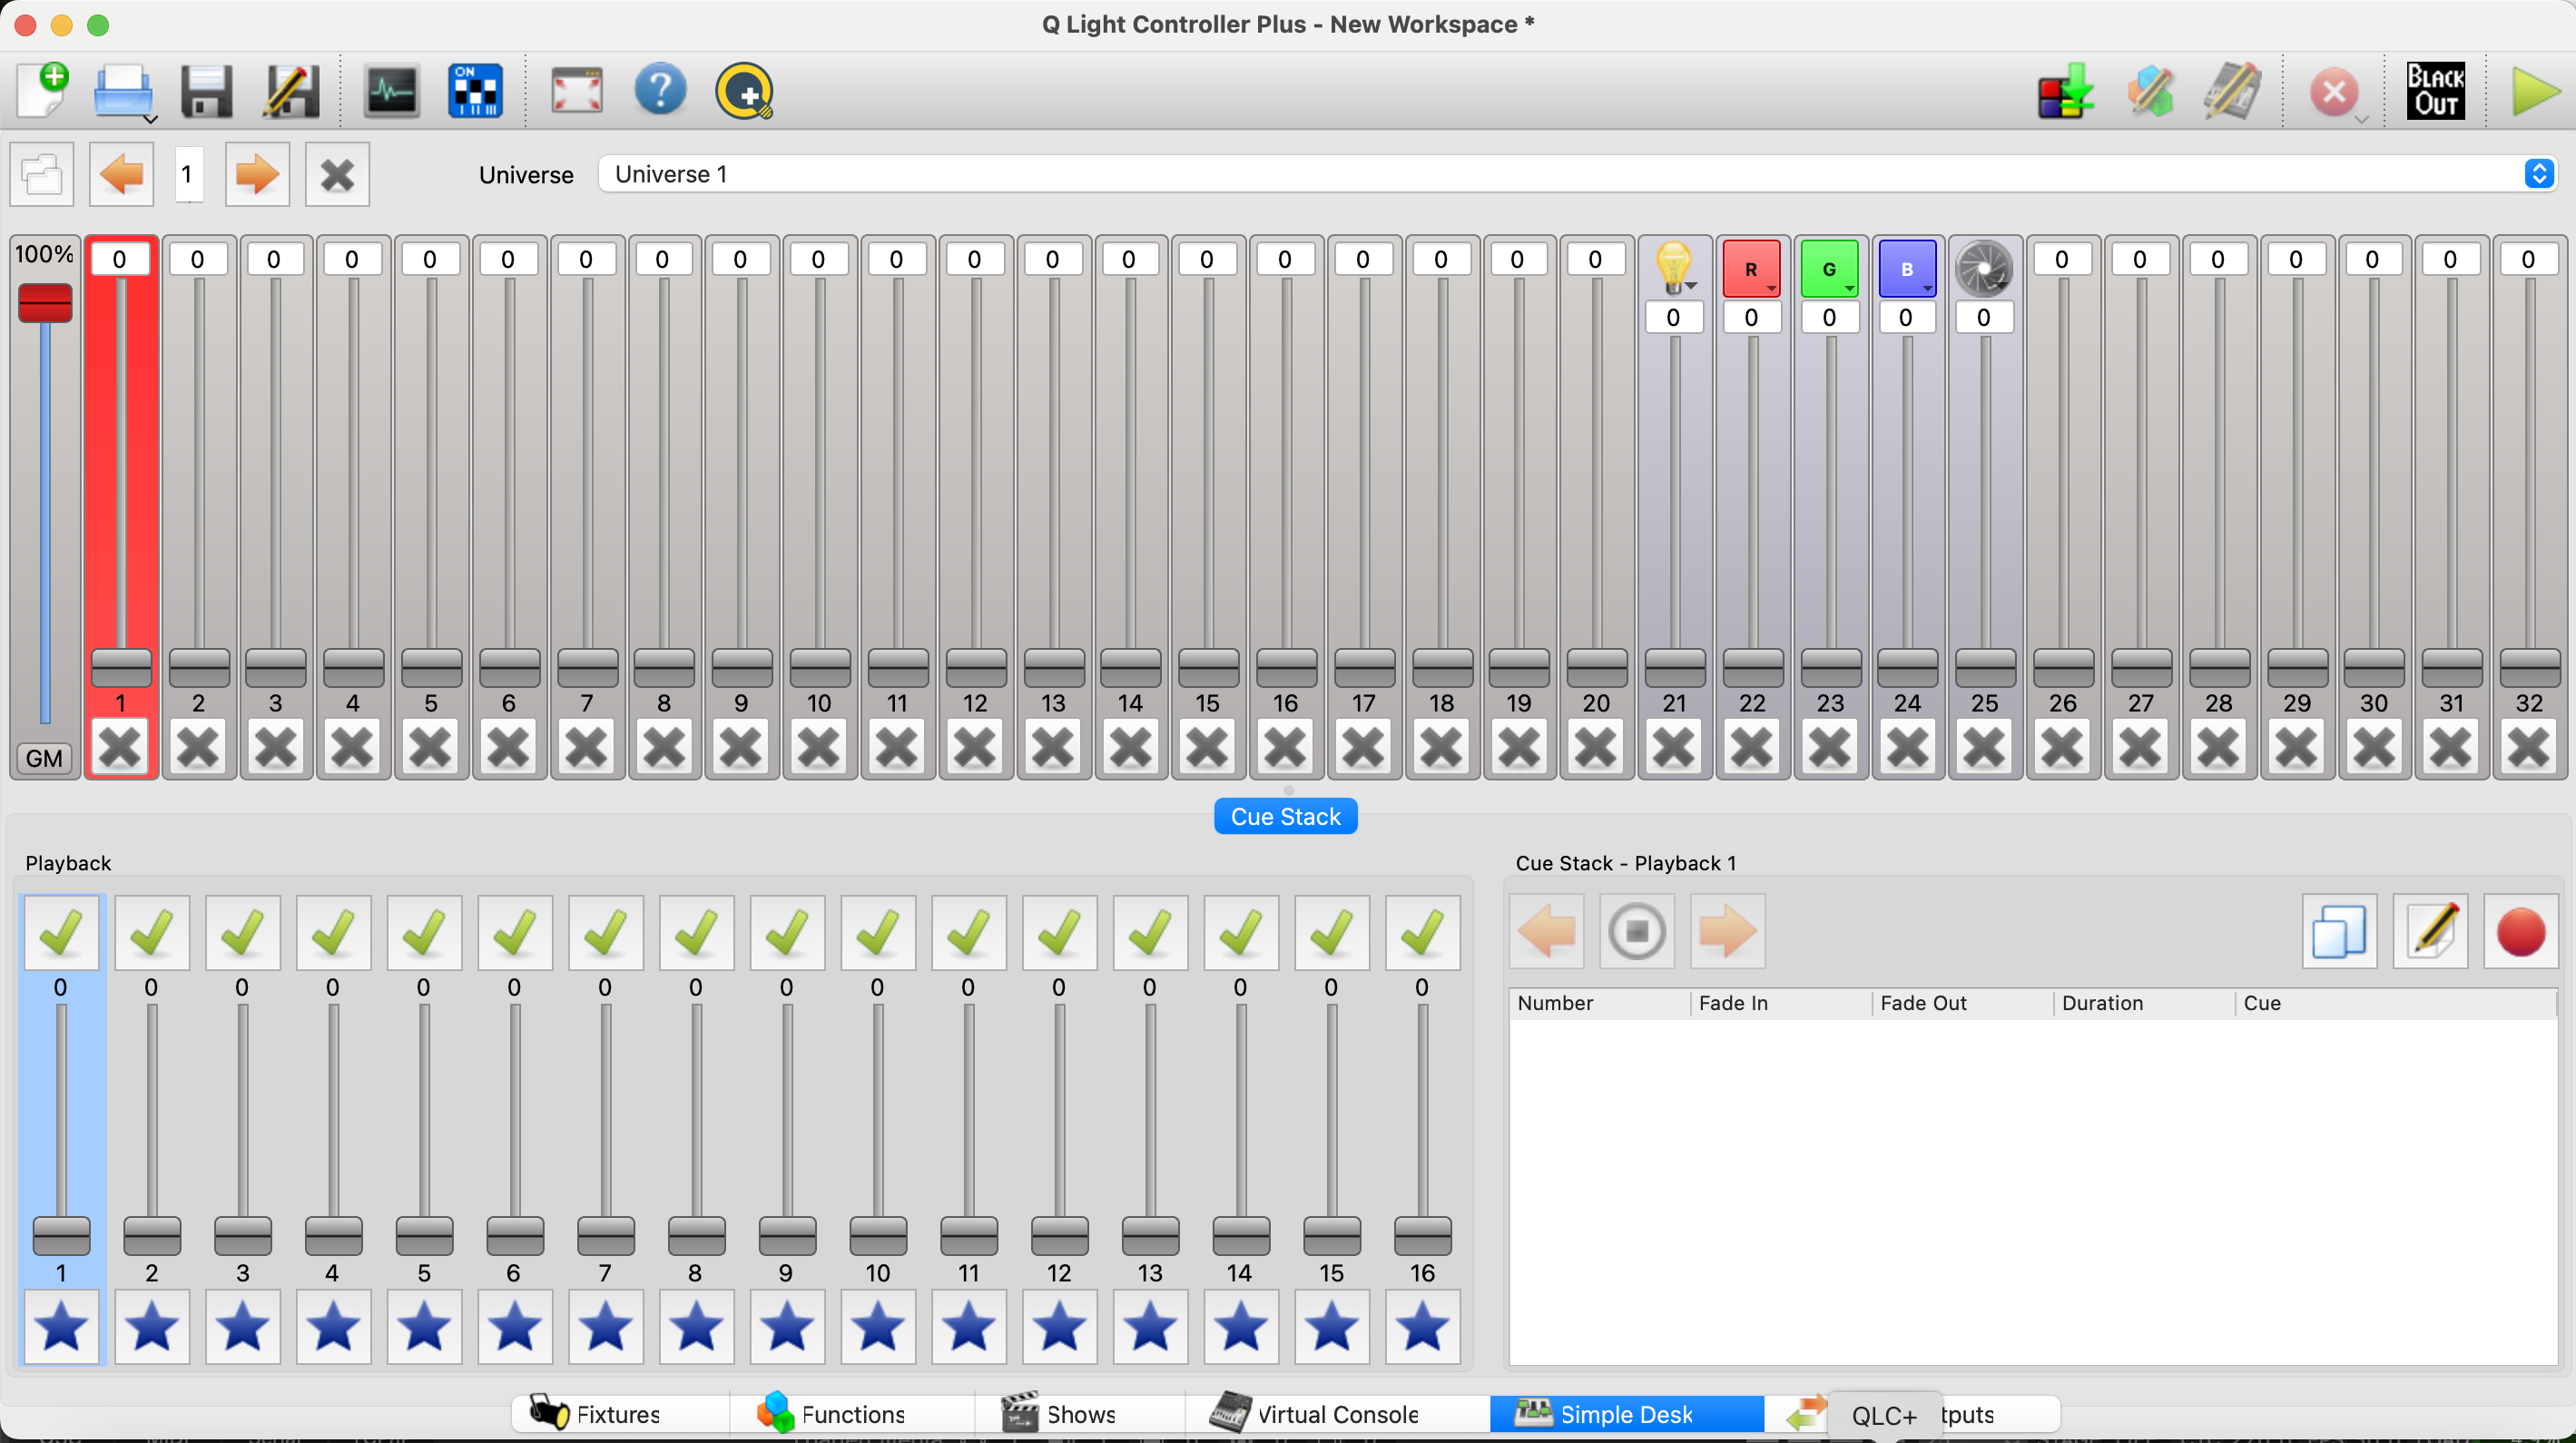
Here we see a representation of what DMX addresses are in use. Channels 21 - 25 have been set with the Intensity, Red, Green, Blue, and Strobe parameters, dictated by the way the 5-channel mode is setup. Turn up the slider with the lightbulb; this will turn the light on, but, we can't see anything yet. This is because the light was turned on for a certain amount, but we aren't outputting any color yet. Use the sliders to output a color.
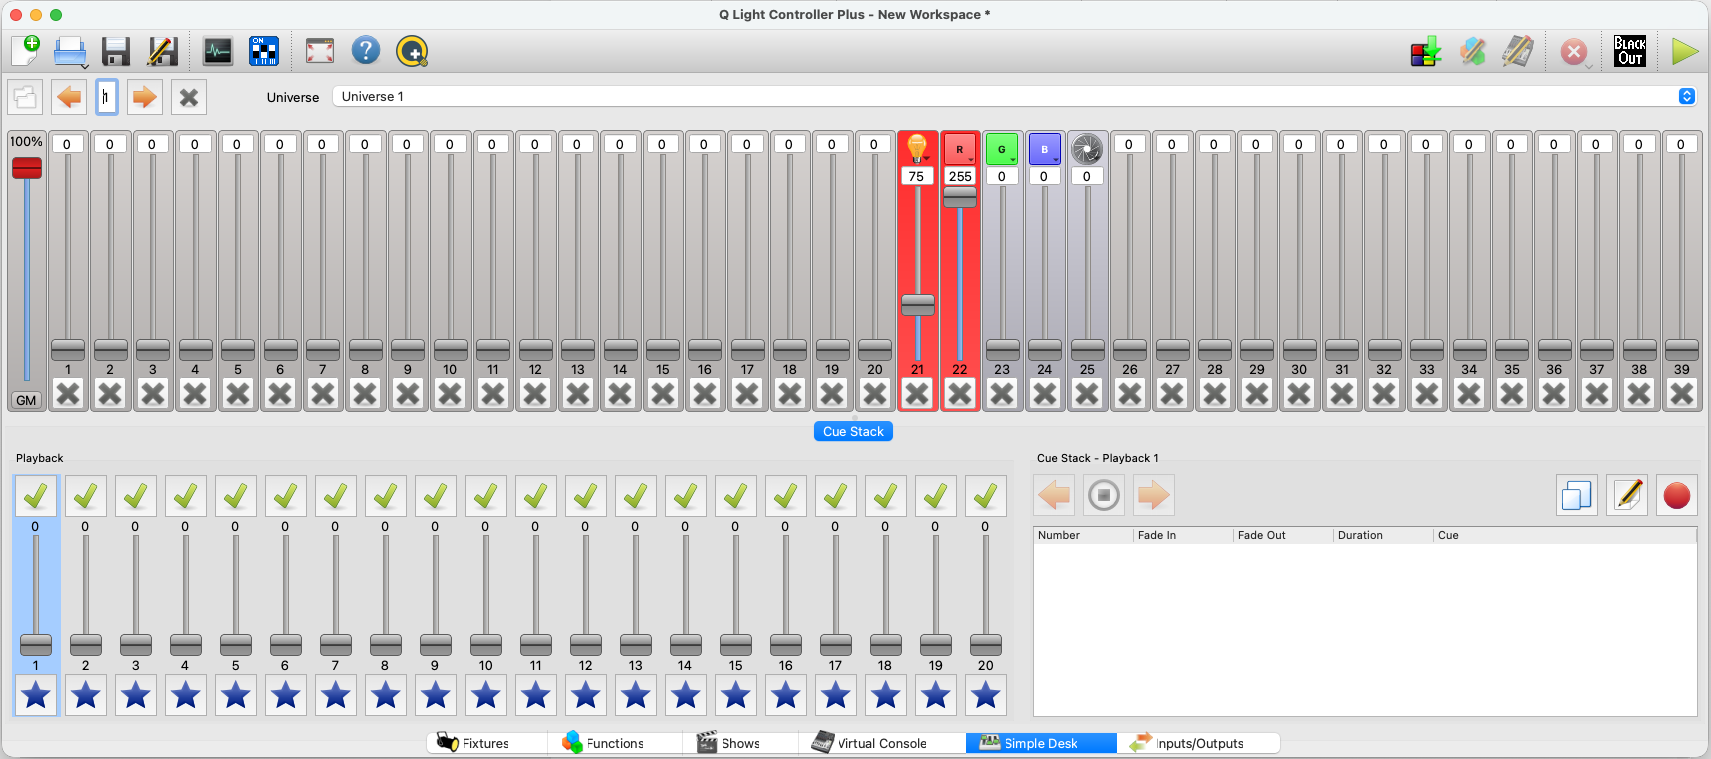
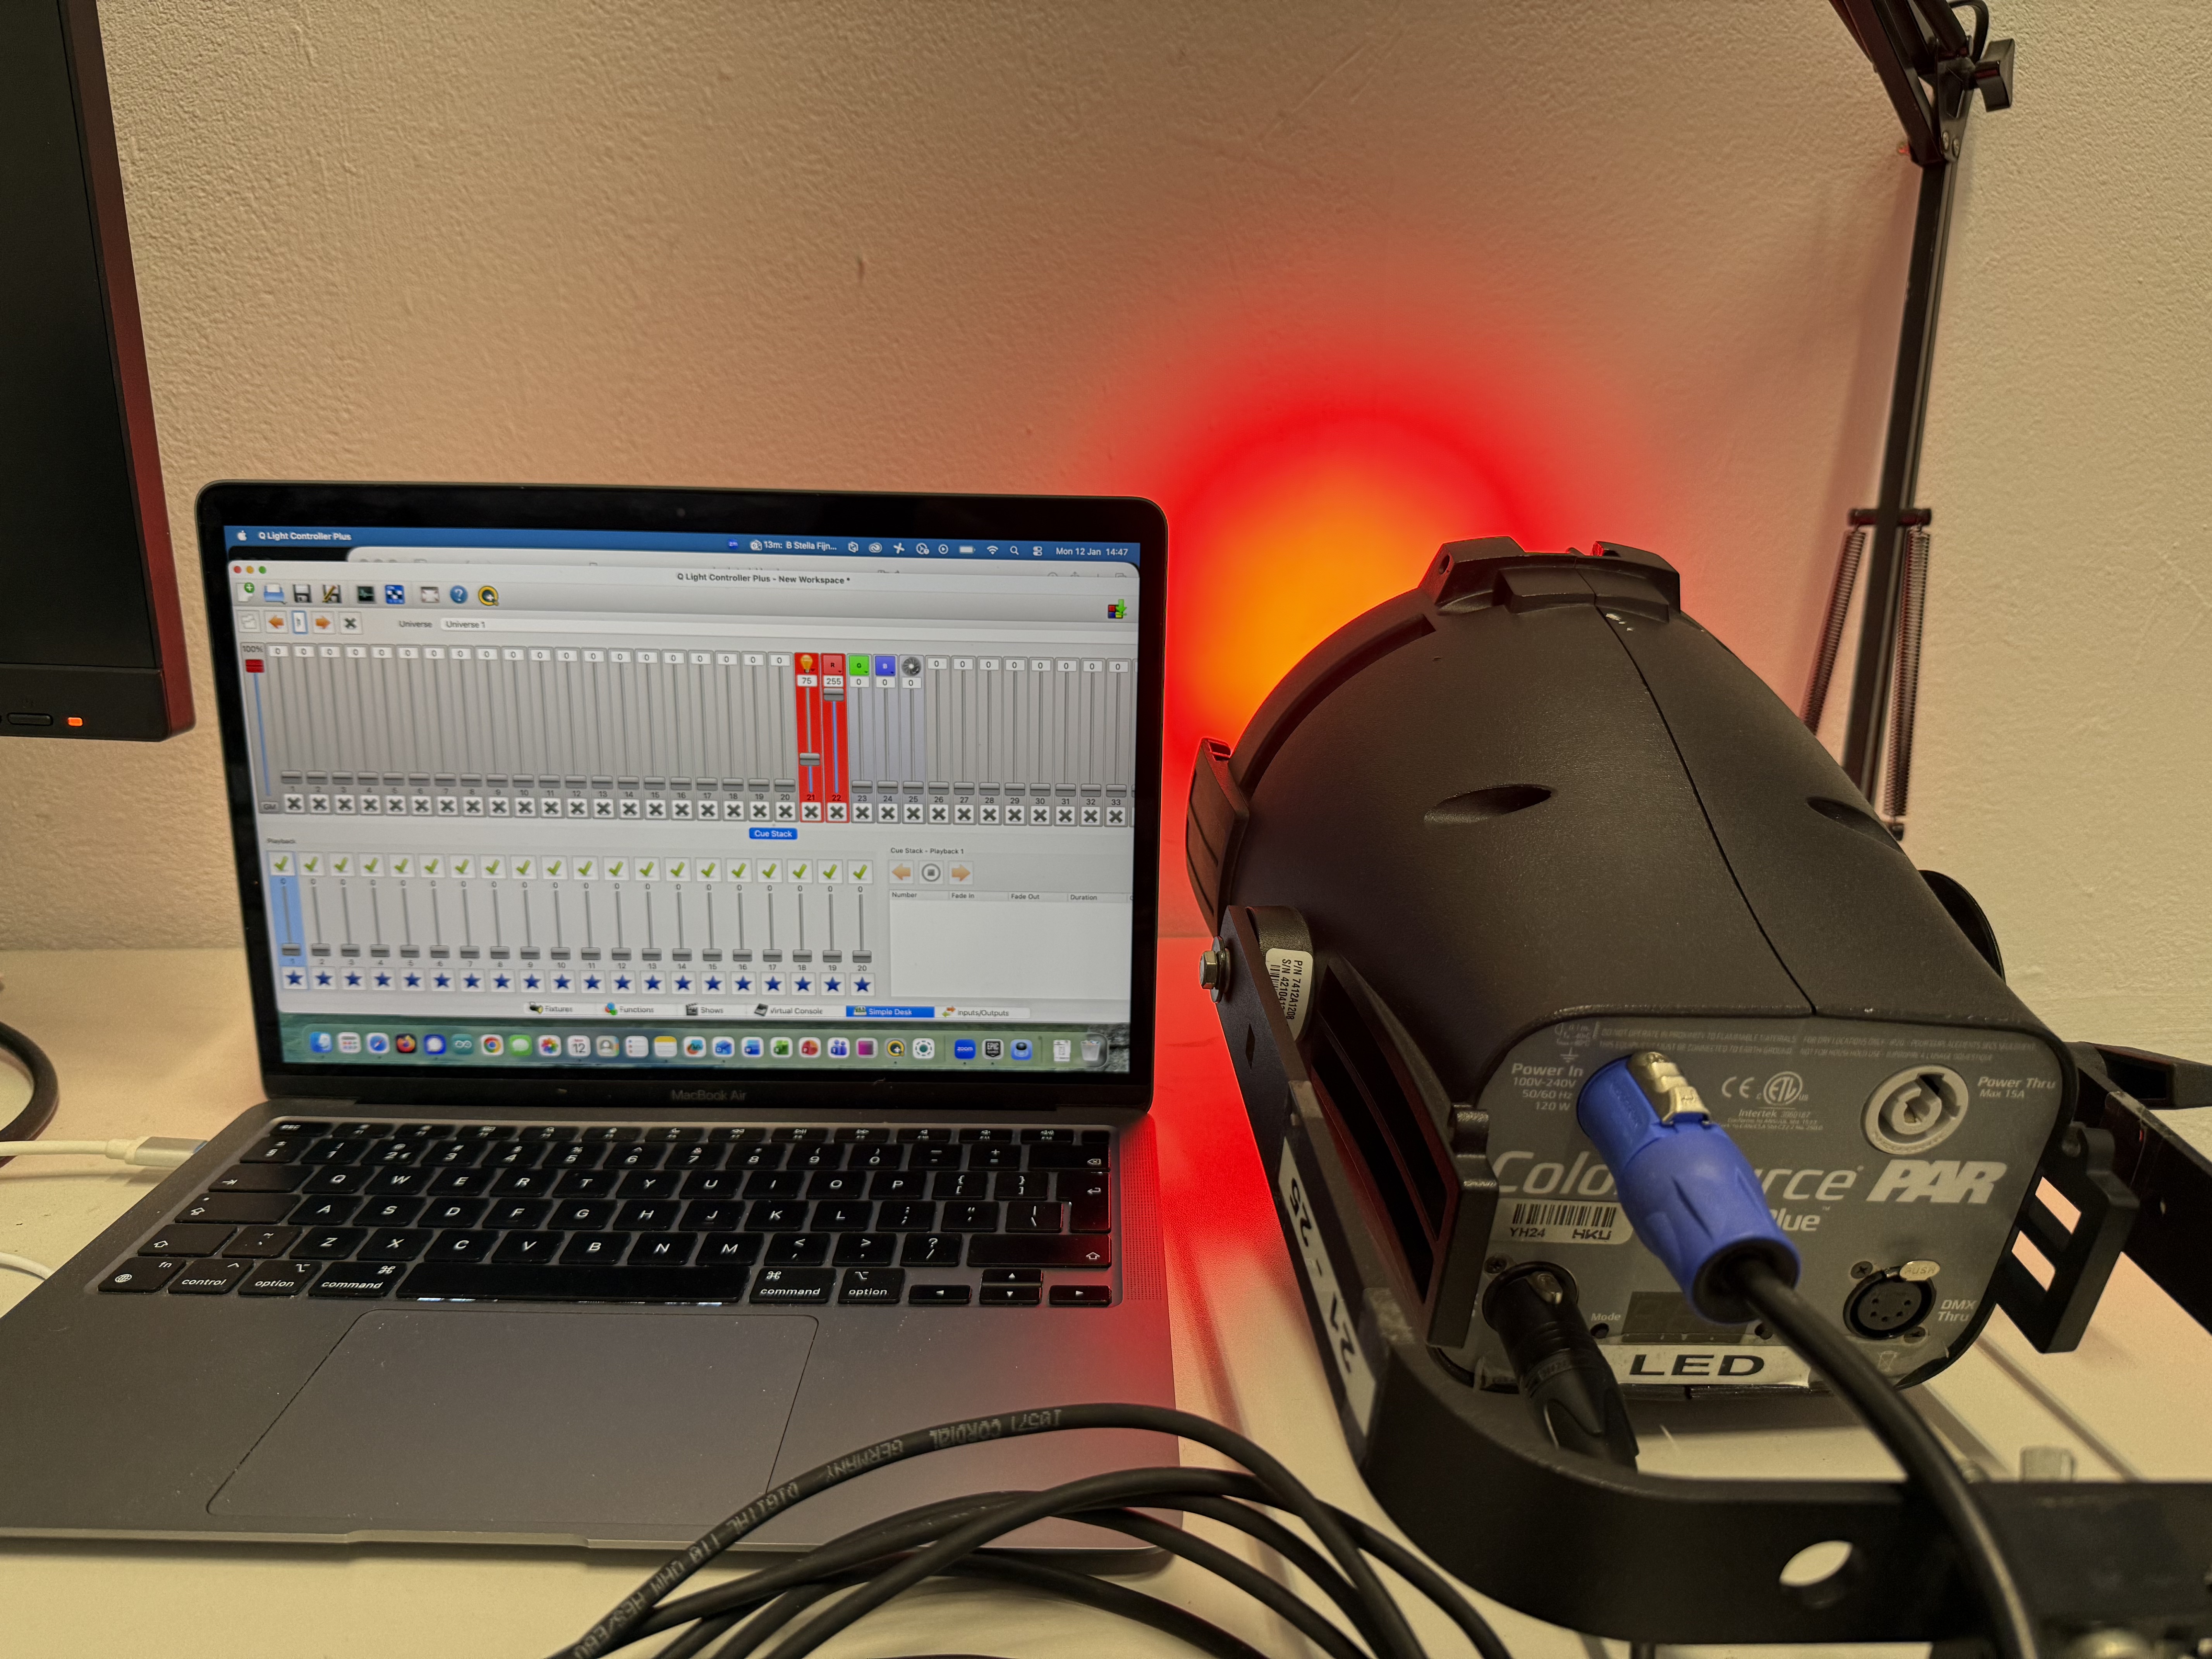
If we've done everything correctly, the light should now turn on! Please note that operating QLC+ from the Simple Desk will not give you access to all the functionalities that QLC+ has to offer. If you're looking for an overview of some of QLC+'s other features, check out this video tutorial.
Is the light still not working for you? Check if:
- Your light is receiving power
- All DMX and USB cables are properly plugged in
- Your DMX interface is still listed and connected in the Input/Output tab in QLC+
- Your DMX address and channel mode are the same between the light and QLC+
Light still not working? Please feel free to contact a blackbox employee!
Controlling halogen lights using a dimmerpack:
7. Connecting your dimmerpack
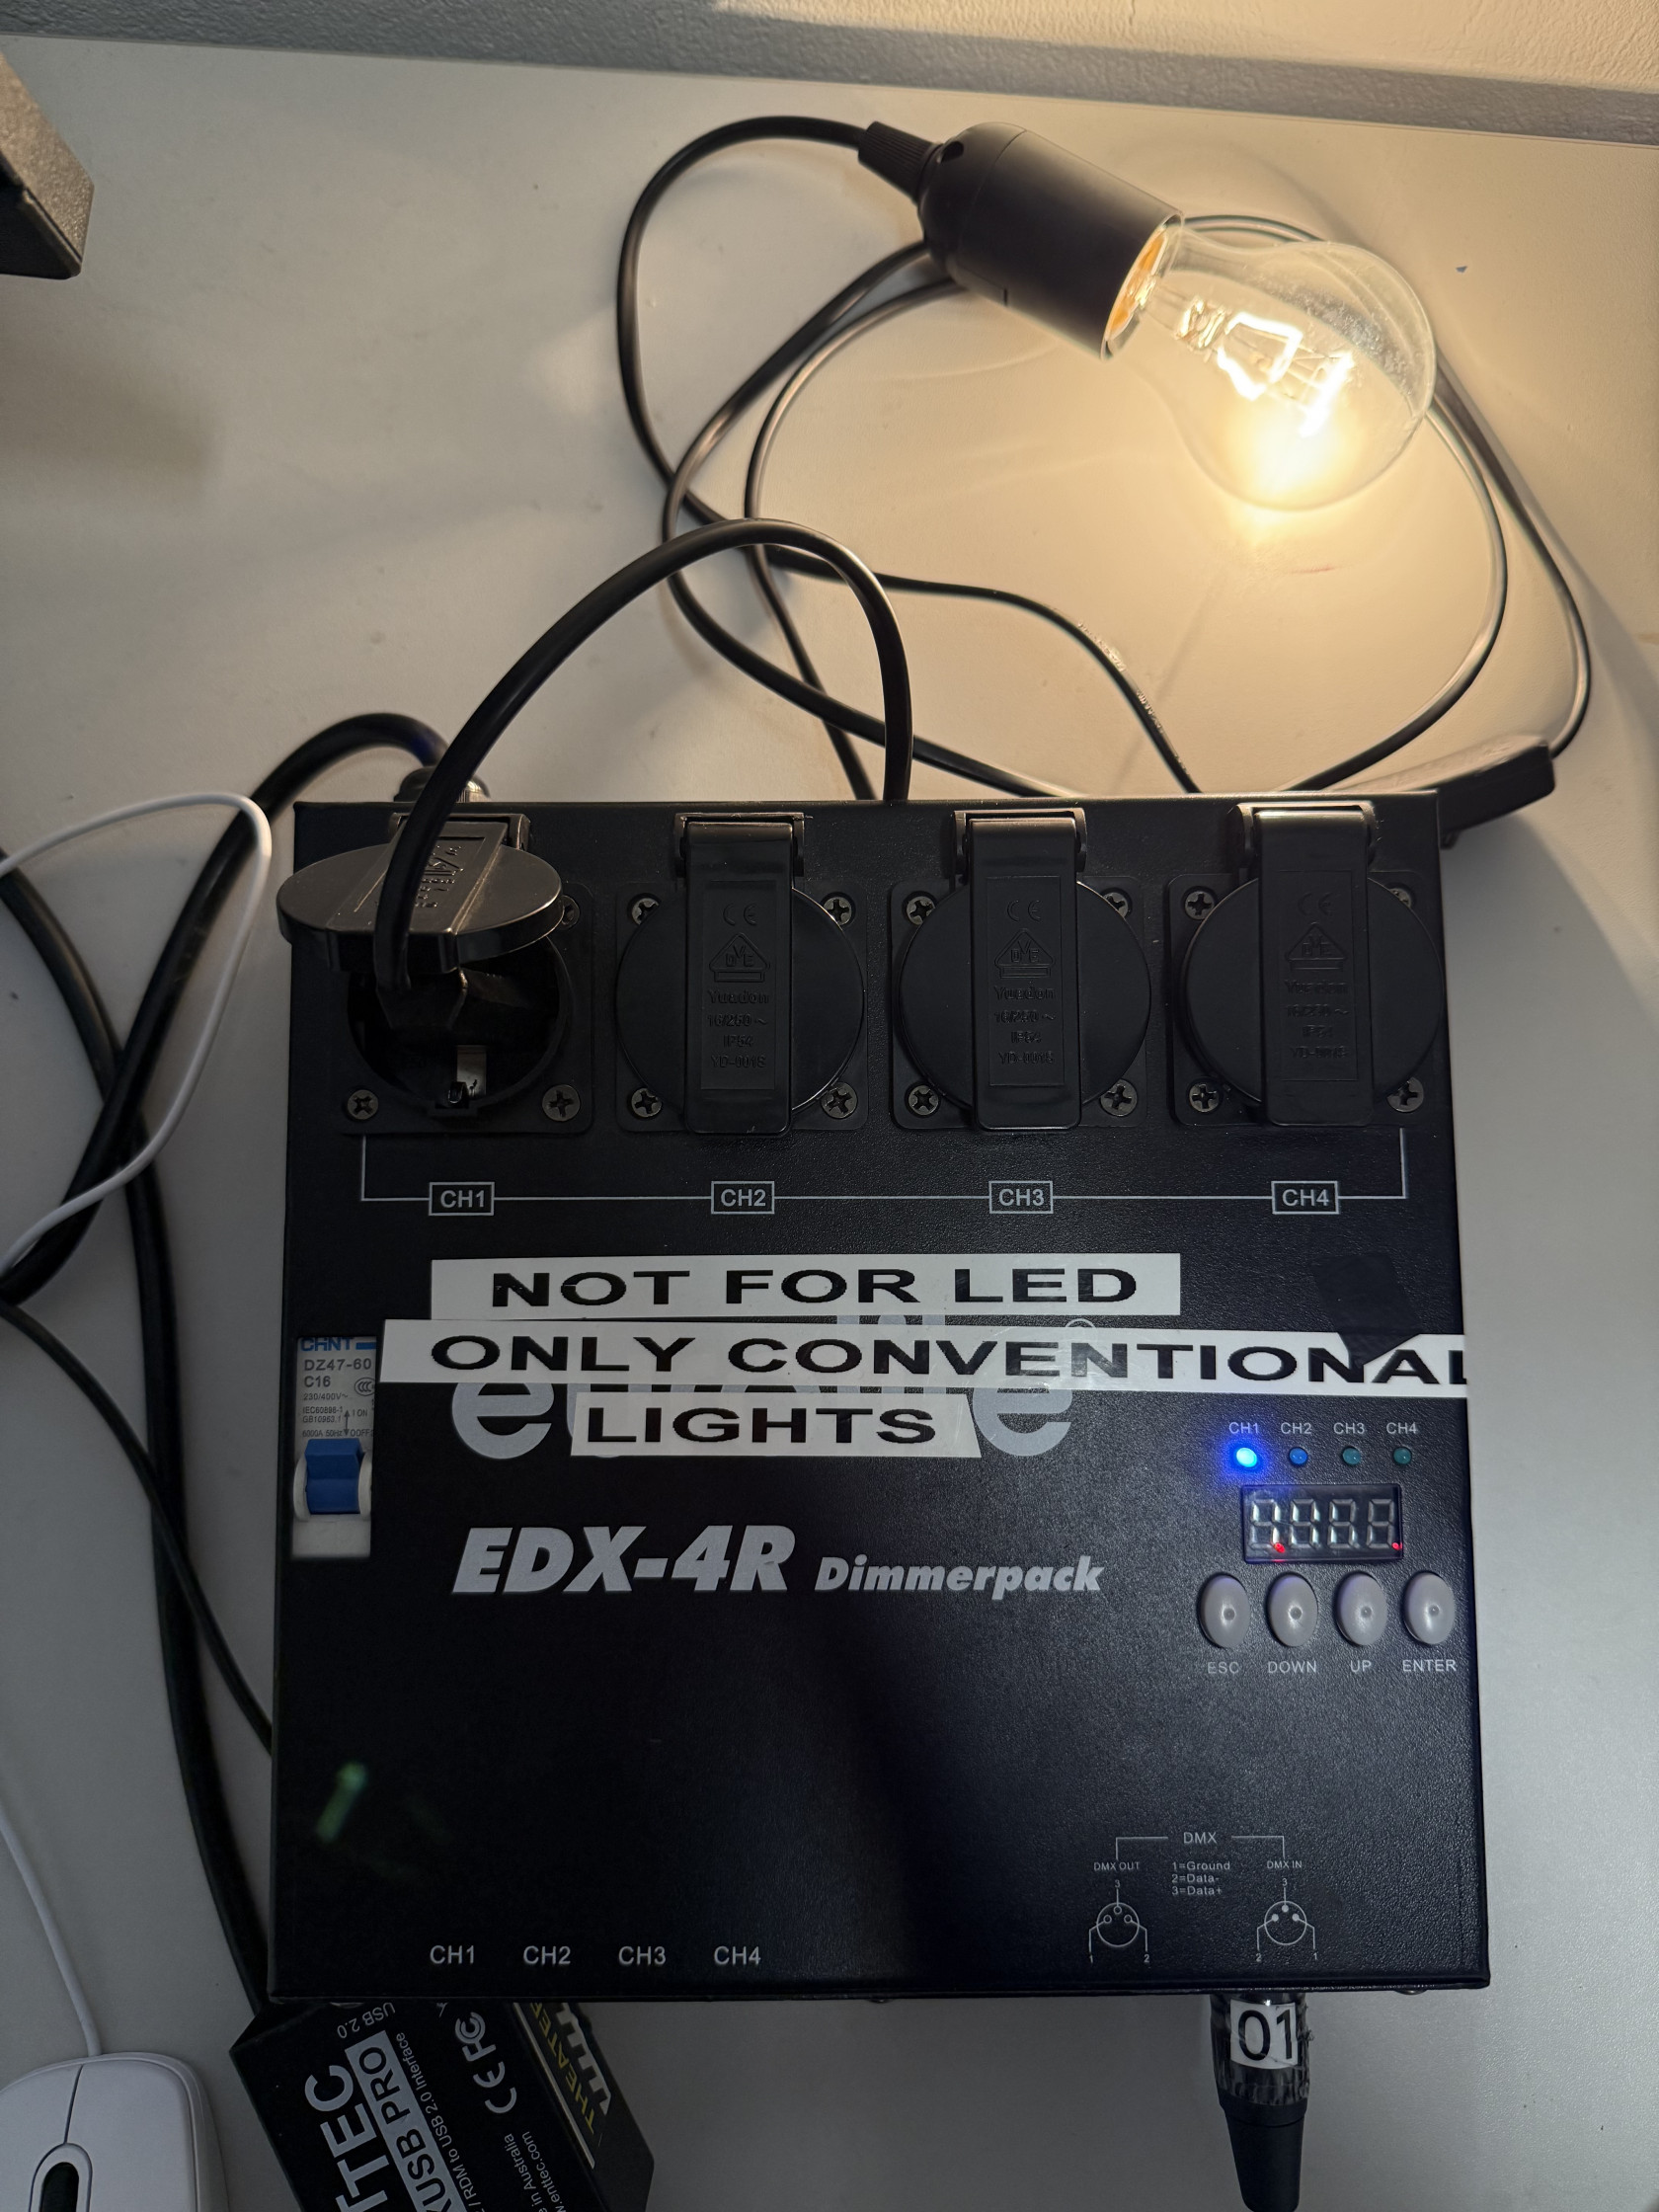
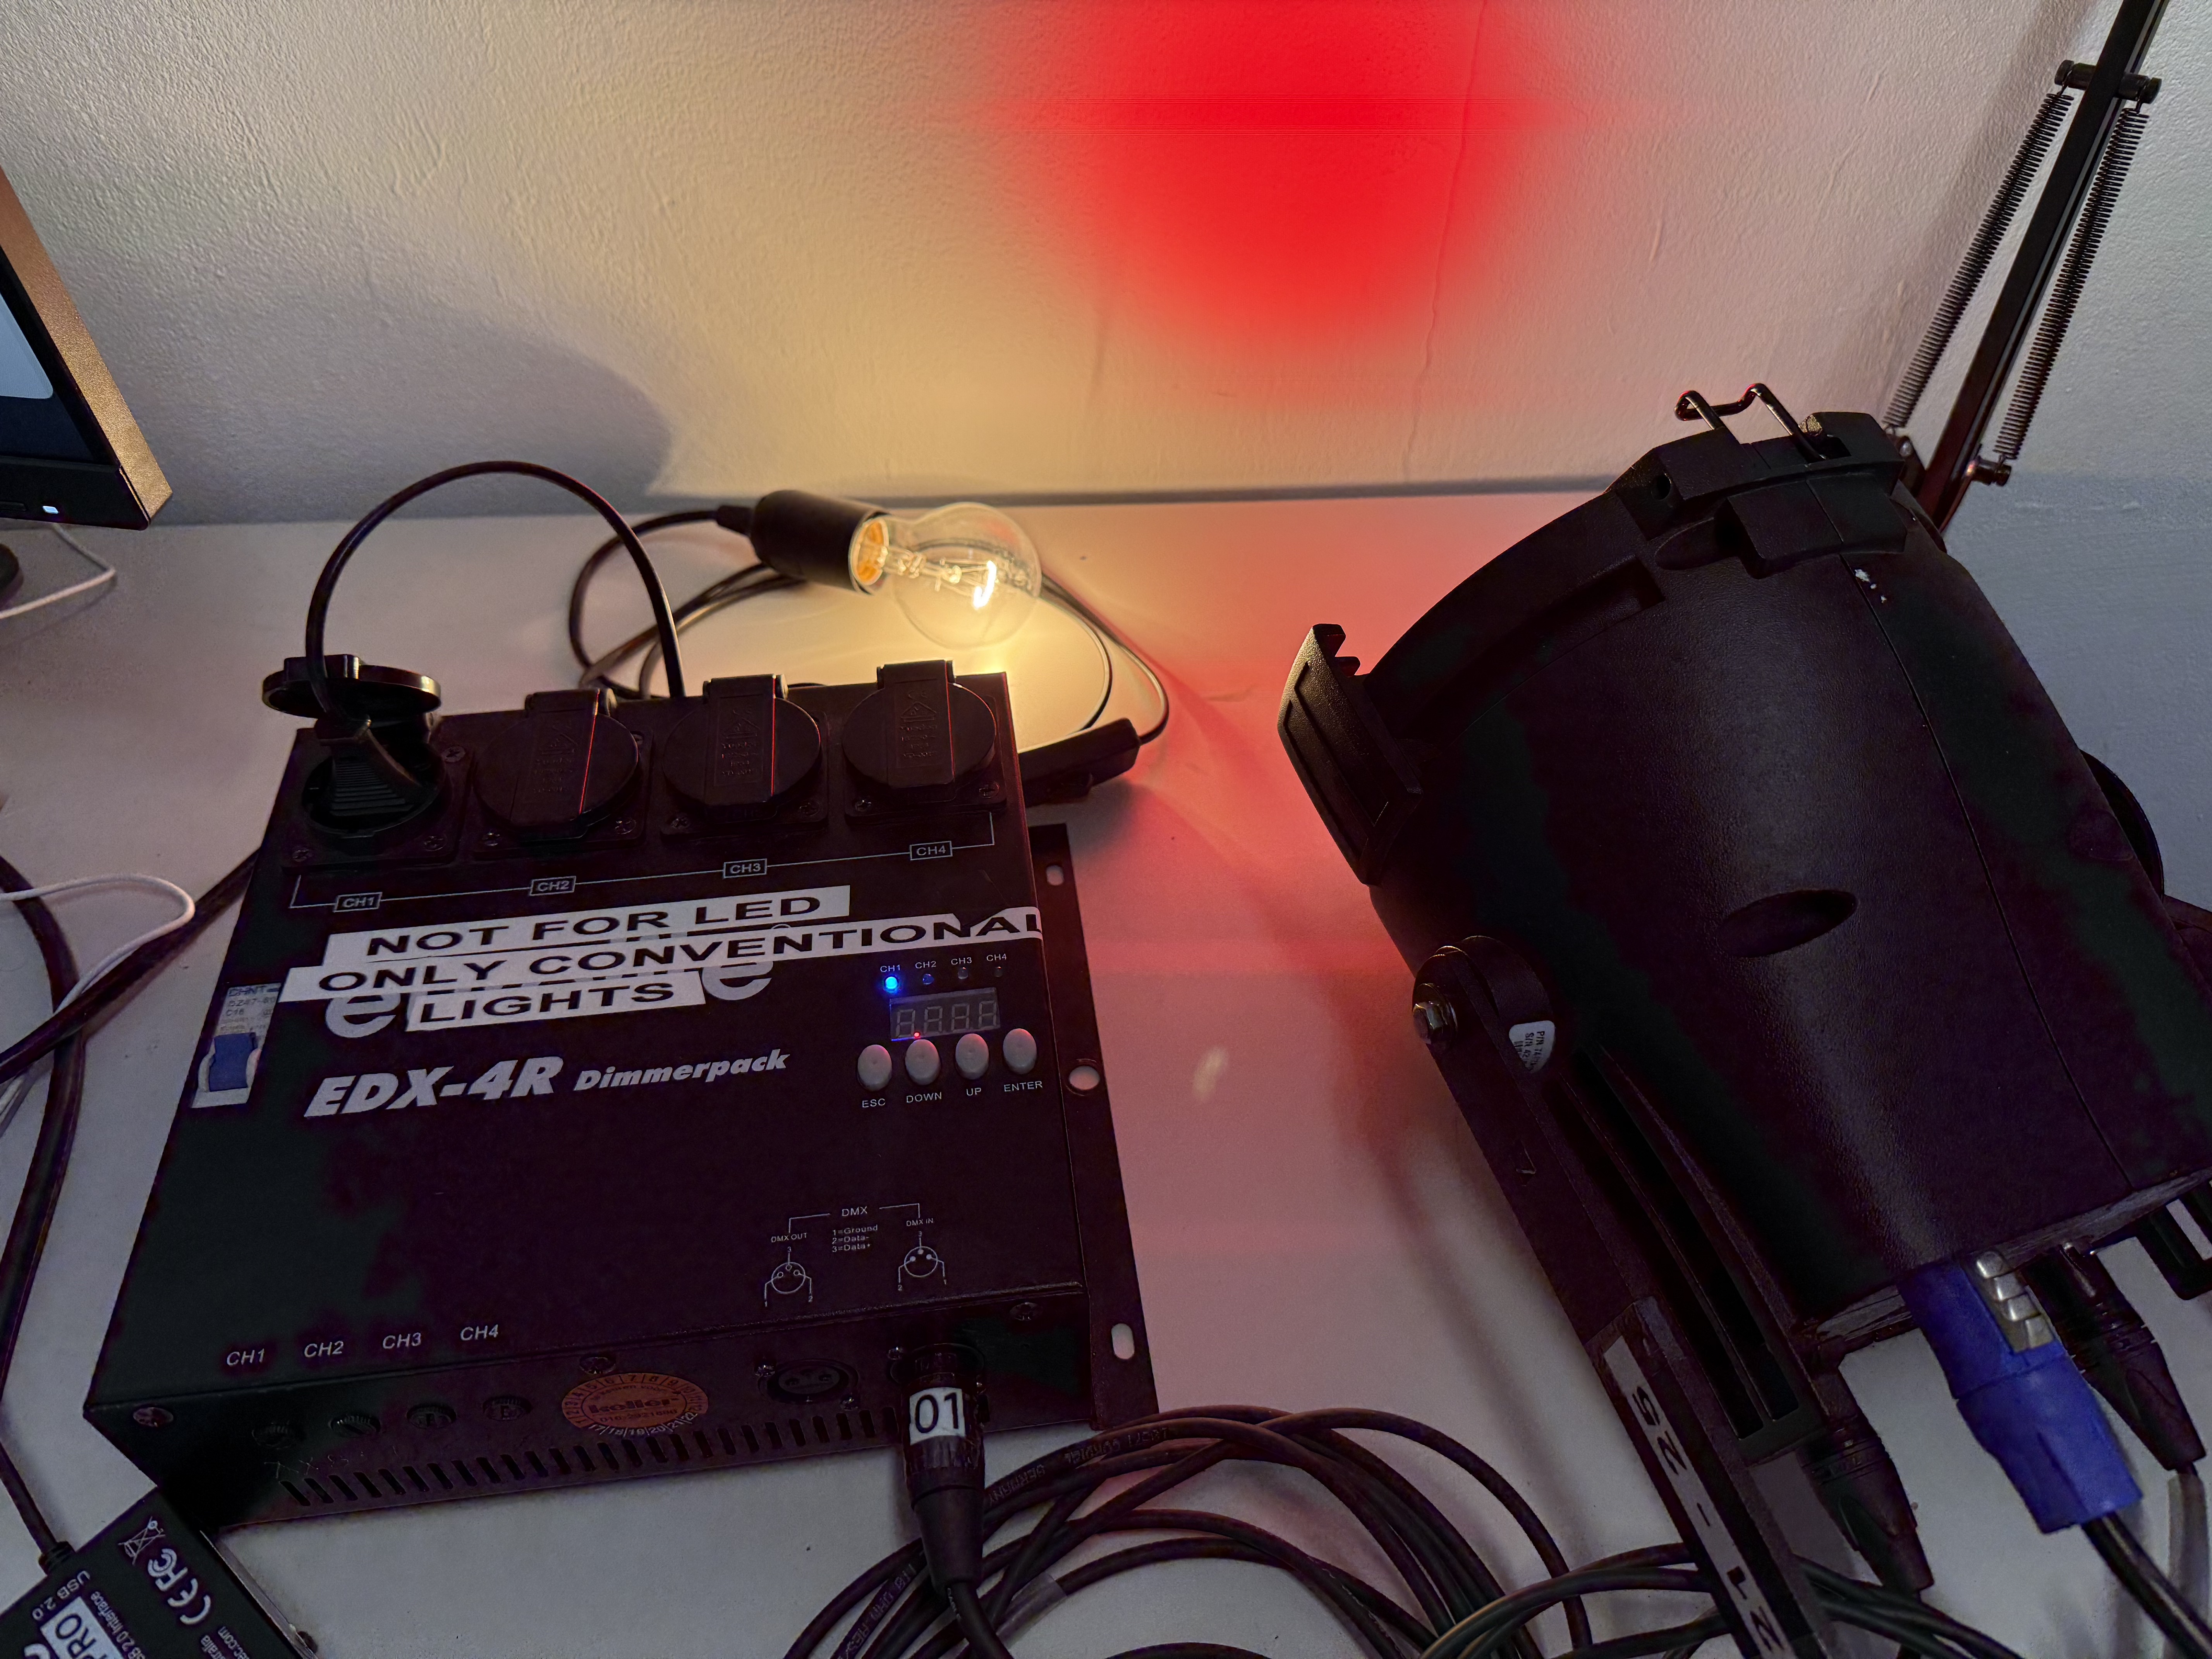
If we want to control halogen lights with our laptop, we will need to use a dimmerpack with DMX control. A dimmerpack can control, or dim, the amount of current you send to a light that you have plugged in. IMPORTANT NOTE: Never plug LED lights or other electronic devices like beamers into a dimmer, ONLY halogen lights. Failing to do so may seriously damage the device, as they were not constructed to be dimmed in this manner.
Connect the DMX interface to your computer like we did in chapter 2, but instead of connecting the DMX cable to a light, connect it to the dimmer's DMX input.
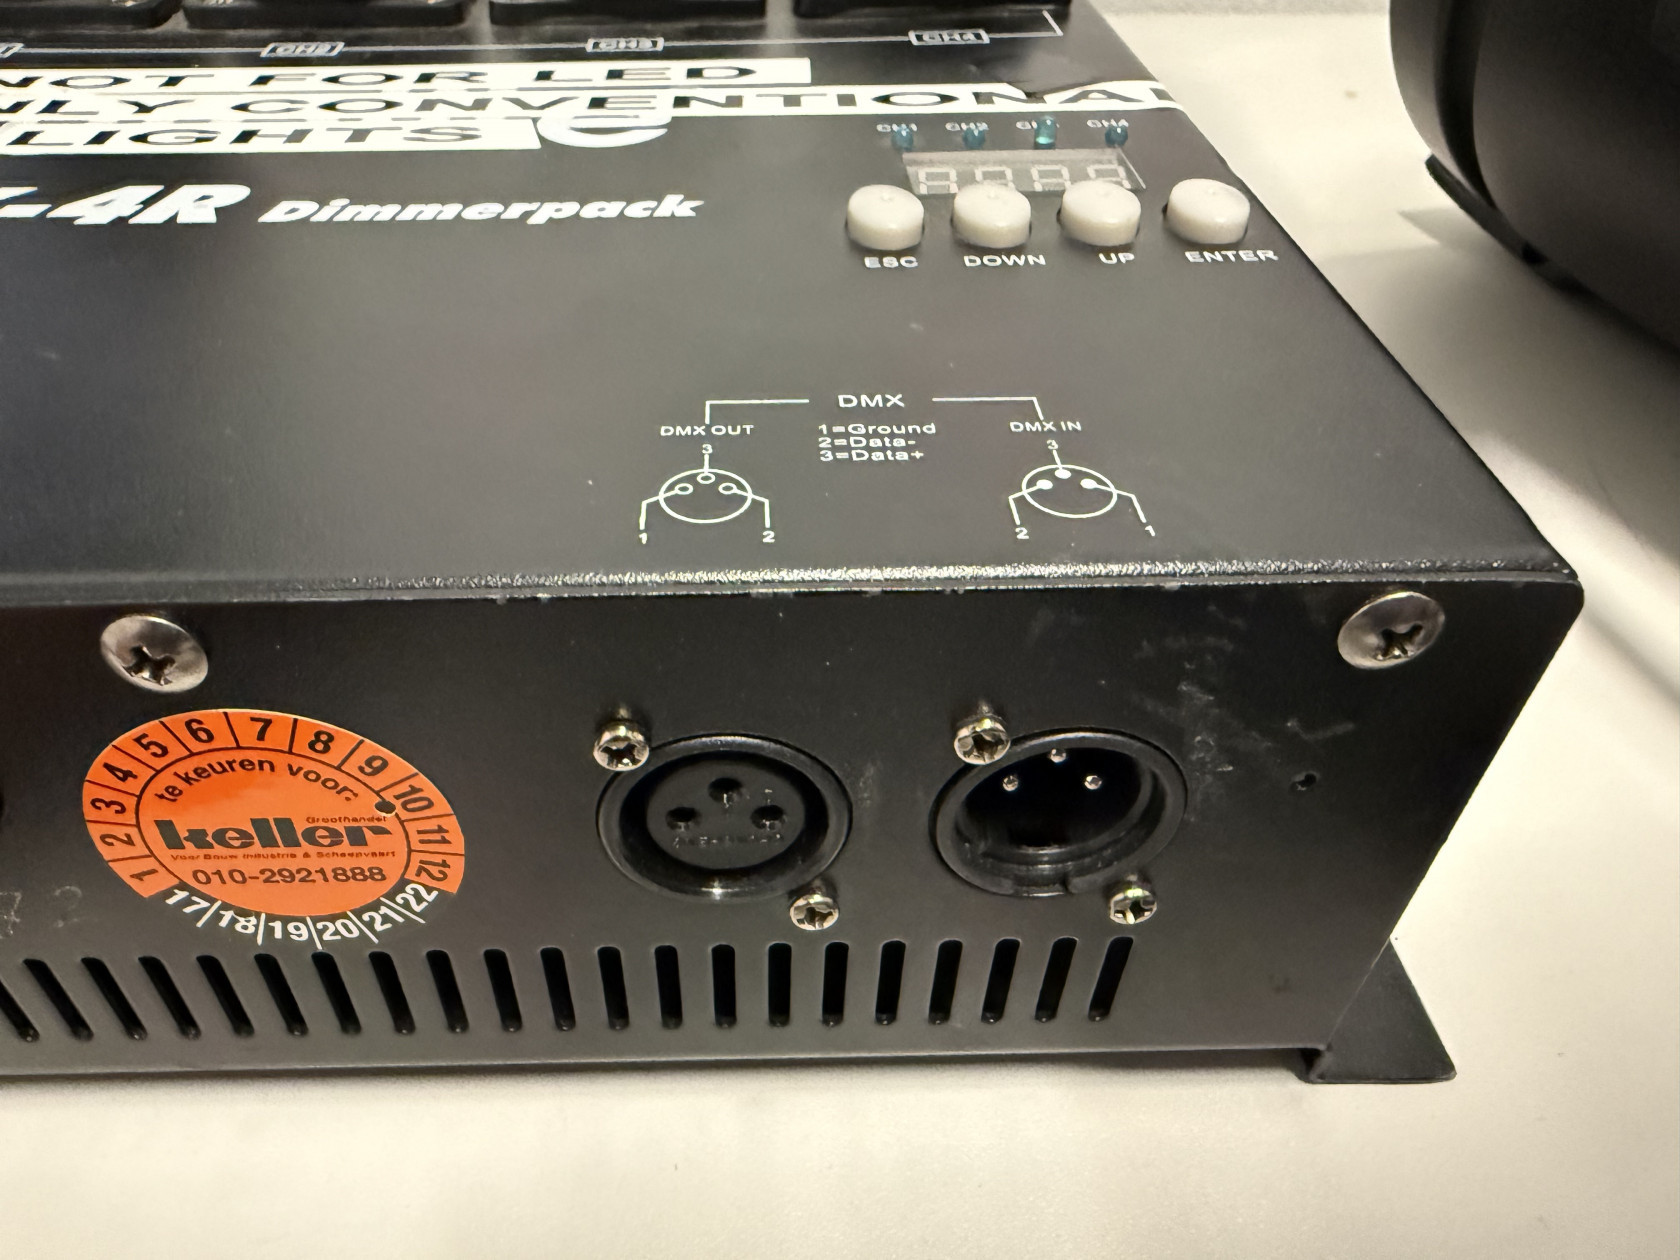

In some dimmerpacks (like this one), there might be a 3-pin DMX in/output connection instead 5 a 5-pin one. In this case, you'll need a 3 to 5-pin adapter, like in the top right picture.
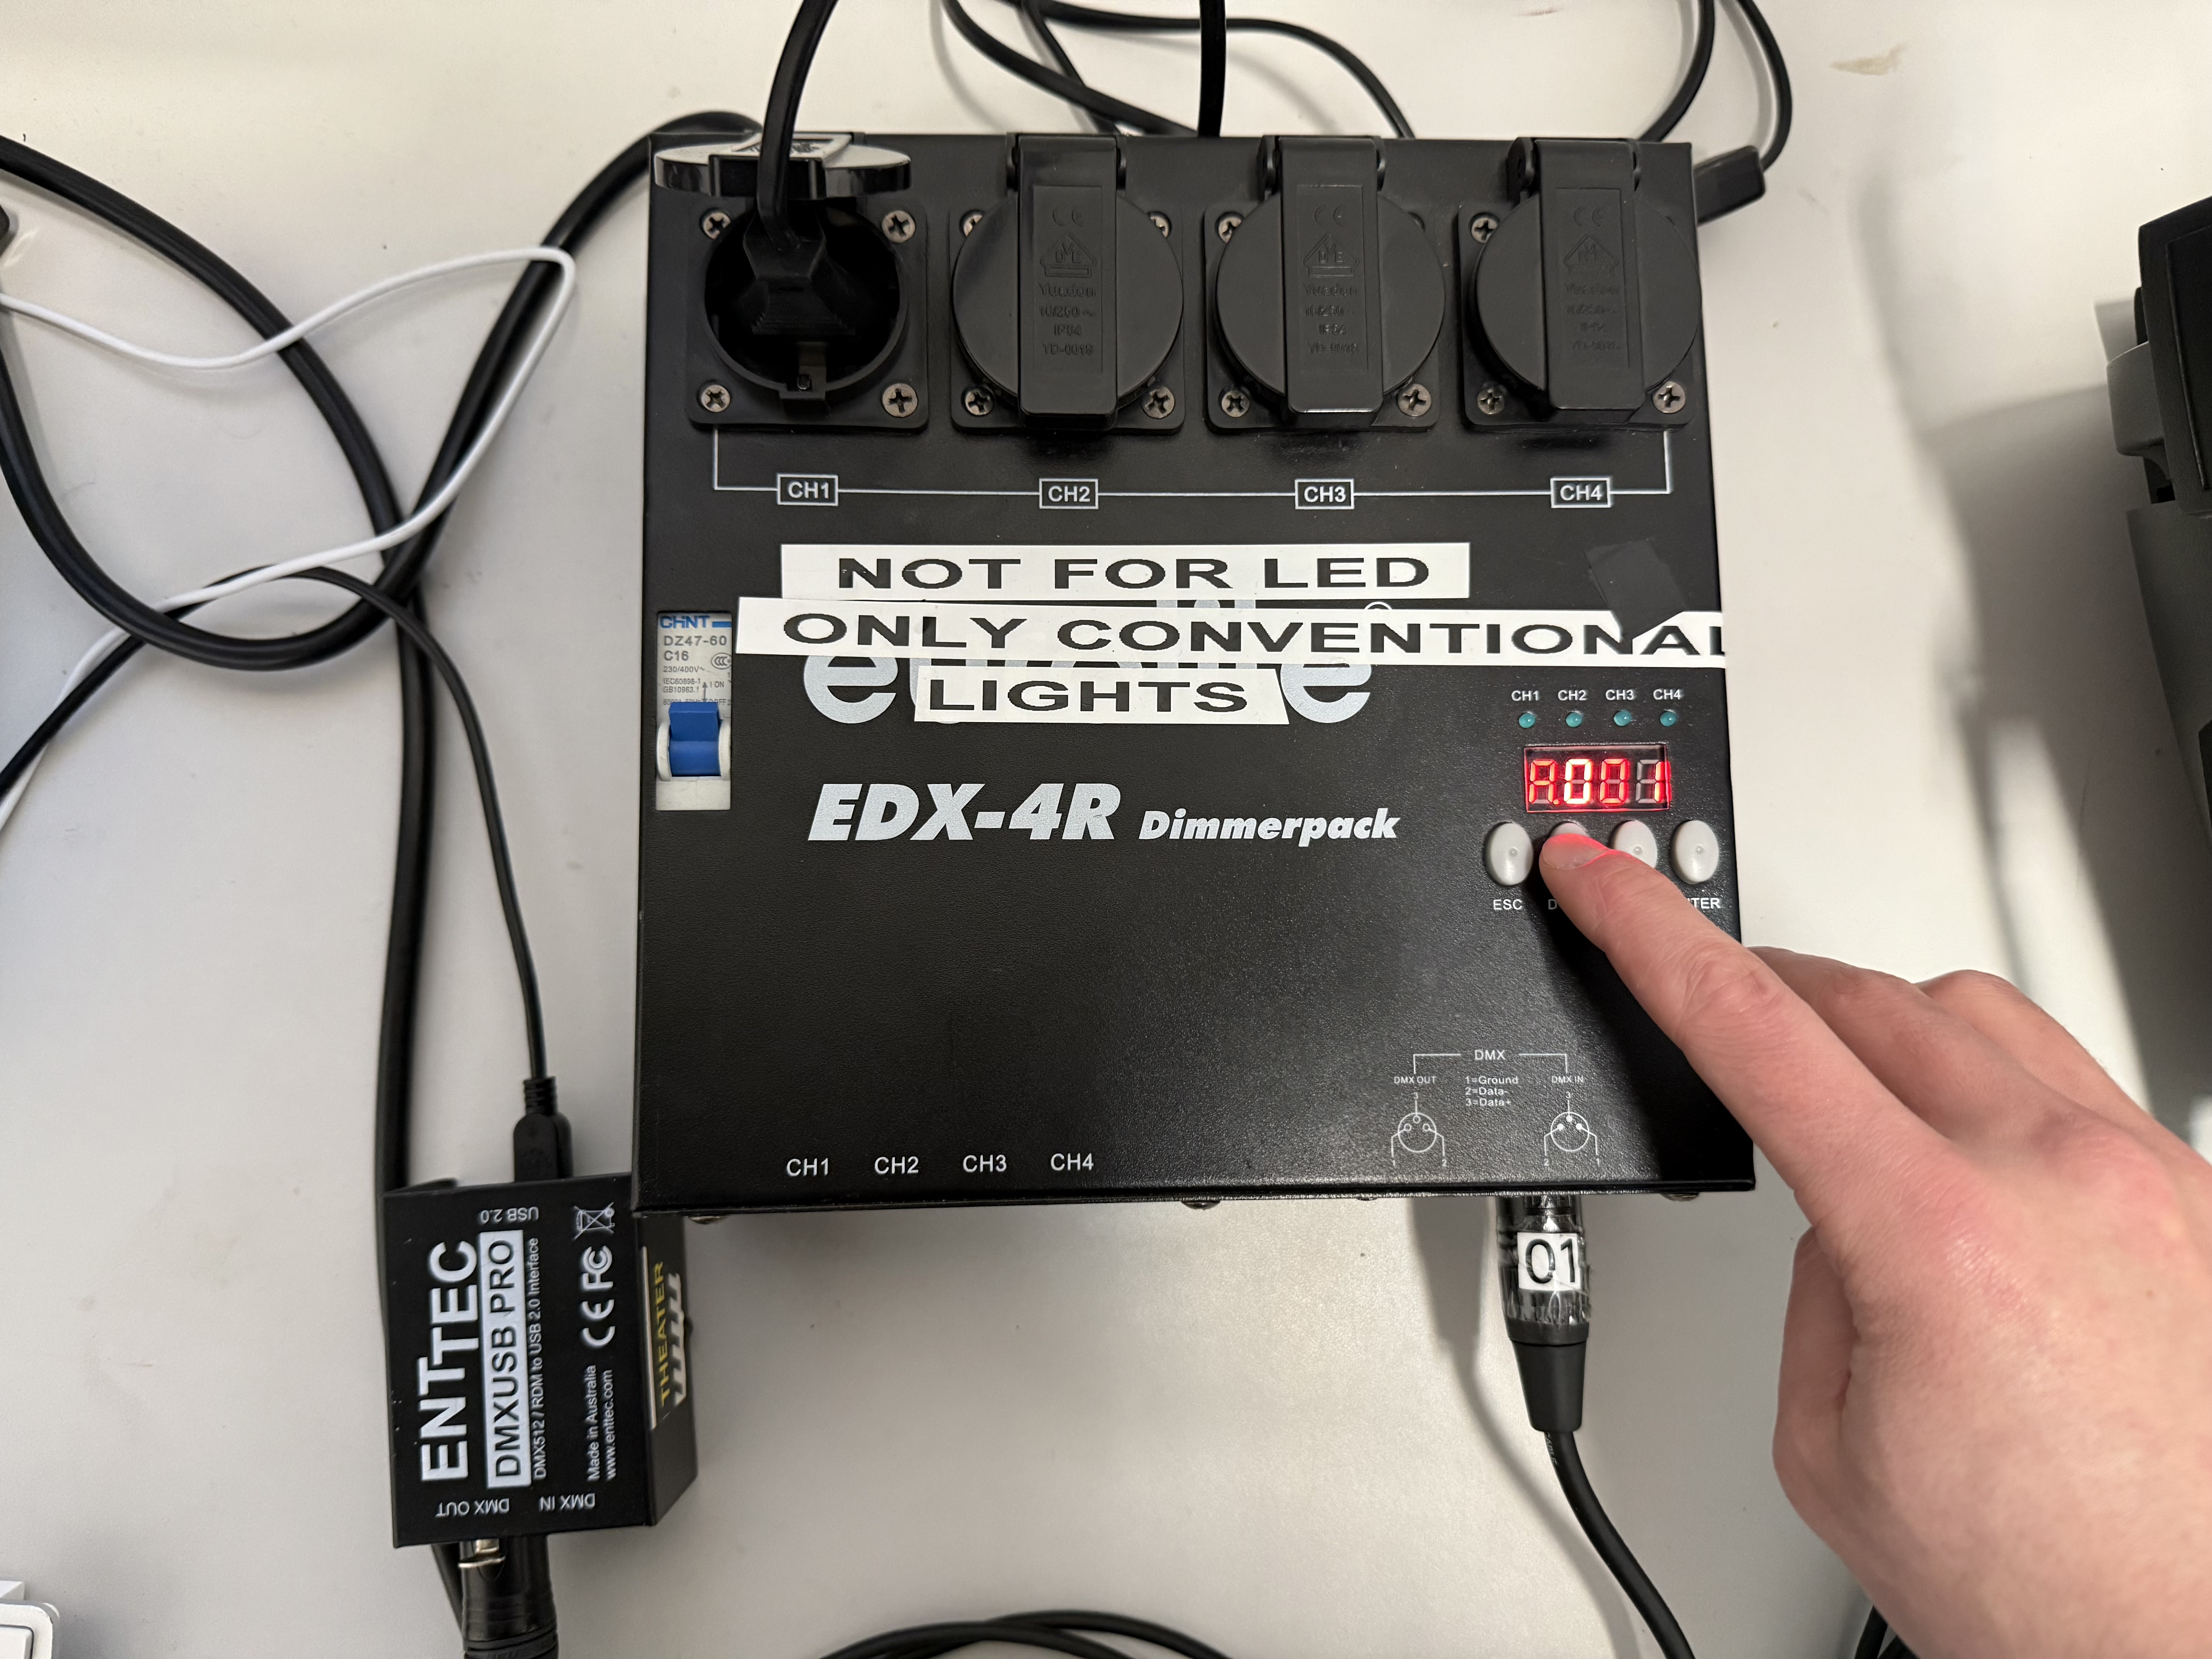
With your dimmerpack connected to power and to the DMX interface, start scrolling through the dimmerpack's menus, using the up and down buttons, until you find DMX mode. In the case of this dimmer, this is marked with an 'A' for address. Right now, it is set to 'A001', or, DMX Address 001.
On the dimmer we see power sockets with CH1, CH2, CH3, CH4 written underneath. In Channel 1 I have plugged in my halogen light.
8. Setting up the dimmer in QLC+
Go back to the Fixtures menu in QLC+. Here we'll need to add the dimmer. Click on the green + icon again like we did before.
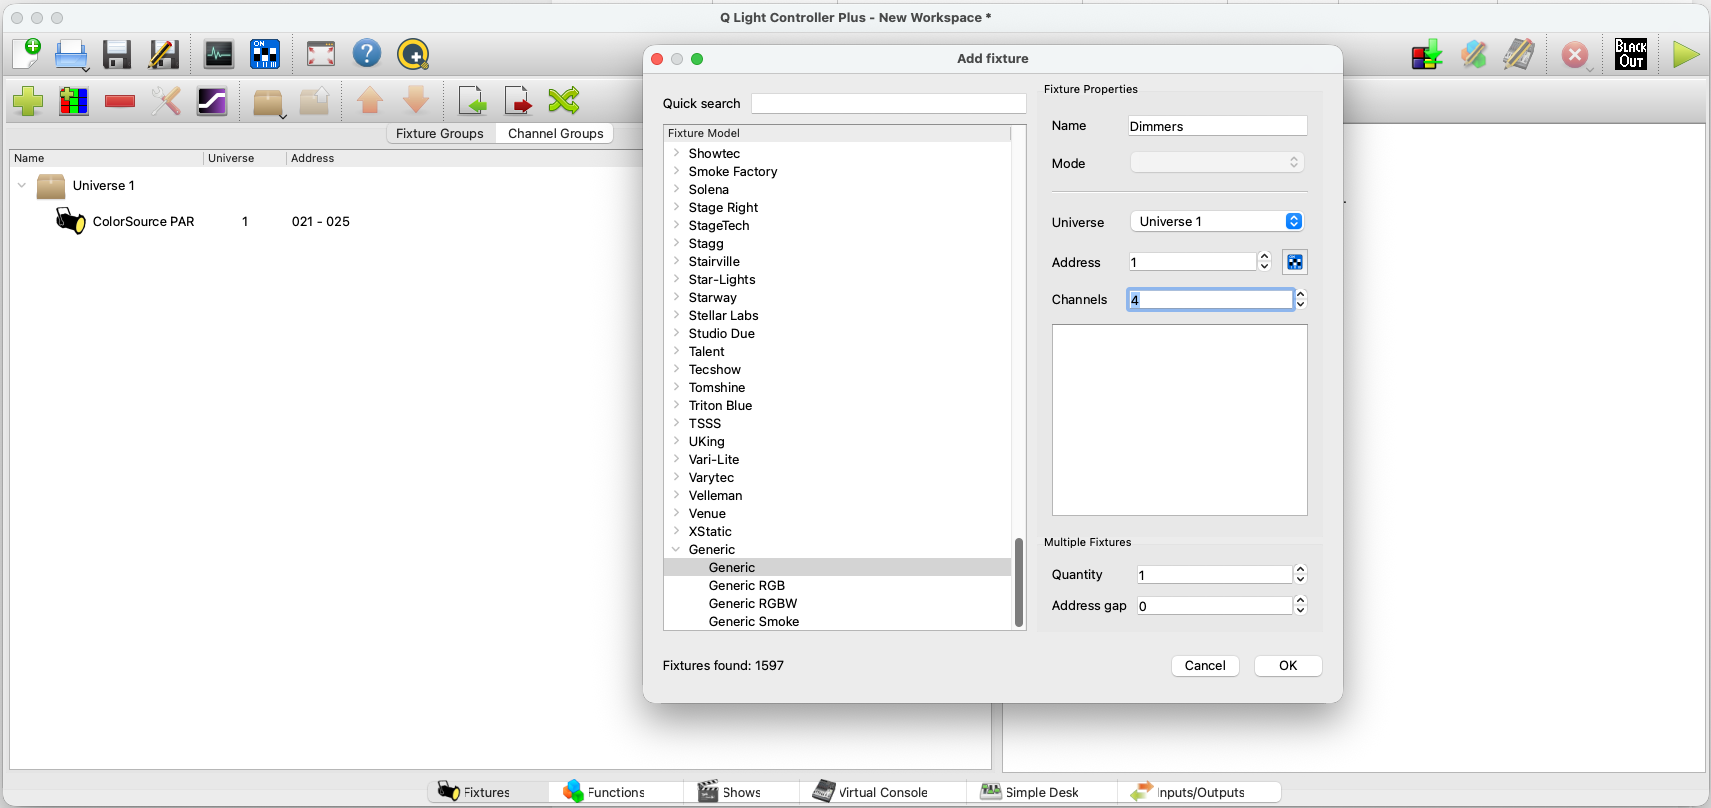
This time, instead of looking for the brand name, scroll all the way down to the 'Generic' tab, and click the first generic option. Make sure the address is set to whatever you set on the dimmer itself, so in my case, '1'. On the dimmer we can plug-0in 4 lights, and there's one channel for each light. So under channels, set it to '4' if this is also the case for you. Press OK.
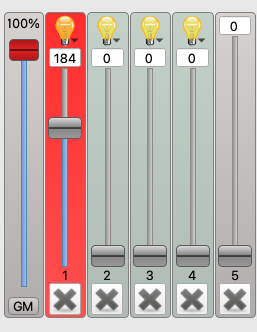
We've now also added a dimmer to our fixtures list:
We should now see something like this:
Note the four lightbulbs all the way to the left. Use the slider to control the light on the channel where you have plugged it in.
9. A short note on safety measures
There are a couple of things to note when working with lights, especially halogens, when it comes to safety. Lights, but halogens in particular, can get very hot when they're on. This can cause several safety hazards:
- Touching the outside of the light can burn your fingers. Be careful where you grab a light when it's on or cooling down.
- Keep a minimum of 0,5m distance for objects that you place close to the light, like curtains. If they are too close, they might catch fire from the heat.
- A light is most fragile when it's hot from being on for a while. Let it cool down before moving it again.
- Cables can melt when in contact with the light's metal casing. Make sure they don't touch. Also be careful where you place a light if it's still cooling down. Plastic floors can melt from the heat aswel.
Please keep these safety measures in mind when working with lights!
10. Daisy Chaining (or controlling several lights at once)
Another important term to understand when controlling lights is 'daisy chaining'. As you may have noticed, there's only one DMX output on our DMX interface (depending on the model you use). Daisy chaining is a technique where you send one input signal coming into a device and output that same signal to a next device, thus creating a signal chain. Think of it as a chain of daisies that you (may or may not have) made when you were a child. In this analogy, the stem of the flower is the cable and the flower bud is the light turning on. One flower is tied to the next, thus creating a chain of flowers, or, lights! The signal flows through the entire chain.

Most LED lights and dimmerpacks with DMX control will have a DMX input and a DMX through/output. If we want to daisy chain our LED light to our dimmerpack, the signal chain will look something like this:
1. Laptop (USB output) -> USB cable -> DMX interface (USB input)
2. DMX interface (DMX output) -> DMX cable -> LED light (DMX input)
3. LED light (DMX thru) -> DMX cable -> Dimmerpack (DMX input)
as can be seen in the image below:
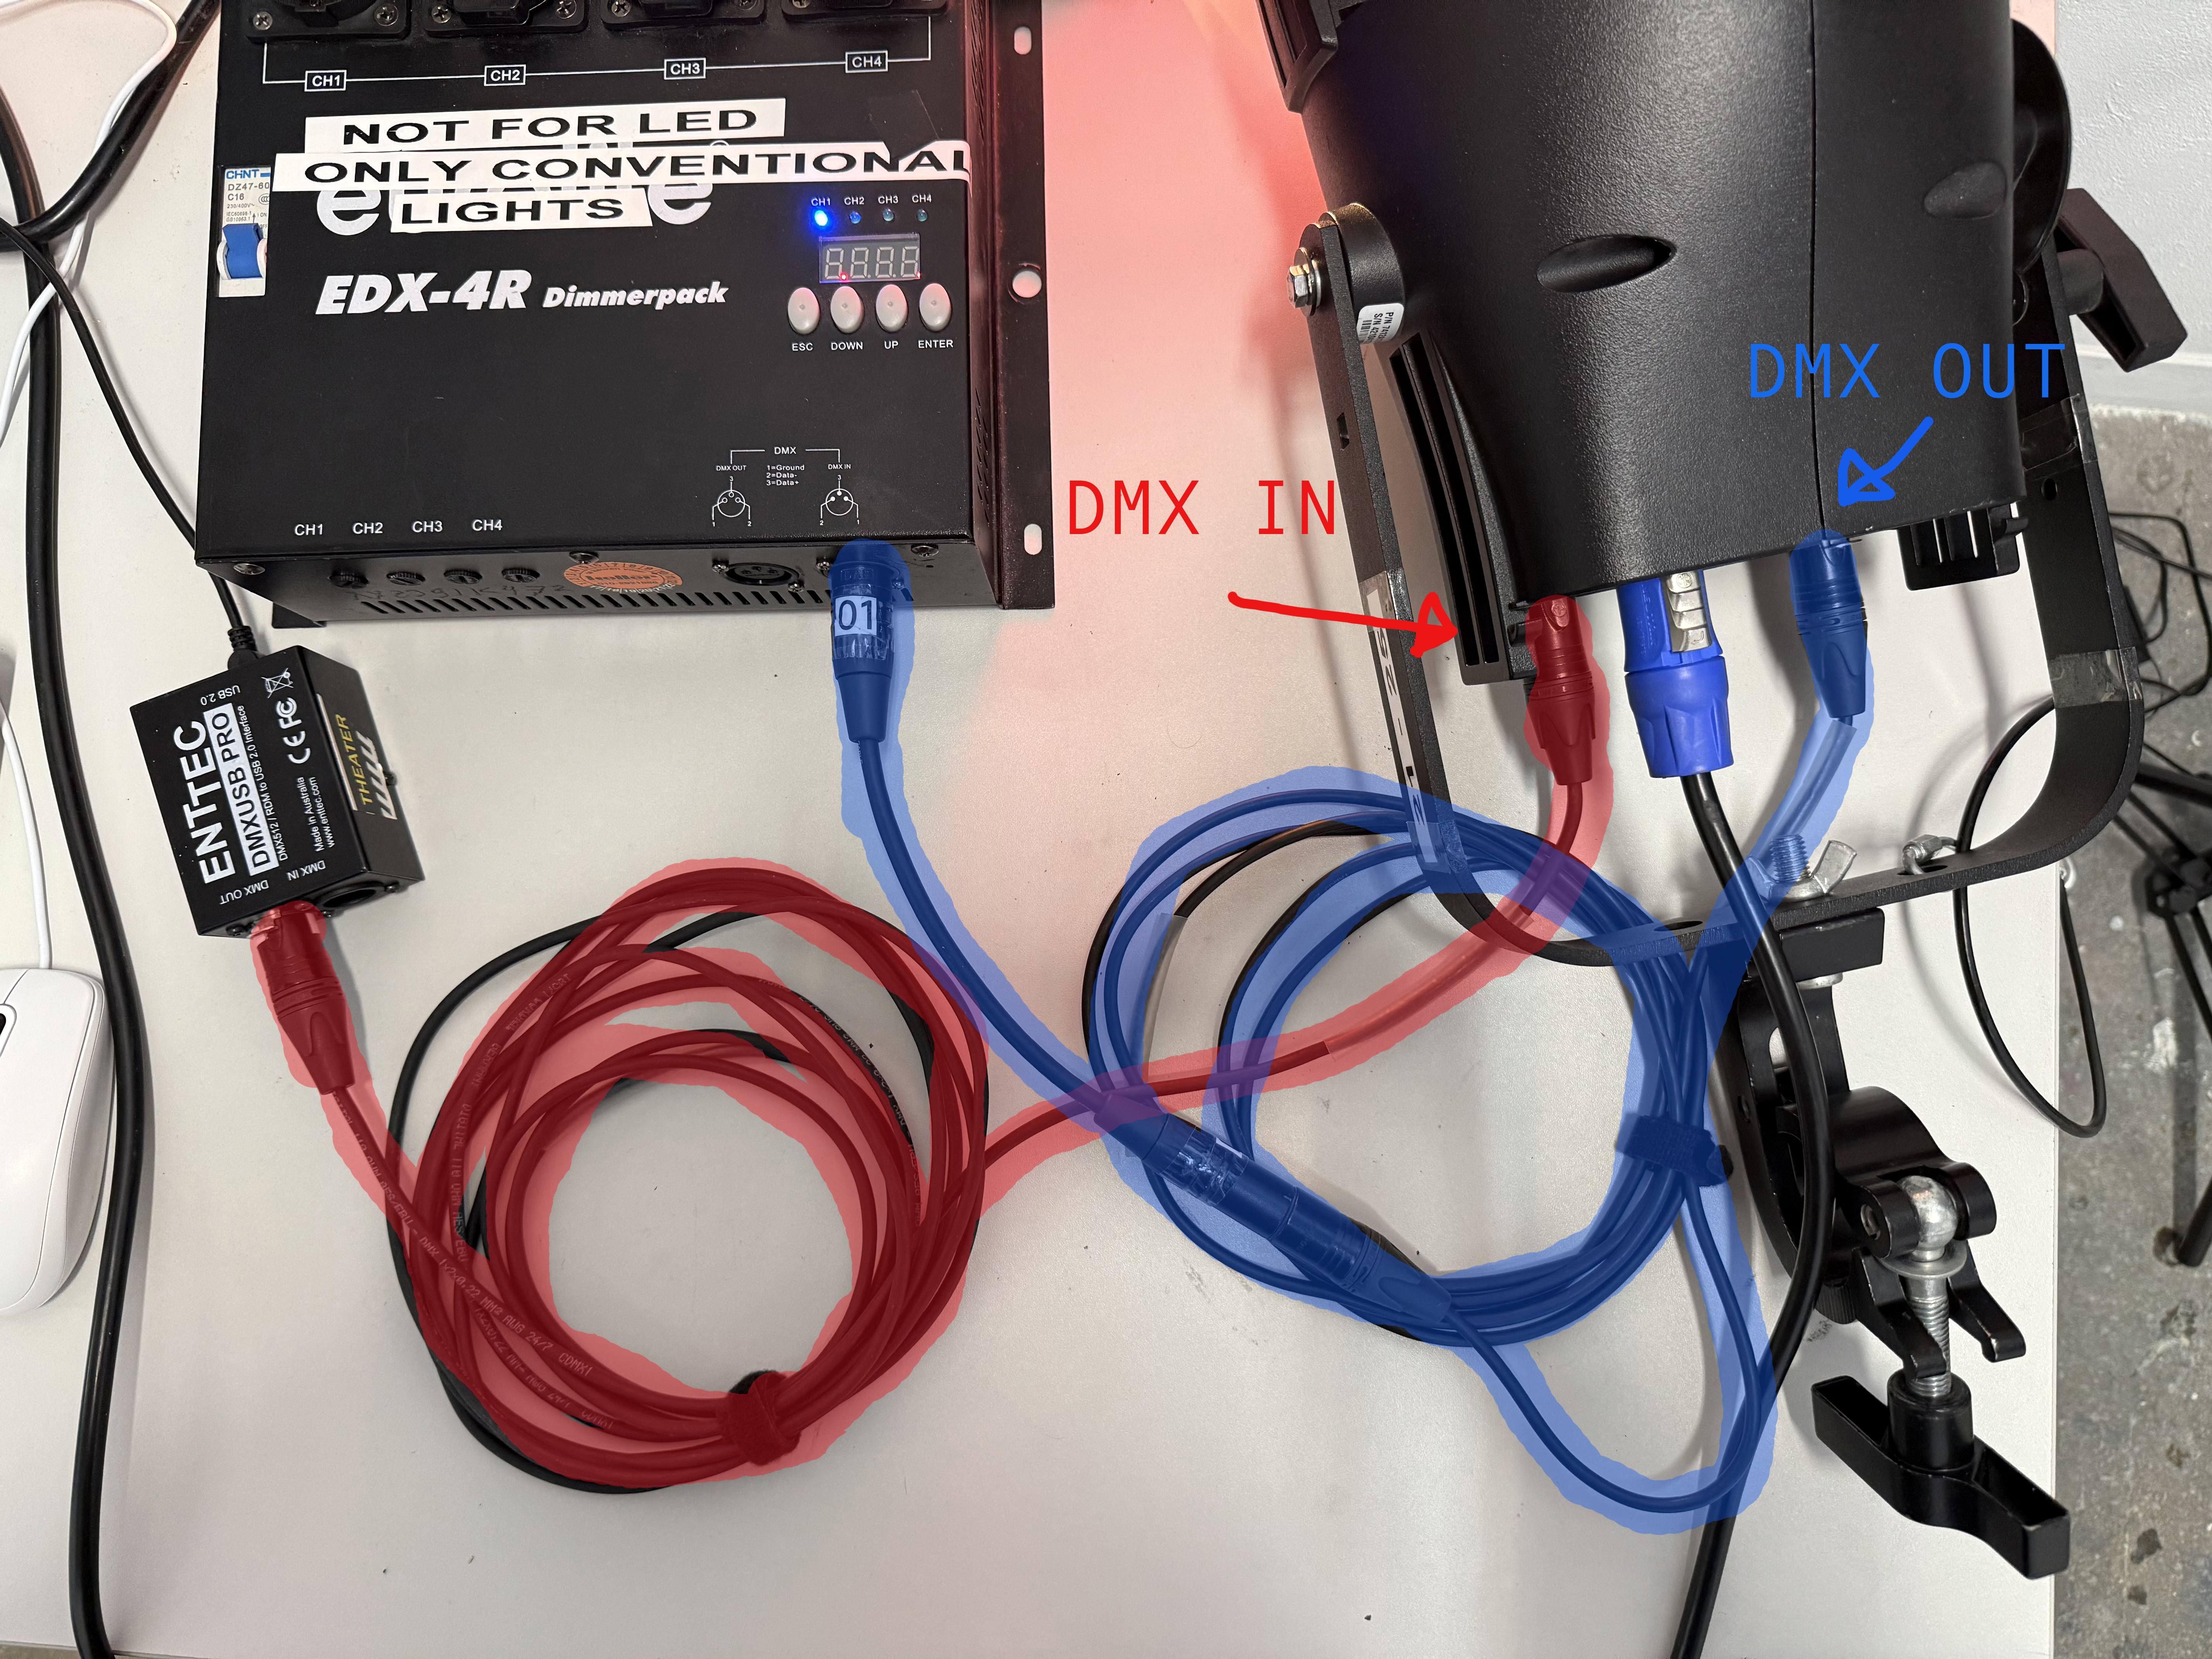
Turning on both lights simultaneously in QLC+ should now work, as they're both receiving a signal. You can keep adding lights to this chain.

11. Controlling lights in Isadora
If you're interested in incorporating lights in your Isadora projects, you can check out the following link: https://bookstack.hku.nl/books/controlling-lights/page/control-lights-from-isadora
This can be interesting if you're looking for a different way to que your lights than with what QLC+ has to offer, and if you want sensors or other inputs like video or sound to influence your lights.
RDM (Remote Device Management)
RDM(Remote Device Management) is a protocol that sits on top of the DMX512 and allows bi-directional communication between a lighting or system controller
general sources and info about RDM
https://ovationlights.com/industry/what-is-rdm-protocol/
Lights in HKU Blackboxes
Each Blackbox has it's own setup & manual
Controlling Light @ Blackbox Theatre (QLC)
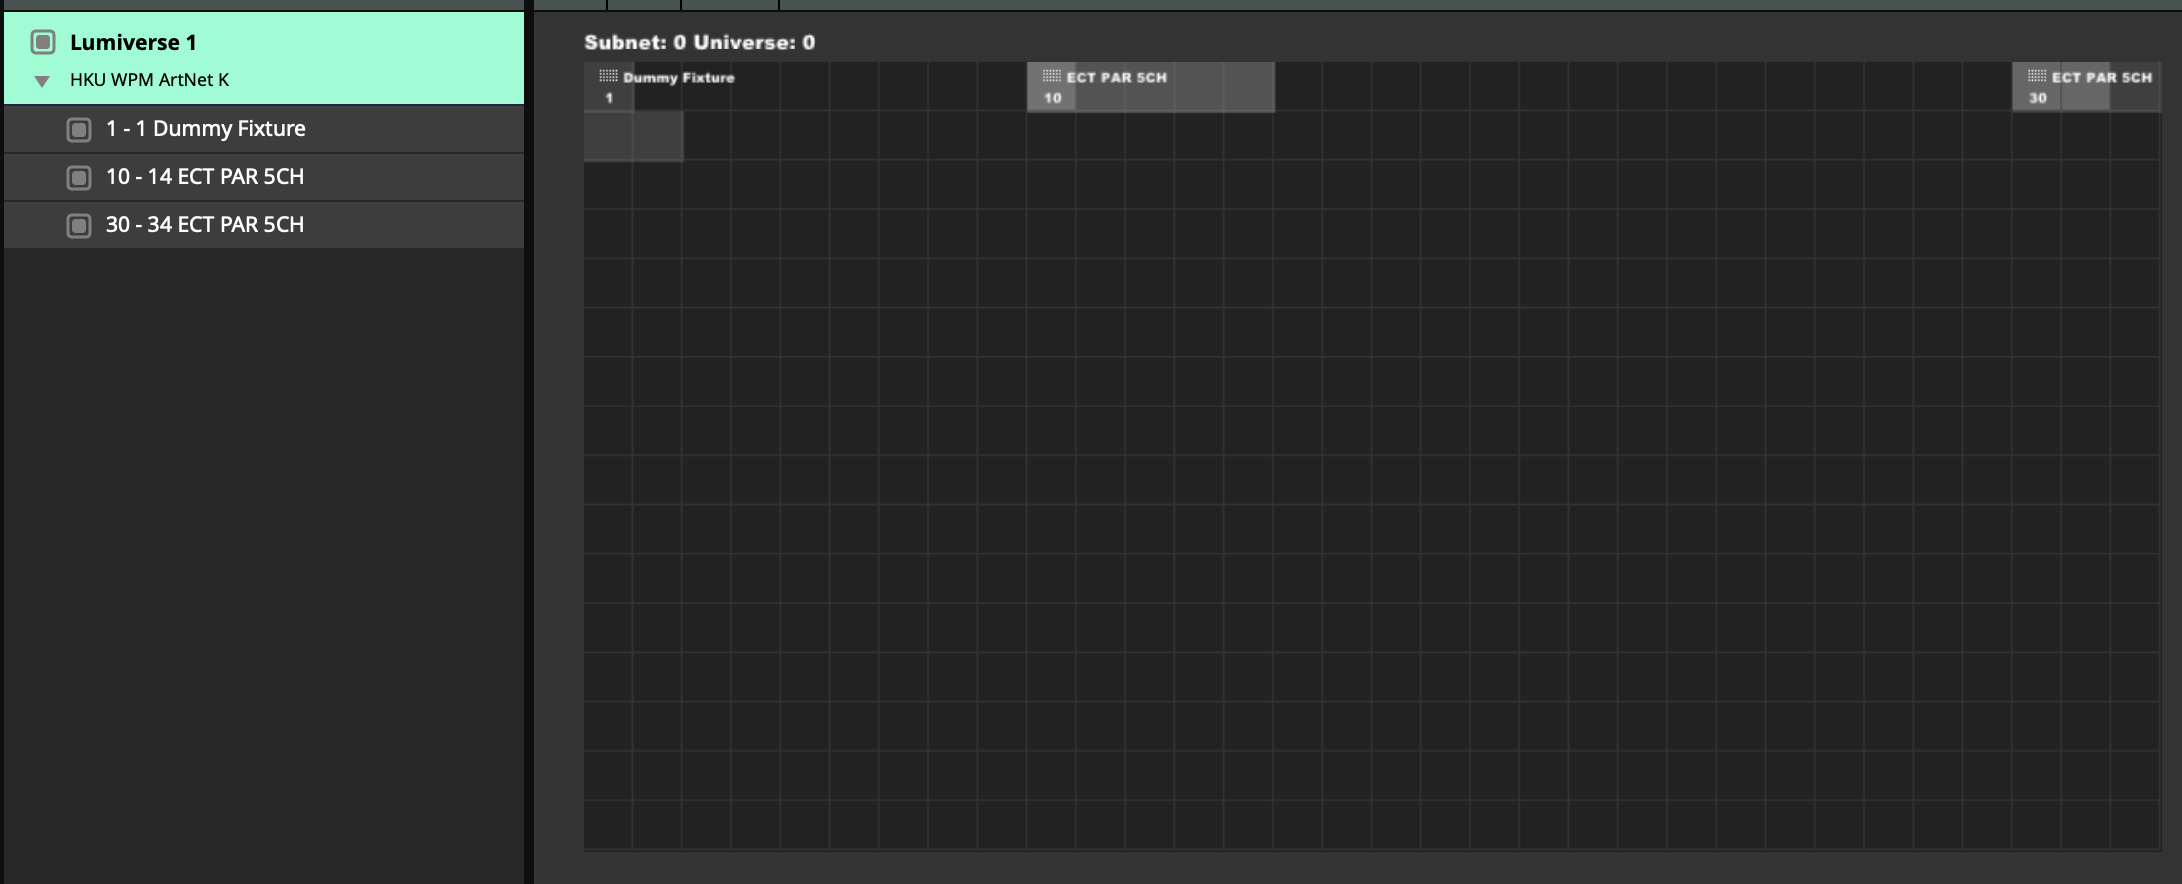
Lighting in the Blackbox @ Janskerkhof is controlled through ArtNet
You can connect to this system from your own laptop or with the Blackbox computers.
At this Blackbox we have 8 pars, the DMX each starting on the decimal: 10, 20 , 30 etc. The 3 spots are on adres 110, 120, 130 (the starting adres matches the sticker on the fixture)
They are named Colorsource PAR #1, #2, #3 etc, The spots are named Colorsource Spot #1, #2, #3.
They are all set to 5 channels. (Intensity, RGB, Strobe)
These fixtures can be hung anywhere you need them to design your work. Always use safeties to have a two point connection to the grid. The fixtures do not need to be returned to a specific spot after use.
0. Login
to computer GW95 tot use QLC with a preset patch.
For working on your own laptop or the other computer check this page
1. Turn on the electricity for the grid.
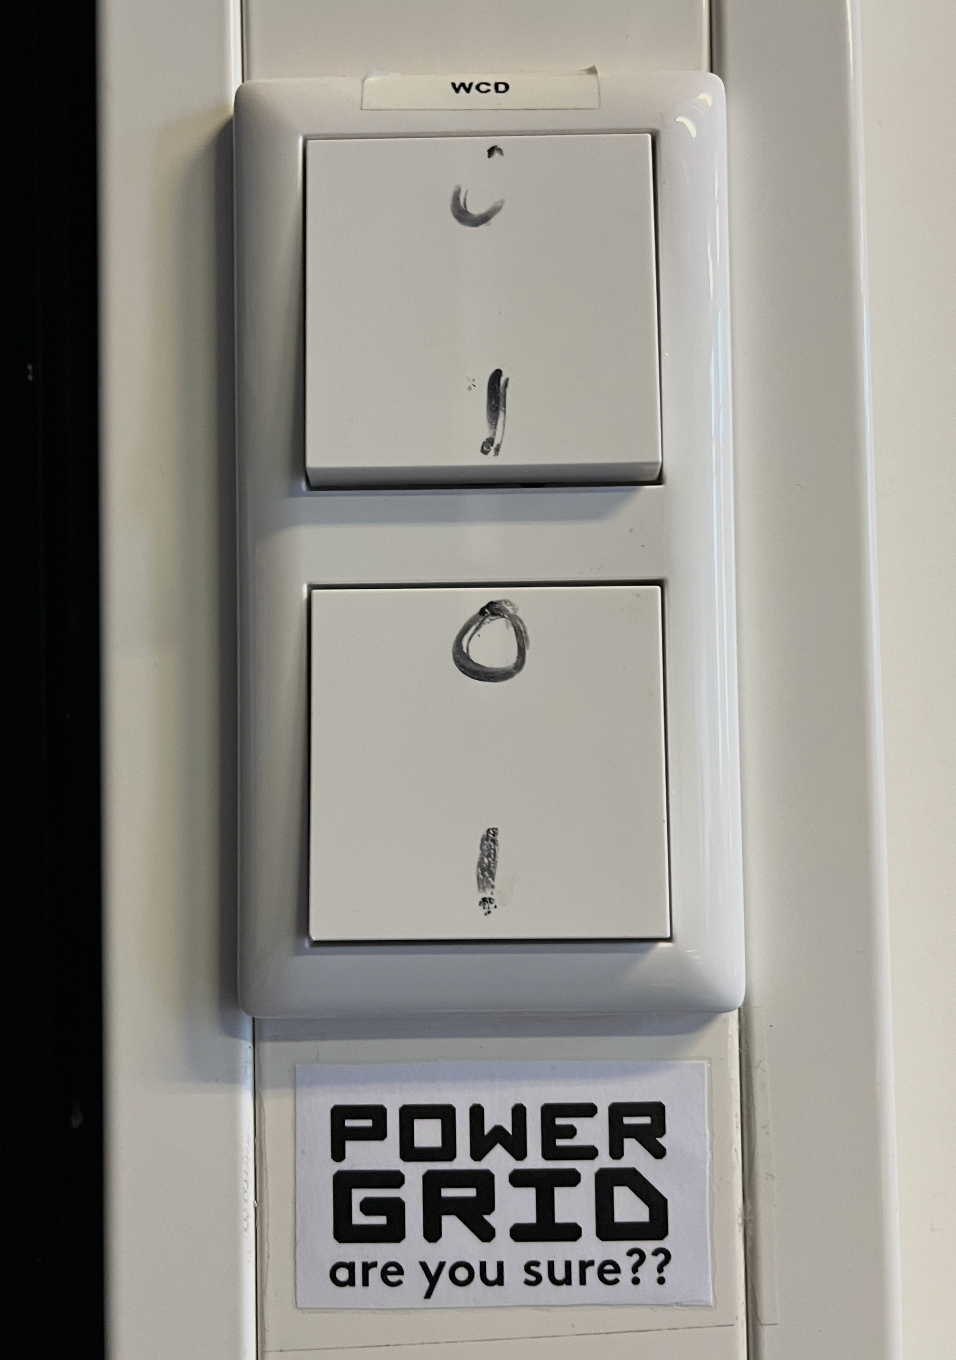
1>0 :)
2. Connect to the local intranet :
WPMArtNet
The password is provided by the host during your introduction, this router also has internet acces.
3. Open QLC (logo on the desktop or taskbar)
(if prompted choose the option: Q Light Controller Plus)
This opens an empty file!
To add the Blackbox fixtures, open the QLC patch on the desktop (again) using the 'open' logo in the top bar: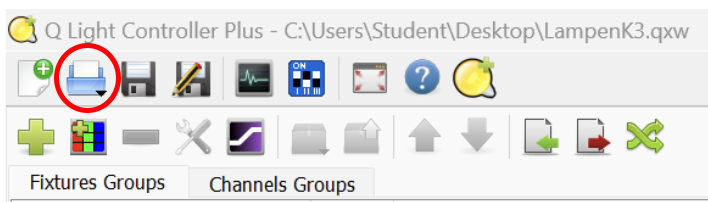
And choose the "Lampen K3.qxw" ![]() file on the desktop
file on the desktop
(yes this is confusing, you are opening the same file again...)
3. Check the TABS at the bottom:

Fixtures: Shows you which fixtures have been added to the patch. This means these can be controlled when added to this daisychain. If you want to add fixtures, please 'save as' this file for your personal patch.
You should now see fixtures added: 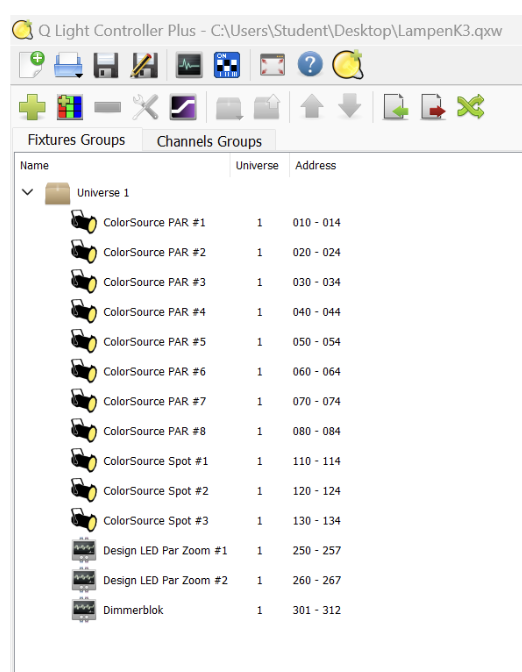
Inputs/outputs:
Shows you the connection to send the data into the daisychain over WiFi.
For this Blackbox & Artnet always choose the 10.0.0.xx adress for OUTPUT
>> This only shows up if you are connected to the WPMArtNet wifi! the XX number may vary.
If you don't see this option, check your wifi connection. 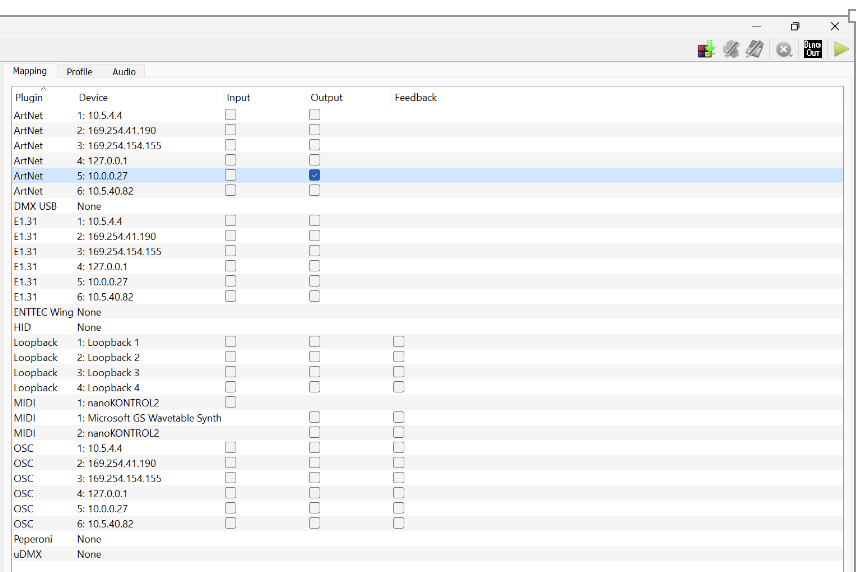
Simple Desk:
This is the interface where the 512 channels of the universe are visualised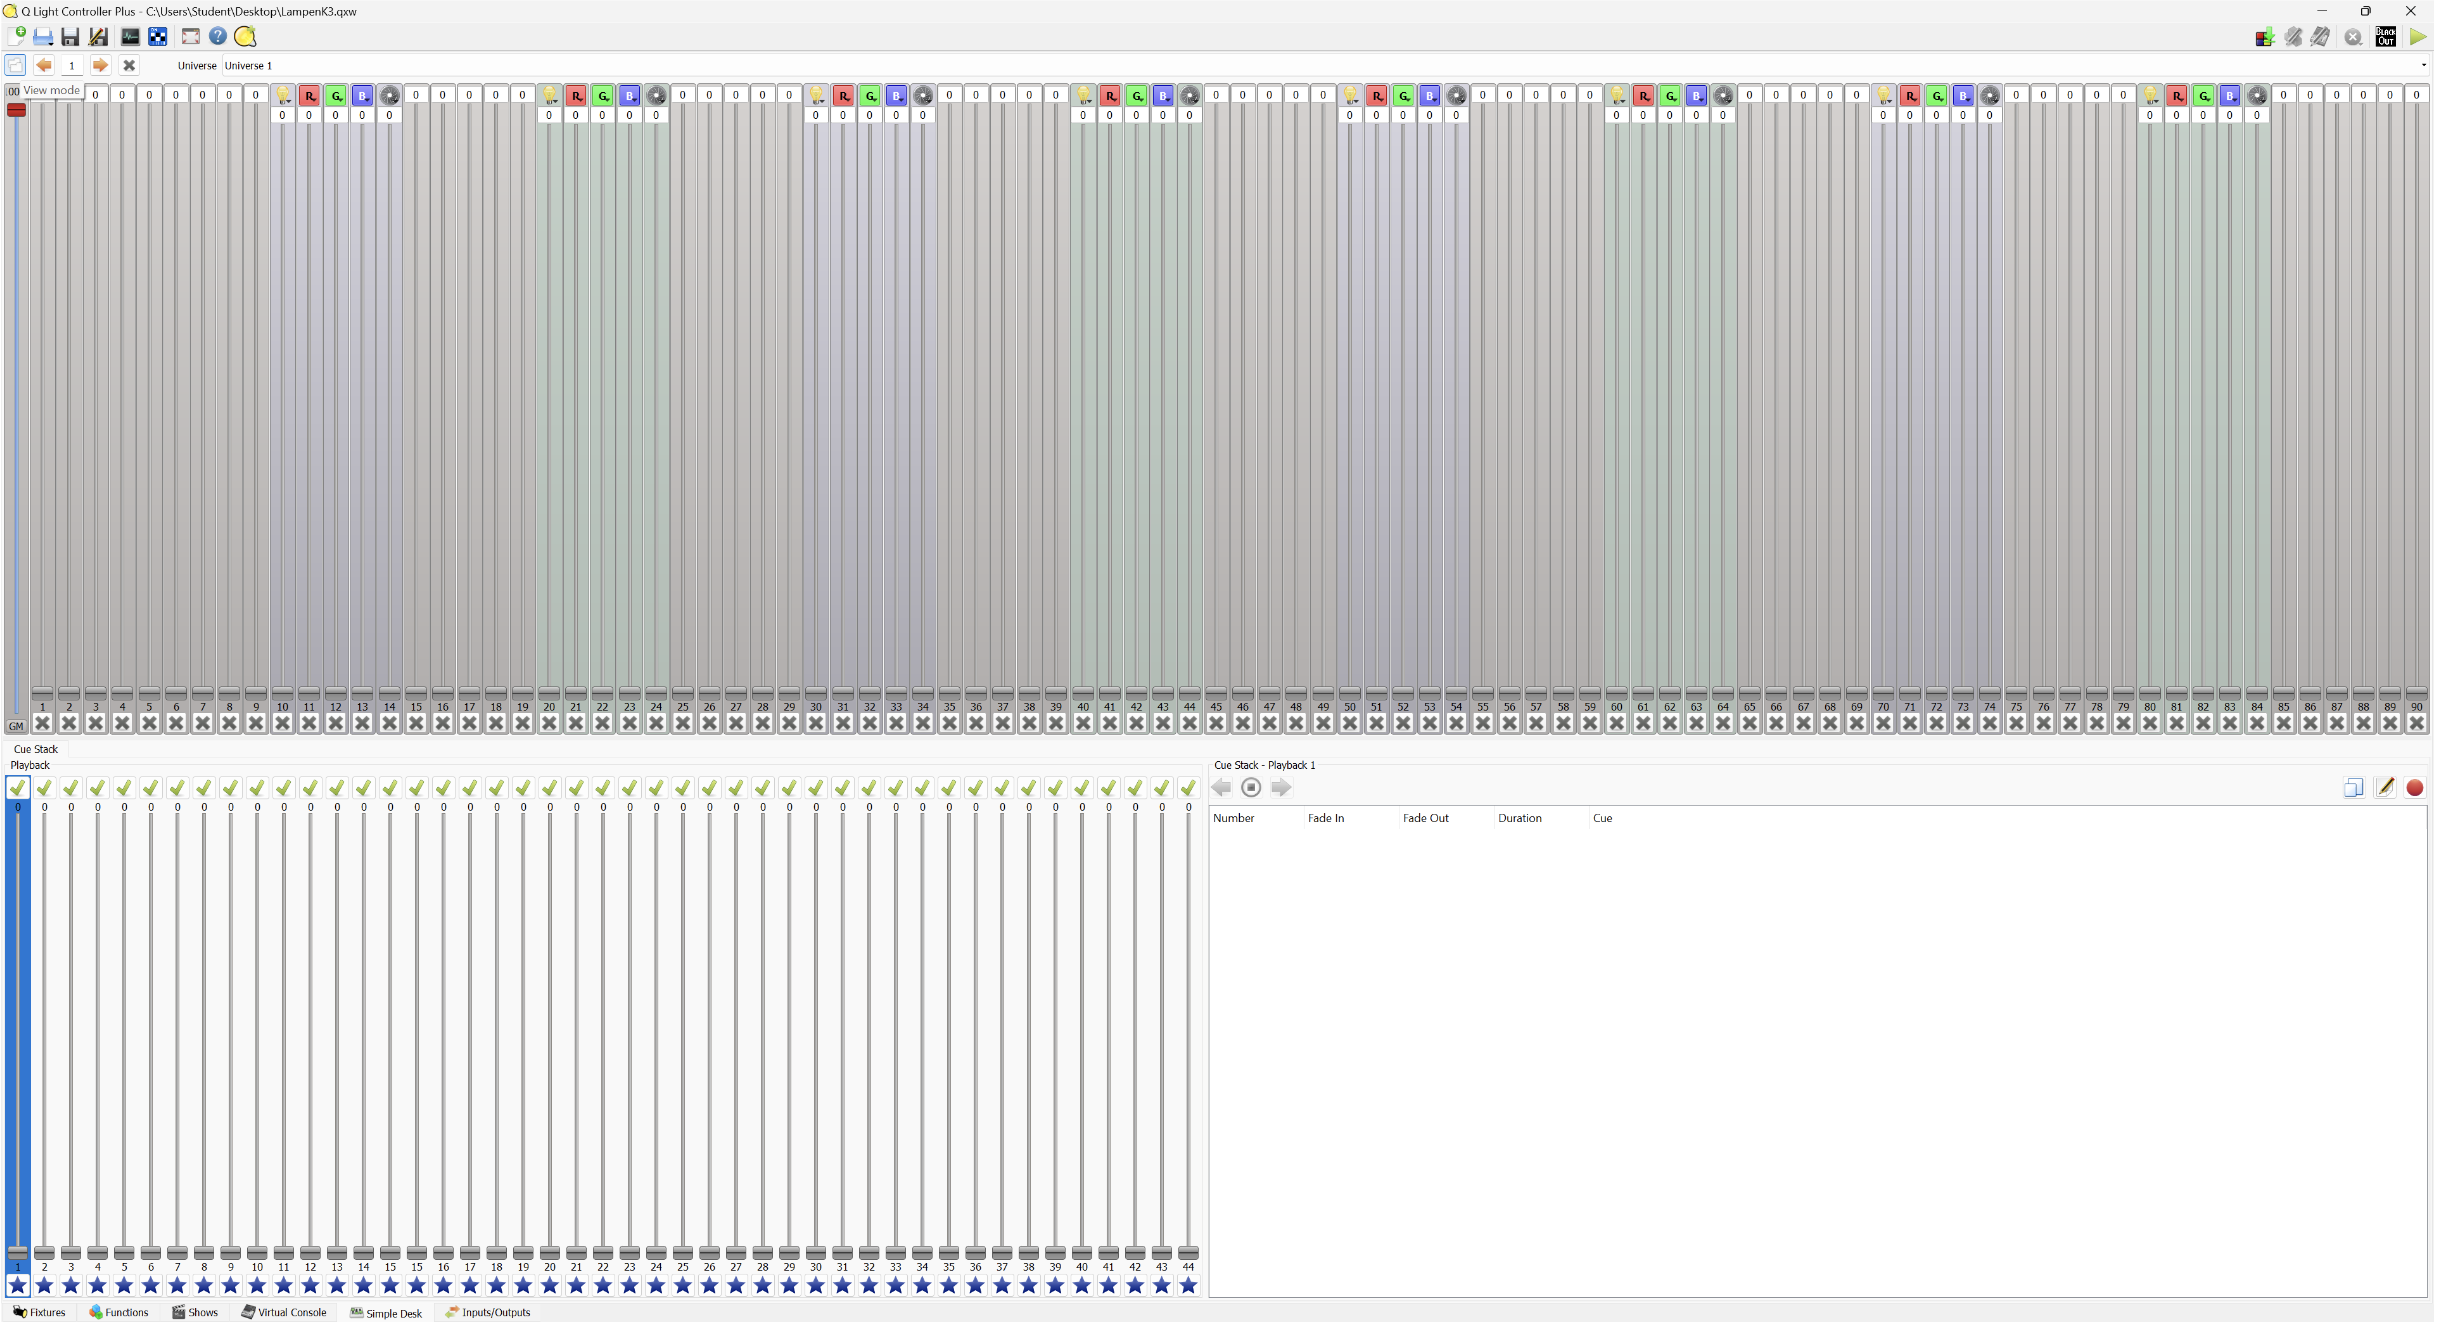
The channels that have a logo are in use. The empty channels can be confusing, to hide them, press this logo: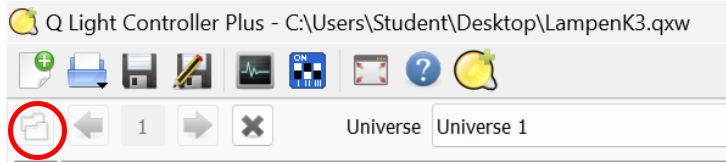
Your interface should now look like this:
To control a fixture, always use the intensity slider combined with colours.
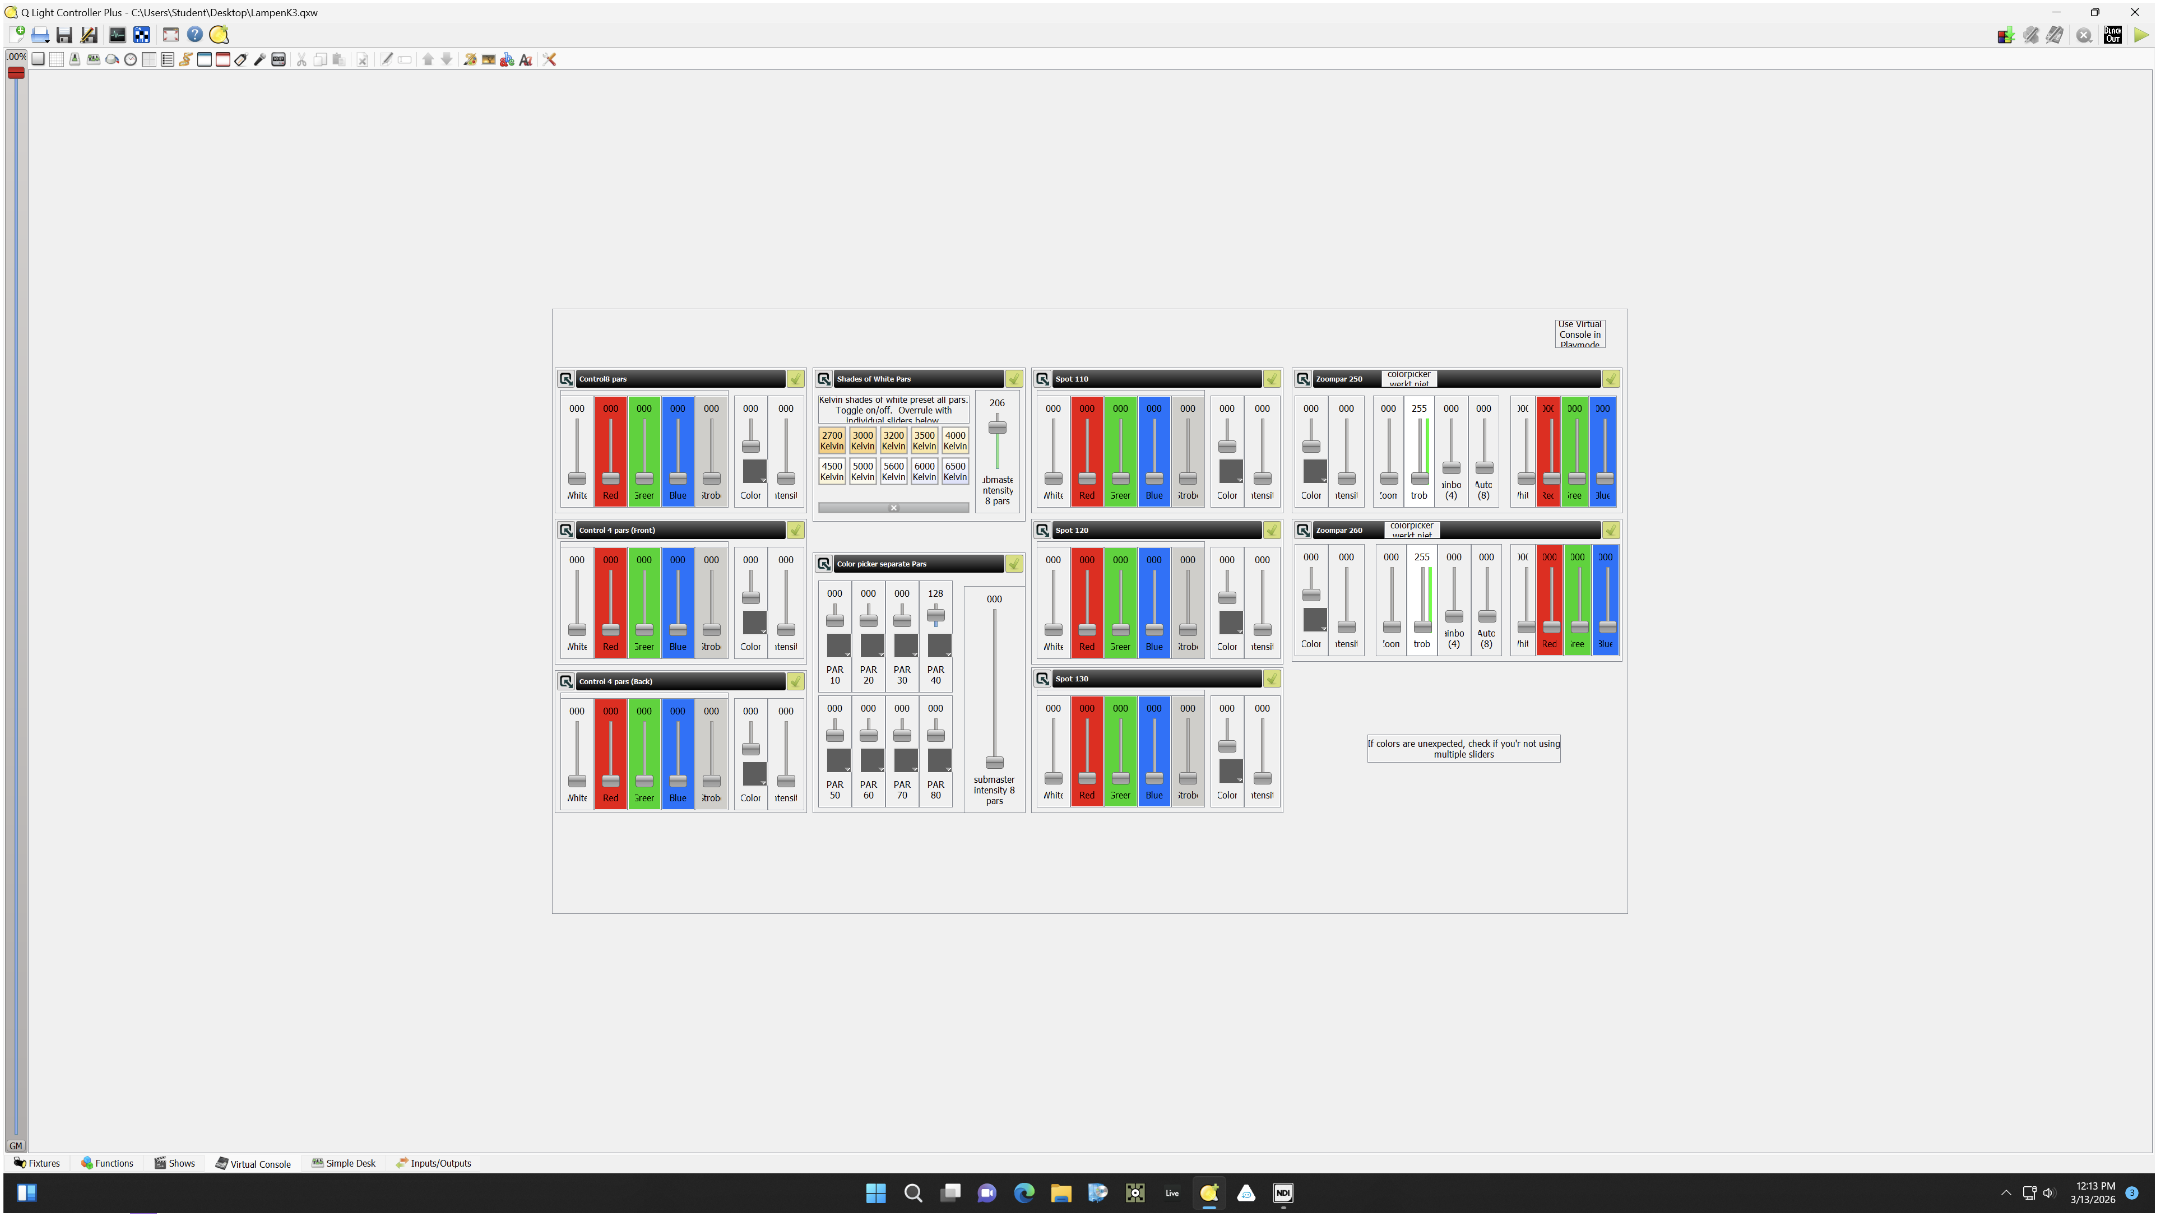
Virtual Console: This is a virtual lighting desk for when all the pars & spots are added to the daisychain.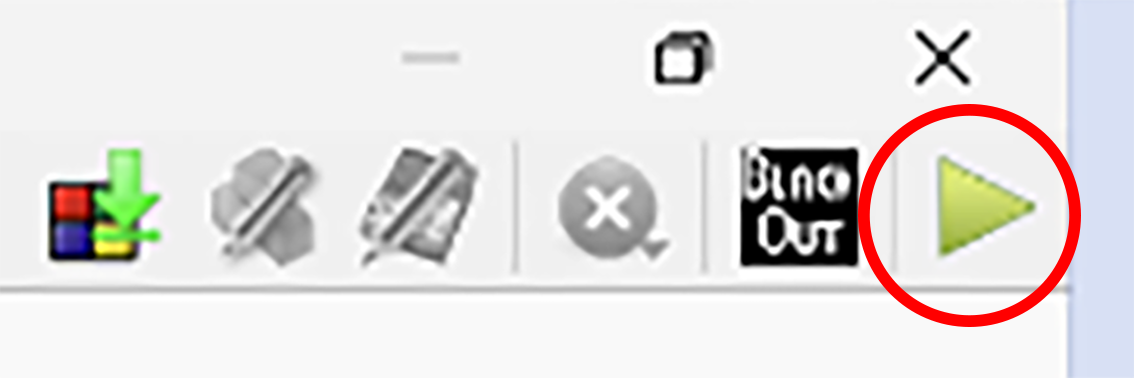
Press the top Play button to acces the possibilities (controlling 4/8 pars, all pars in white balance presets or pars/spots with the colorpicker. Note: this console is NOT the best design... also, when using the simple desk, it overrules the virtual console which may be confusing)
When using this feature & finished, "unplay" by pressing the red square. Else you cannot quit the program.
Functions/Shows
Are not yet used in this patch, but you can look up info and tutorials on this page: https://www.qlcplus.org/old/docs/html_en_EN/index.html
5. Troubleshooting
The Blackbox at Janskerkhof is a workshop. Students are encouraged to change, understand and manage setups, but this may result in an environment that is less plug & play...
If the lights are not working, check all of the above steps first.
The WiFi sometimes disconnects.
Fixtures may not be in the daisychain, check the cables and if they are truly connected to the system. Power & data.
If the display is showing the correct adres, but blinking it is expecting but not receiving DMX data.
Lights giving unexpected colours? Check the adres on the fixture. Does it match the sticker? Change it back.
If for any reason you ever adapt the adres number: put it back to the sticker default afterwards!
If anything weird still persists, you try to contact Astrid (check the QR on the Blackbox front door). If anything seems broken, or breaks, always let her know.
controlling Lights Blackbox Theatre Touchdesigner
1. Turn on the electricity for the grid.
1>0 :)
2. Connect to the local intranet :
WPMArtNet
The password is provided by the host during your introduction, this router also has internet acces.
3. Open this patch
You can use this patch on your own laptop or a Blackbox computer: lights@BlackboxJK.toe