Other related stuff to dive into
- Remote control of Lights through TouchOSC
- Visualizing shows
- Combining Software
- MagicQ : lighting software mimicking a light console
- Pixel mapping
- Creating a QLC+ file from scratch, and controlling lights with your own laptop
Remote control of Lights through TouchOSC
TouchOSC is a modular control surface toolkit for designing and constructing custom controllers that can be used on a multitude of operating systems and devices. An easy way of designing your own OSC controls. Use the old version of TouchOSC Editor or new version to design custom sliders, faders and buttons, control other software through OSC using the app TouchOSC
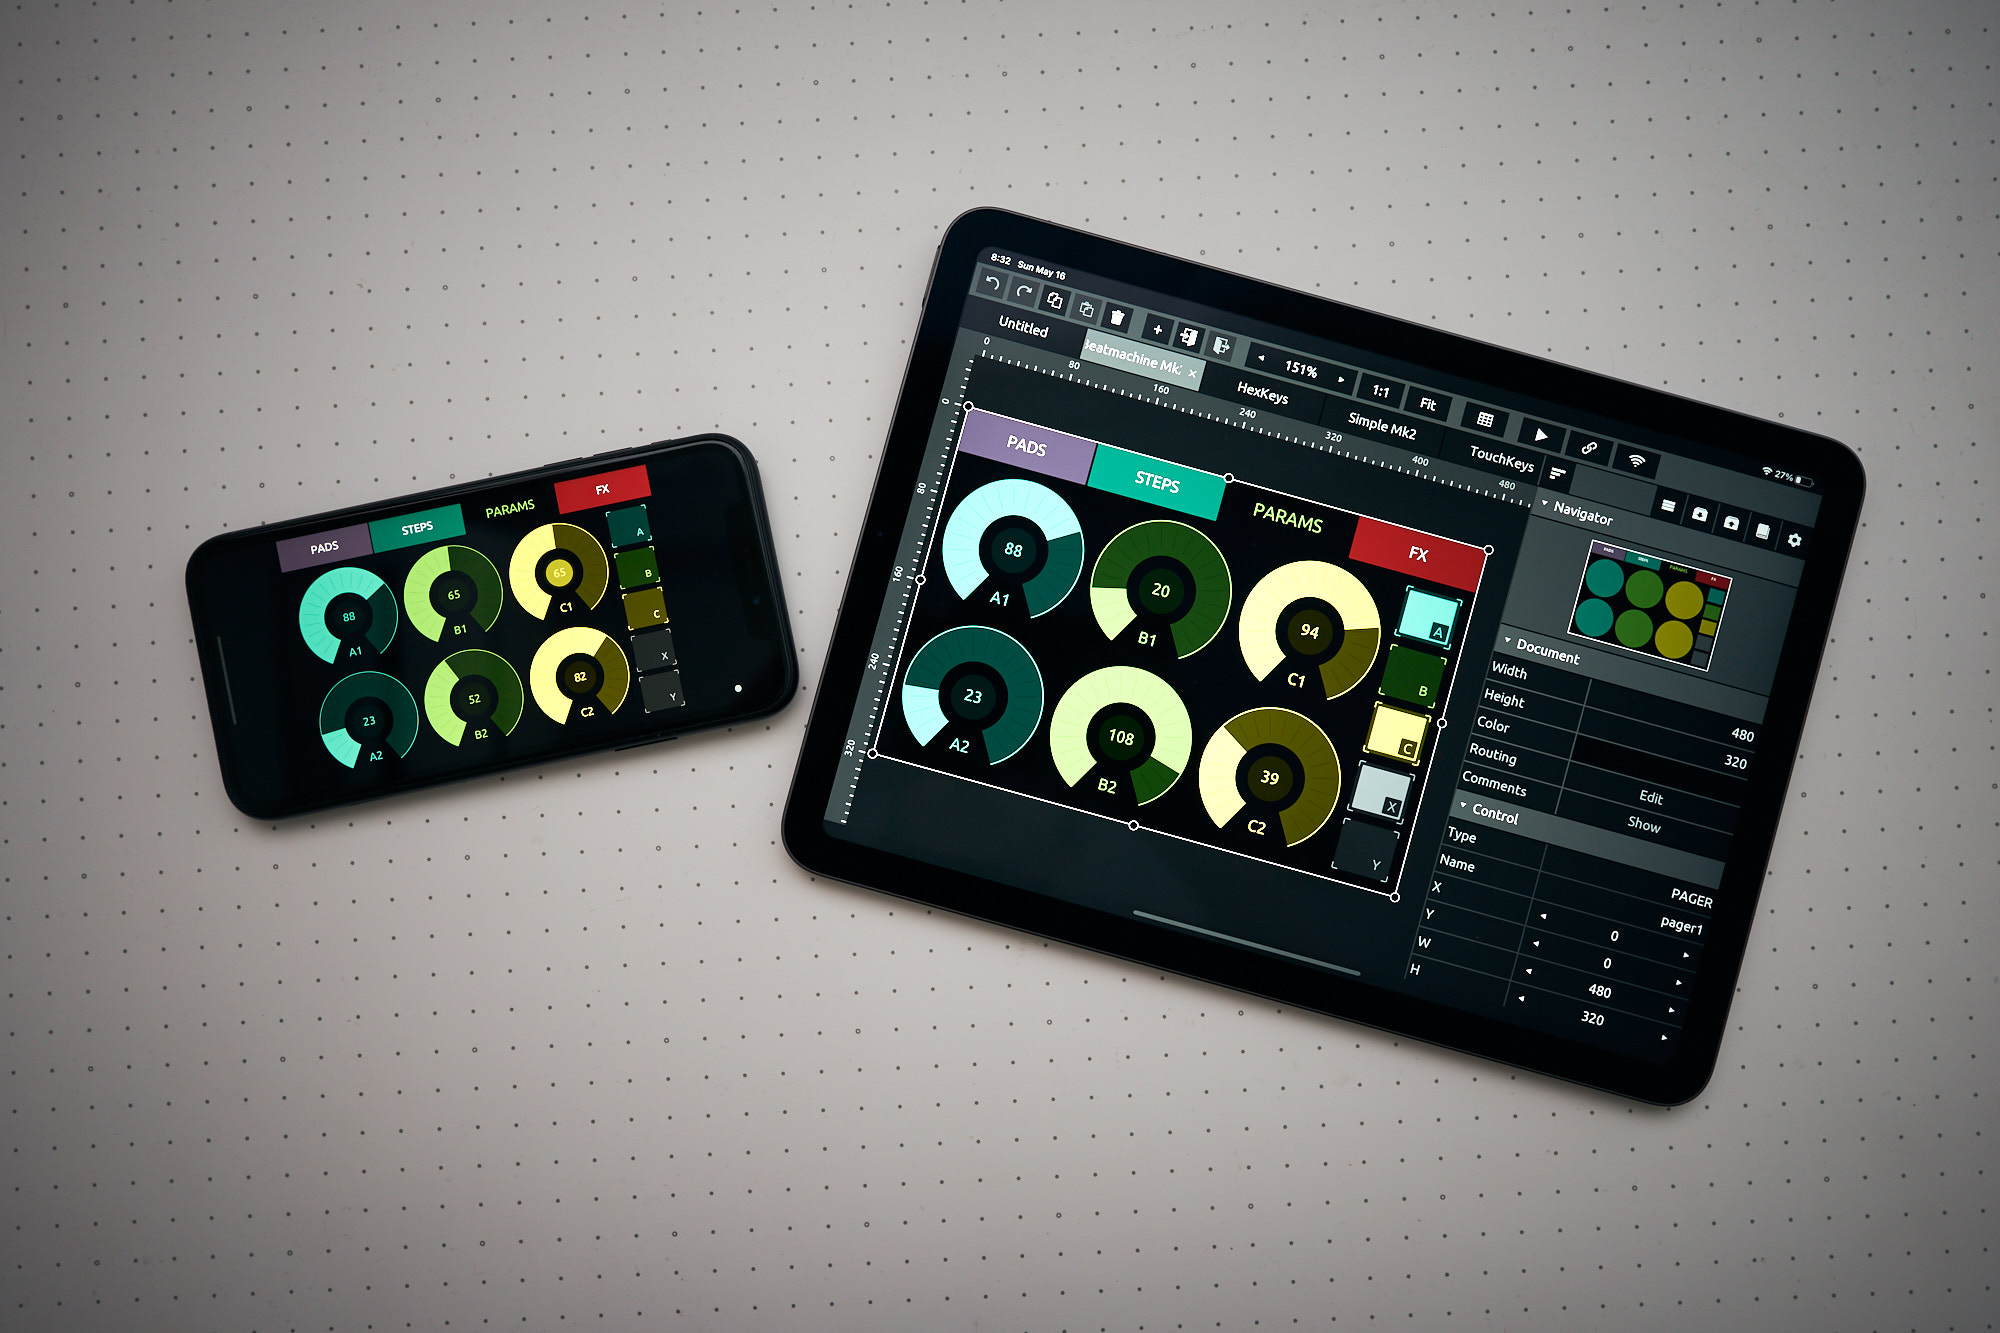
| Simple TouchOSC template to control 8 pars & 3 spots (5 channels). Open this patch in TouchOSC Editor to upload to your device. Any software that receives OSC massages can be connected. | Controlling LightPars&Spots.touchosc |
How to use the templates:
-
Download and install the TouchOSC App on your tablet or smartphone
-
Download and install the TouchOSC desktop editor on your computer
-
Start the desktop editor and load a template
- Check to make both devices on the same WiFi Network. Set the computer ipadres in the app.
-
In the App go to LAYOUT & tap ADD. Select your host (computer name running the desktop editor) Click on “sync” and the template will be sent to your tablet or smartphone.
-
The template will now appear on your tablet or smartphone list of templates
TouchOSC & Touchdesigner:
| Control the lights* remotely with Touchdesigner & TouchOSC on Ipad with these 2 patches & ArtNet. |
|
| Open this patch in TouchOSC Editor to upload to your device. | |
| Open this patch in Touchdesigner, check OSC port & ArtNet connection. | |
| After connecting, slide all the faders once to refresh the connection with Touchdesigner & remove errors. This connection also works when TD is running in perform mode in the background. * these patches were designed for the fixtures in the Blackbox @Janskerkhof (8 pars & 3 spots) but can easily be adapted. |
TouchOSC & QLC
| tbd add example patch |
Visualizing shows
Combining Software
Sending DMX data from Touchdesigner over Artnet to Resolume.
Sending OSC data from Isadora to QLC
Connecting EMU & Abelton
MagicQ : lighting software mimicking a light console
MagicQ software offers powerful lighting control with loads of features that lighting designers have come to rely on, such as full lighting visualisation, pixel mapping, and HD media playback on up to 8 different layers, all integrated smoothly to streamline workflows, save time, and shorten learning curves on even the most complex lighting systems.
- MagicVis Visualiser
- Magic HD Pixel-Mapper
- Morphing
- Cloning
- Patch Offsetting
- Group and Palette FX
Chamsys MagicQ supports an extensive array of features to enable lighting designers to quickly and easily realise their innovative and imaginative designs. MagicQ offers lighting control on up to 256 universes with full lighting visualisation, pixel mapping, and HD media playback on up to 8 different layers, all integrated smoothly to streamline workflows, save time, and shorten learning curves on even the most complex lighting systems.
MagicQ PC is available free of charge for use on Windows, Mac and Linux with 64 universes of output fully enabled (via Art-net, sACN, Pathport) - no hardware required!
Magic Q software to download MagicQ
https://chamsyslighting.com/pages/video-tutorials to learn MagicQ
Pixel mapping
(under construction)
Pixel mapping is the use of software to map video imagery to an array of individual lighting fixtures.
the setup is:
1. in: A source of video.
2. in between: The software to map the video to the fixtures. (Resolume, Touchdesigner a.o.)
3. out: An array of RGB LED fixtures.
Exploring further, think of the software as a piece of paper that you have cut a geometric series of small holes in. When you hold that paper up to your computer screen, you only see what is let through by the holes. If you send what you see in each hole to a dedicated fixture, or pixel, you have pixel mapping.
Pixel Mapping is often used to create dynamic and creative lighting effects. You can programme intricate patterns, colour changes, and animations that respond in real-time to the mood or theme of the performance.
This short tutorial looks at the concept of pixel mapping as part of lighting and visuals for live performance such as concerts, clubs and theatre. Pixel mapping is the application of still or moving images to a lighting system, often an array of RGB LEDs and shouldn't be confused with projection mapping. The tutorial doesn't explain HOW to set up pixel mapping as part of a lighting control system but uses the example of the ChamSys MagicQ to explain the fundamental principle.
Creating a QLC+ file from scratch, and controlling lights with your own laptop
Introduction
This is a guide on how to control lights on the go, using your own laptop, outside of the blackbox, with QLC+
In this guide, we will use a device called a DMX interface to communicate with an LED light and/or dimmerpak, using the free software called QLC+. We will need to download a driver for the DMX interface, and install a fixture profile for the light you wish to use. We'll learn what channel modes and DMX addresses are, and we'll also cover some safety measures for halogens, and how to daisy chain your lights. I will guide you through these simple steps.
1. Materials needed
We will need a couple of ingredients for this to work. You should be able to find all of these in one of HKU’s uitleens. You'll need a:
- Working laptop or computer
- If you’re on Mac, a usb-c dongle to connect the USB device
- DMX interface (ENTTEC USB Pro MK1 or 2)
- 5-pin DMX cable
- LED light with DMX input (or a dimmerpack with DMX input + a halogen light)
- Idealy, a lighting stand (tripod) to put your lights on
Controlling LED lights:
2. DMX interface & driver
Before connecting the DMX interface, we need to install the driver for it. The company that makes the interface is called ENTTEC, and they also make their own light control software. We need to install this software so our computer can communicate with the interface. The software is called EMU, you can download it here.
You need to make an account to download the file (any email will work, no verification needed). If you a re opposed to this, a blackbox employee can give you the file if you want.
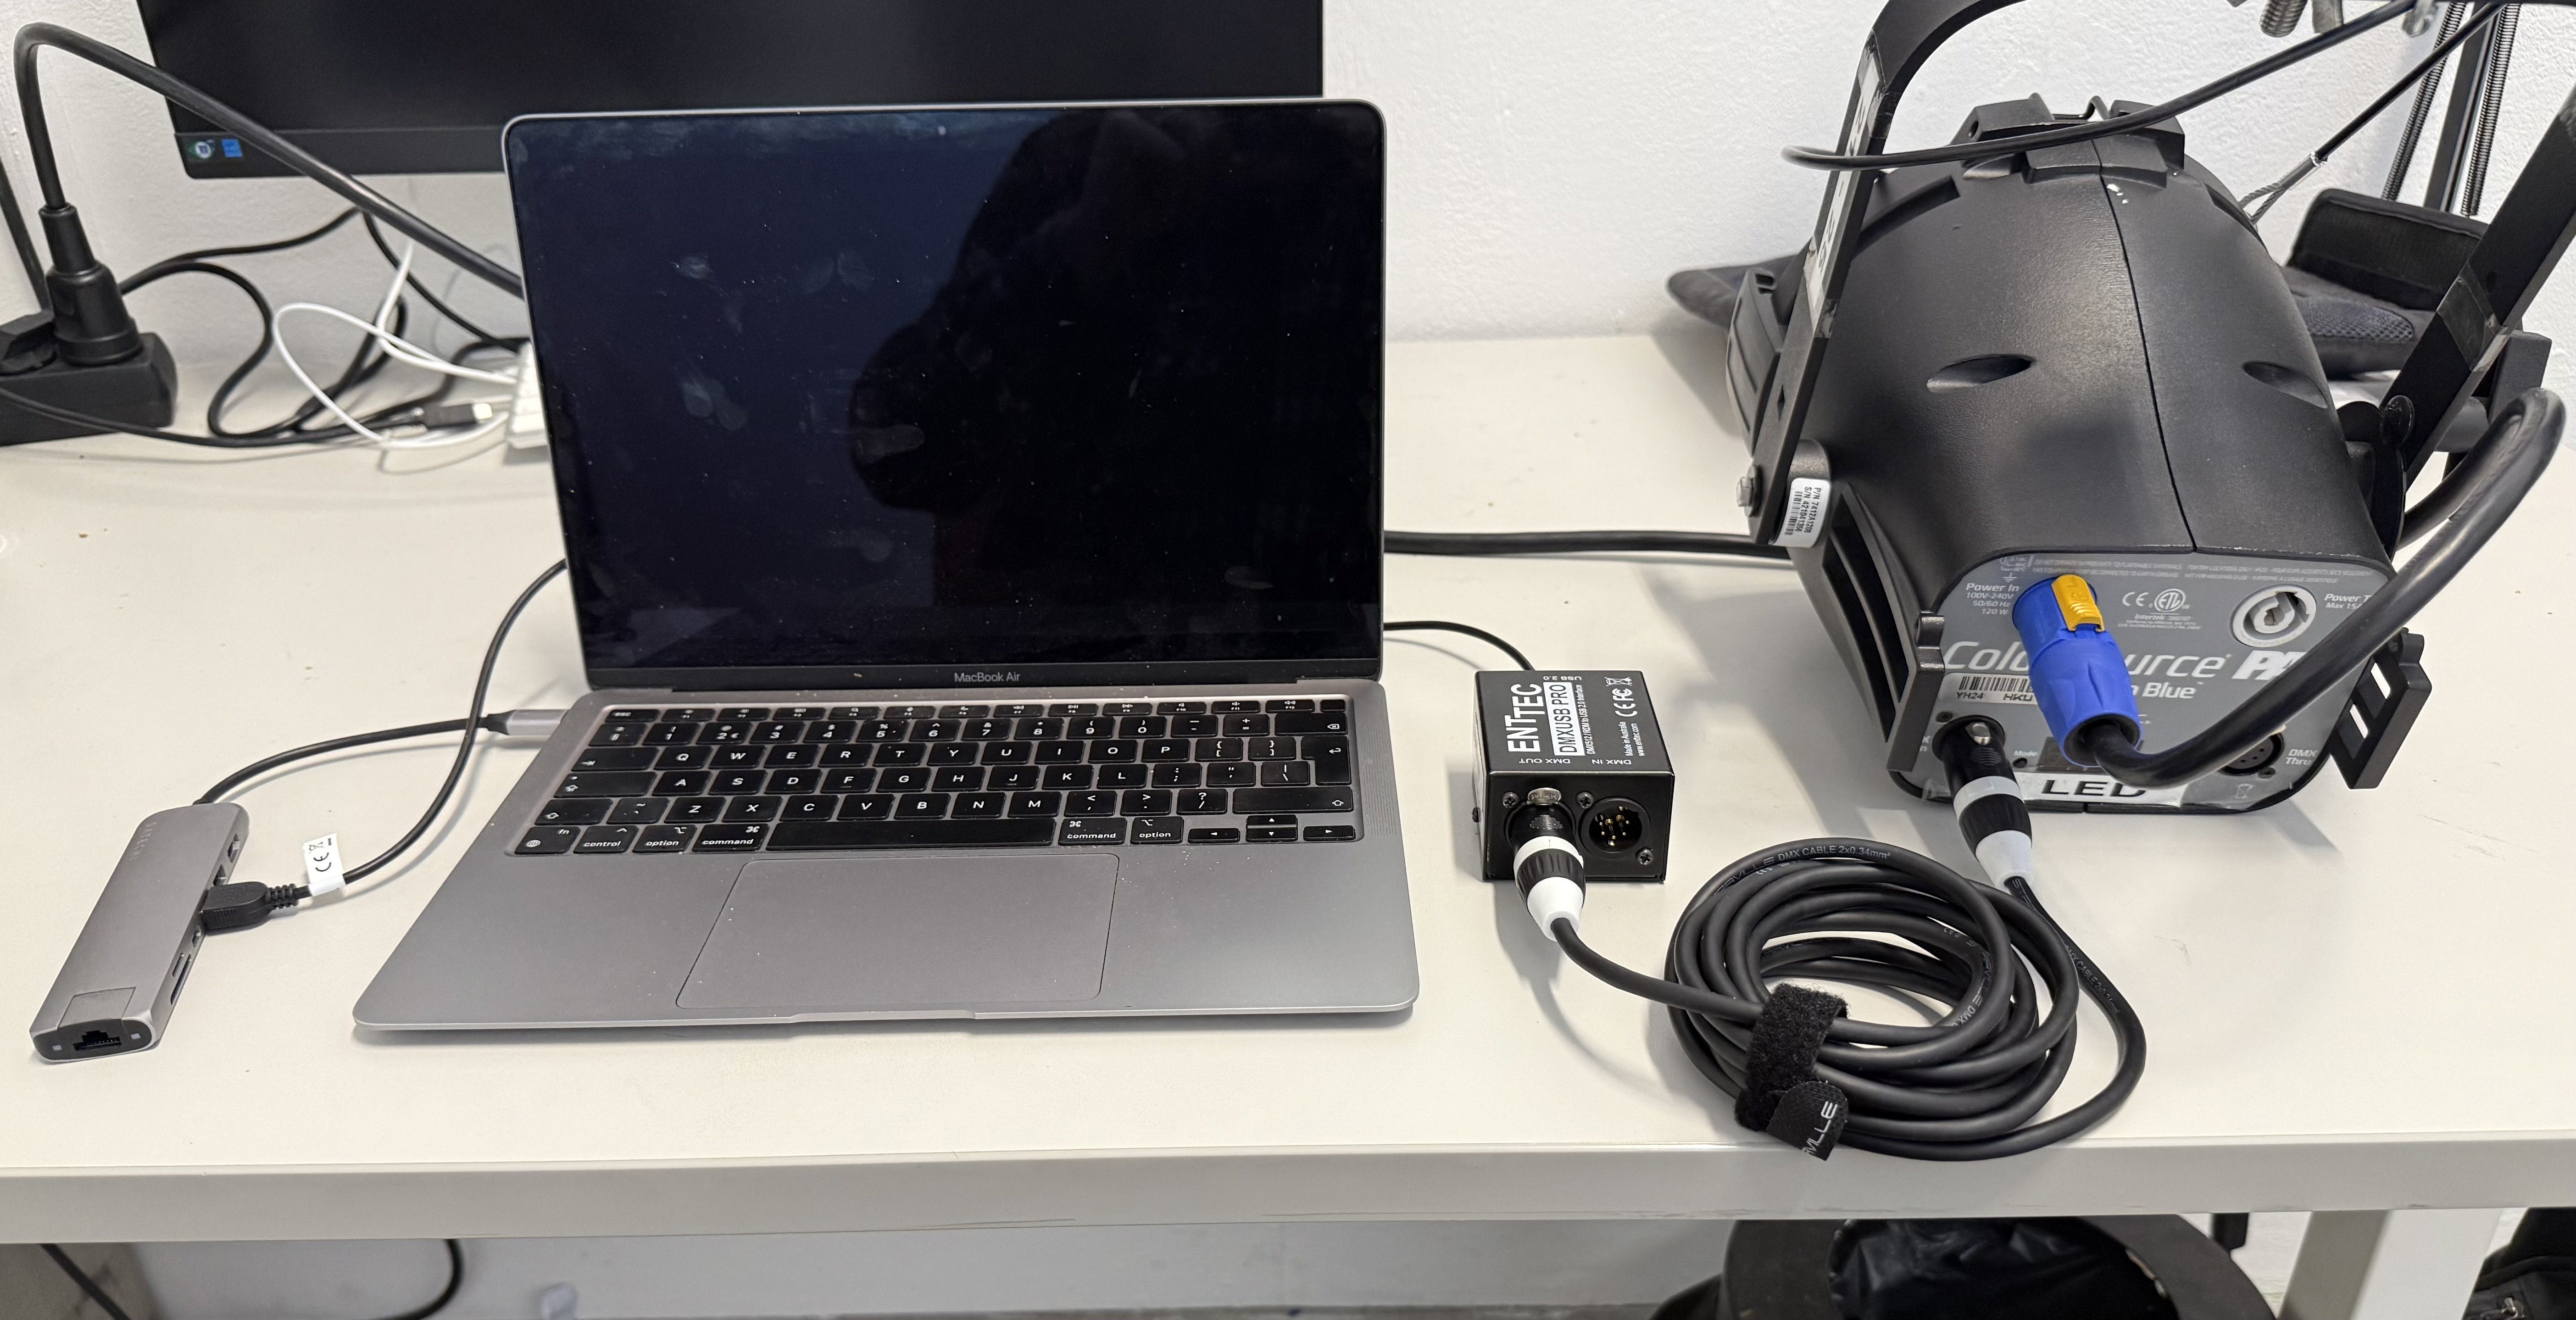
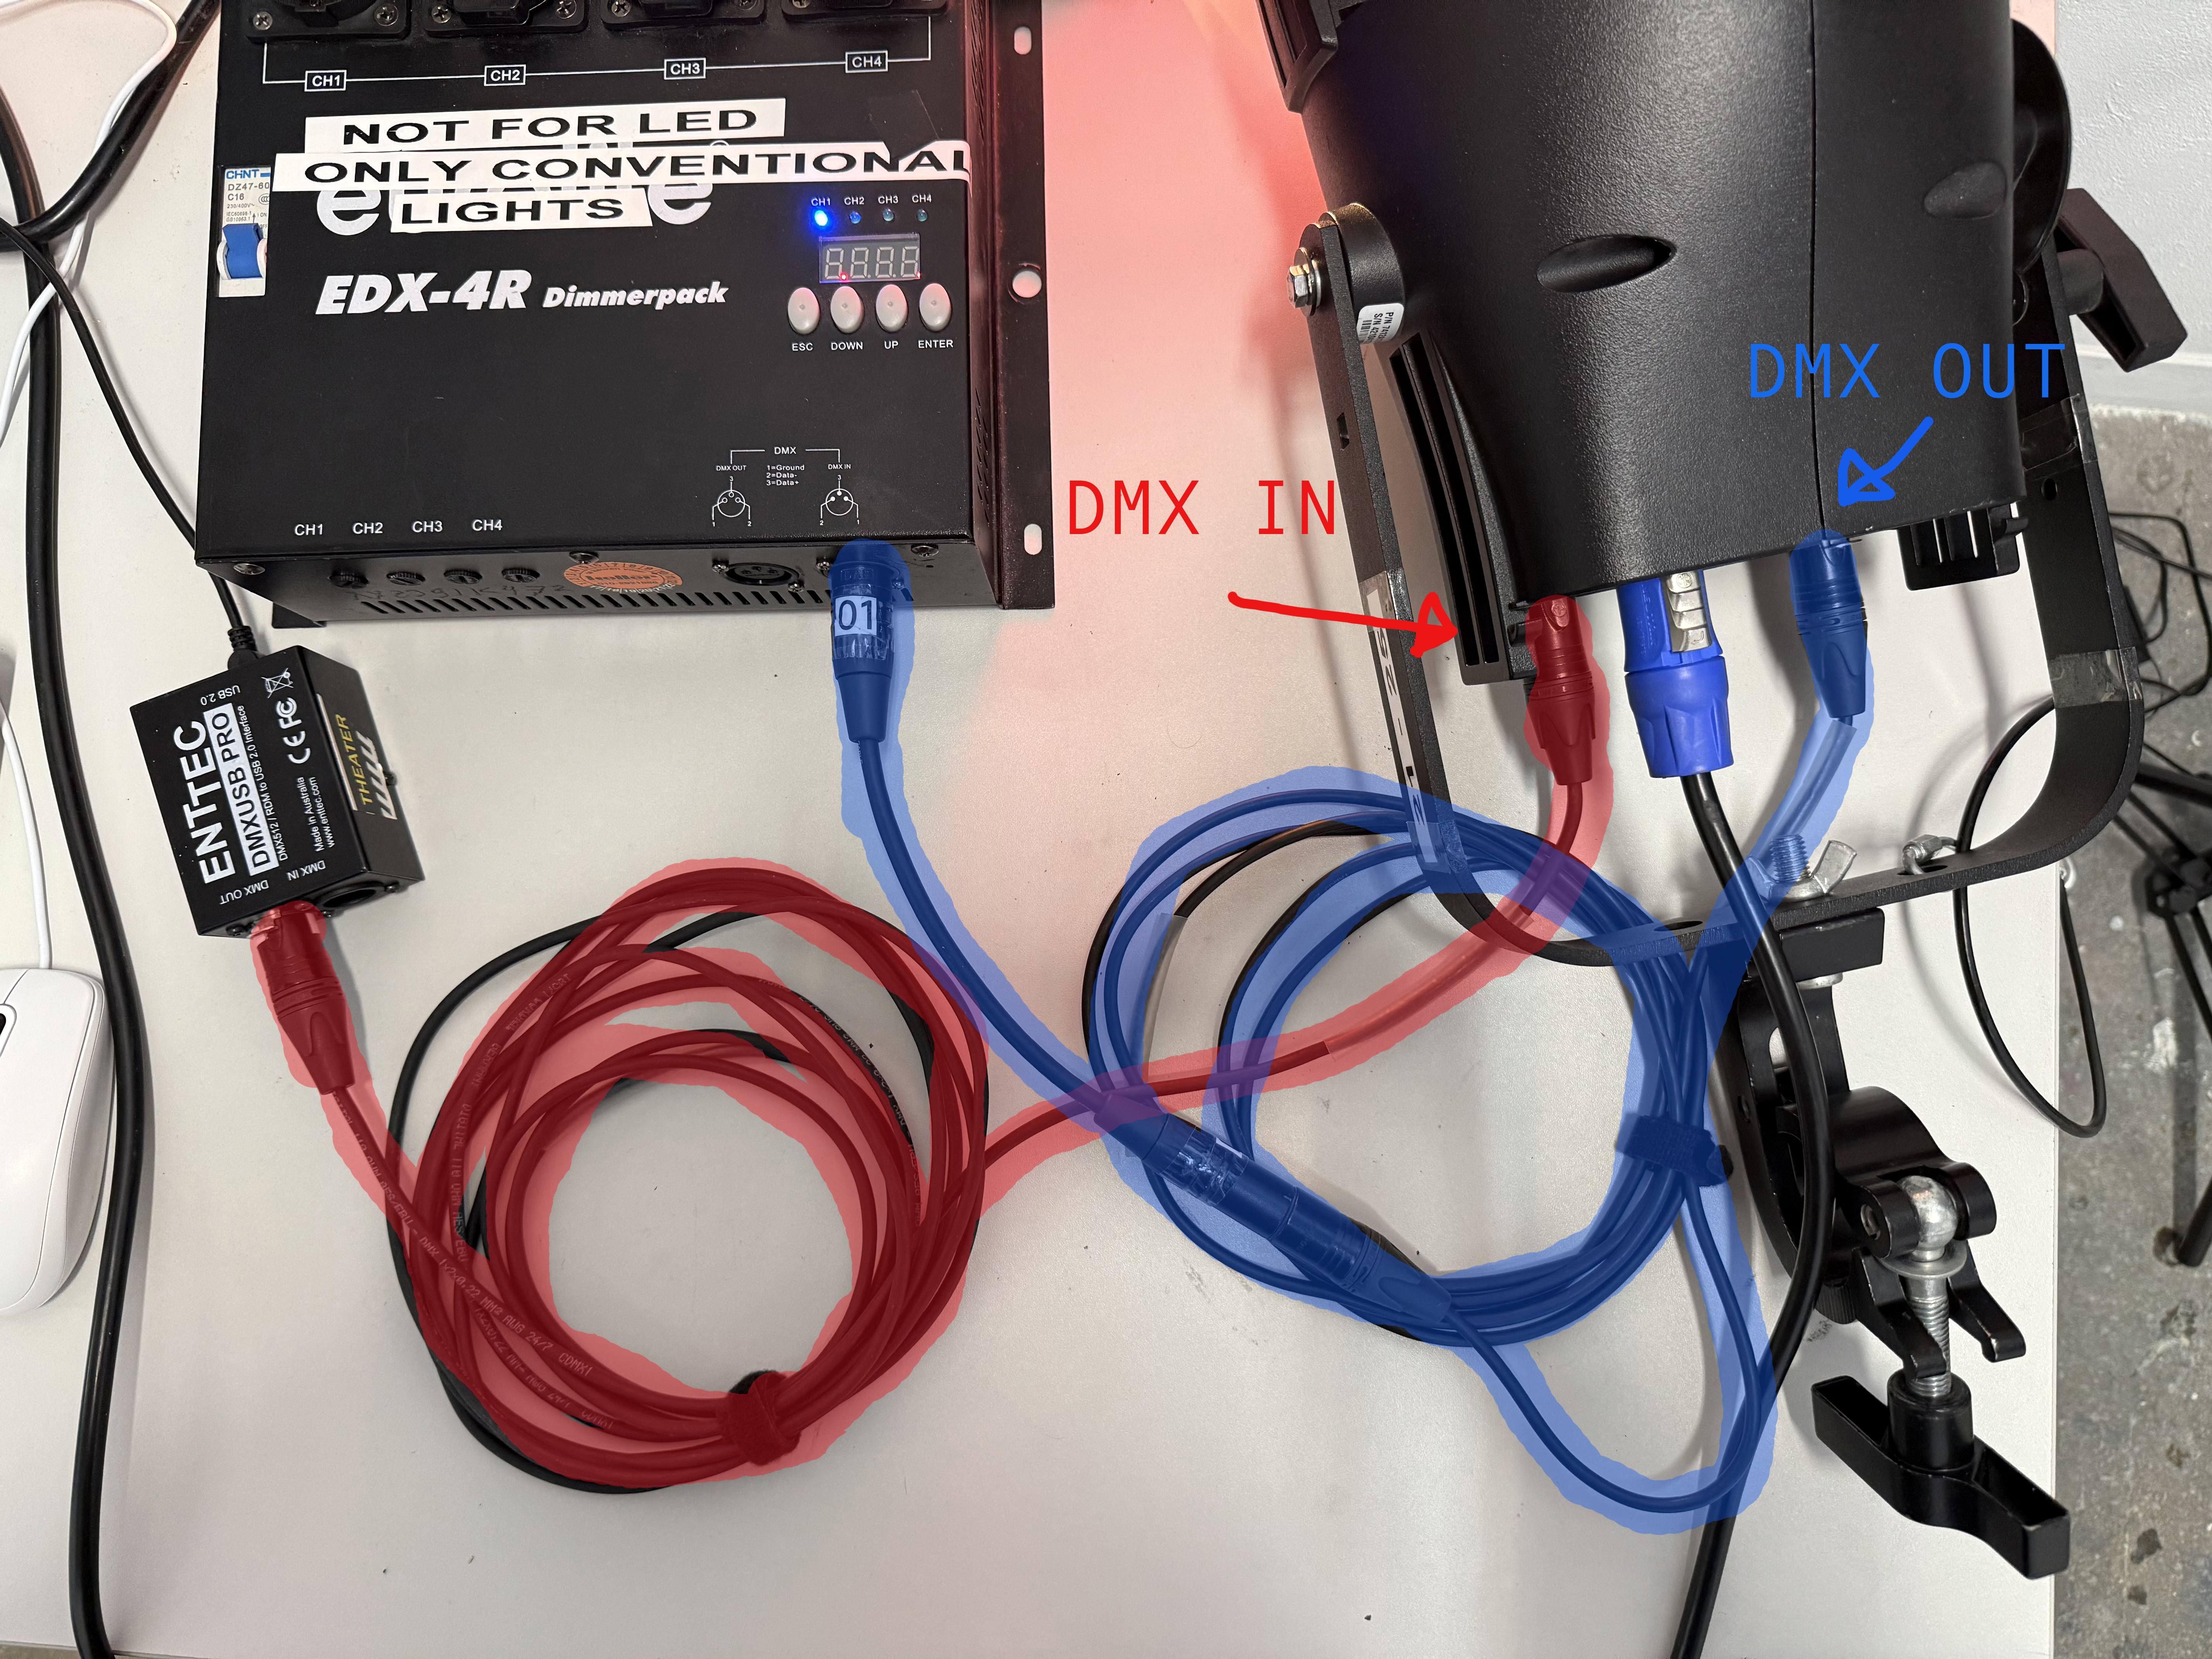
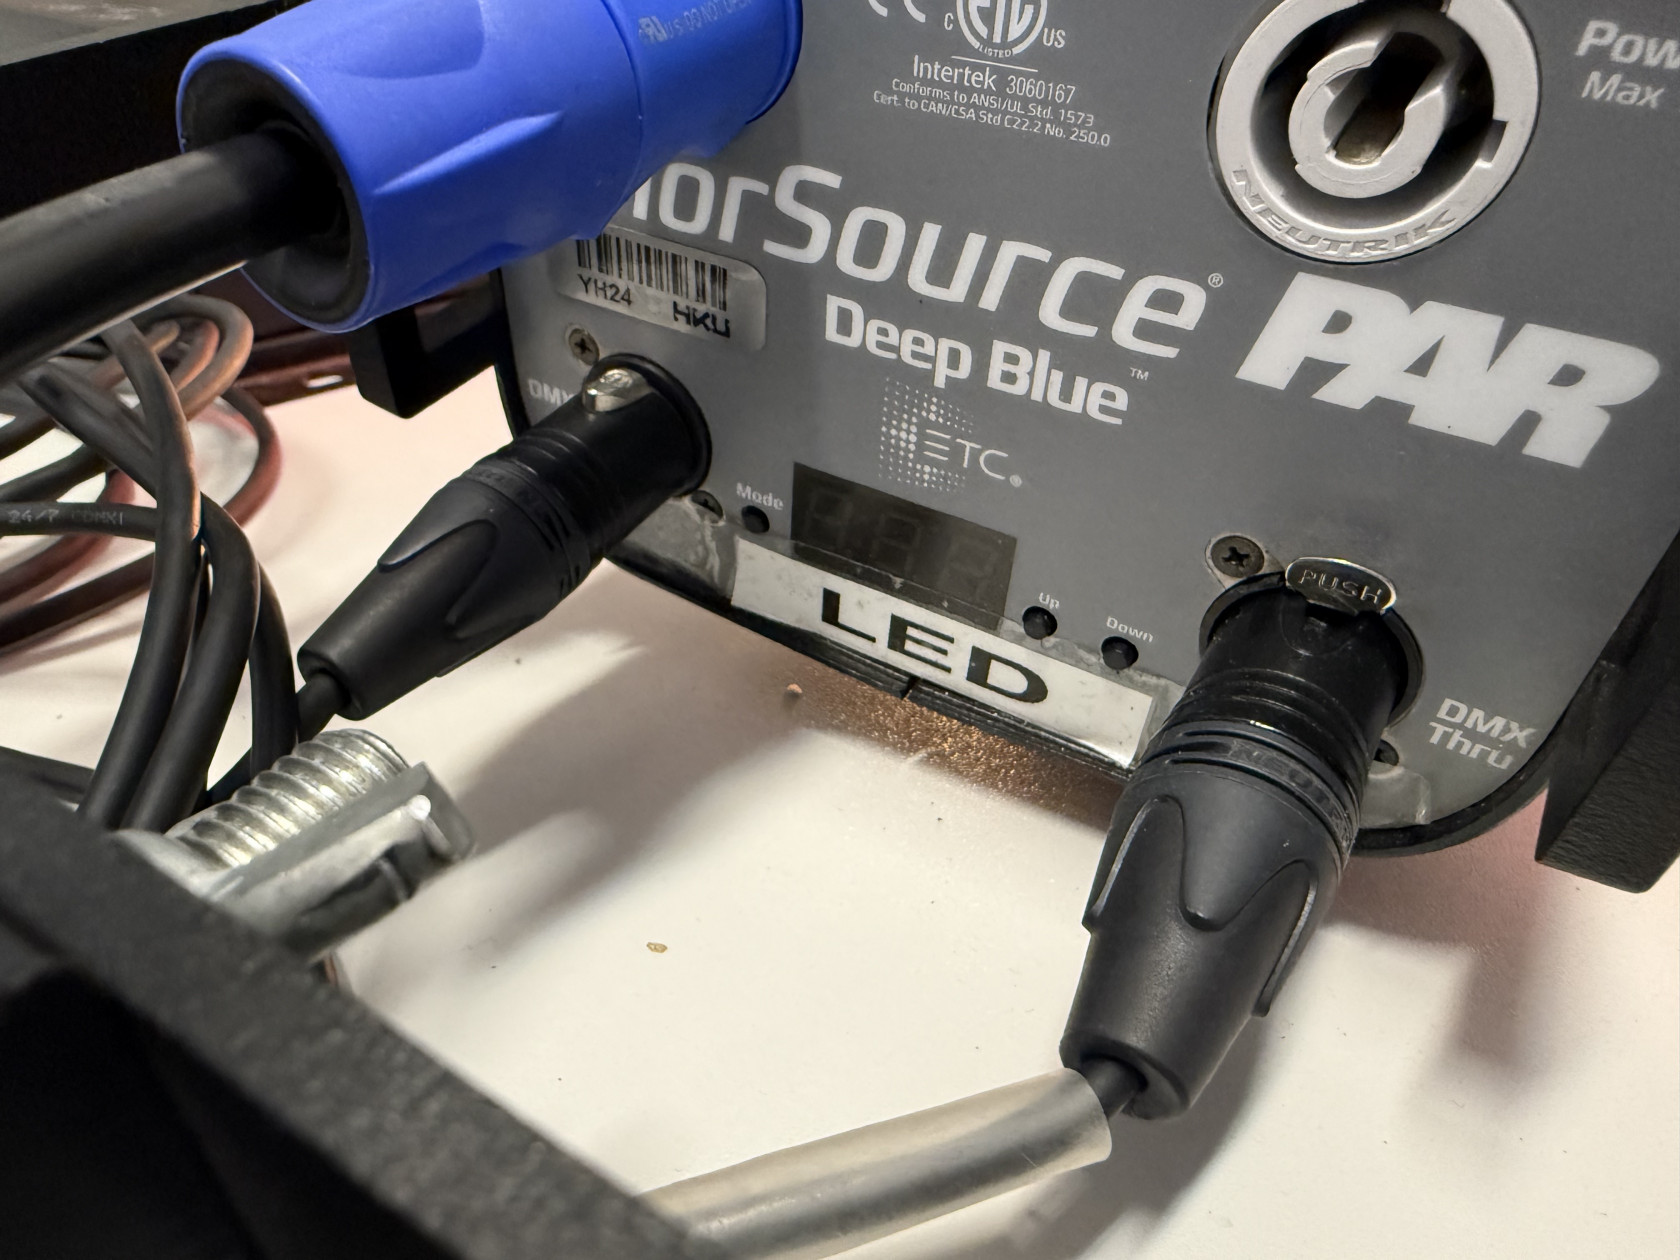
After installing the driver, we can now start connecting our devices. The DMX interface we connect with a USB cable to our computer, and using a DMX cable we connect the DMX interface to our light. Pay extra attention that you connect the cable to the 'DMX OUT' of the interface to the 'DMX IN' of the light. See pictures below.
Laptop -> (USB-C dongle ->) DMX interface -> LED light
3. DMX interface in QLC+
The software we use to control lights in the blackbox is QLC+ (among other softwares, for different use cases).
IMPORTANT: For this tutorial we're working with QLC+ 4, not 5! Make sure to download the right one. You can download QLC+ here. When you open QLC, this window will pop up:
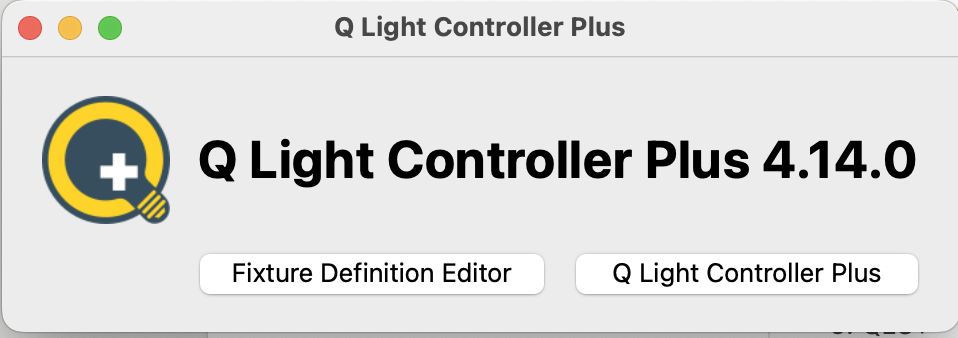
Click on Q Light Controller Plus. An empty QLC file will pop up.
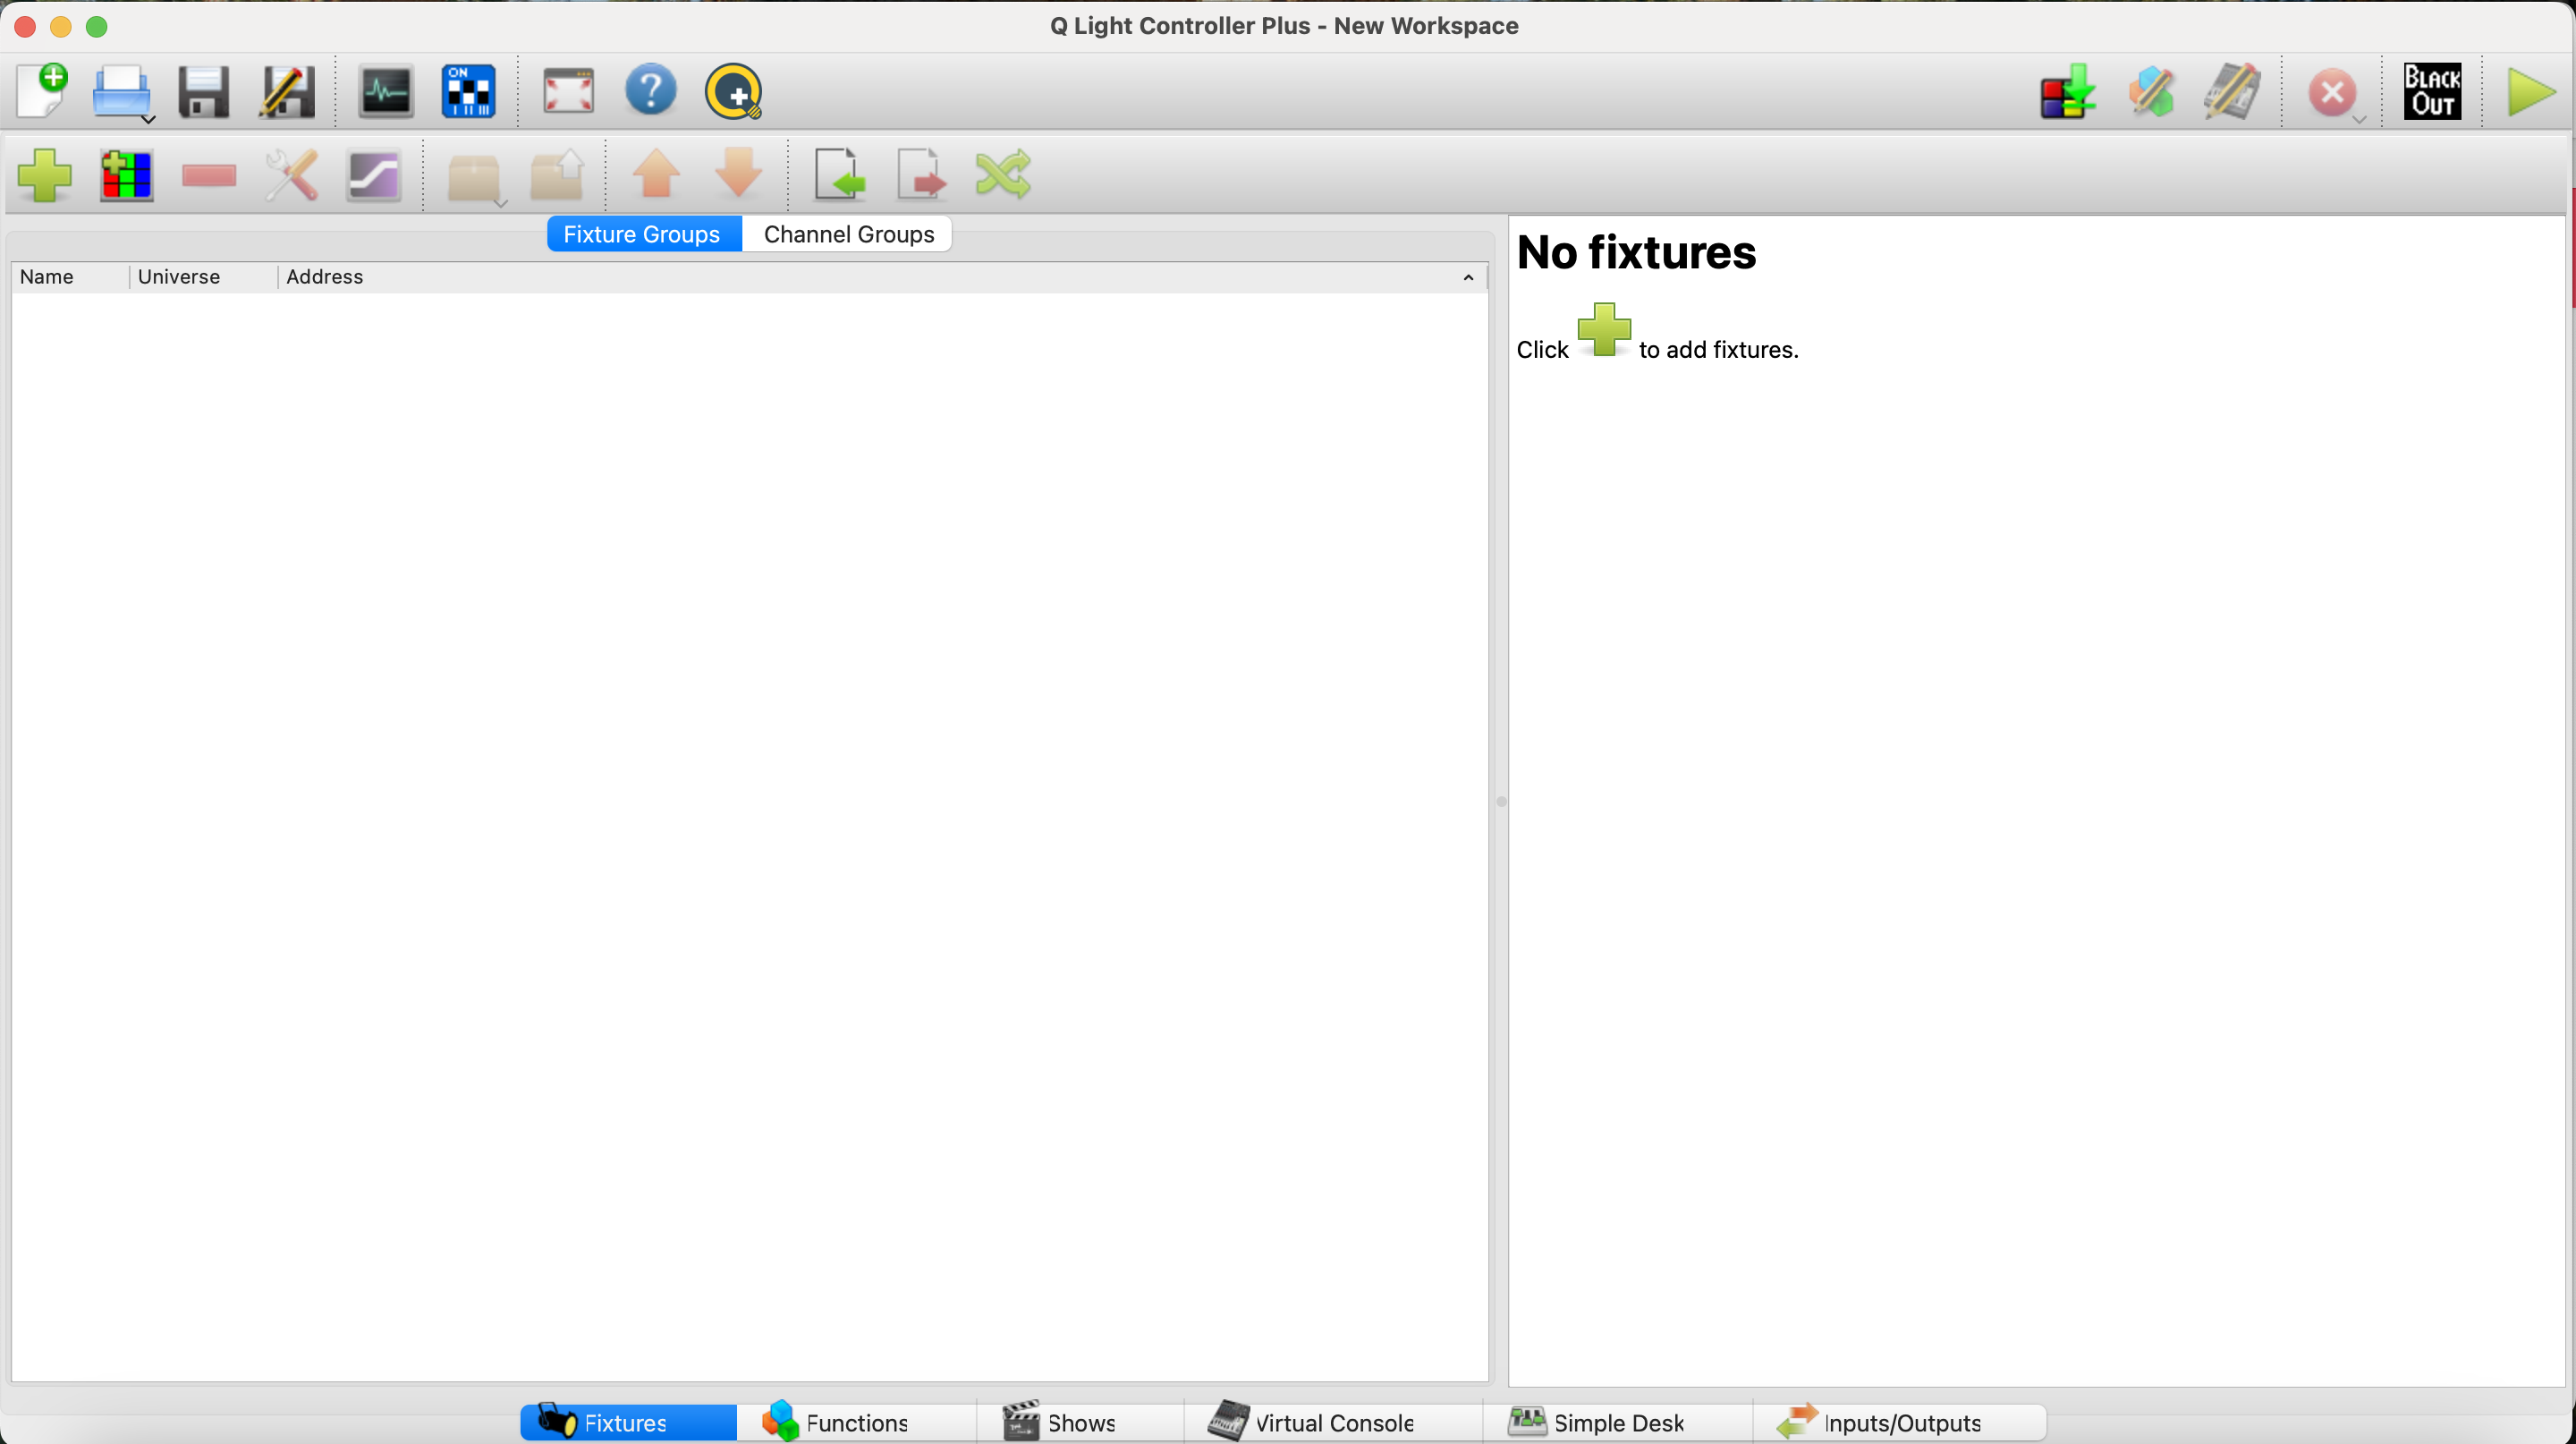
In the bottom we see a bar with several options, including fixtures, functions, shows, etc. The first step is to check if QLC is recognising our DMX interface. To do this, in the bottom bar, navigate to the inputs/outputs tab.
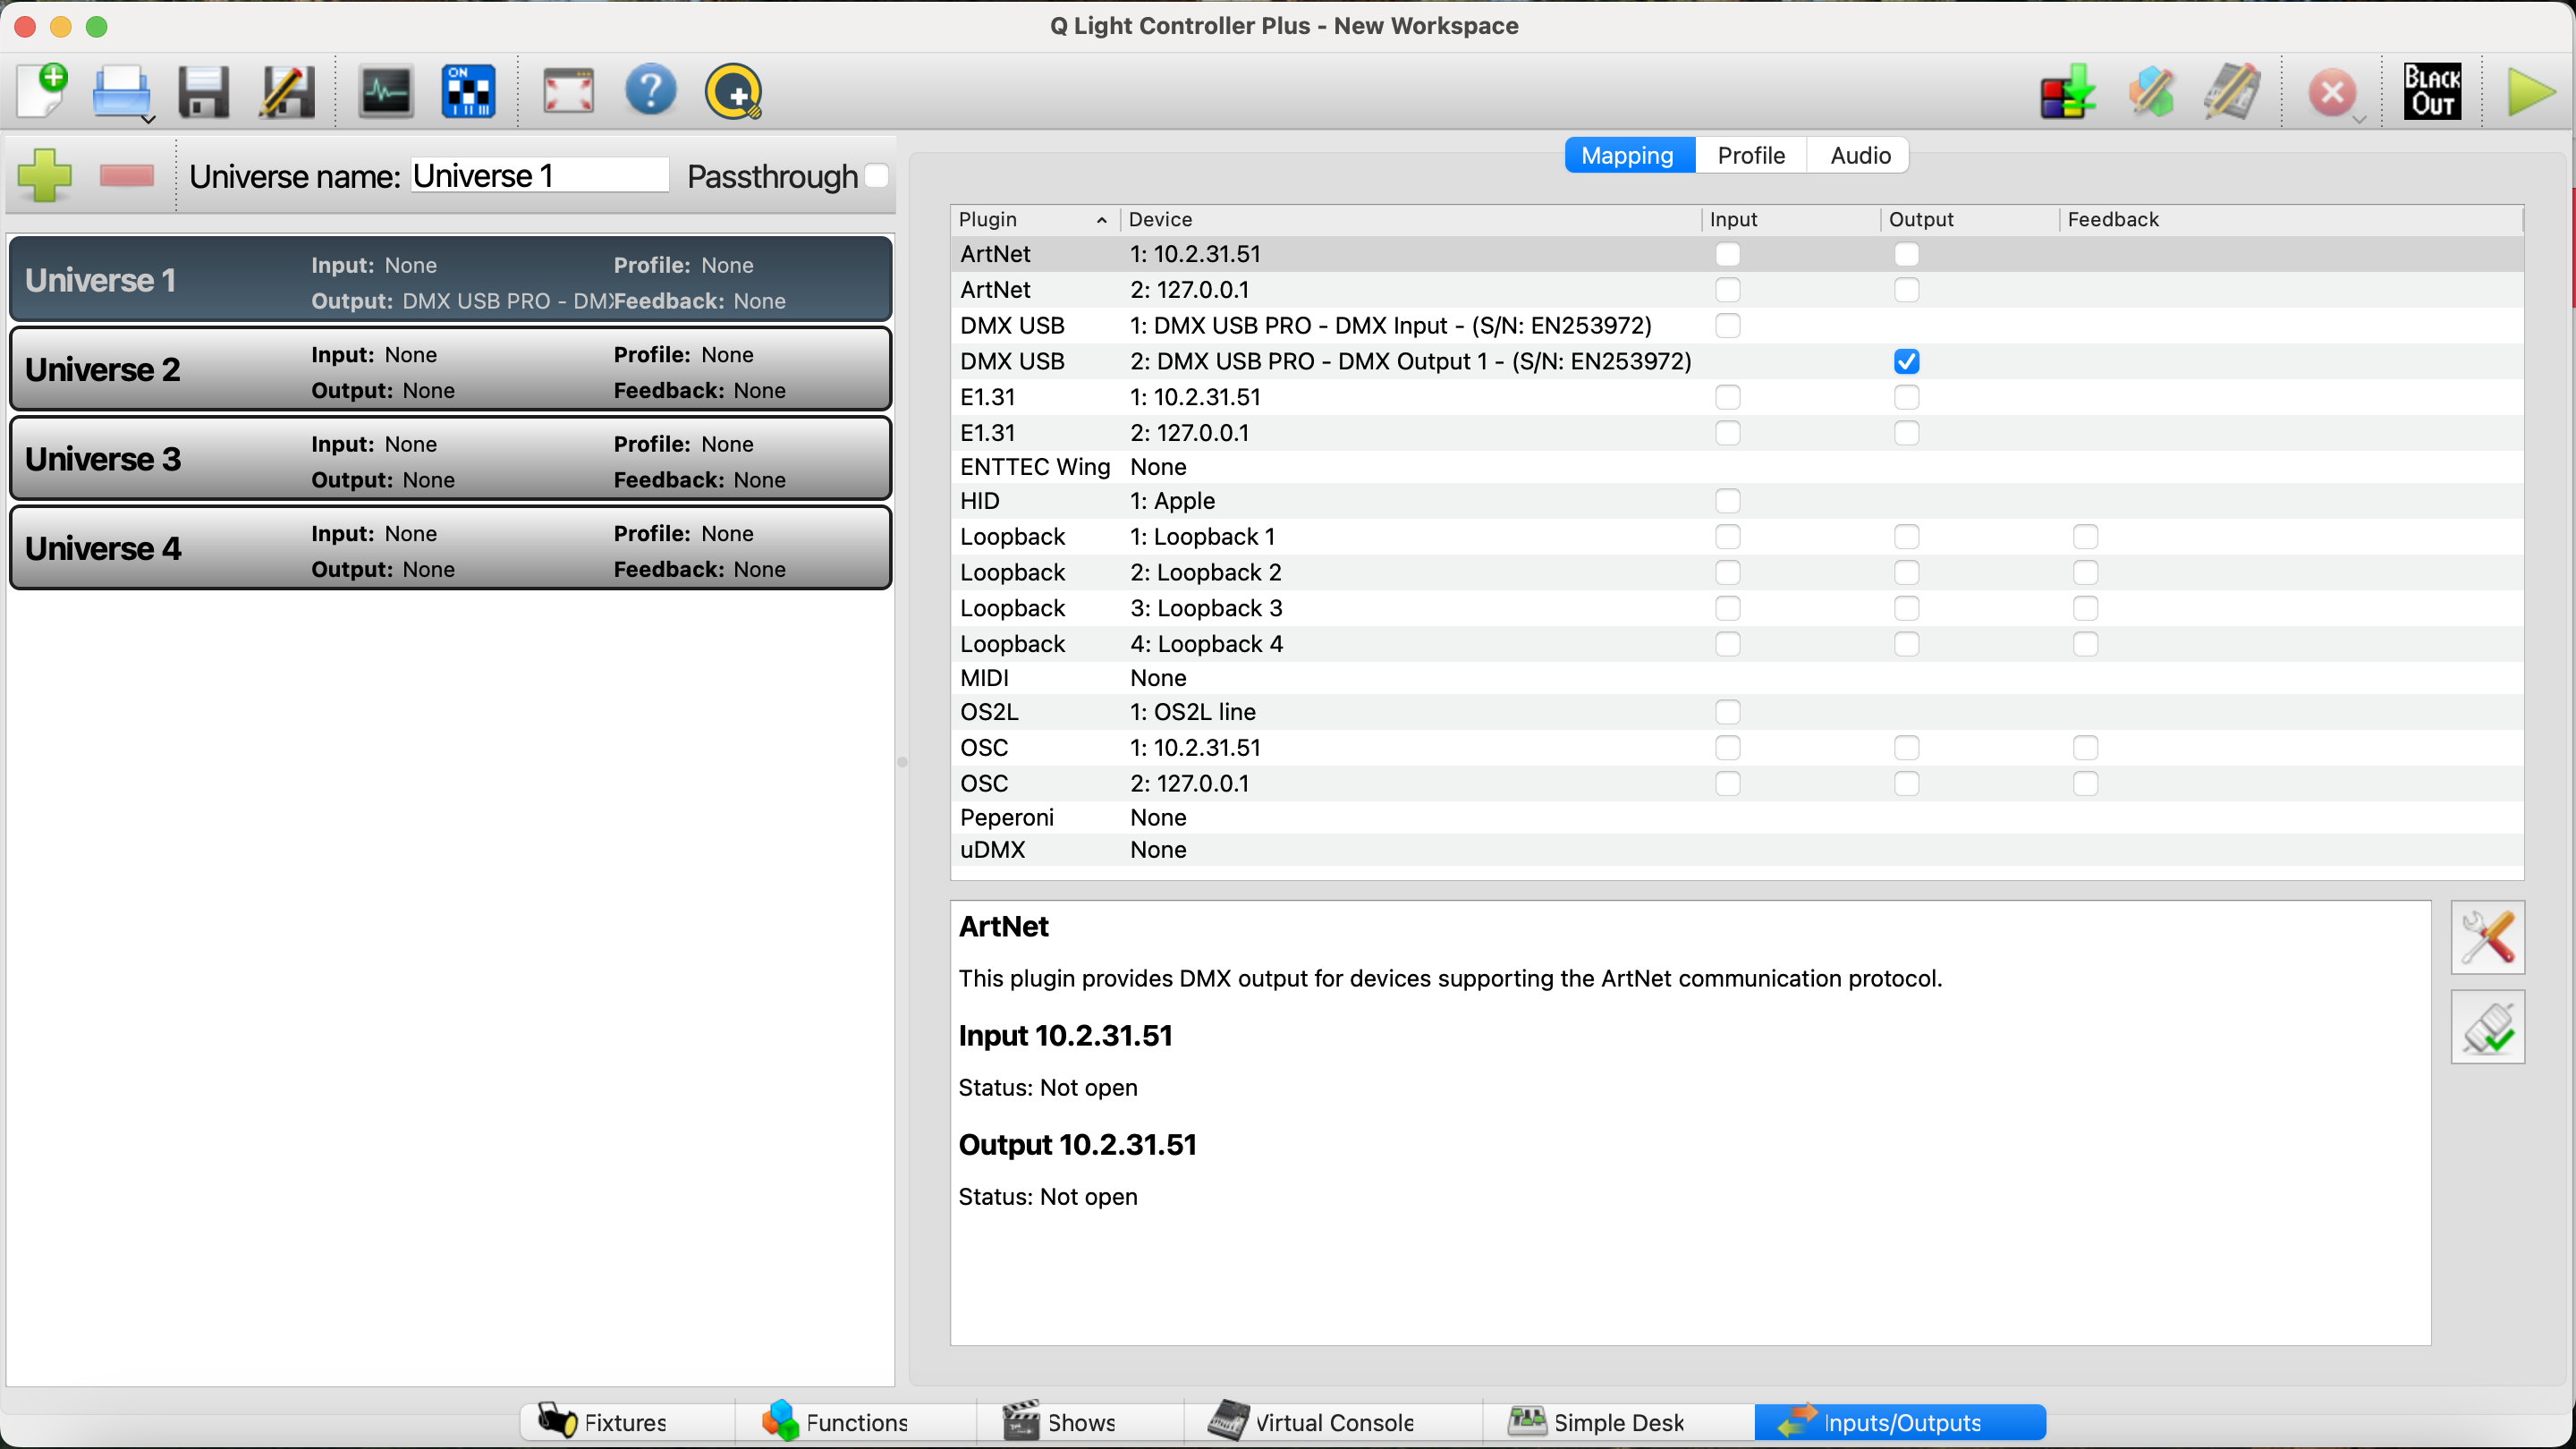
Here we should see our DMX USB Pro interface. If it's not yet visible for you and the output box is not checked like in the picture above, make sure your DMX interface is connected. If it is, and it's not showing up, in the list under 'plugin', click DMX USB in the list and then press this icon:
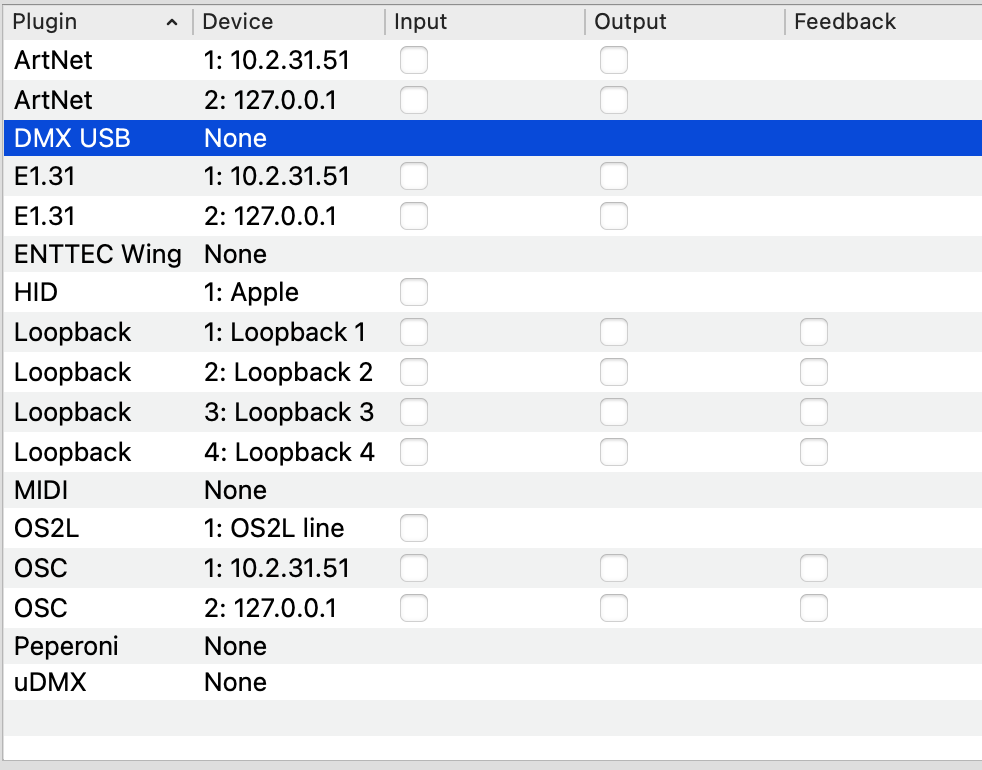

The list should now refresh and the DMX interface should become visible and connected.
After you've confirmed this, navigate back to the 'Fixtures' tab.
4. Configuring our LED light
Before we can communicate with our light, we need to understand how our light is configured. The settings we enter in our light need to correspond with how we set our light in QLC. For this there are two terms to understand. Channel Mode, and DMX Address. We'll start with Channel Mode.
Channel Mode
To understand what a light's channel mode is, it's a good idea to look up your light in the Open Fixture Library. Once in the library, look up your light, which in my case is a ColorSource PAR Deep Blue by ETC.
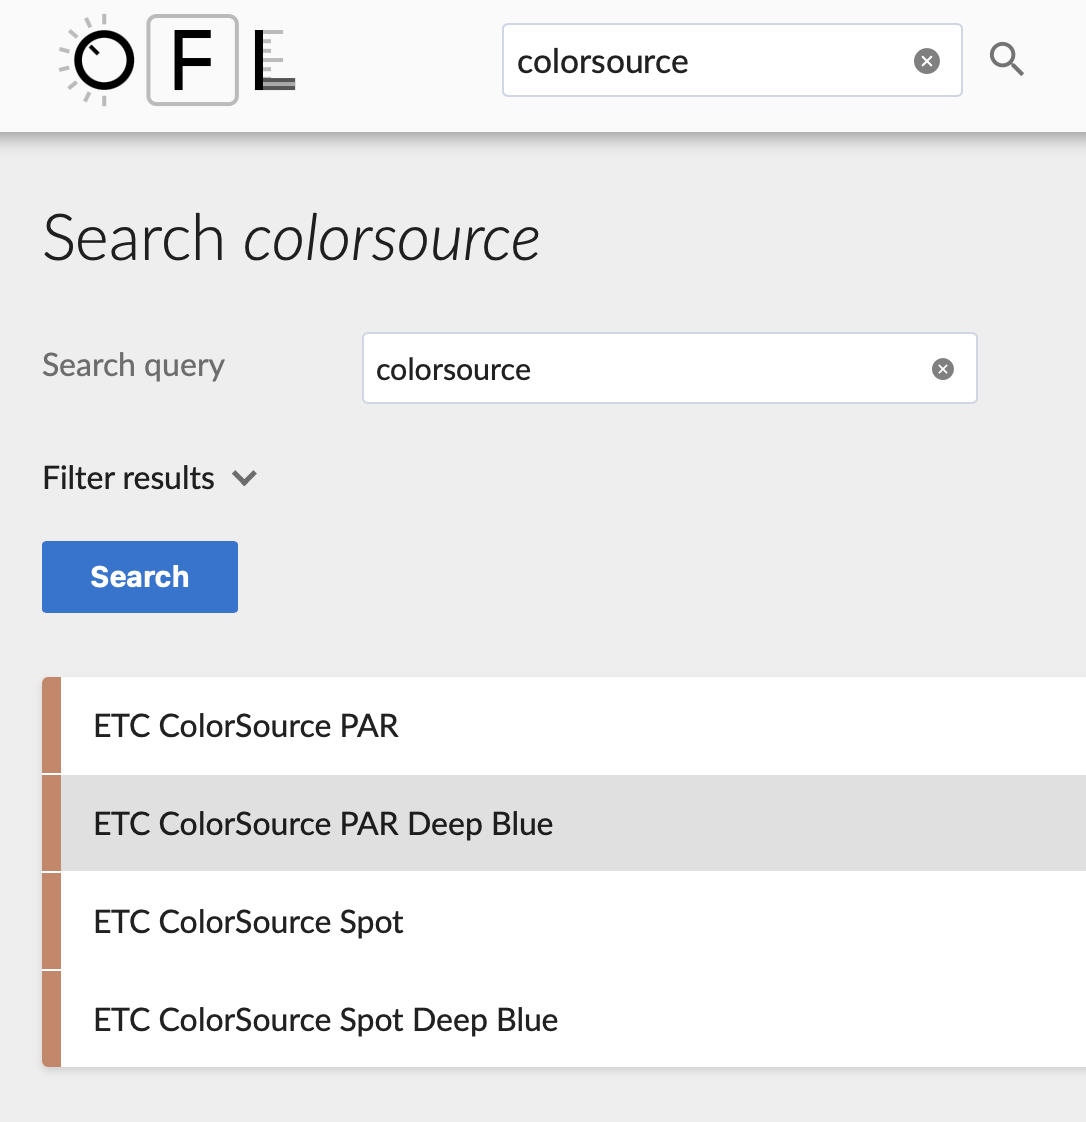
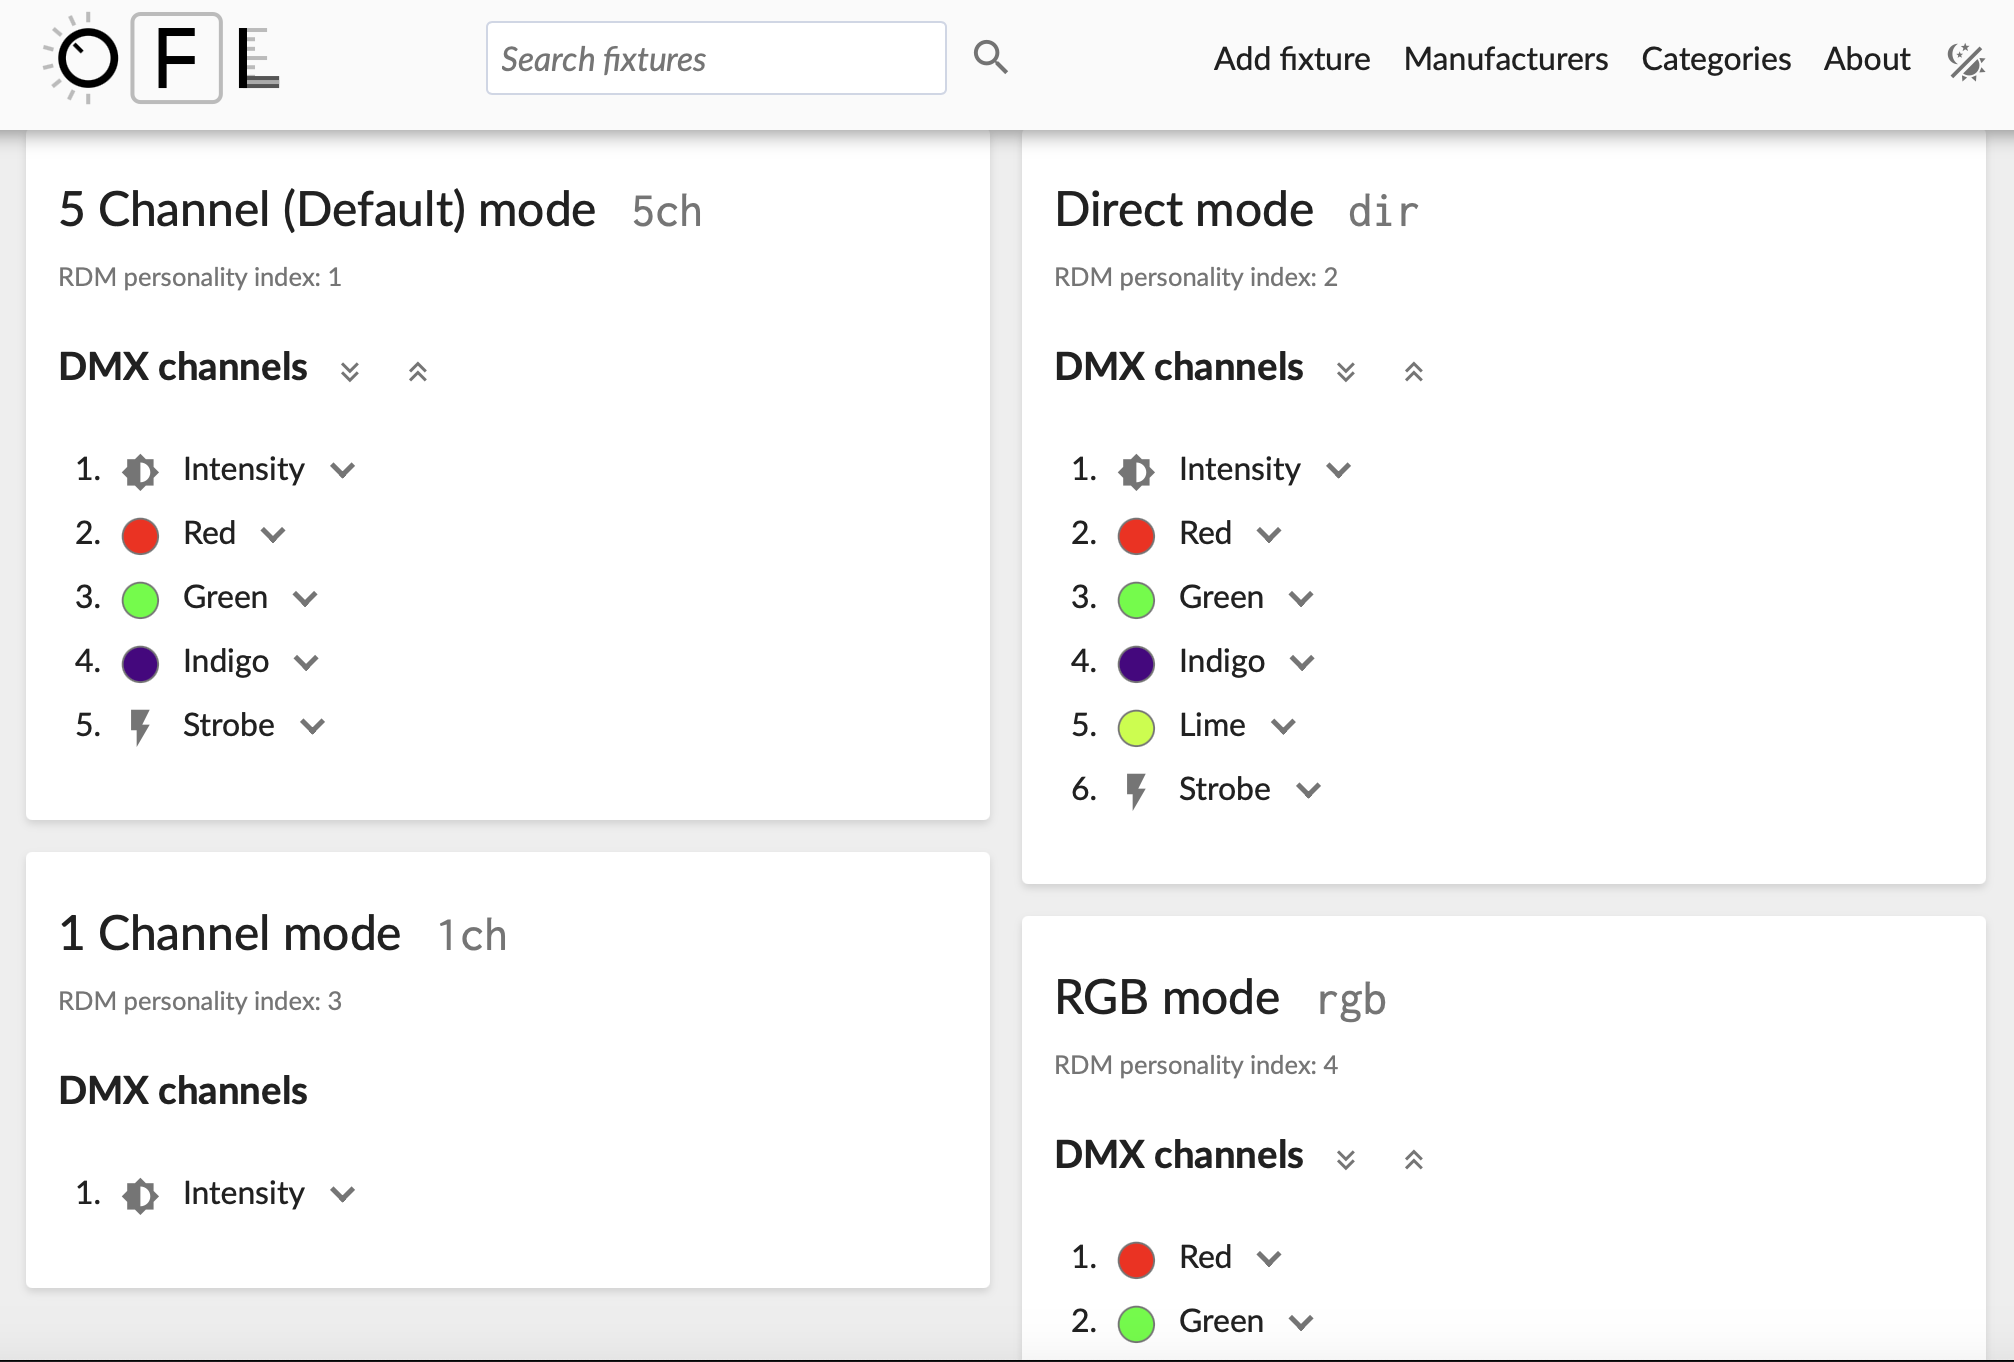
This page gives an overview of the different channel modes your light can be programmed in. Each channel mode gives us access to a different set of parameters to edit, like intensity, red, green, blue, or strobe. Use the small buttons on your light to figure out which channel mode your light is set to (you might have to keep the 'mode' button pressed for a couple of seconds to acces this menu, depending on the light you're using).
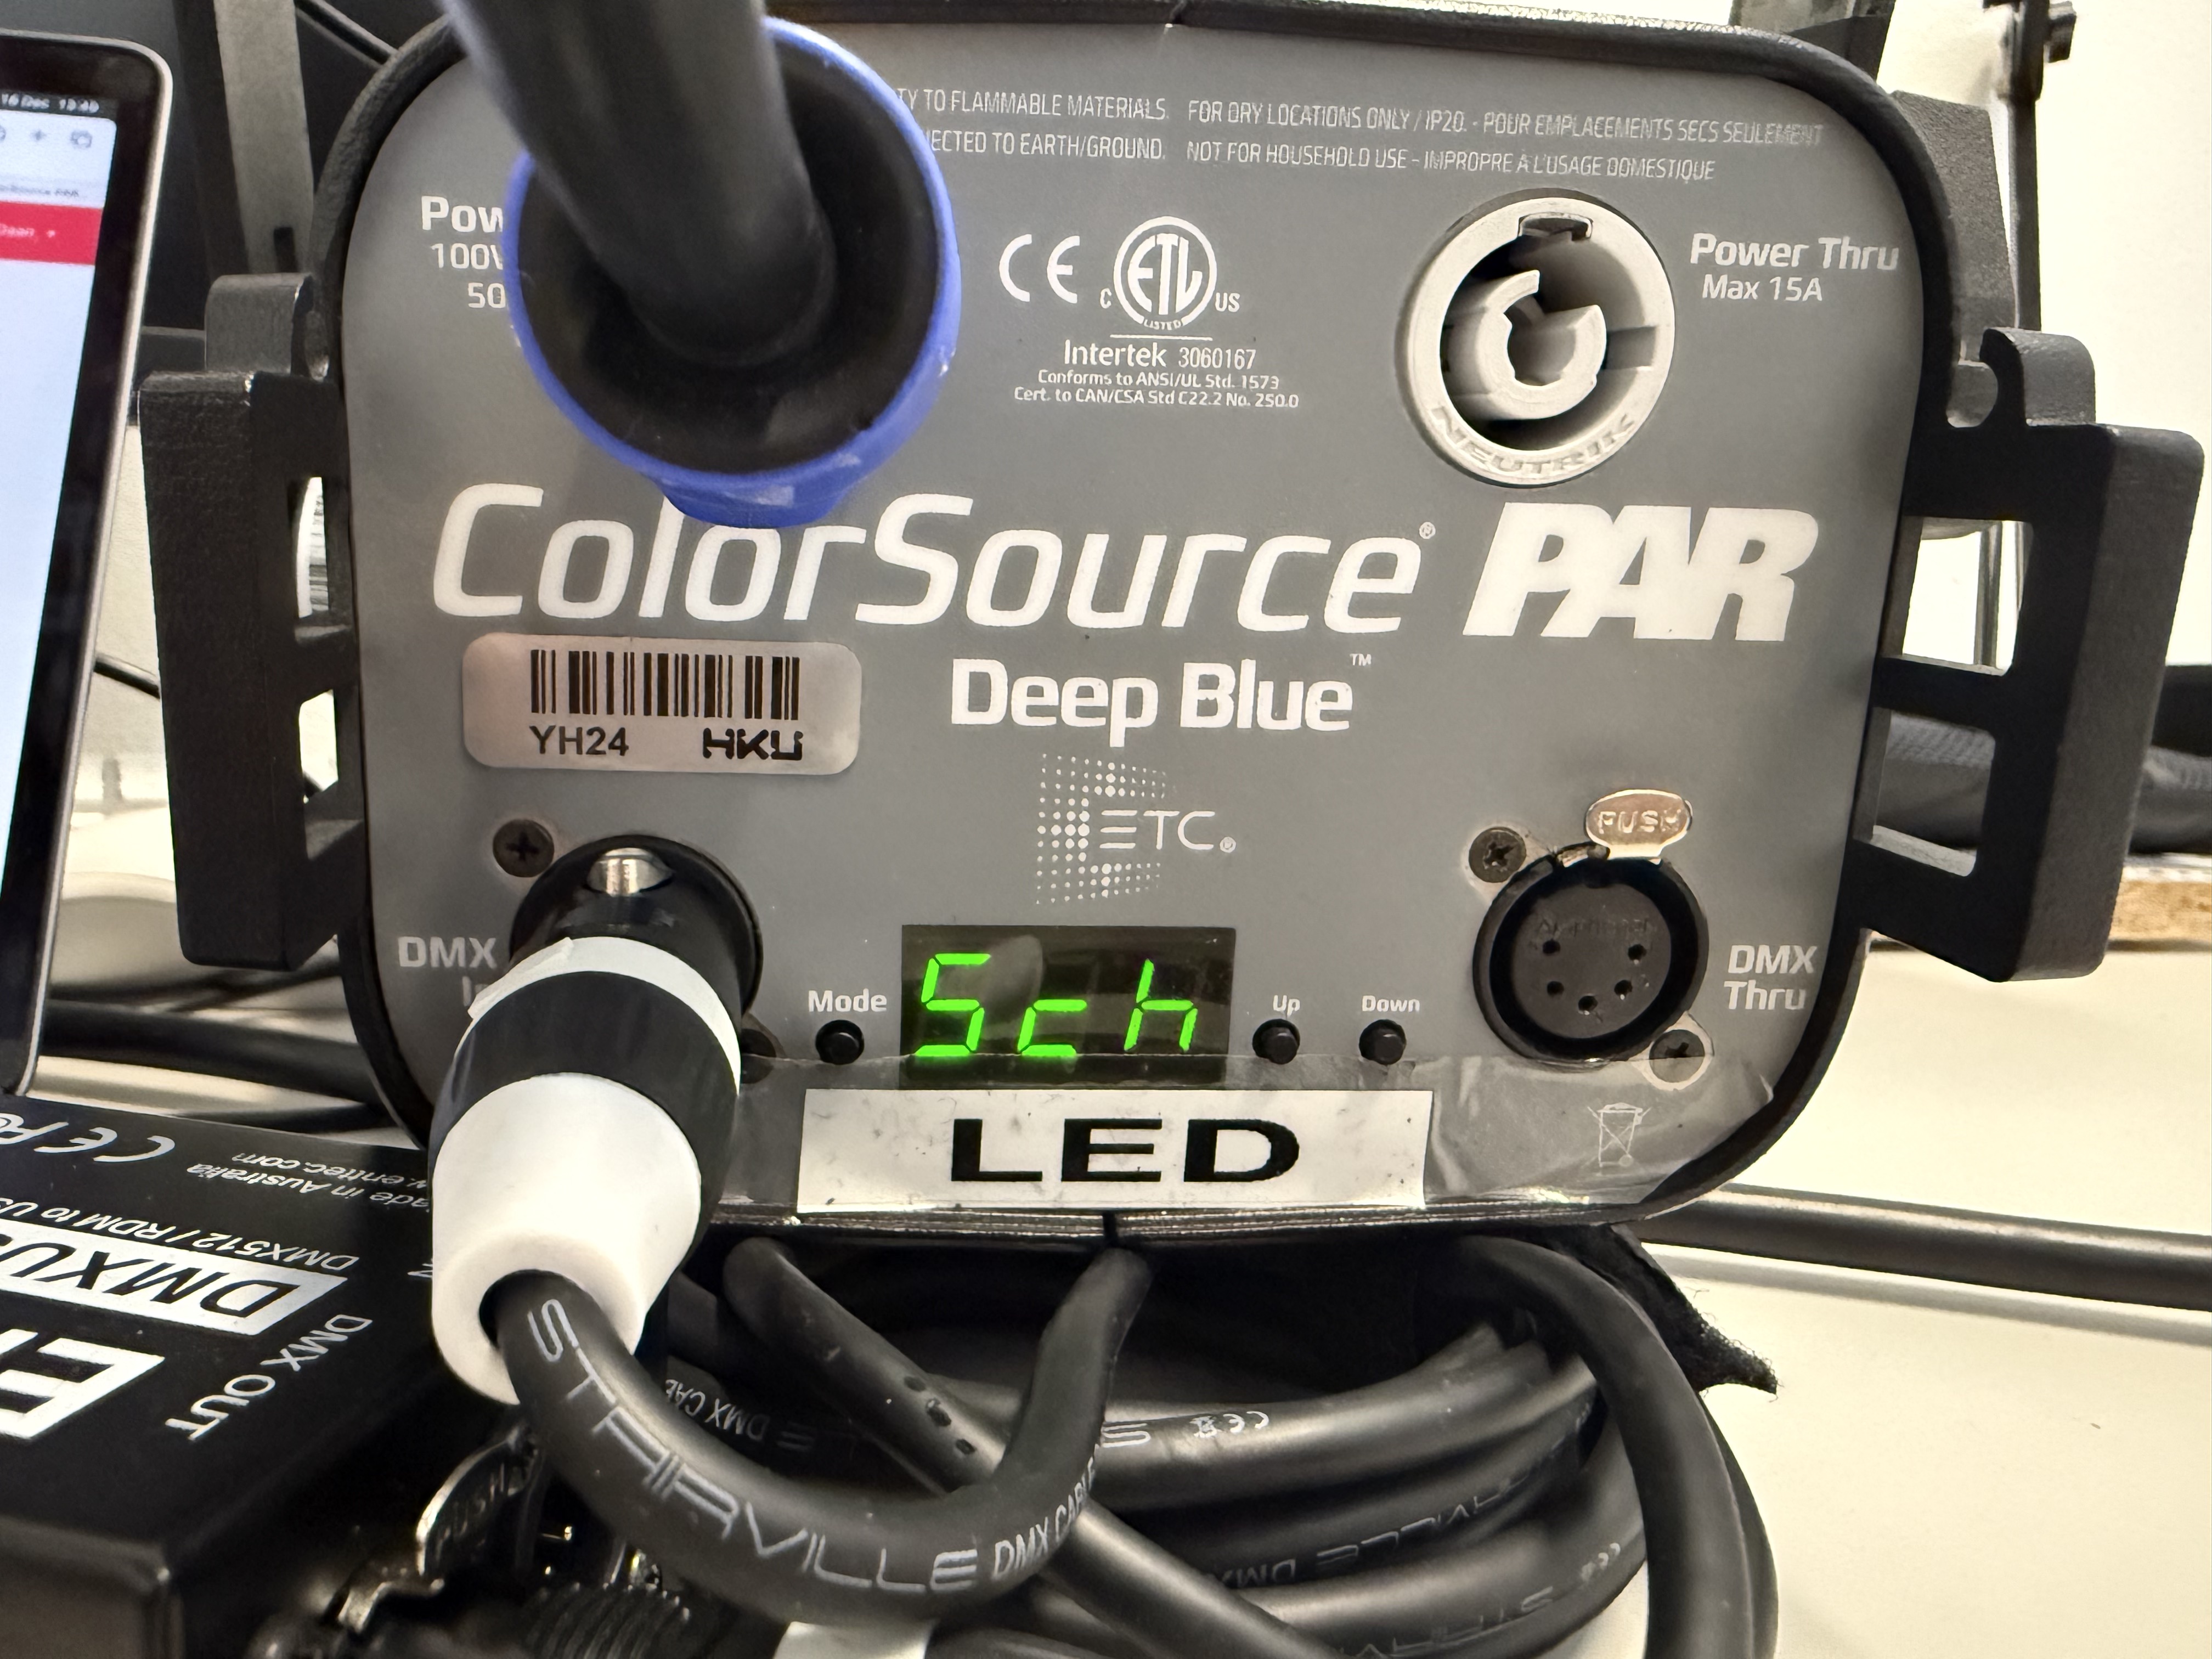
My light is telling me that it's set to '5ch' mode. Looking back at the Open Fixture Library, I can see that the 5 Channel mode gives me access to:
- Intensity
- Red
- Green
- Indigo (Blue)
- Strobe
This channel mode is fine for now, as it gives me access to a lot of different parameters. It's import to note the order that the parameters are listed in. This has to do with the DMX Address of the light.
DMX Address
Each light can be assigned its own DMX address. Think of the DMX address as the lights house number. We can send a letter to this address, and the letter wil contain a command to turn on for example. My light is set to number 21, which can be found on the lights display (make sure the light is set to DMX mode which displays a number, like in the image below, not the standalone mode which displays something like P:01 or similar)
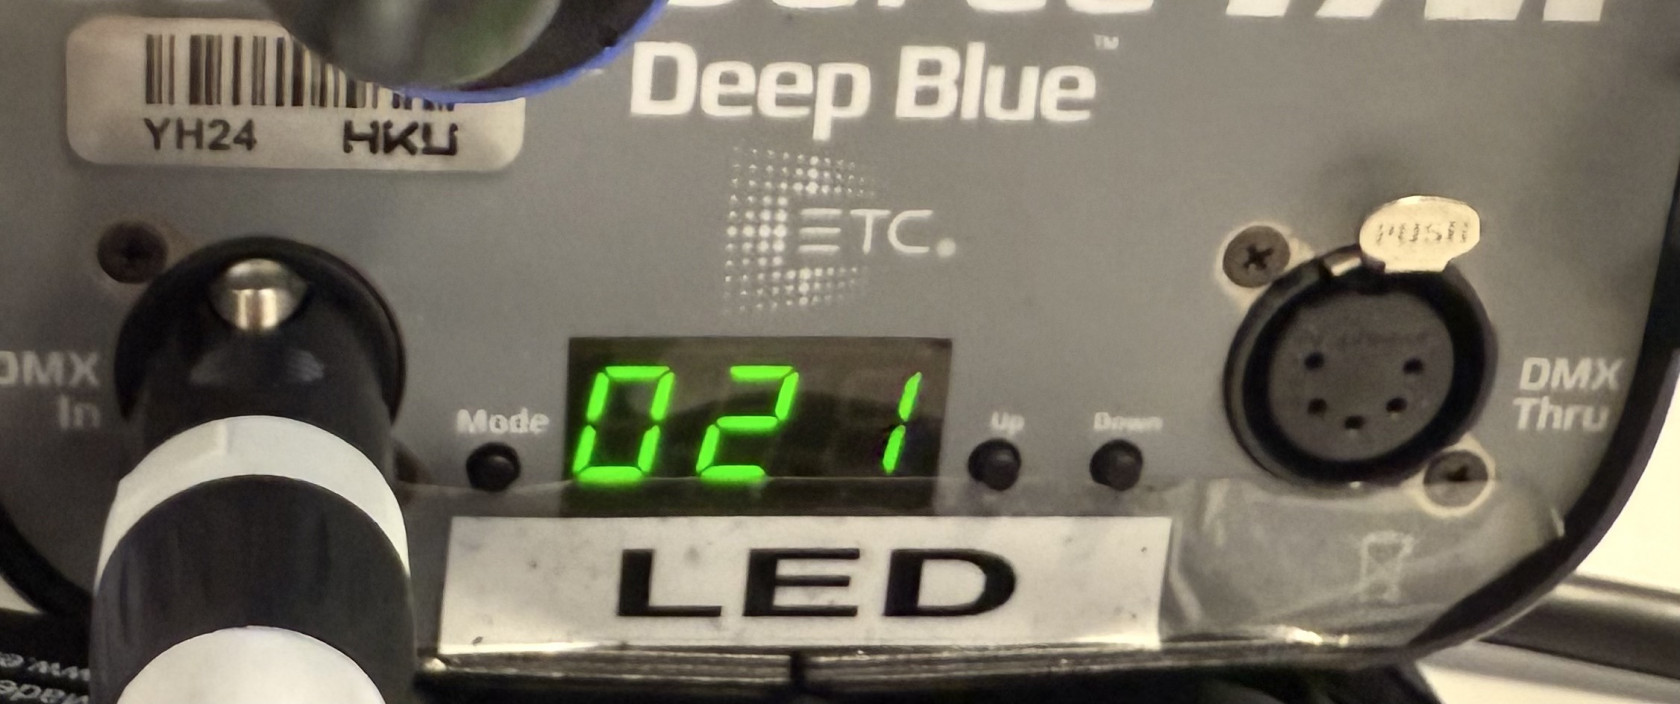
By knowing the lights address, we can send a command to this address. This command is a value, usually ranging from 0 to 255. If we send '0' to address number 21, we are sending a value of zero to the first parameter, which in case of the 5 Channel mode, is 'Intensity'. By sending it a value of 0, it means the light is turned all the way off. By sending it a value of 255, the light is turned all the way on. How to send values to different channels in QLC+, we'll get to in a bit. First, we need to input the light's parameters into QLC+, by creating a fixture profile.
5. Adding a fixture to QLC+
Going back to QLC+, look in the bottom bar where we also found inputs/outputs, but this time click on the 'Fixtures' tab.
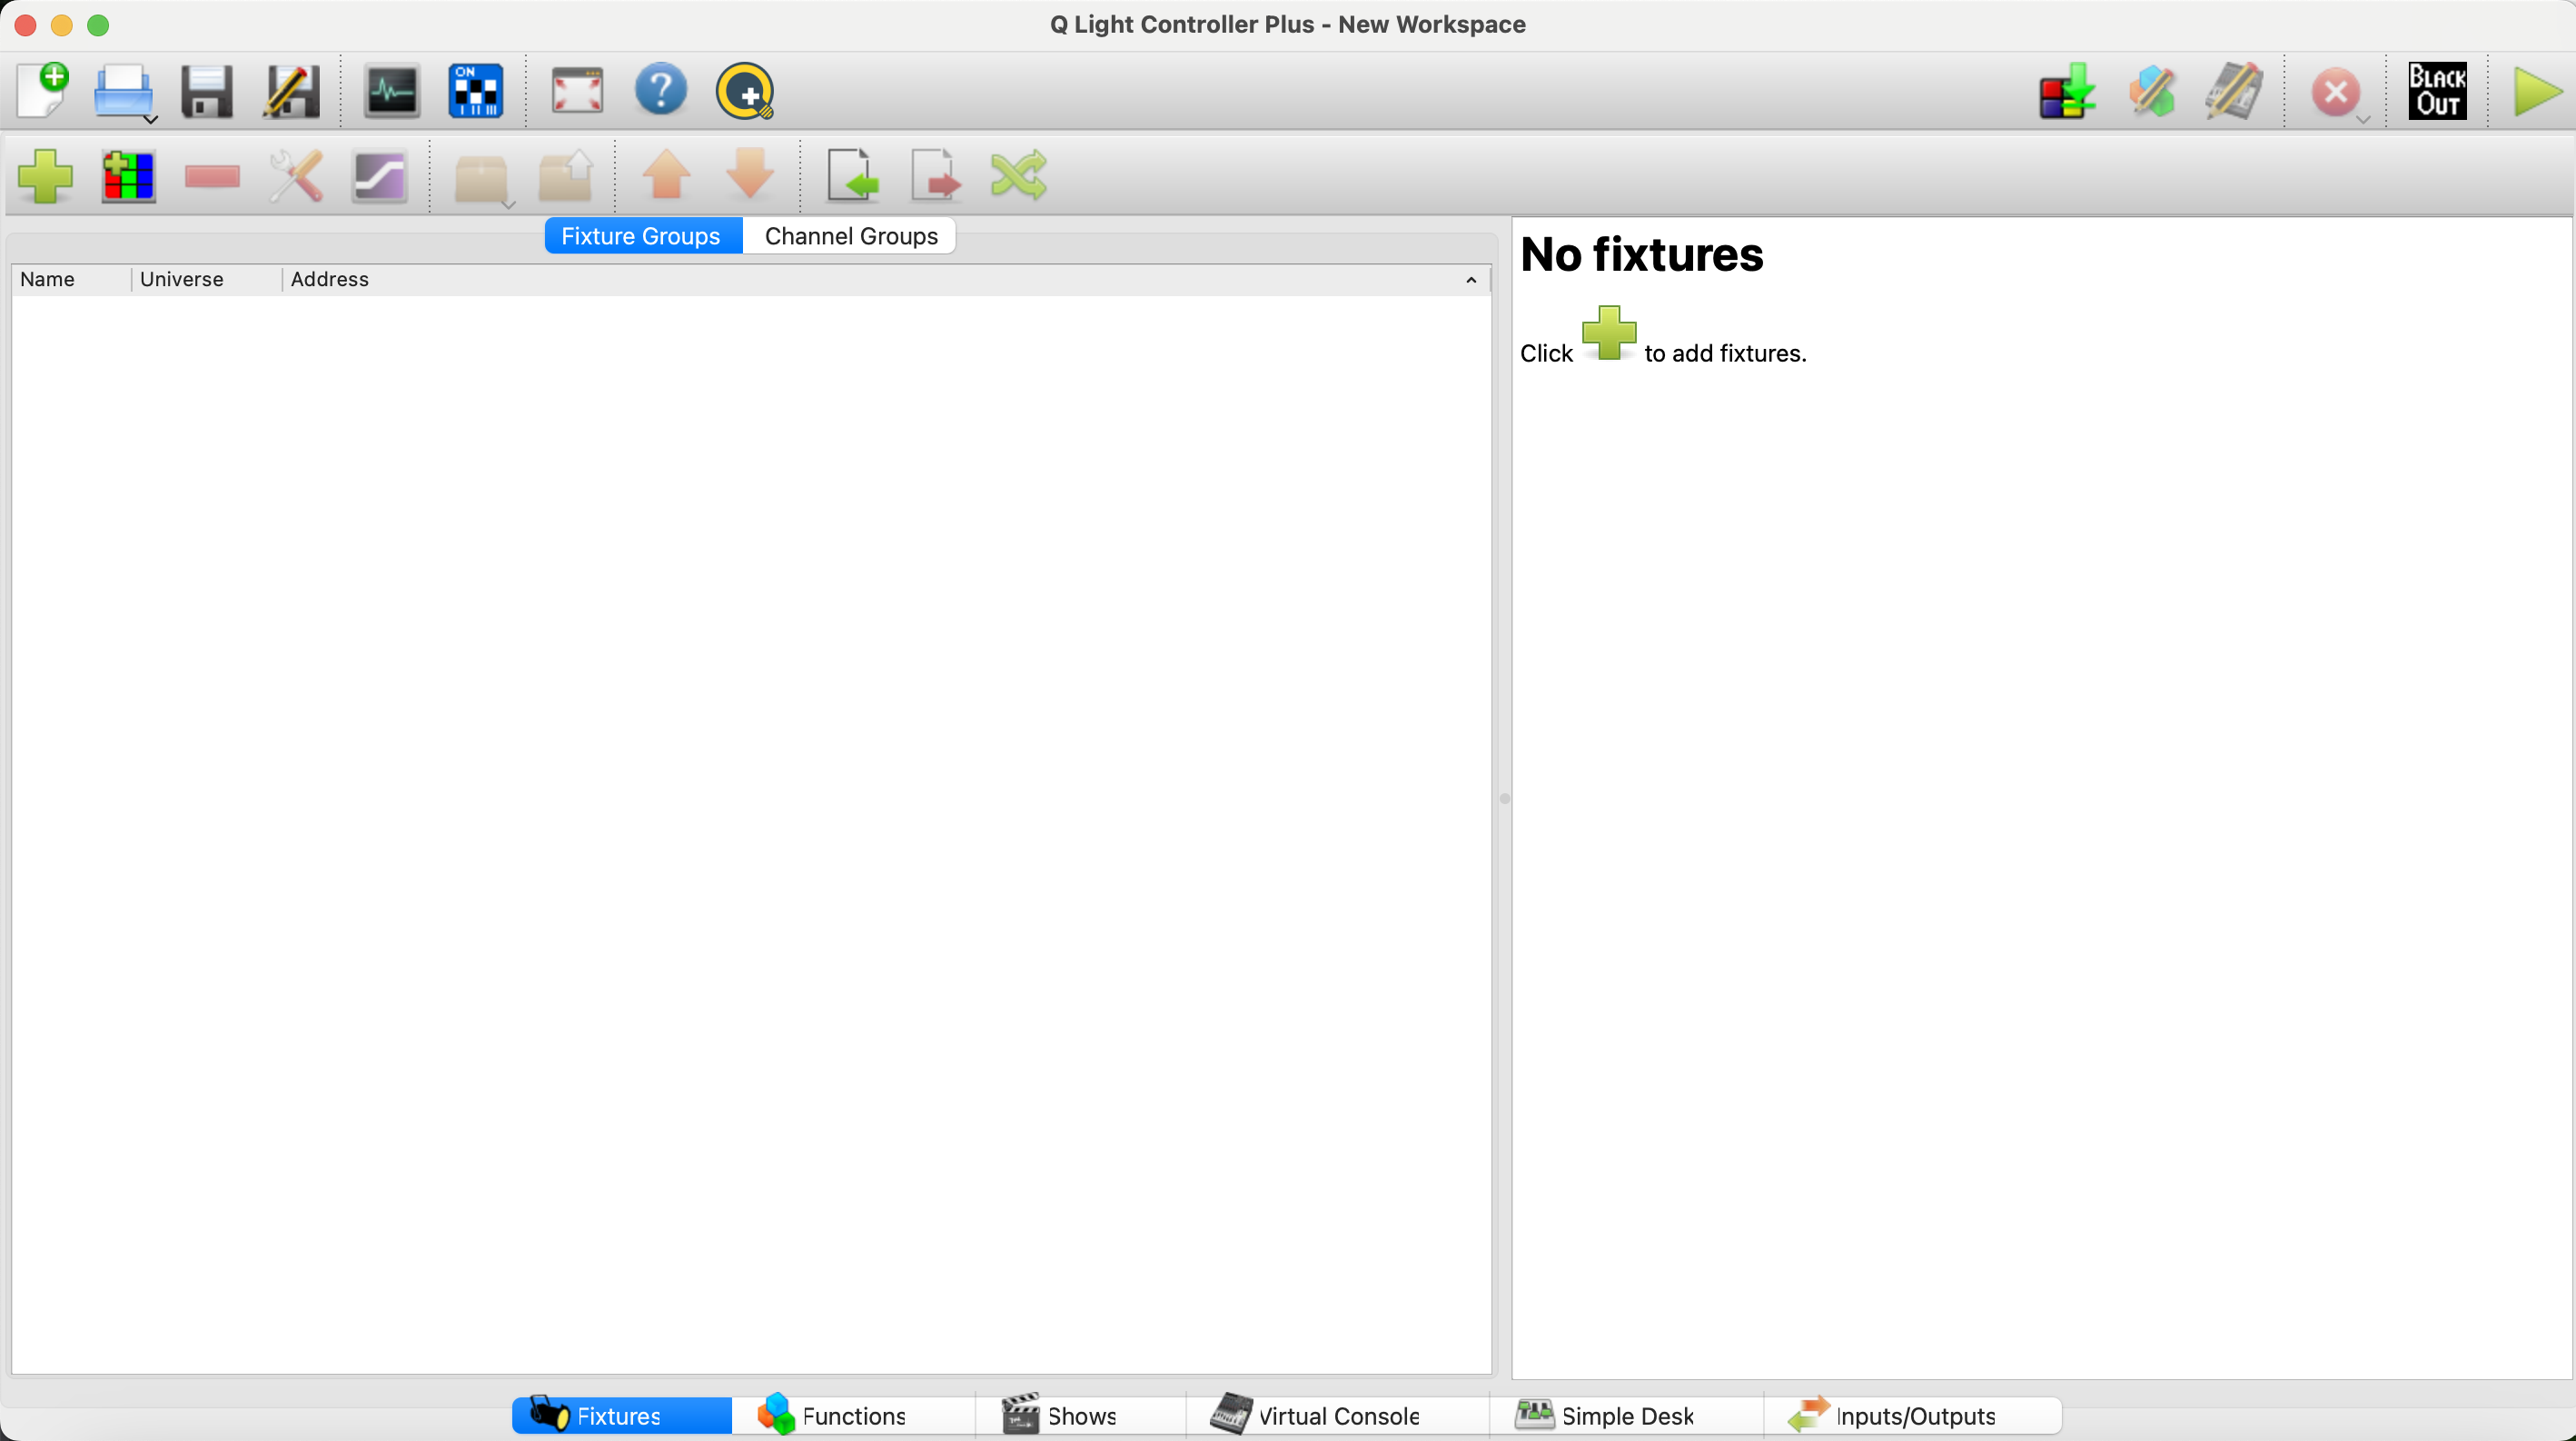
Press the green + button. This will open up the Add Fixture menu:
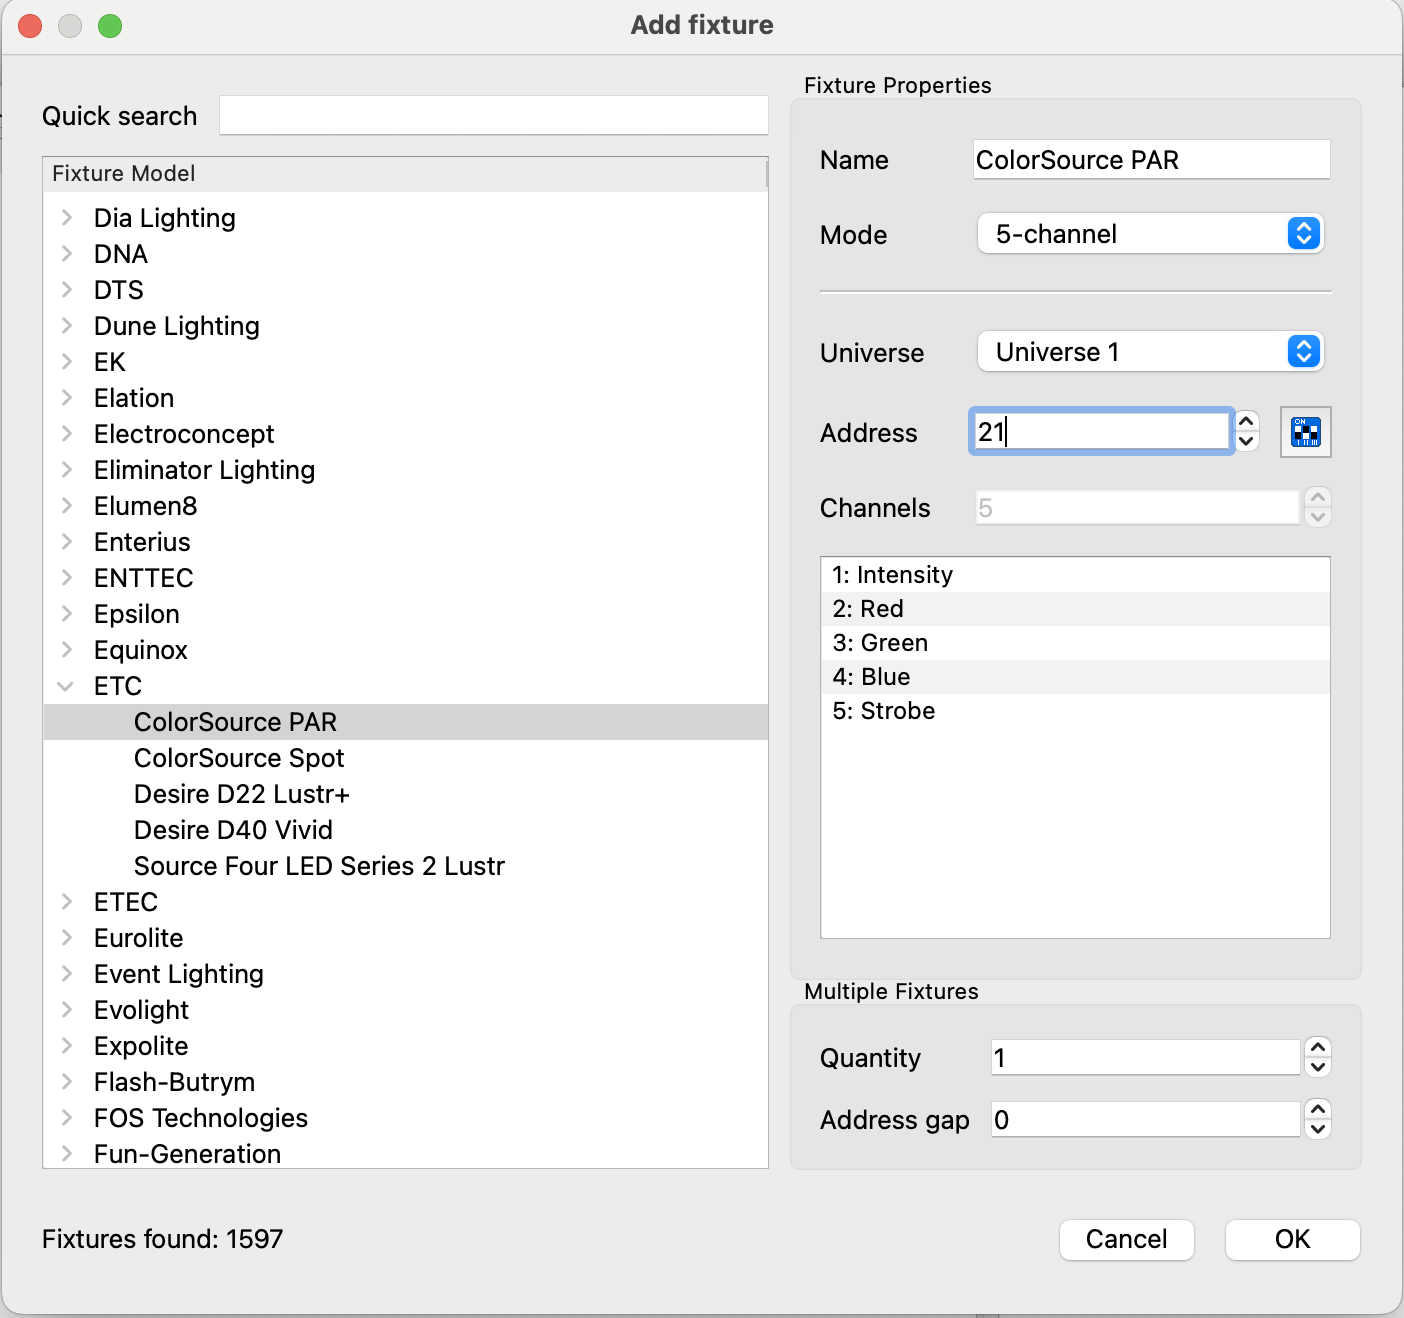
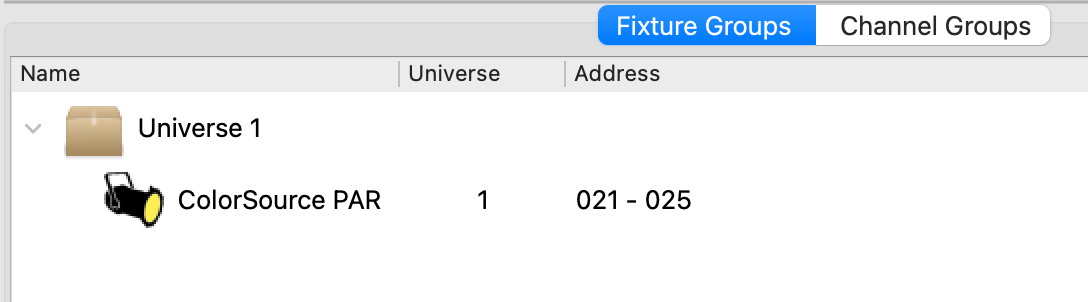
On the right side of this menu, we now see the tab 'Fixture Properties'. It's important that the settings that we input here, correspond to the settings that were input into the light. So, my light was set to 5 Channel mode, and its DMX address was 21. Make sure these settings correspond, otherwise we end up sending values to the wrong addresses (making your light blue instead of red for example, or your light not turning on at all). Press OK, and then we should see our light in our list of fixtures.
6. Controlling lights!
Now finally onto actually controlling lights. To see if we if we set up everything correctly, in the bottom bar, navigate to the 'Simple Desk'.
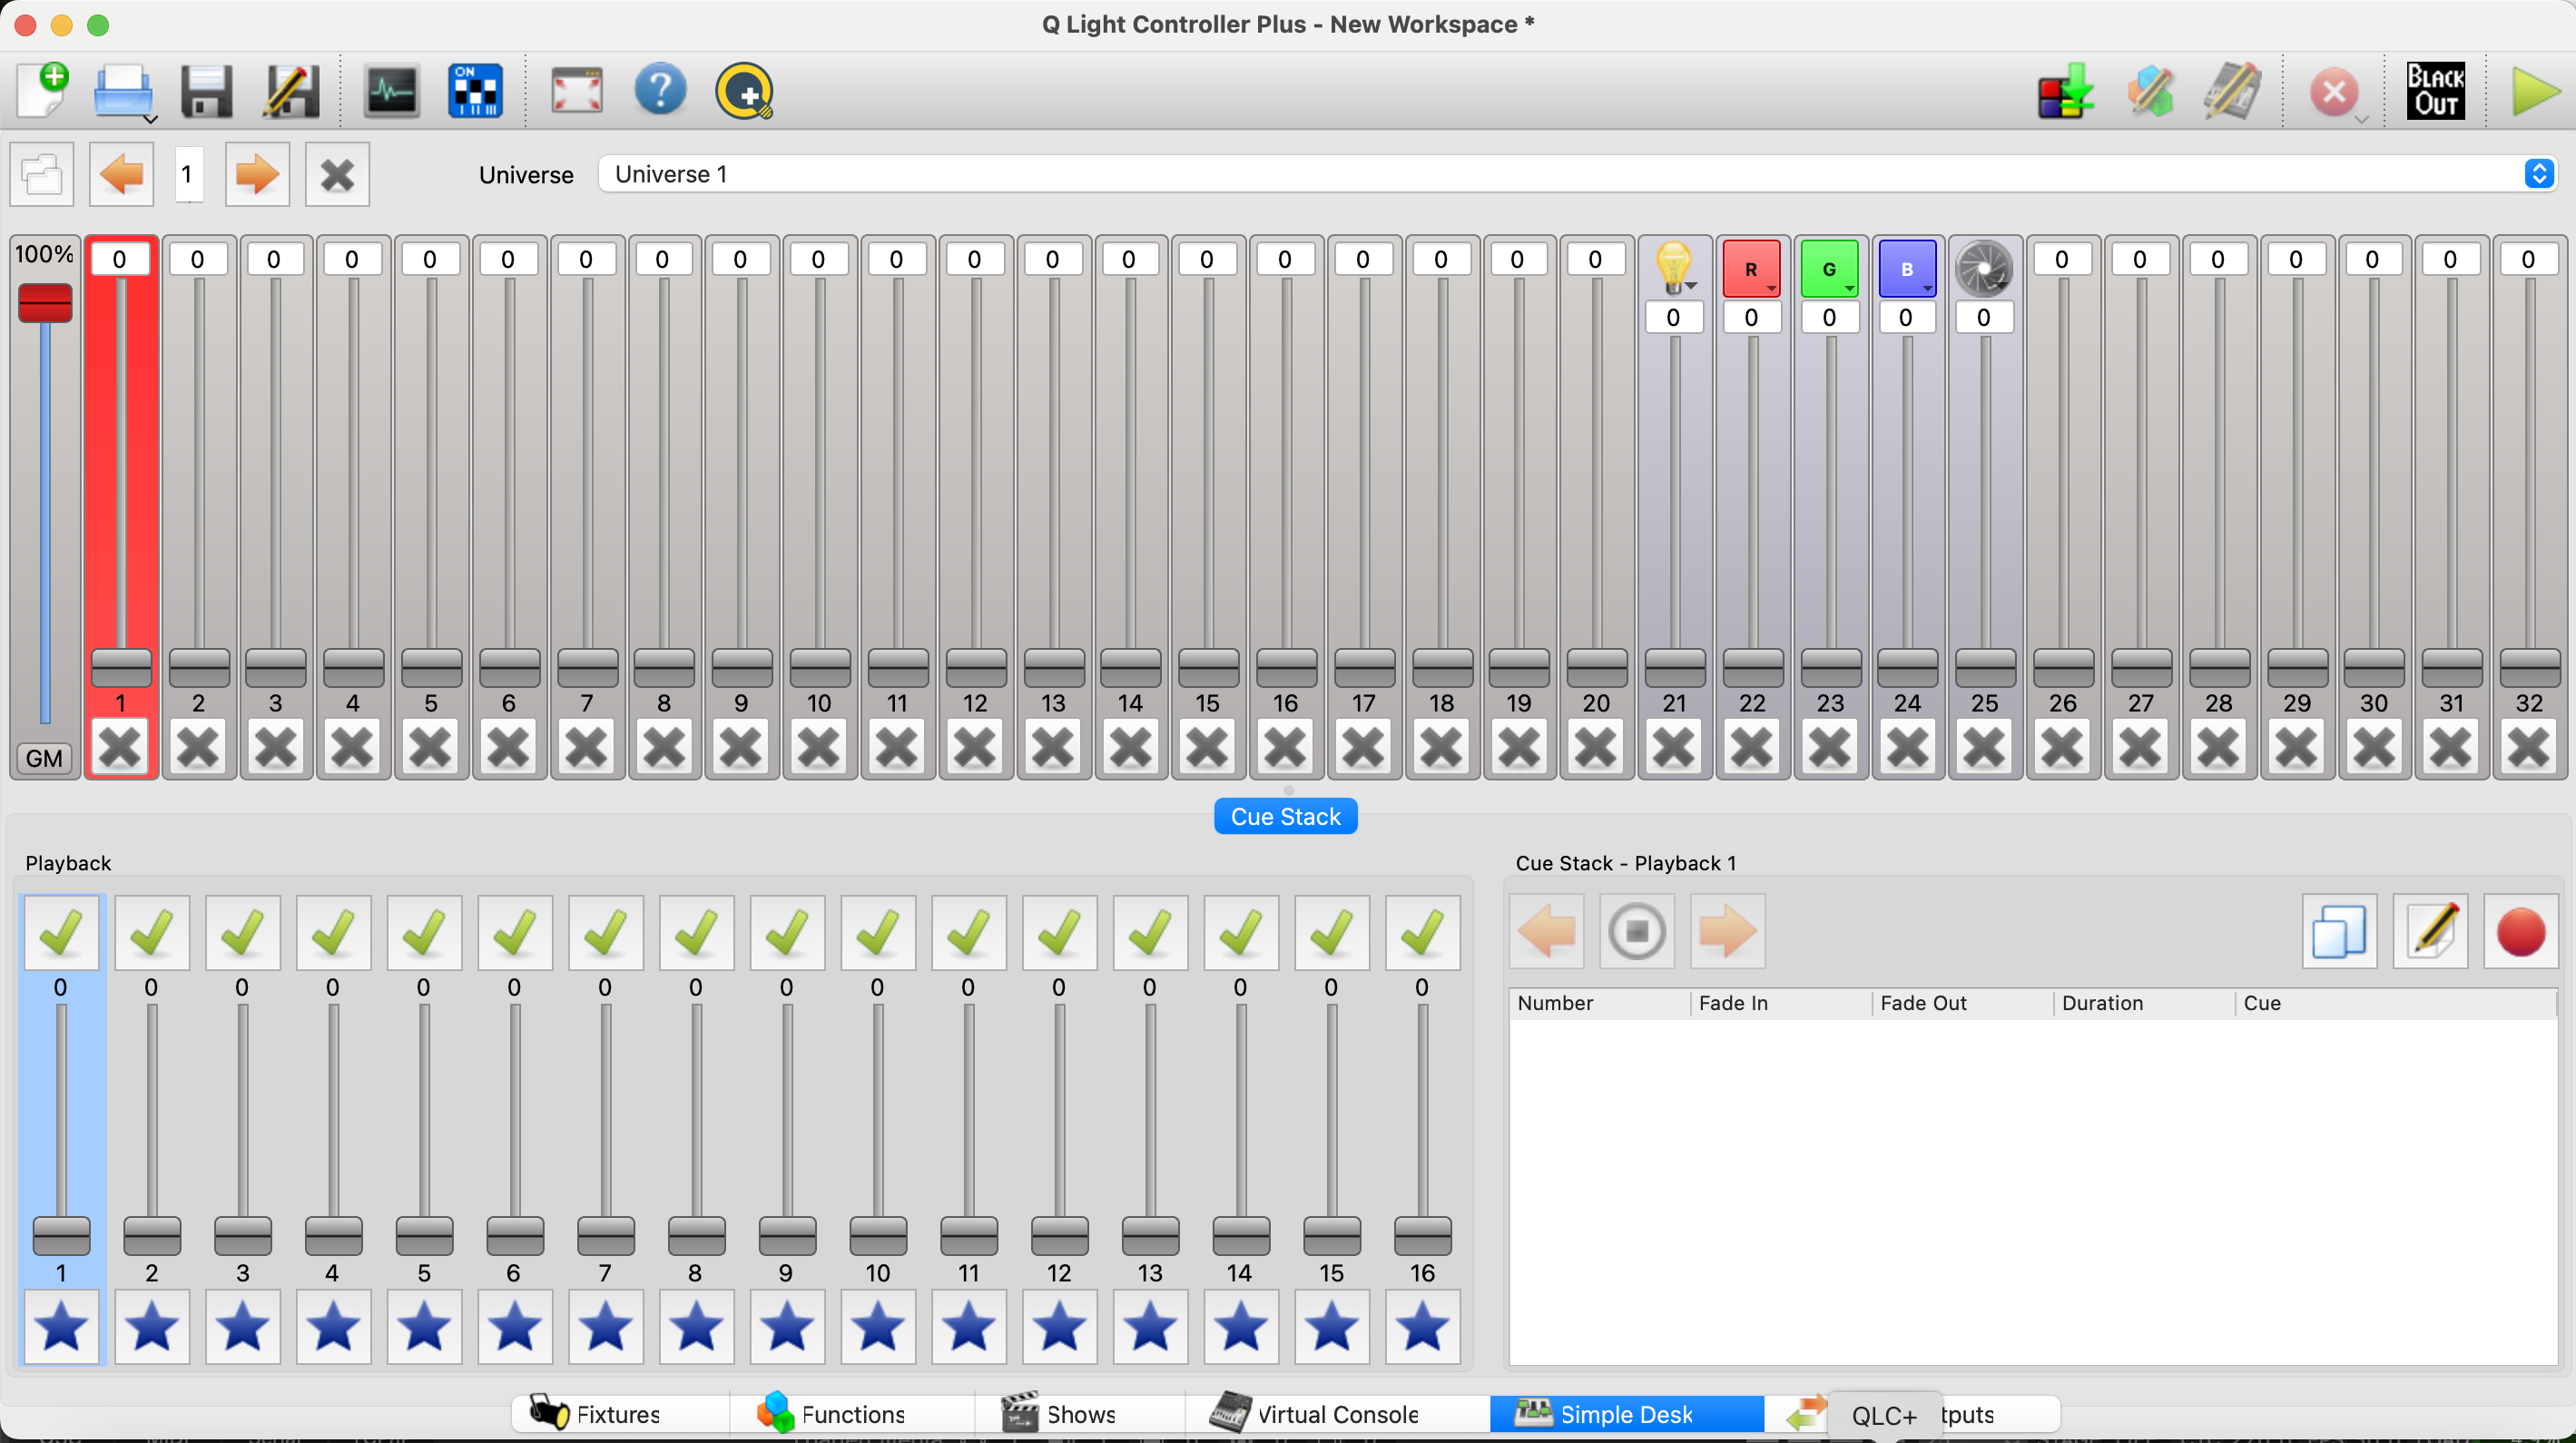
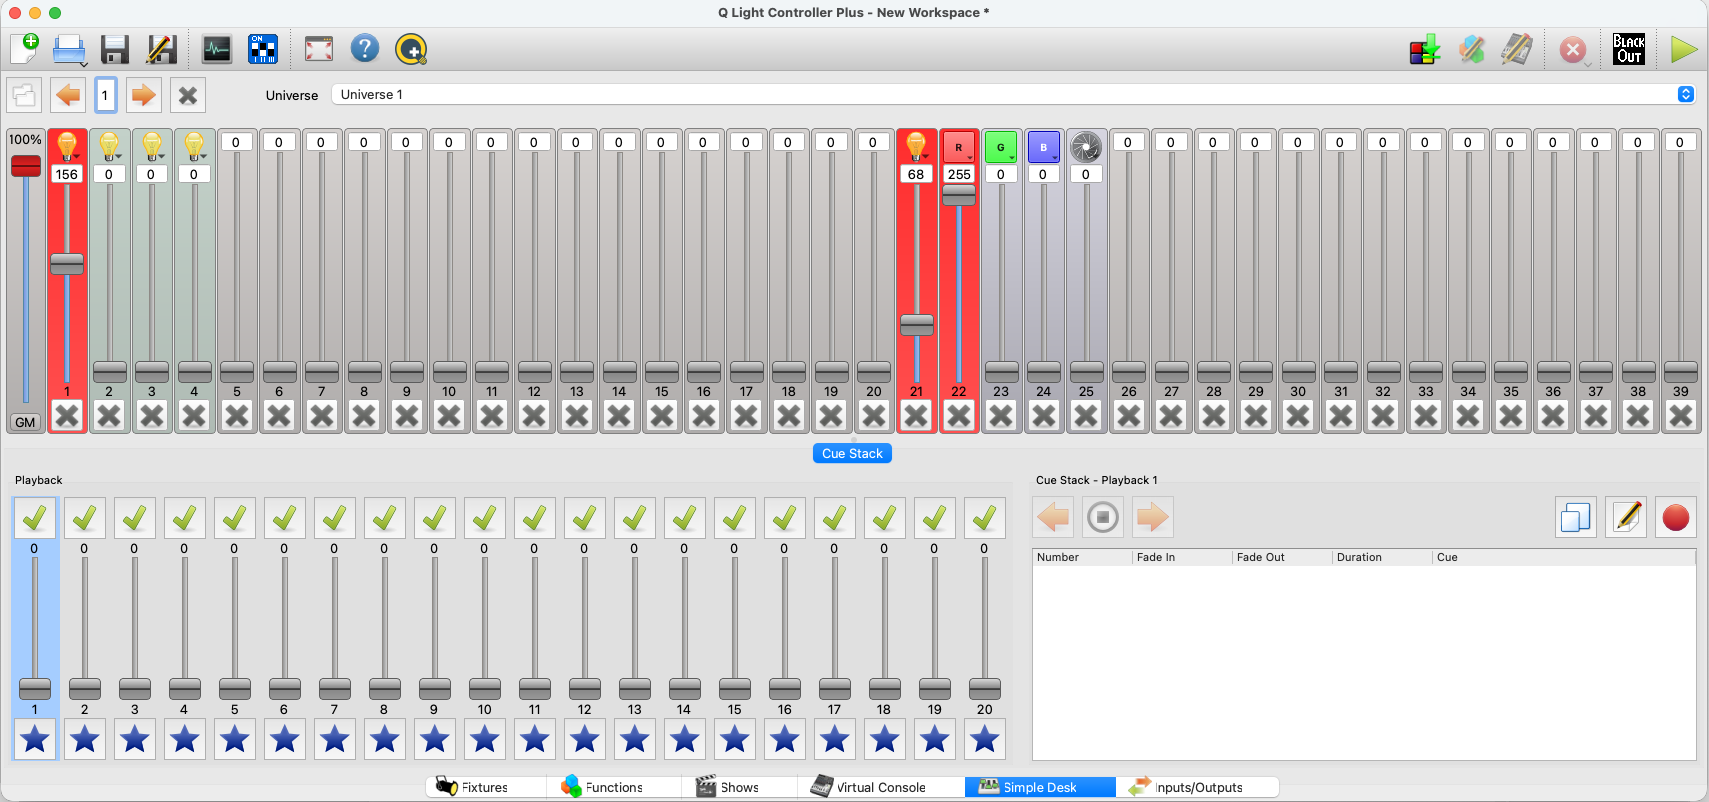
Here we see a representation of what DMX addresses are in use. Channels 21 - 25 have been set with the Intensity, Red, Green, Blue, and Strobe parameters, dictated by the way the 5-channel mode is setup. Turn up the slider with the lightbulb; this will turn the light on, but, we can't see anything yet. This is because the light was turned on for a certain amount, but we aren't outputting any color yet. Use the sliders to output a color.
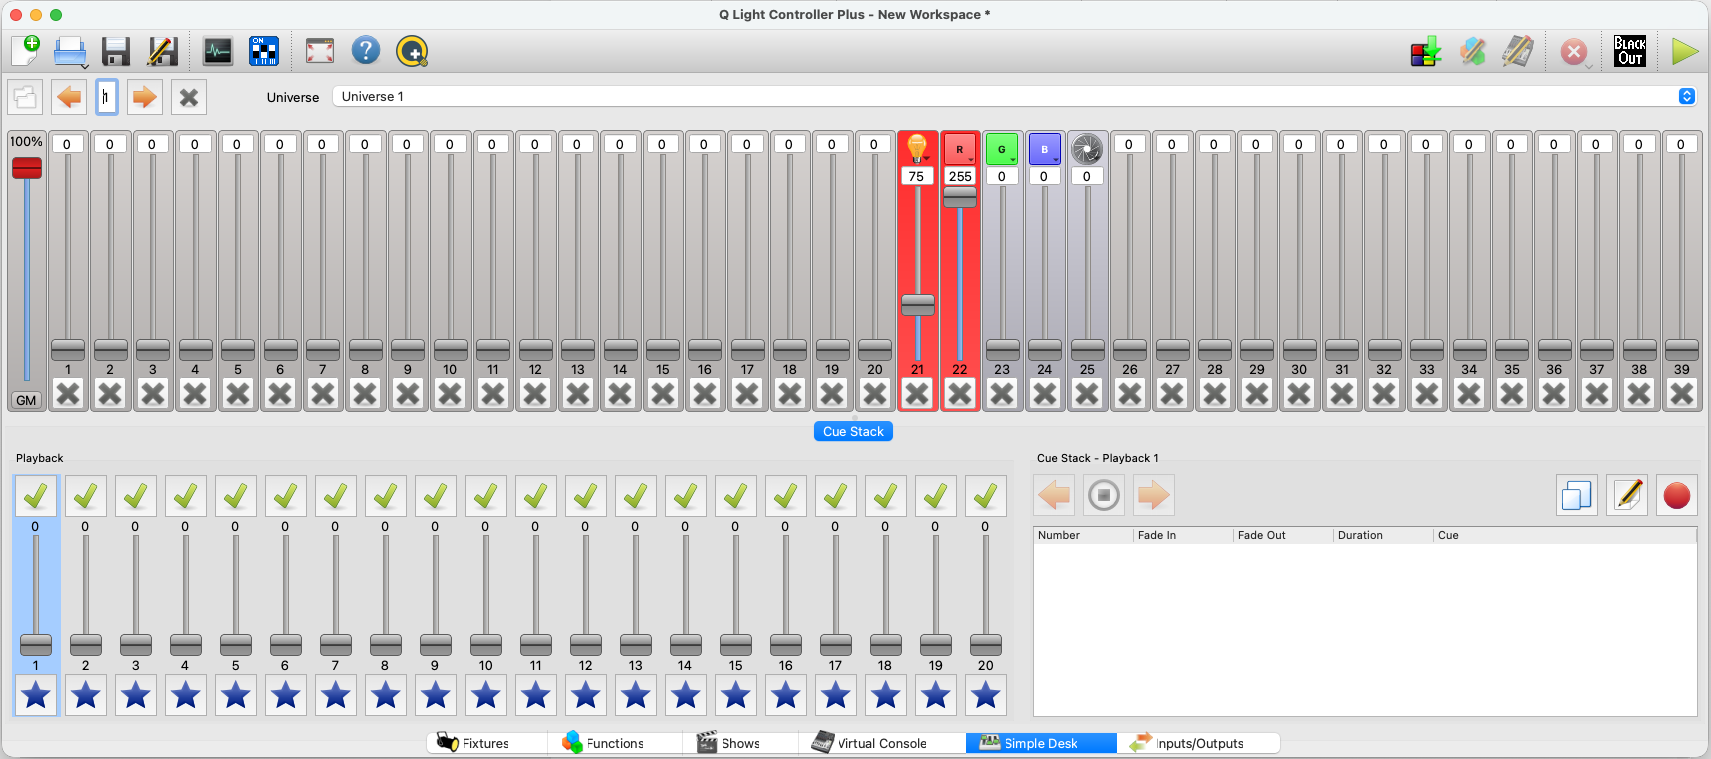
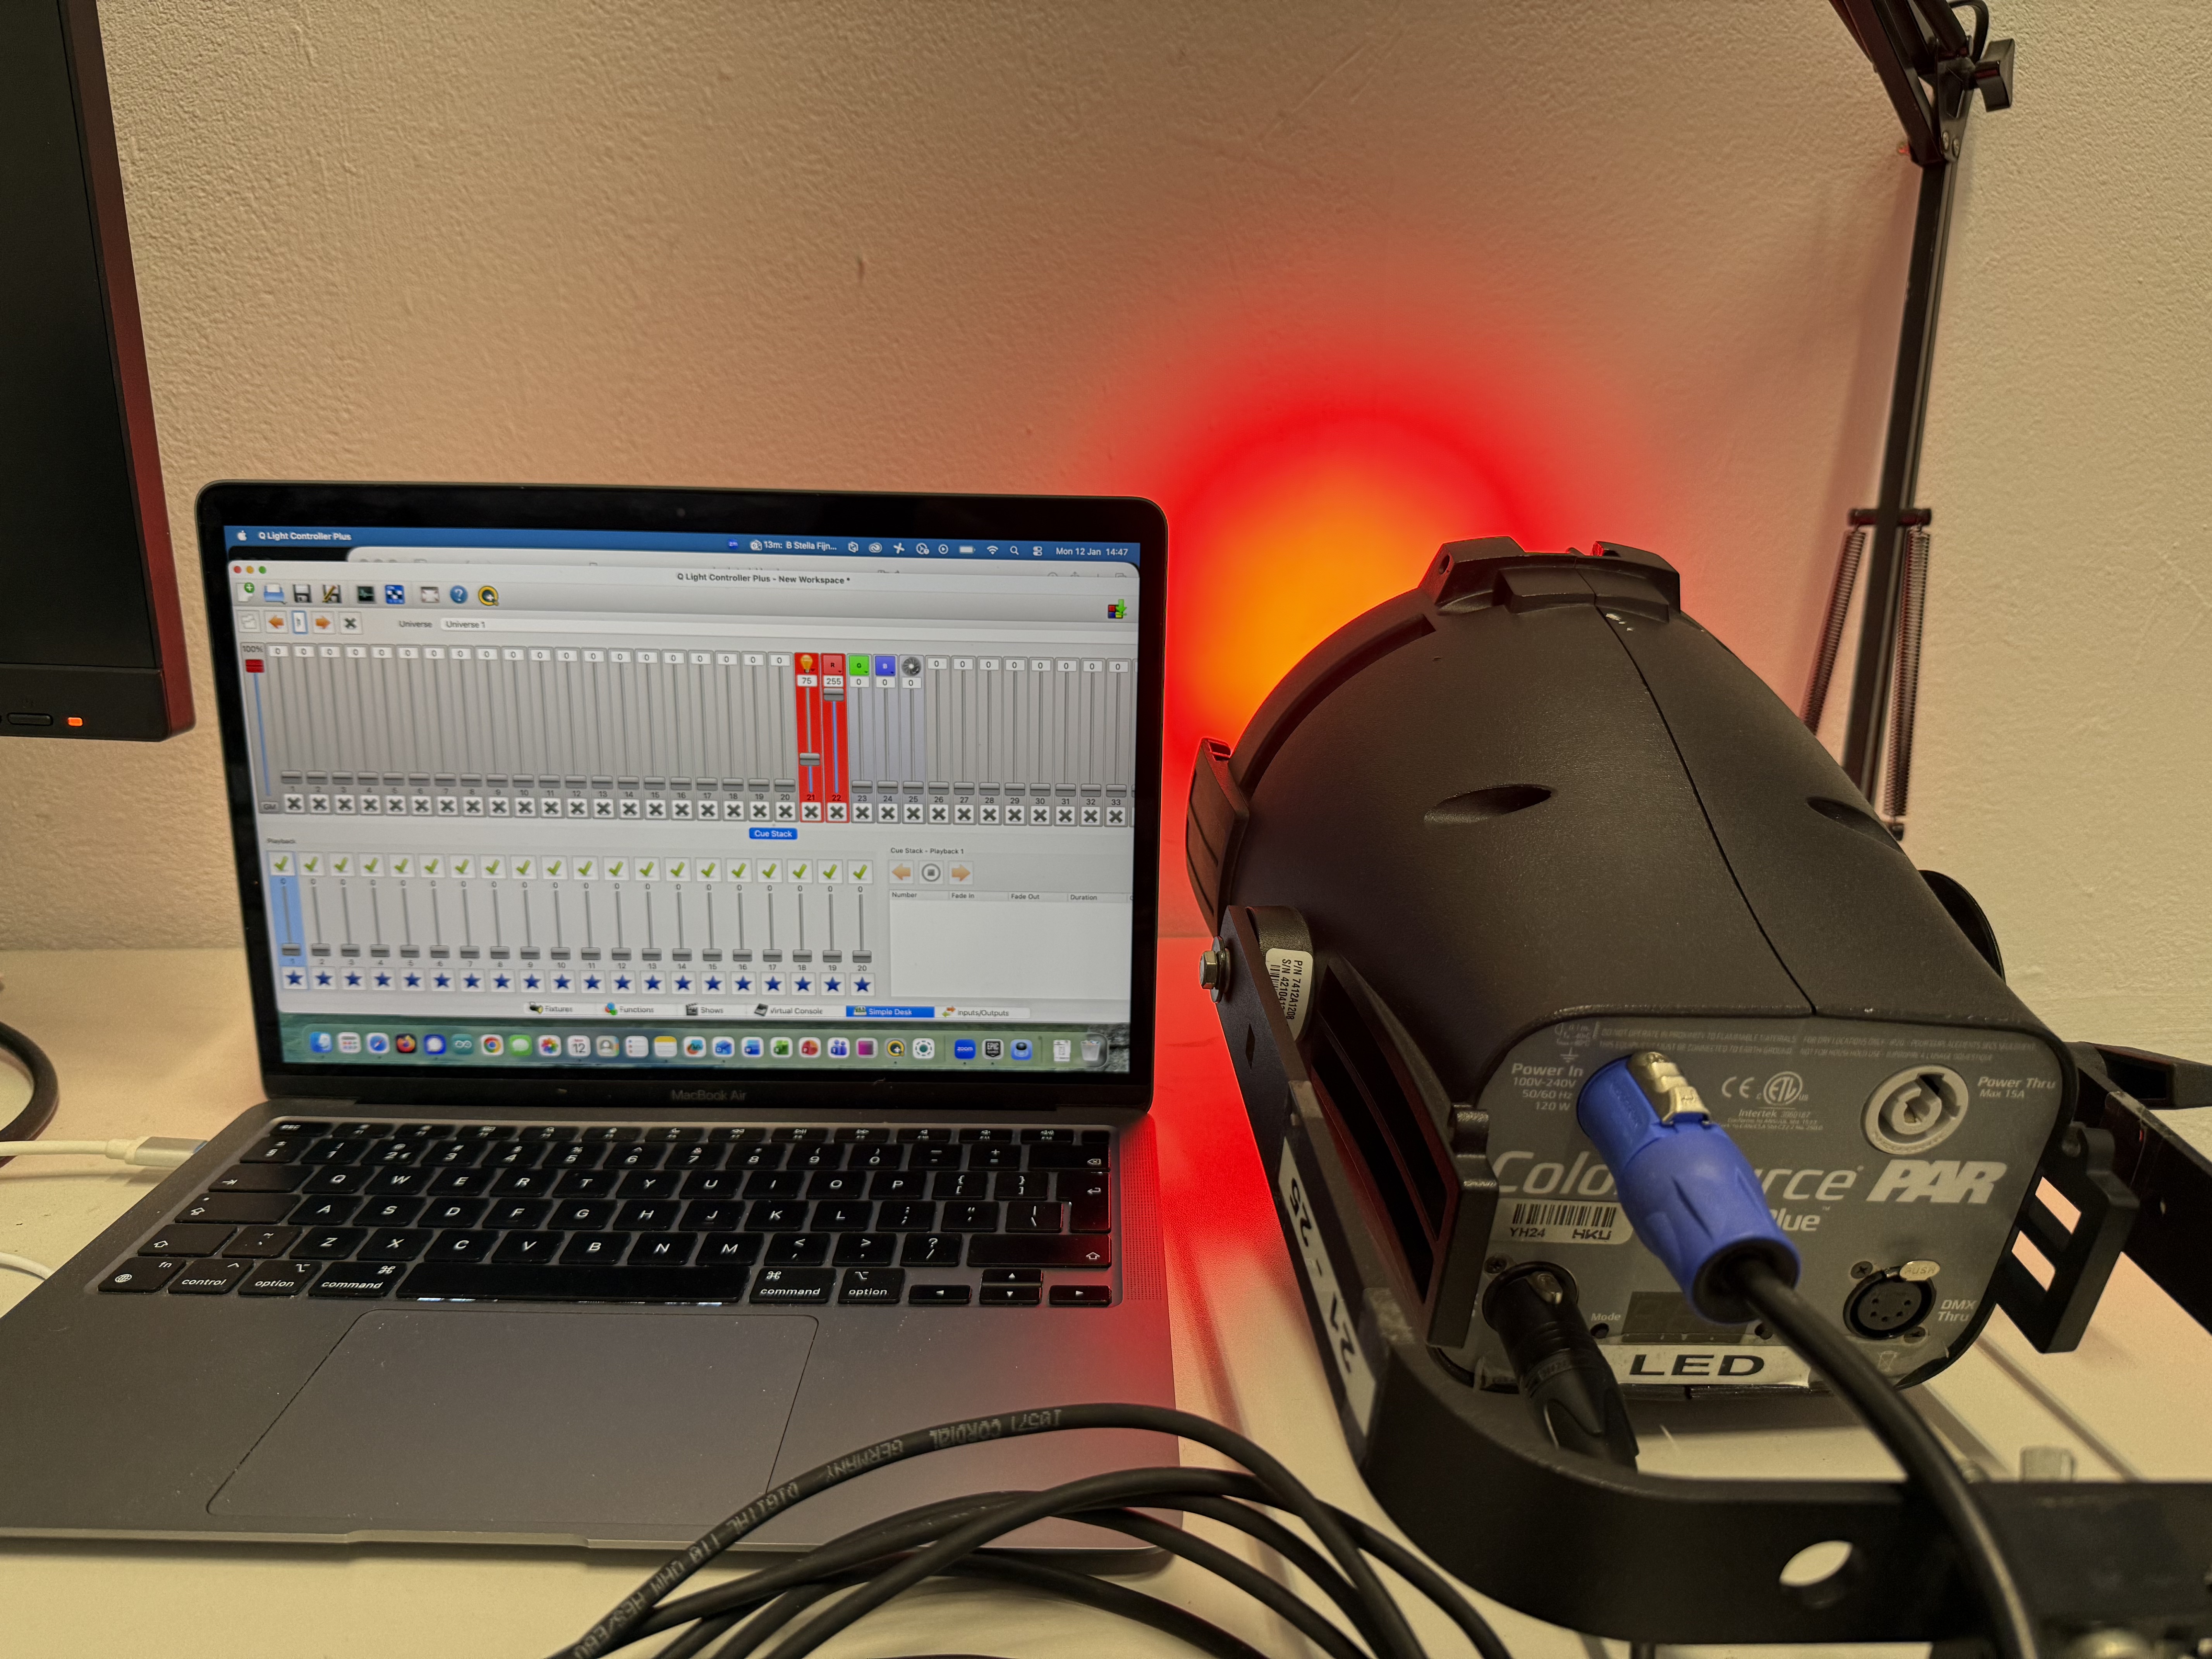
If we've done everything correctly, the light should now turn on! Please note that operating QLC+ from the Simple Desk will not give you access to all the functionalities that QLC+ has to offer. If you're looking for an overview of some of QLC+'s other features, check out this video tutorial.
Is the light still not working for you? Check if:
- Your light is receiving power
- All DMX and USB cables are properly plugged in
- Your DMX interface is still listed and connected in the Input/Output tab in QLC+
- Your DMX address and channel mode are the same between the light and QLC+
Light still not working? Please feel free to contact a blackbox employee!
Controlling halogen lights using a dimmerpack:
7. Connecting your dimmerpack
If we want to control halogen lights with our laptop, we will need to use a dimmerpack with DMX control. A dimmerpack can control, or dim, the amount of current you send to a light that you have plugged in. IMPORTANT NOTE: Never plug LED lights or other electronic devices like beamers into a dimmer, ONLY halogen lights. Failing to do so may seriously damage the device, as they were not constructed to be dimmed in this manner.
Connect the DMX interface to your computer like we did in chapter 2, but instead of connecting the DMX cable to a light, connect it to the dimmer's DMX input.
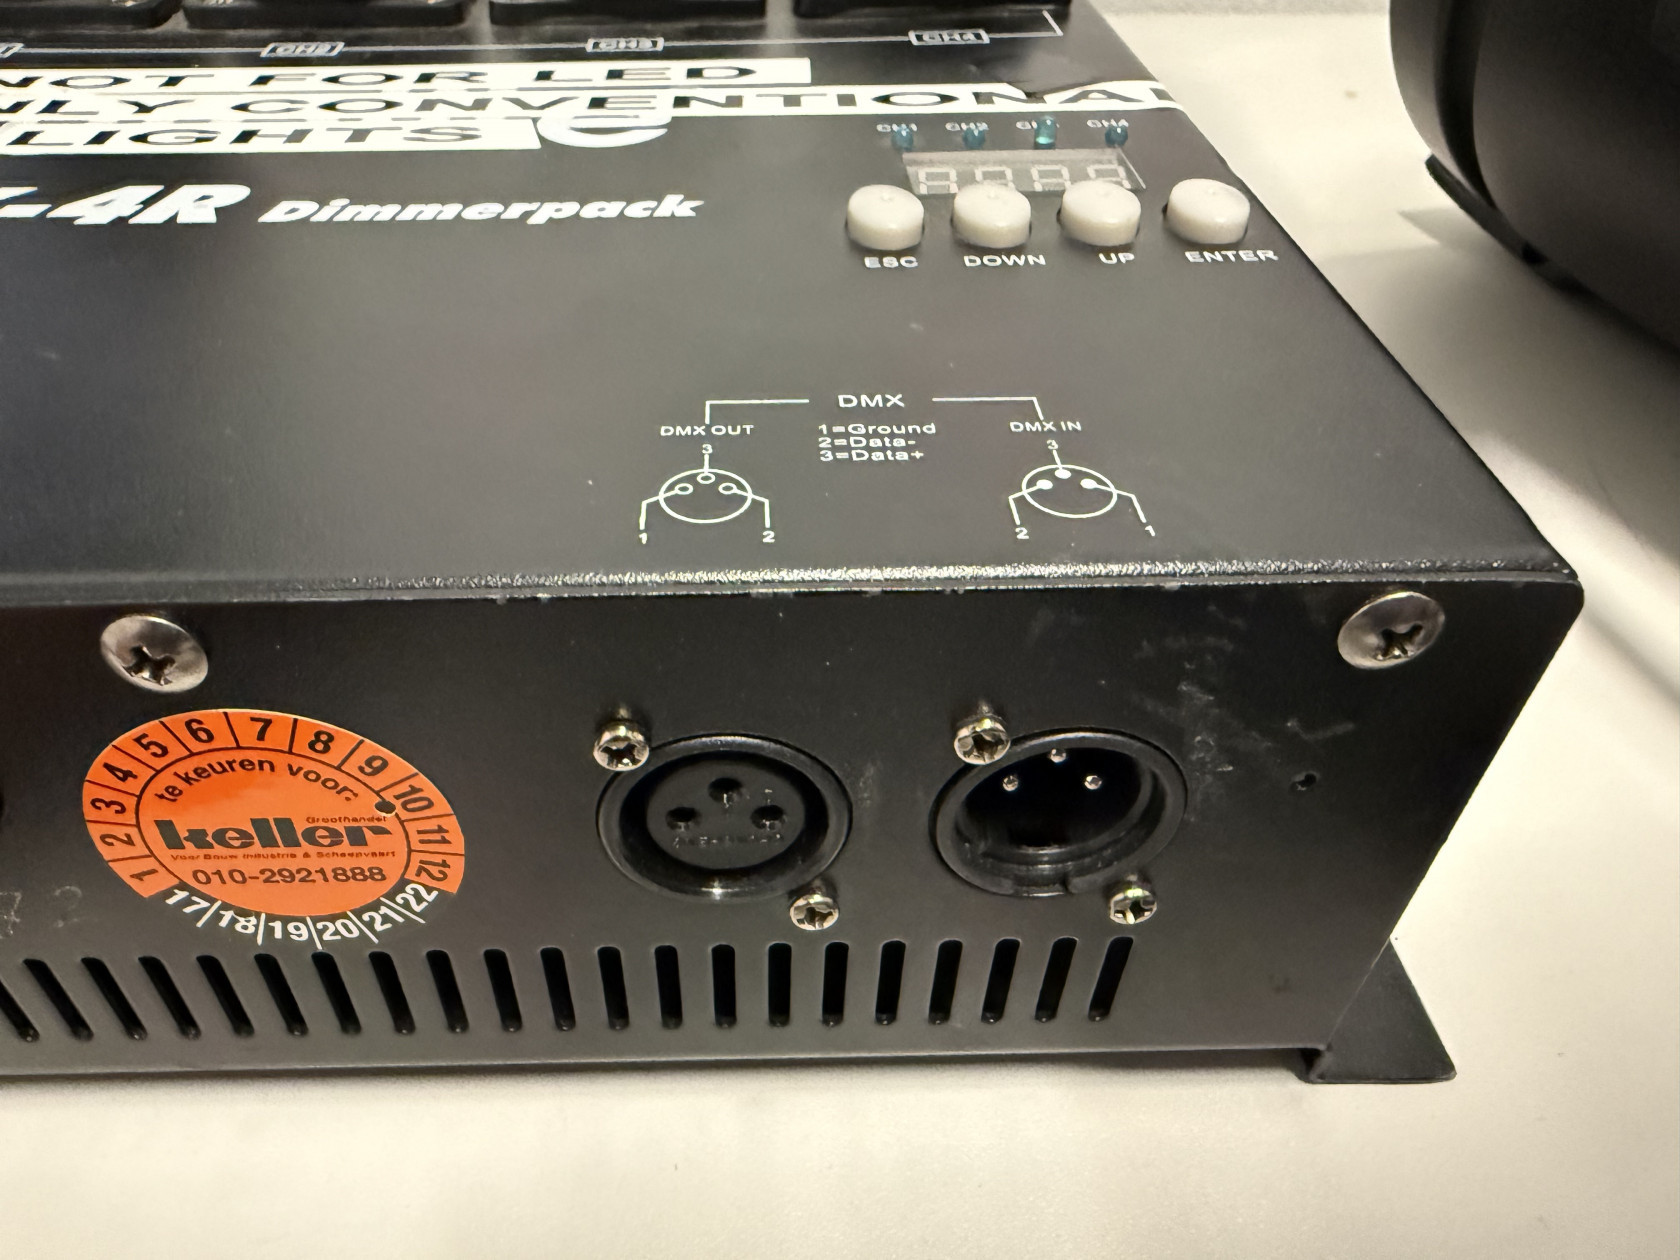
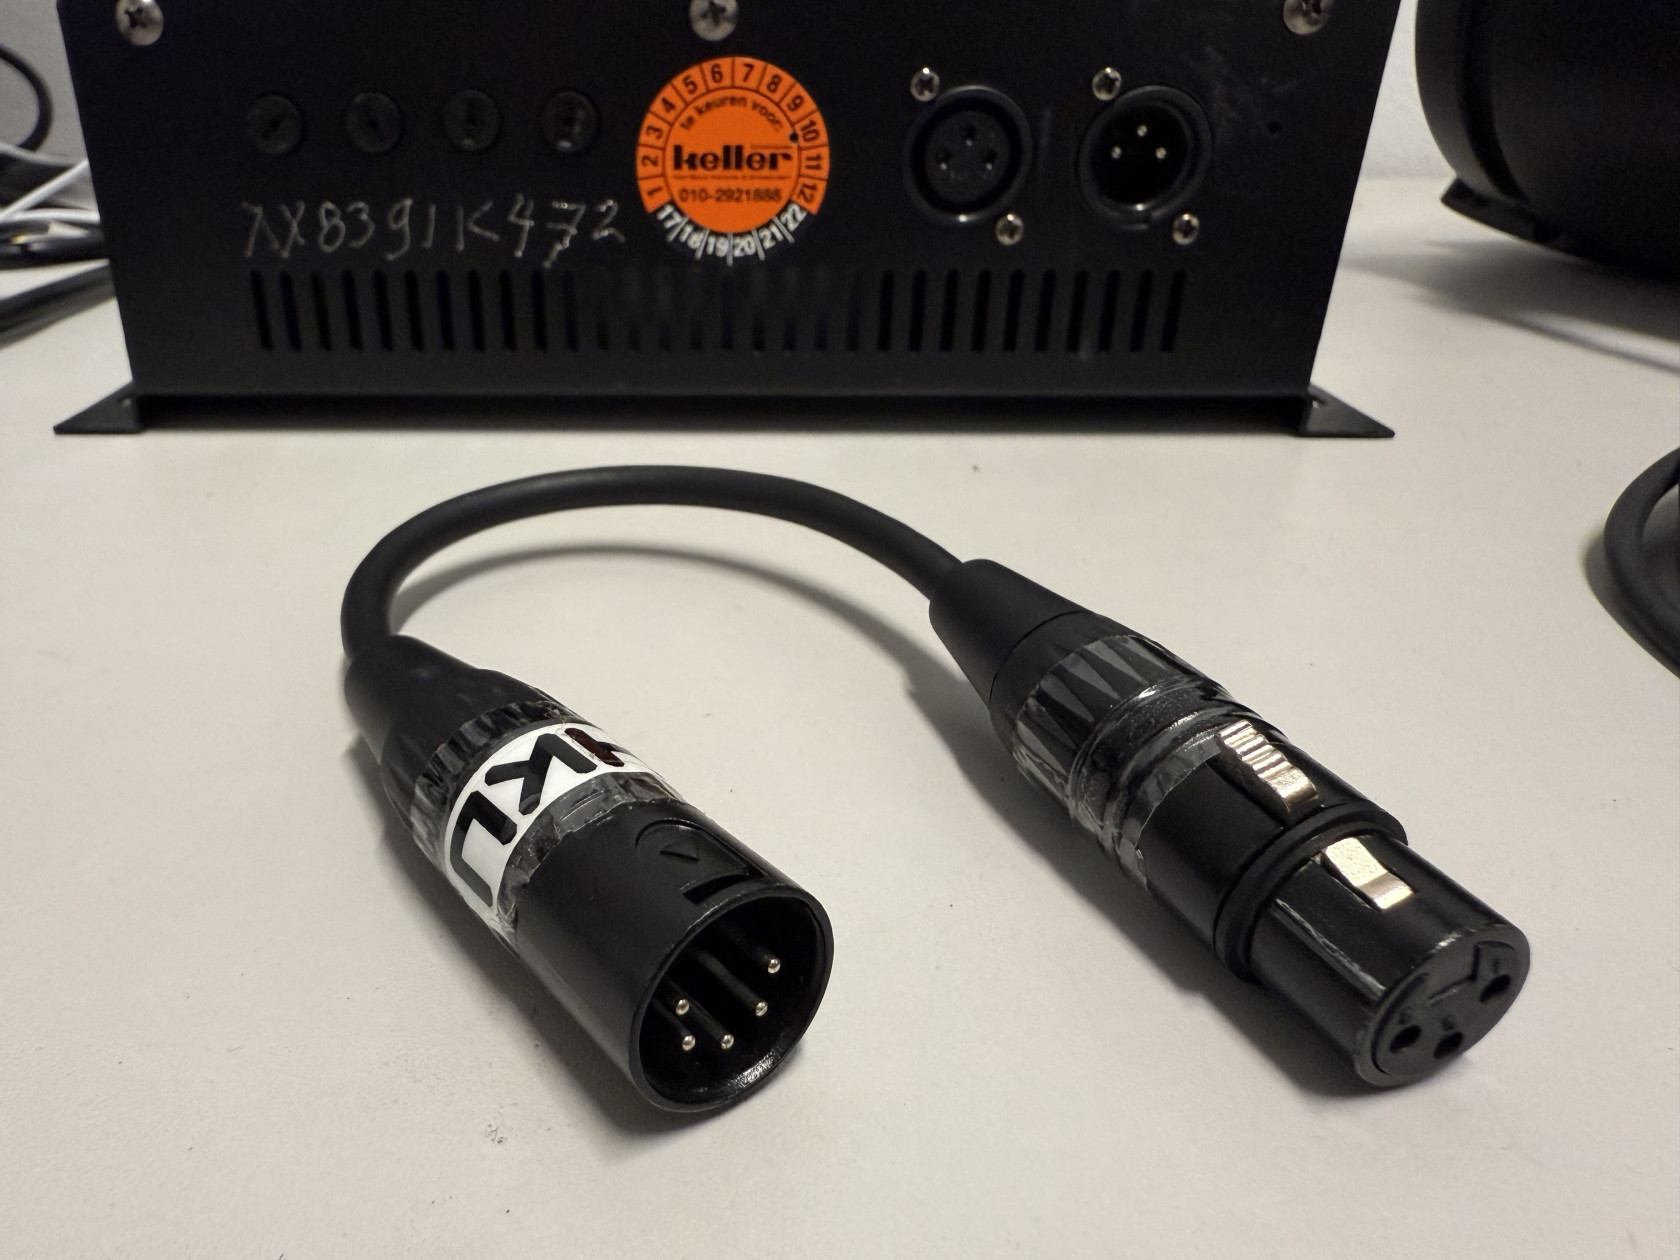
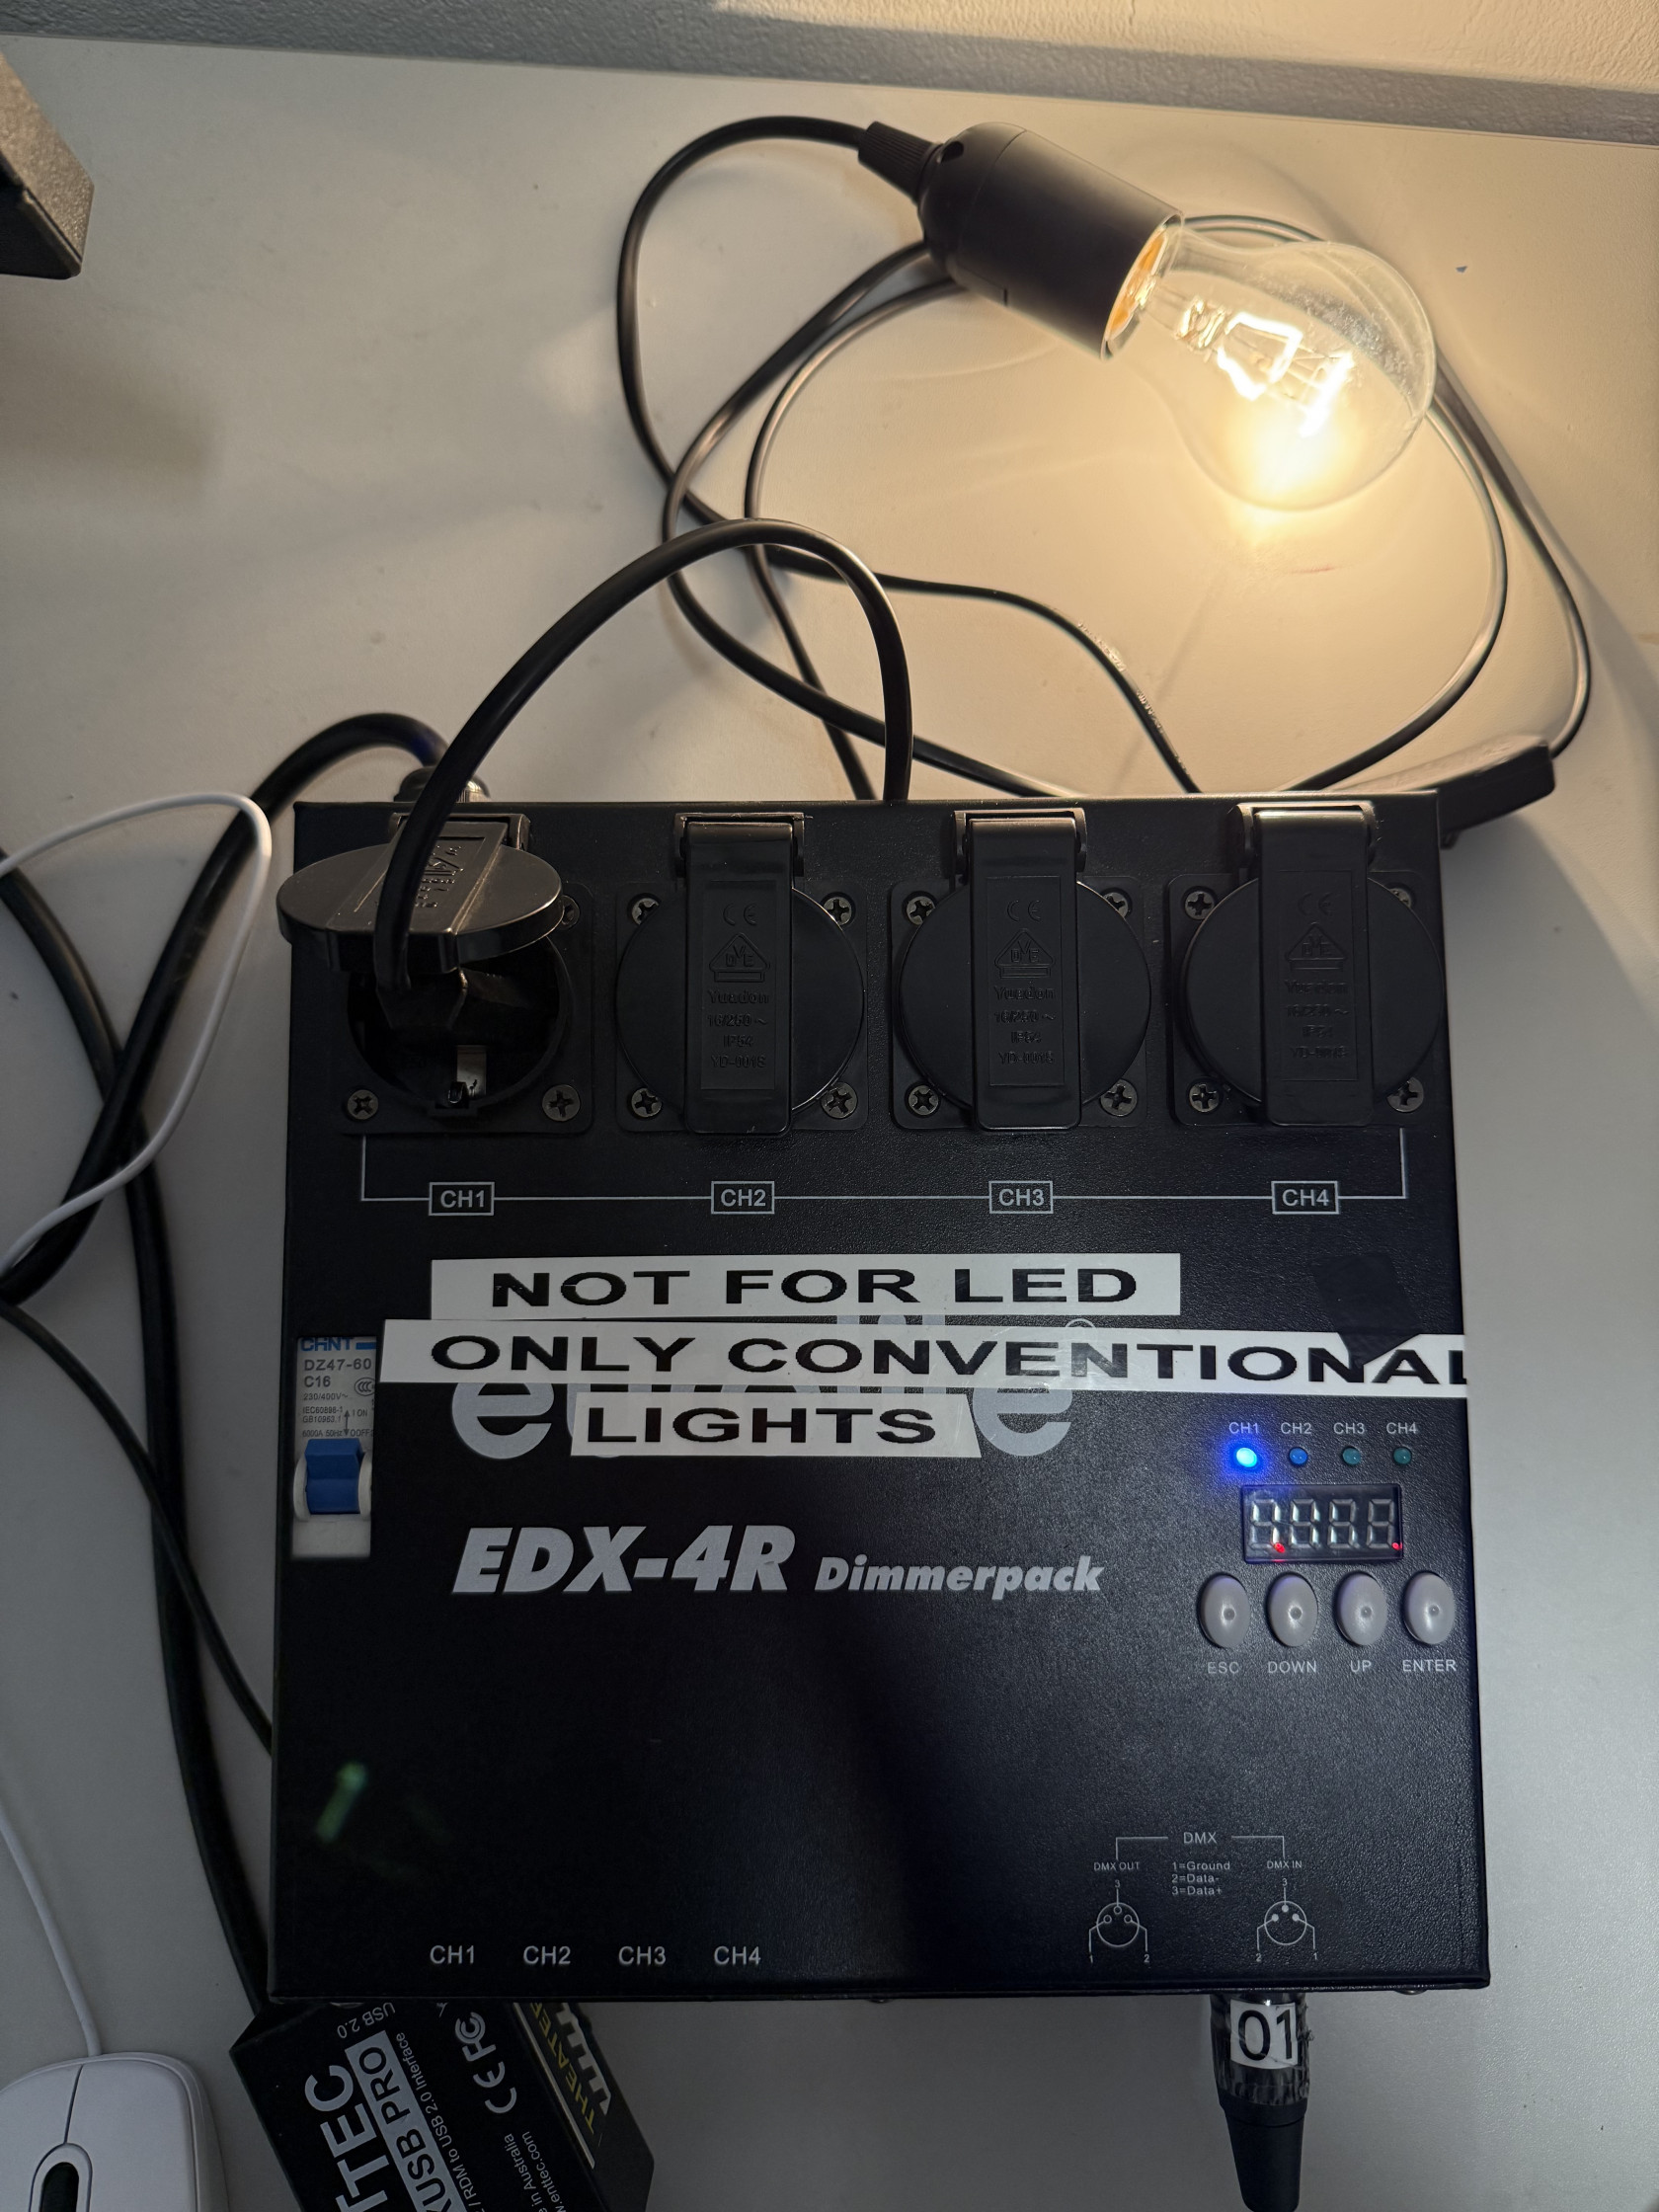
In some dimmerpacks (like this one), there might be a 3-pin DMX in/output connection instead 5 a 5-pin one. In this case, you'll need a 3 to 5-pin adapter, like in the top right picture.
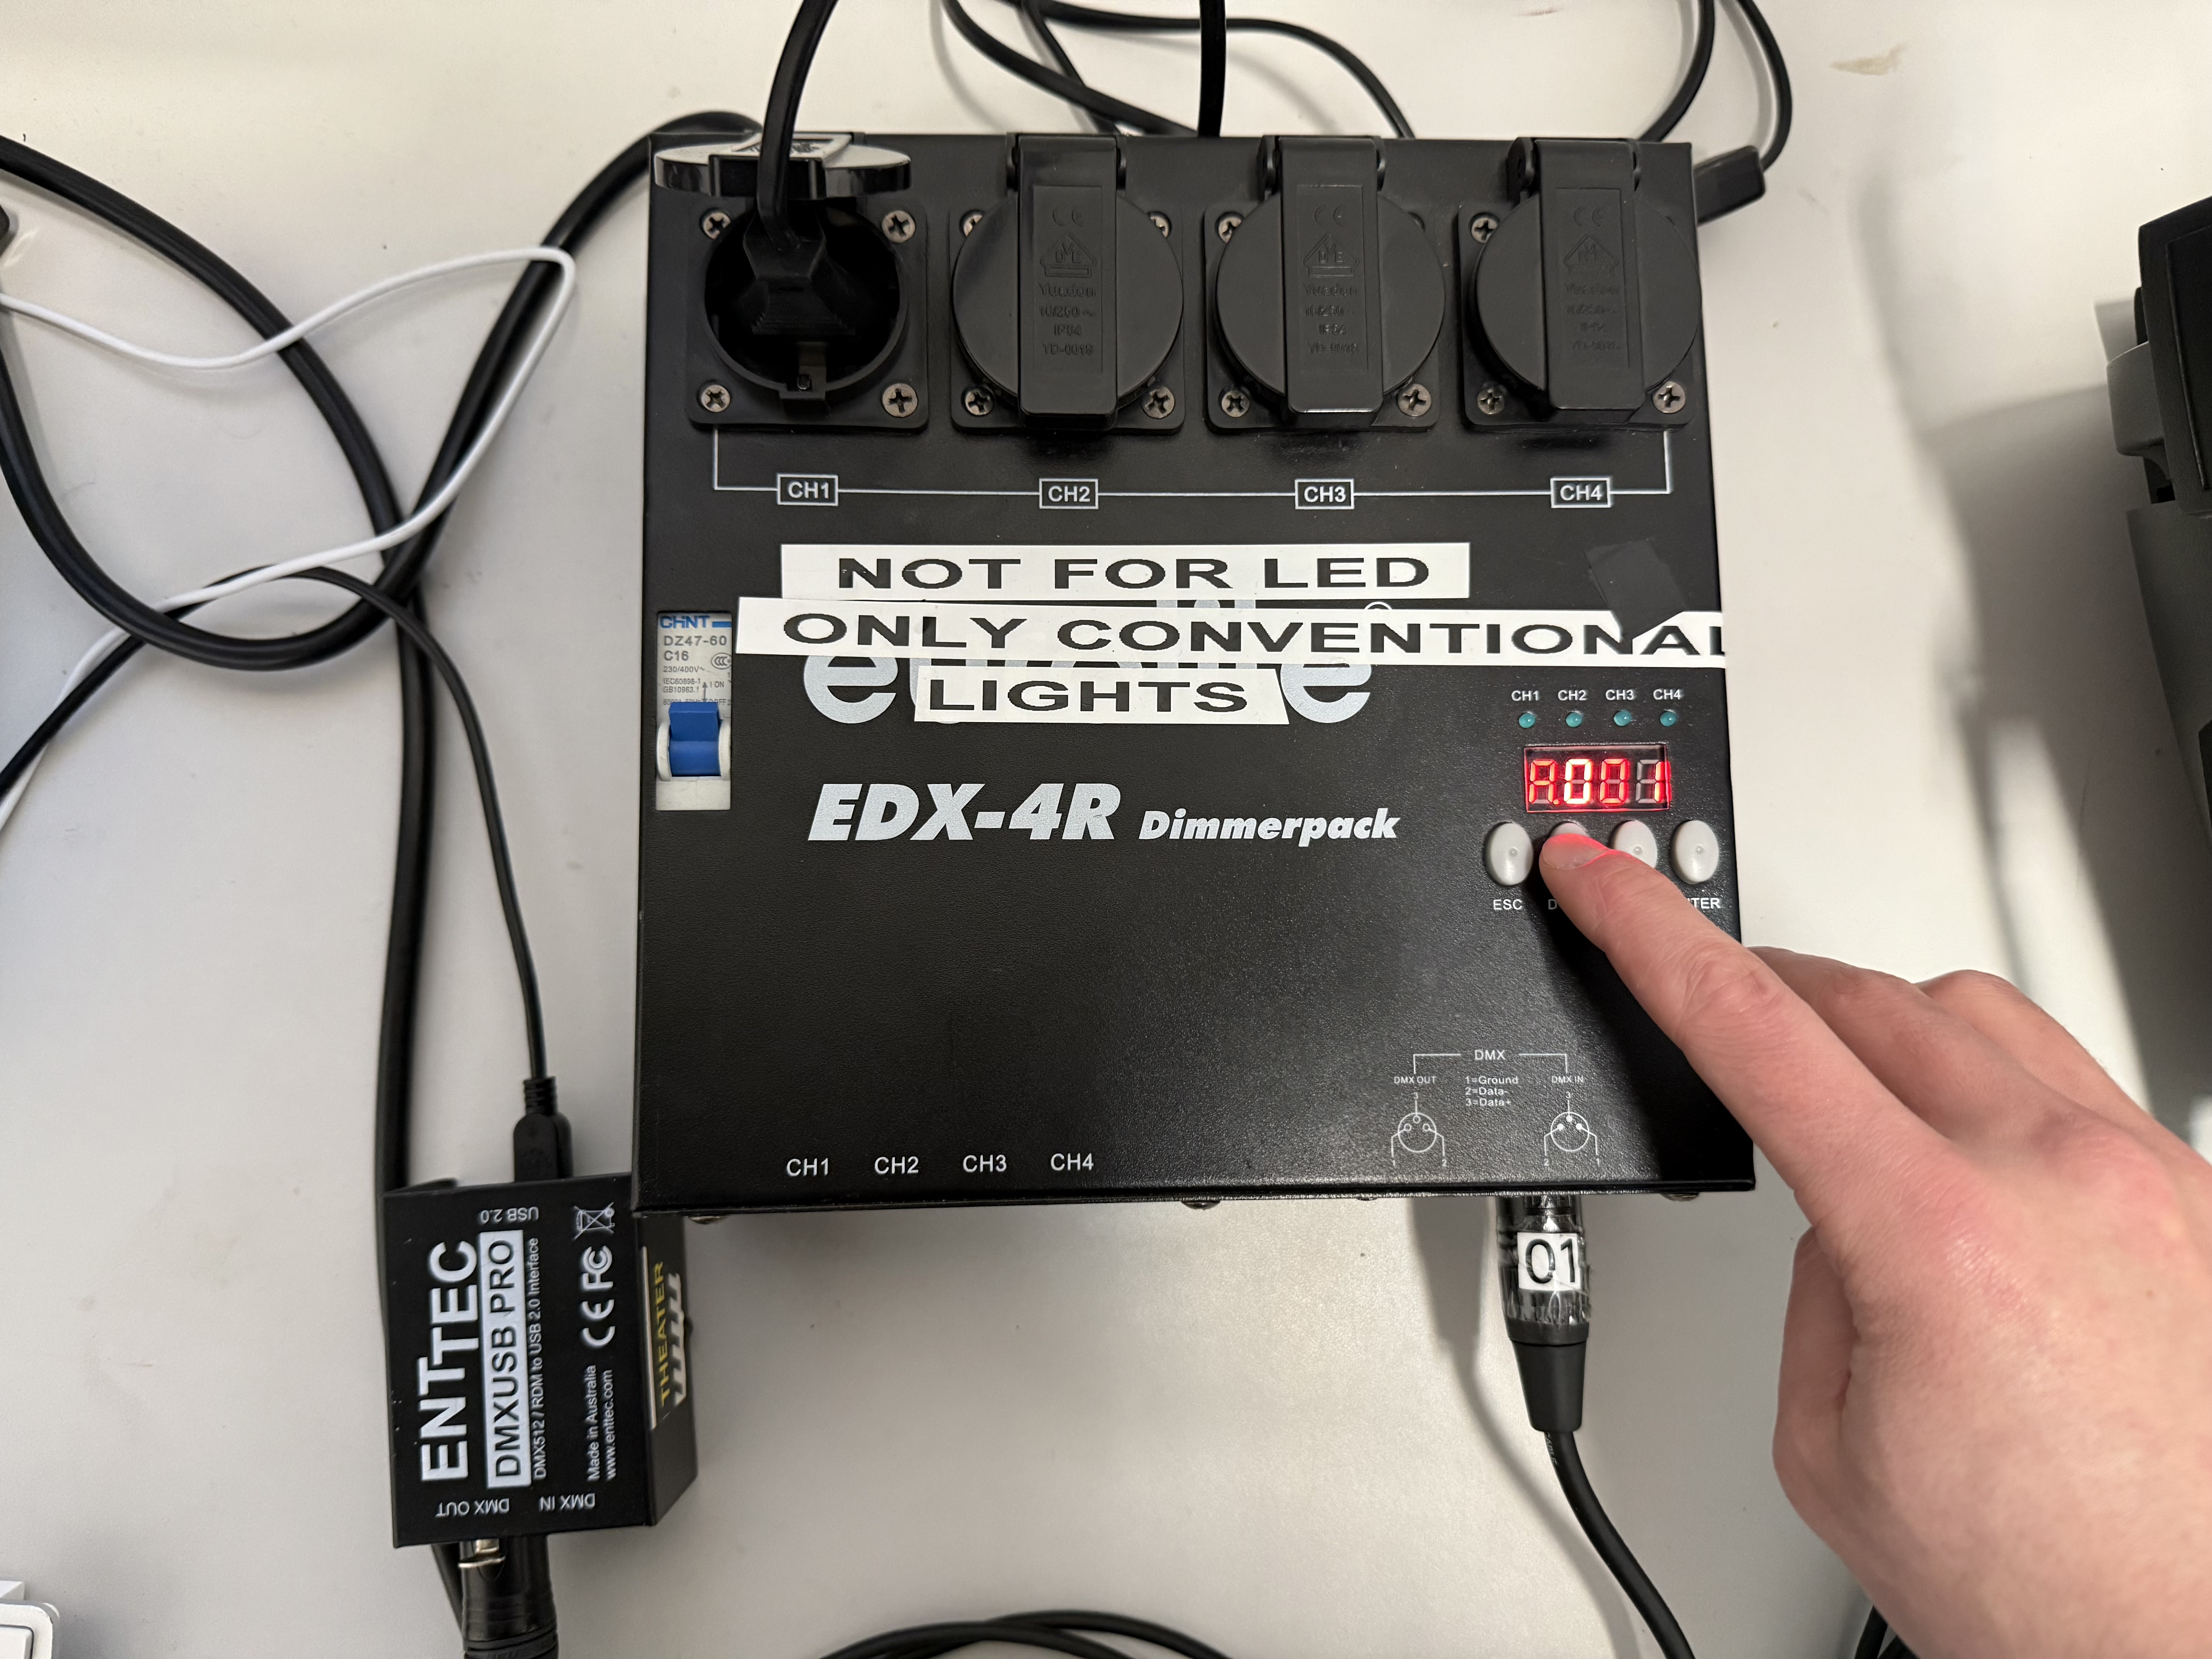
With your dimmerpack connected to power and to the DMX interface, start scrolling through the dimmerpack's menus, using the up and down buttons, until you find DMX mode. In the case of this dimmer, this is marked with an 'A' for address. Right now, it is set to 'A001', or, DMX Address 001.
On the dimmer we see power sockets with CH1, CH2, CH3, CH4 written underneath. In Channel 1 I have plugged in my halogen light.
8. Setting up the dimmer in QLC+
Go back to the Fixtures menu in QLC+. Here we'll need to add the dimmer. Click on the green + icon again like we did before.
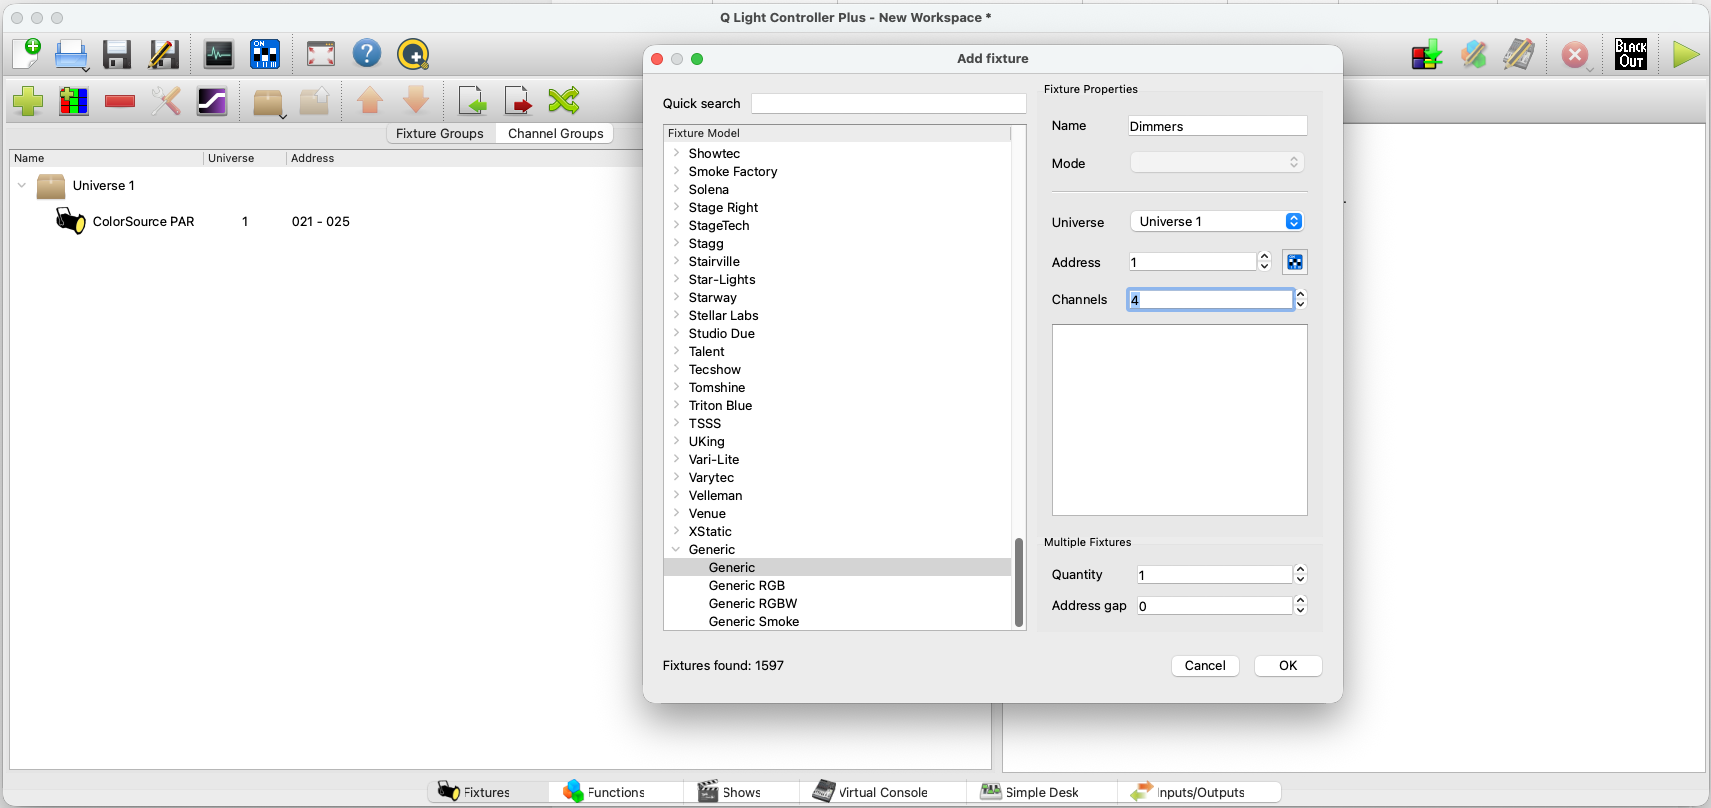
This time, instead of looking for the brand name, scroll all the way down to the 'Generic' tab, and click the first generic option. Make sure the address is set to whatever you set on the dimmer itself, so in my case, '1'. On the dimmer we can plug-0in 4 lights, and there's one channel for each light. So under channels, set it to '4' if this is also the case for you. Press OK.
We've now also added a dimmer to our fixtures list:
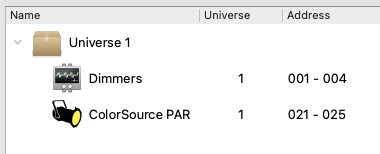
We should now see something like this:
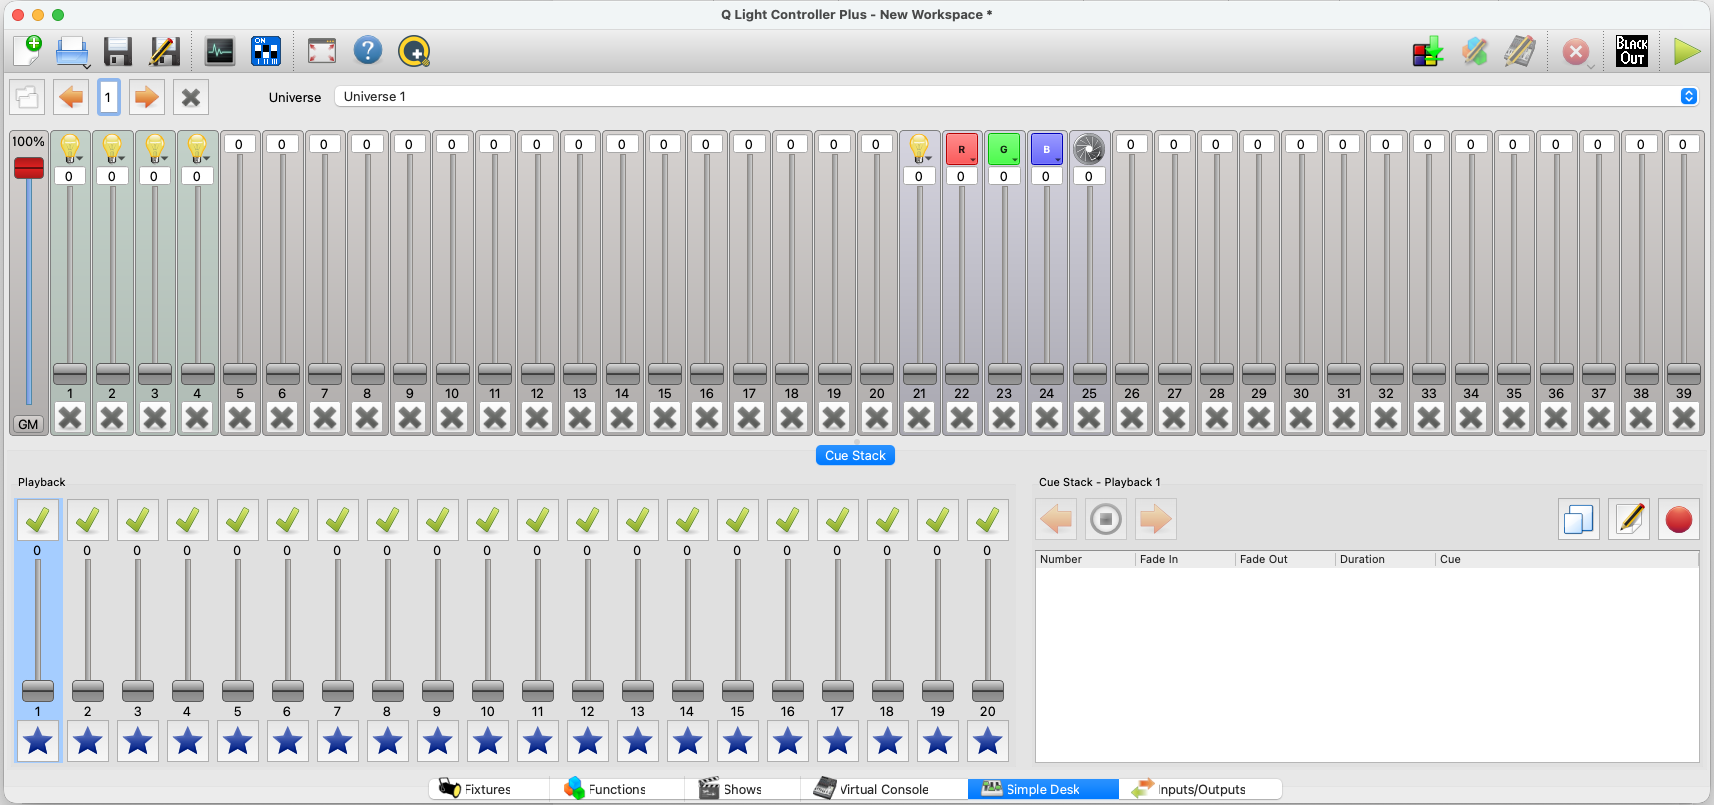
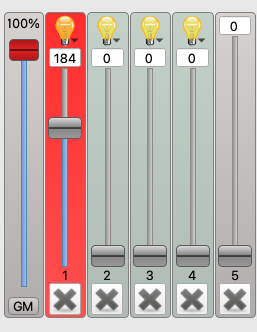
Note the four lightbulbs all the way to the left. Use the slider to control the light on the channel where you have plugged it in.
9. A short note on safety measures
There are a couple of things to note when working with lights, especially halogens, when it comes to safety. Lights, but halogens in particular, can get very hot when they're on. This can cause several safety hazards:
- Touching the outside of the light can burn your fingers. Be careful where you grab a light when it's on or cooling down.
- Keep a minimum of 0,5m distance for objects that you place close to the light, like curtains. If they are too close, they might catch fire from the heat.
- A light is most fragile when it's hot from being on for a while. Let it cool down before moving it again.
- Cables can melt when in contact with the light's metal casing. Make sure they don't touch. Also be careful where you place a light if it's still cooling down. Plastic floors can melt from the heat aswel.
Please keep these safety measures in mind when working with lights!
10. Daisy Chaining (or controlling several lights at once)
Another important term to understand when controlling lights is 'daisy chaining'. As you may have noticed, there's only one DMX output on our DMX interface (depending on the model you use). Daisy chaining is a technique where you send one input signal coming into a device and output that same signal to a next device, thus creating a signal chain. Think of it as a chain of daisies that you (may or may not have) made when you were a child. In this analogy, the stem of the flower is the cable and the flower bud is the light turning on. One flower is tied to the next, thus creating a chain of flowers, or, lights! The signal flows through the entire chain.

Most LED lights and dimmerpacks with DMX control will have a DMX input and a DMX through/output. If we want to daisy chain our LED light to our dimmerpack, the signal chain will look something like this:
1. Laptop (USB output) -> USB cable -> DMX interface (USB input)
2. DMX interface (DMX output) -> DMX cable -> LED light (DMX input)
3. LED light (DMX thru) -> DMX cable -> Dimmerpack (DMX input)
as can be seen in the image below:
Turning on both lights simultaneously in QLC+ should now work, as they're both receiving a signal. You can keep adding lights to this chain.
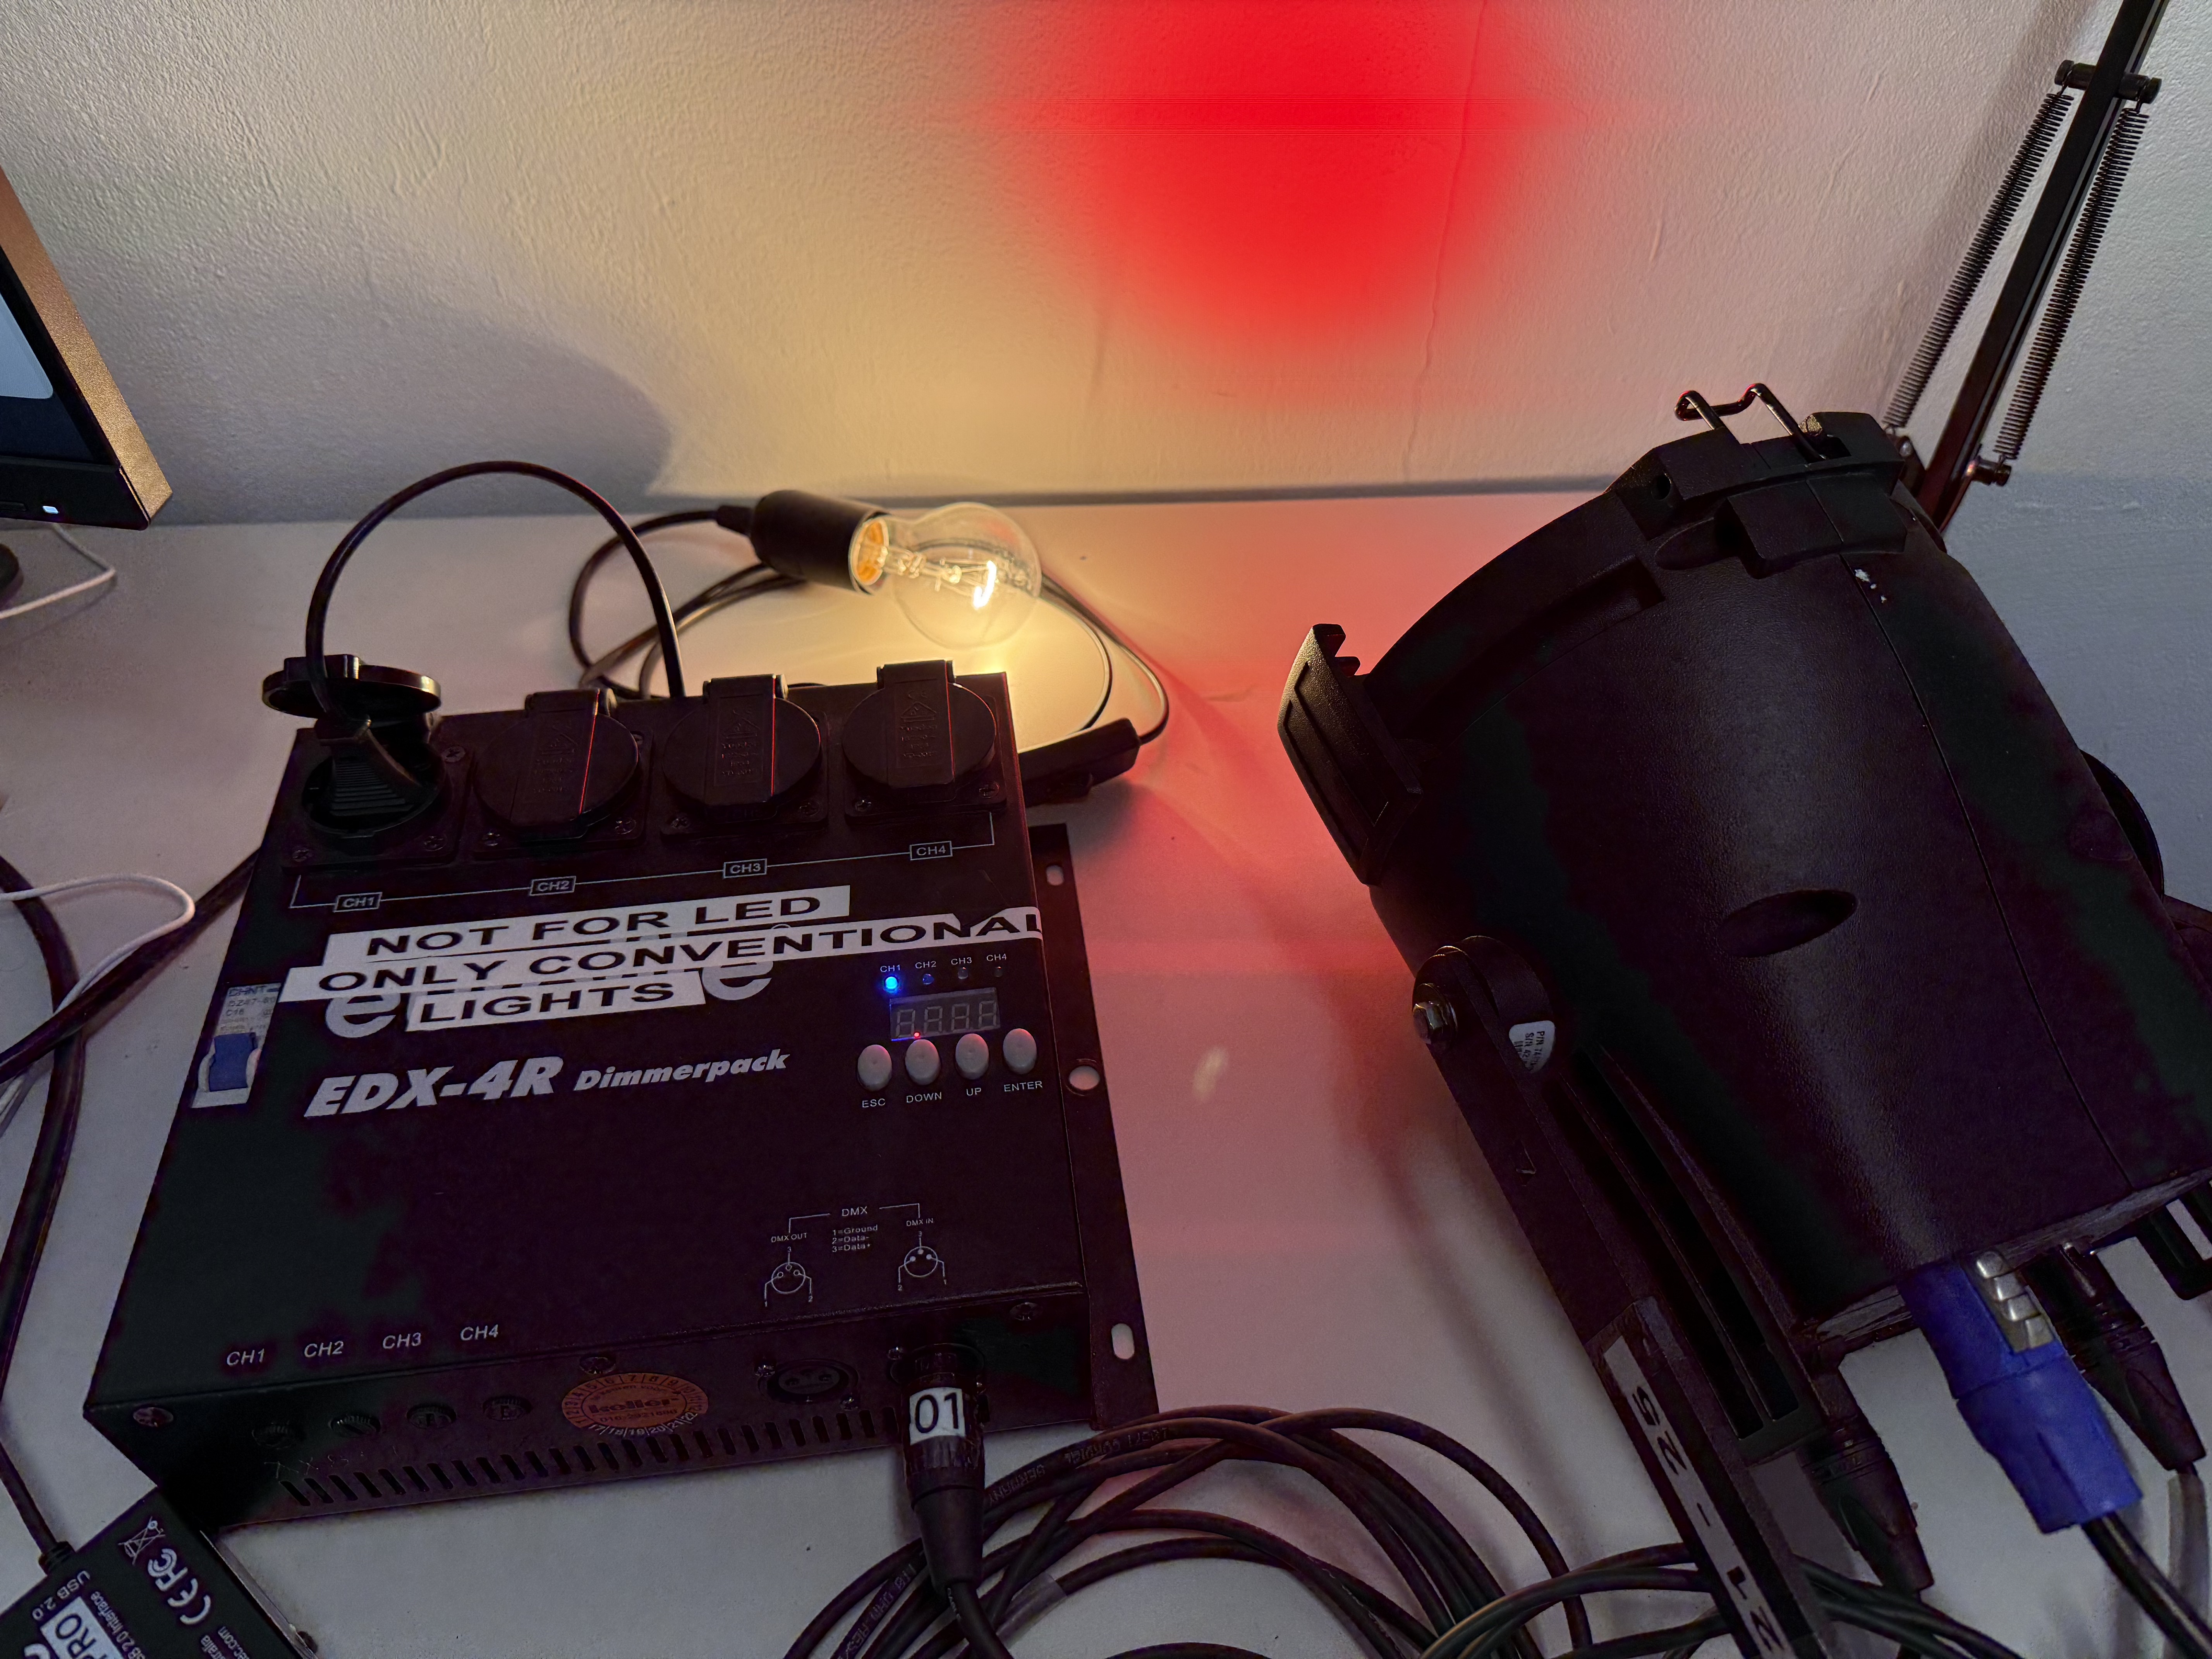
11. Controlling lights in Isadora
If you're interested in incorporating lights in your Isadora projects, you can check out the following link: https://bookstack.hku.nl/books/controlling-lights/page/control-lights-from-isadora
This can be interesting if you're looking for a different way to que your lights than with what QLC+ has to offer, and if you want sensors or other inputs like video or sound to influence your lights.