Audio hardware & software
This book contains general information about hard- and software.
- Hardware
- Types of Audio Cables
- Using Audio Interfaces
- Basic Stereo Speaker Setup
- Quadrophonic Speaker Setup
- Zoom recorder
- Software
- Multichannel audio
- Multichannel audio in Isadora and Reaper
- 4 speaker setup with Reaper
- Ambisonics and the ATK toolkit for Reaper for multichannel playback.
- Speaker configuration focusrite 1st and 2nd Gen Scarlett 2i4
- Touchdesigner + audio multichannel output
- Audio effects and plugins
- Independent Audio Players using a Trigger
Hardware
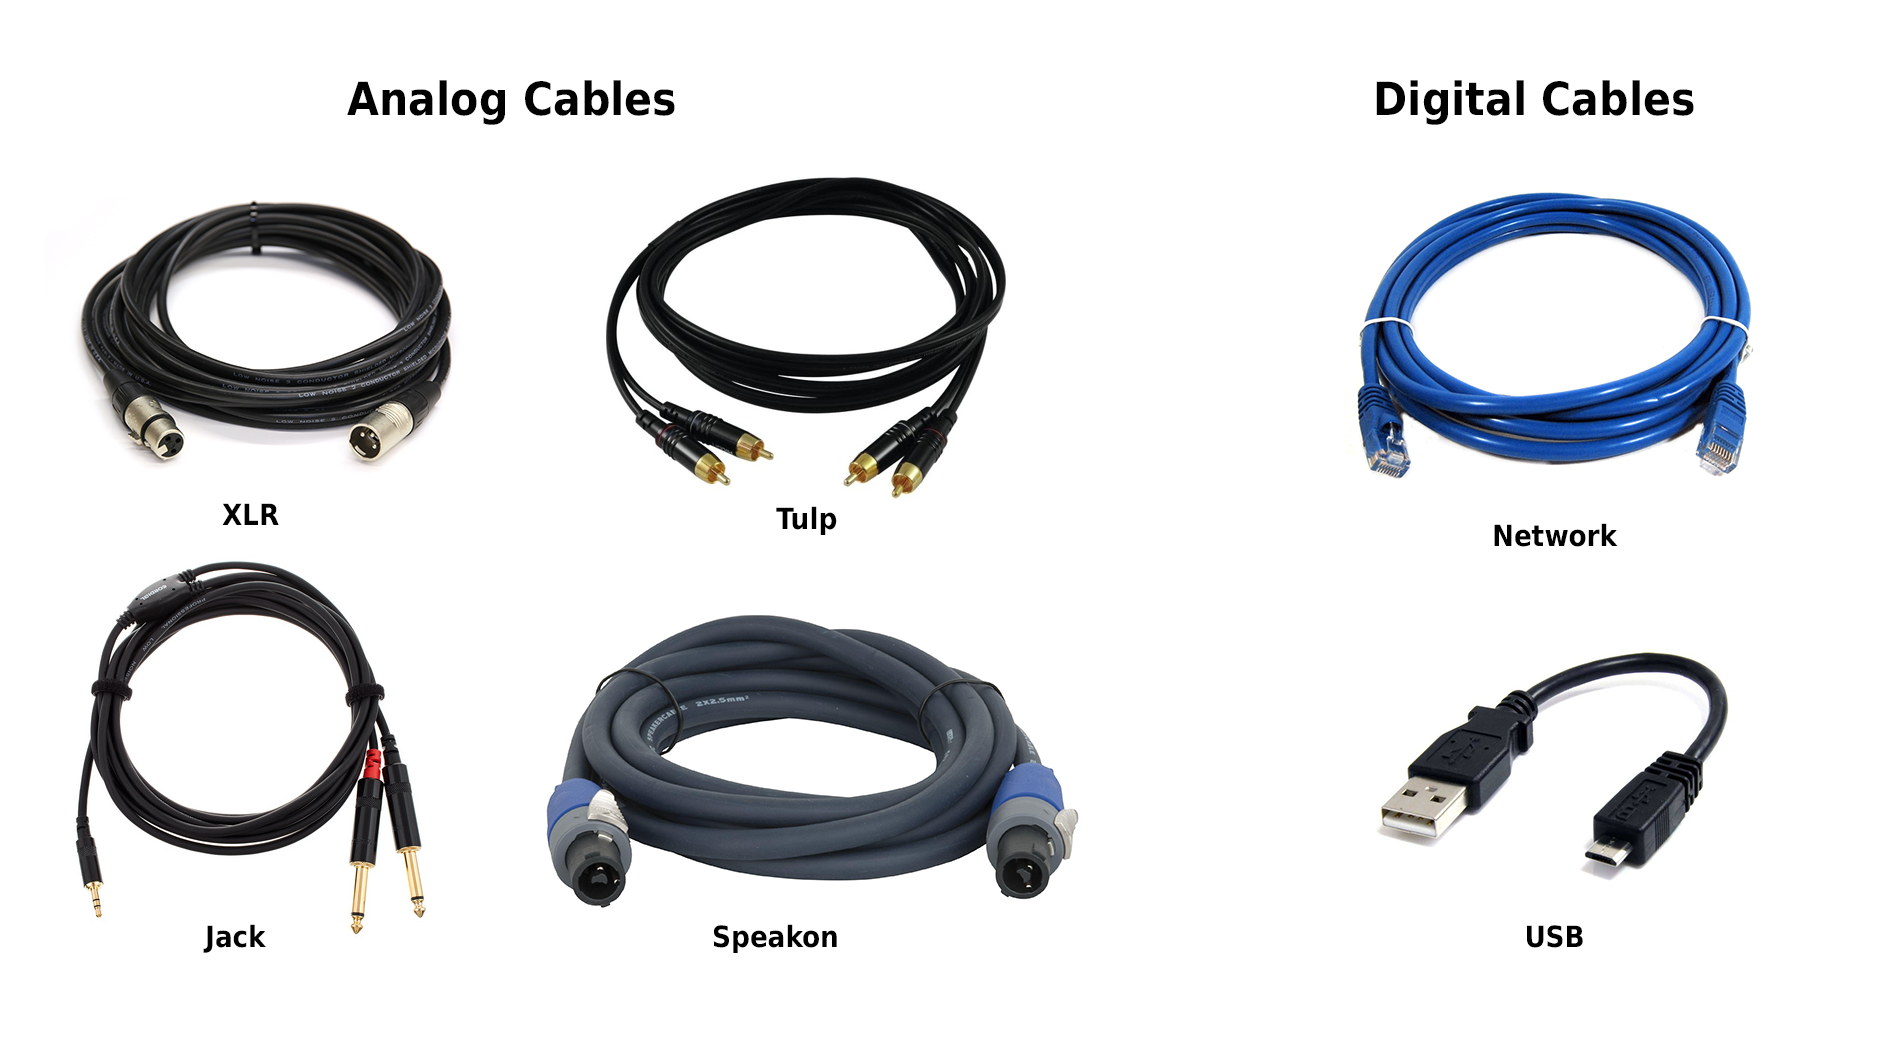
Types of Audio Cables
There's a difference between analog and digital audio cables:
- Analog Cables are using electricity to transmit information
- Digital Cables use strings of data (1's and 0's) to transmit information
In the Blackbox, you will find both of these types of cables, for most setups we use analog cables such as Jacks, XLR, Tulp, and sometimes Speakon. Digital cables are used more as 'interface cables' and common ones are USB and Network cables.
Analog Cables
Most analog cables are used to transmit 3 types of signals:
- Line level: is the standard strength we use with audio equipment
- Mic/Microphone level: needs to be boosted to line level, because it's a low signal.
- Instrument level: such as coming from guitars/synths, also need to be boosted to line level.
This 'boosting' of the signal can be accomplished using amplifier equipment such as mixers, audio interfaces, and DI (Direct-In) Boxes.
UNBALANCED cables have only 2 wires:
- Signal
- Ground
BALANCED cables have 3 wires:
- Signal (+)
- Signal (-)
- Ground
Balanced cables are generally better for noise cancellation, we're not going to deep dive into this for now, but the use of 2 Signal (+) and (-) makes that the interfering noise that occurs between sender and receiver is canceled out.
Jack Cables
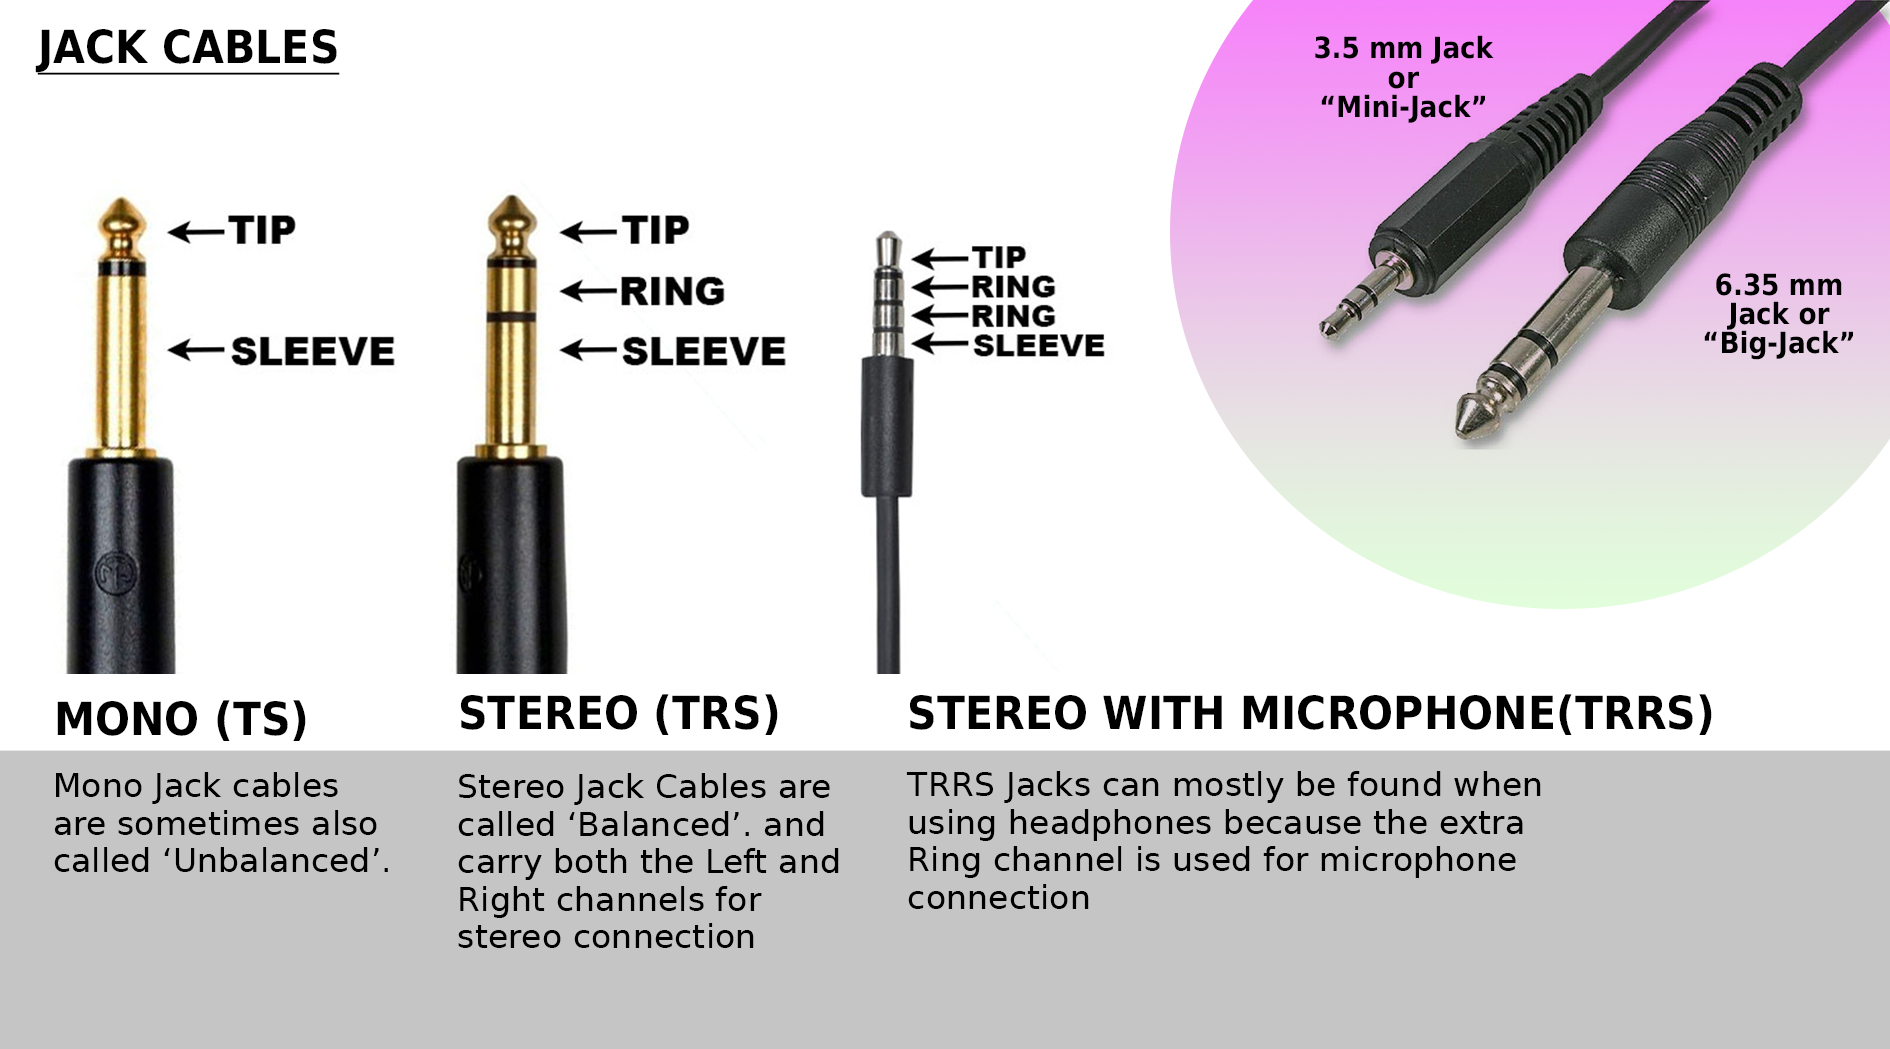
A TRS cable consists of:
- Tip (Signal +)
- Ring (Signal -)
- Sleeve or Ground
When working with Jack cables, you can choose between unbalanced and balanced cables. A lot of instruments such as guitars and keyboards have unbalanced connections. When building sound setups over longer distances, we always advise balanced (TRS) cables.
XLR Cables
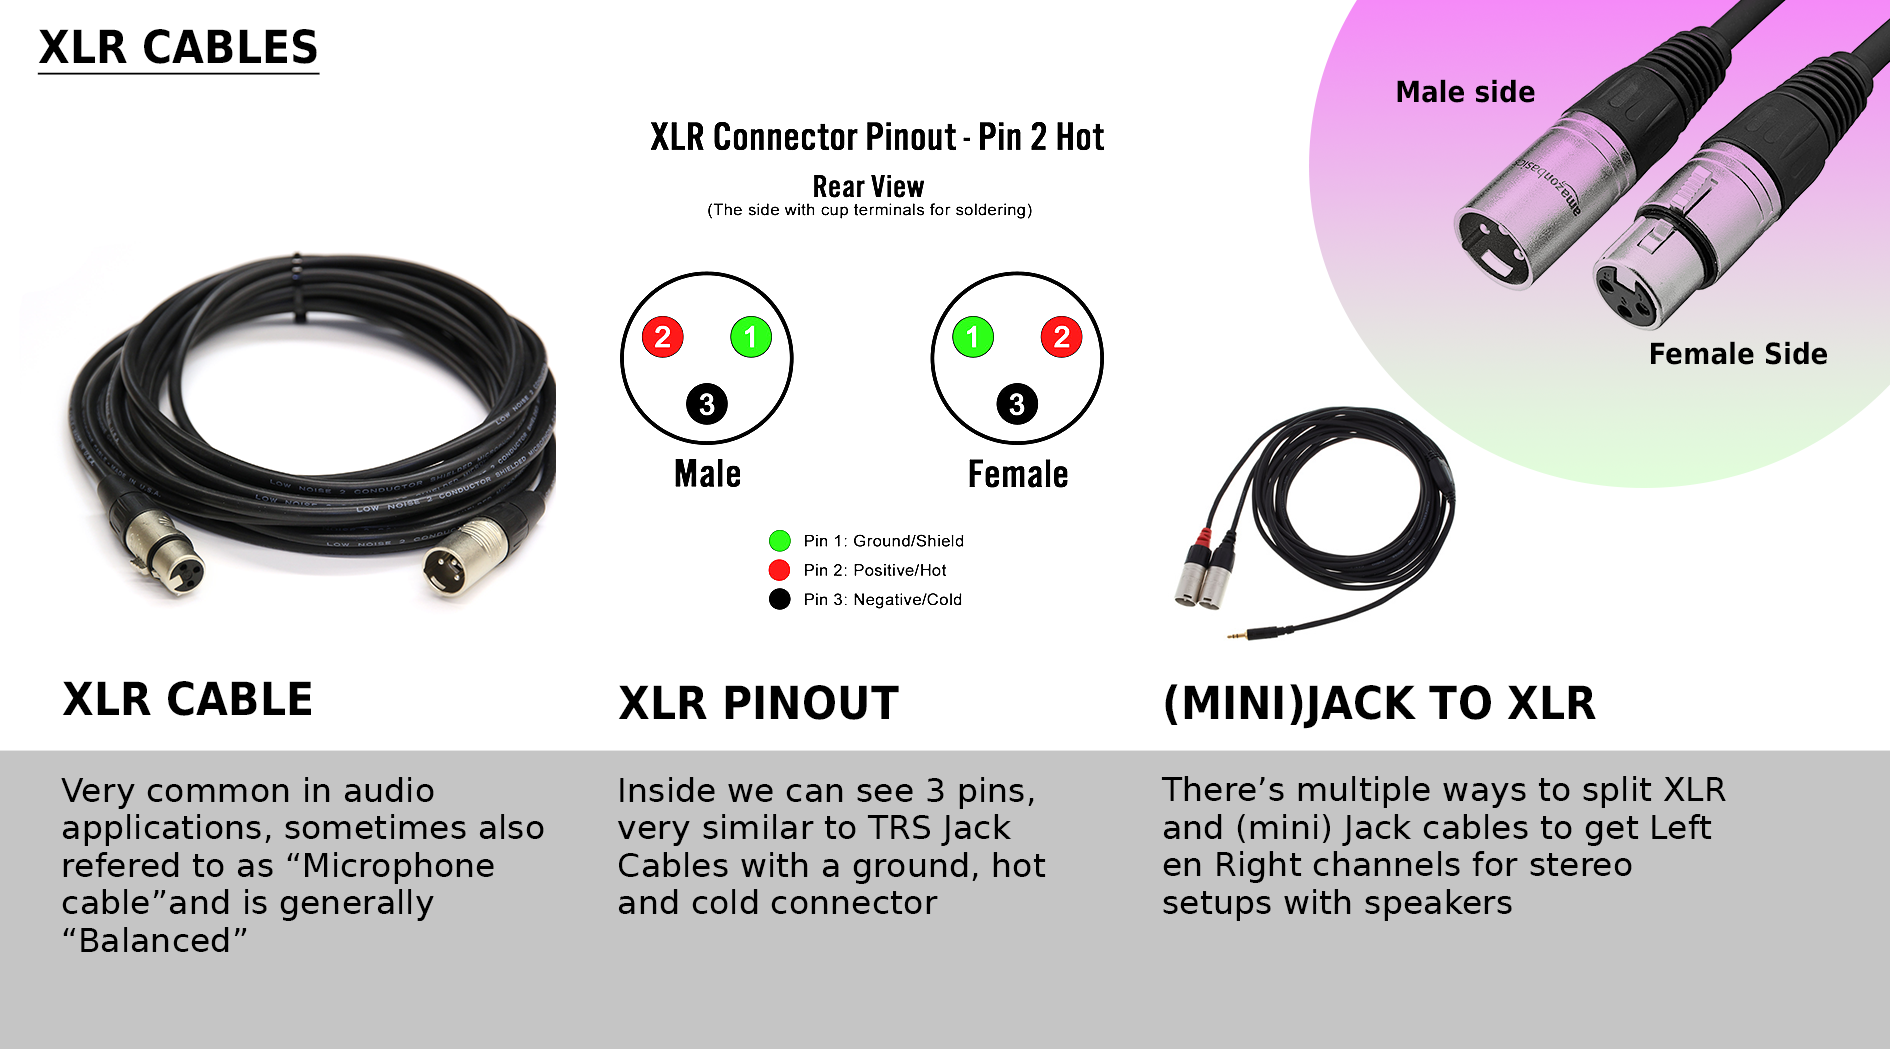
XLR cables are always balanced and are also used commonly as microphone cables and also have 3 contact points. (Signal +, Signal -, Ground)
XLR connectors are much sturdier and the cables are generally better shielded than Jack connectors.
Tulp/Cinch cables
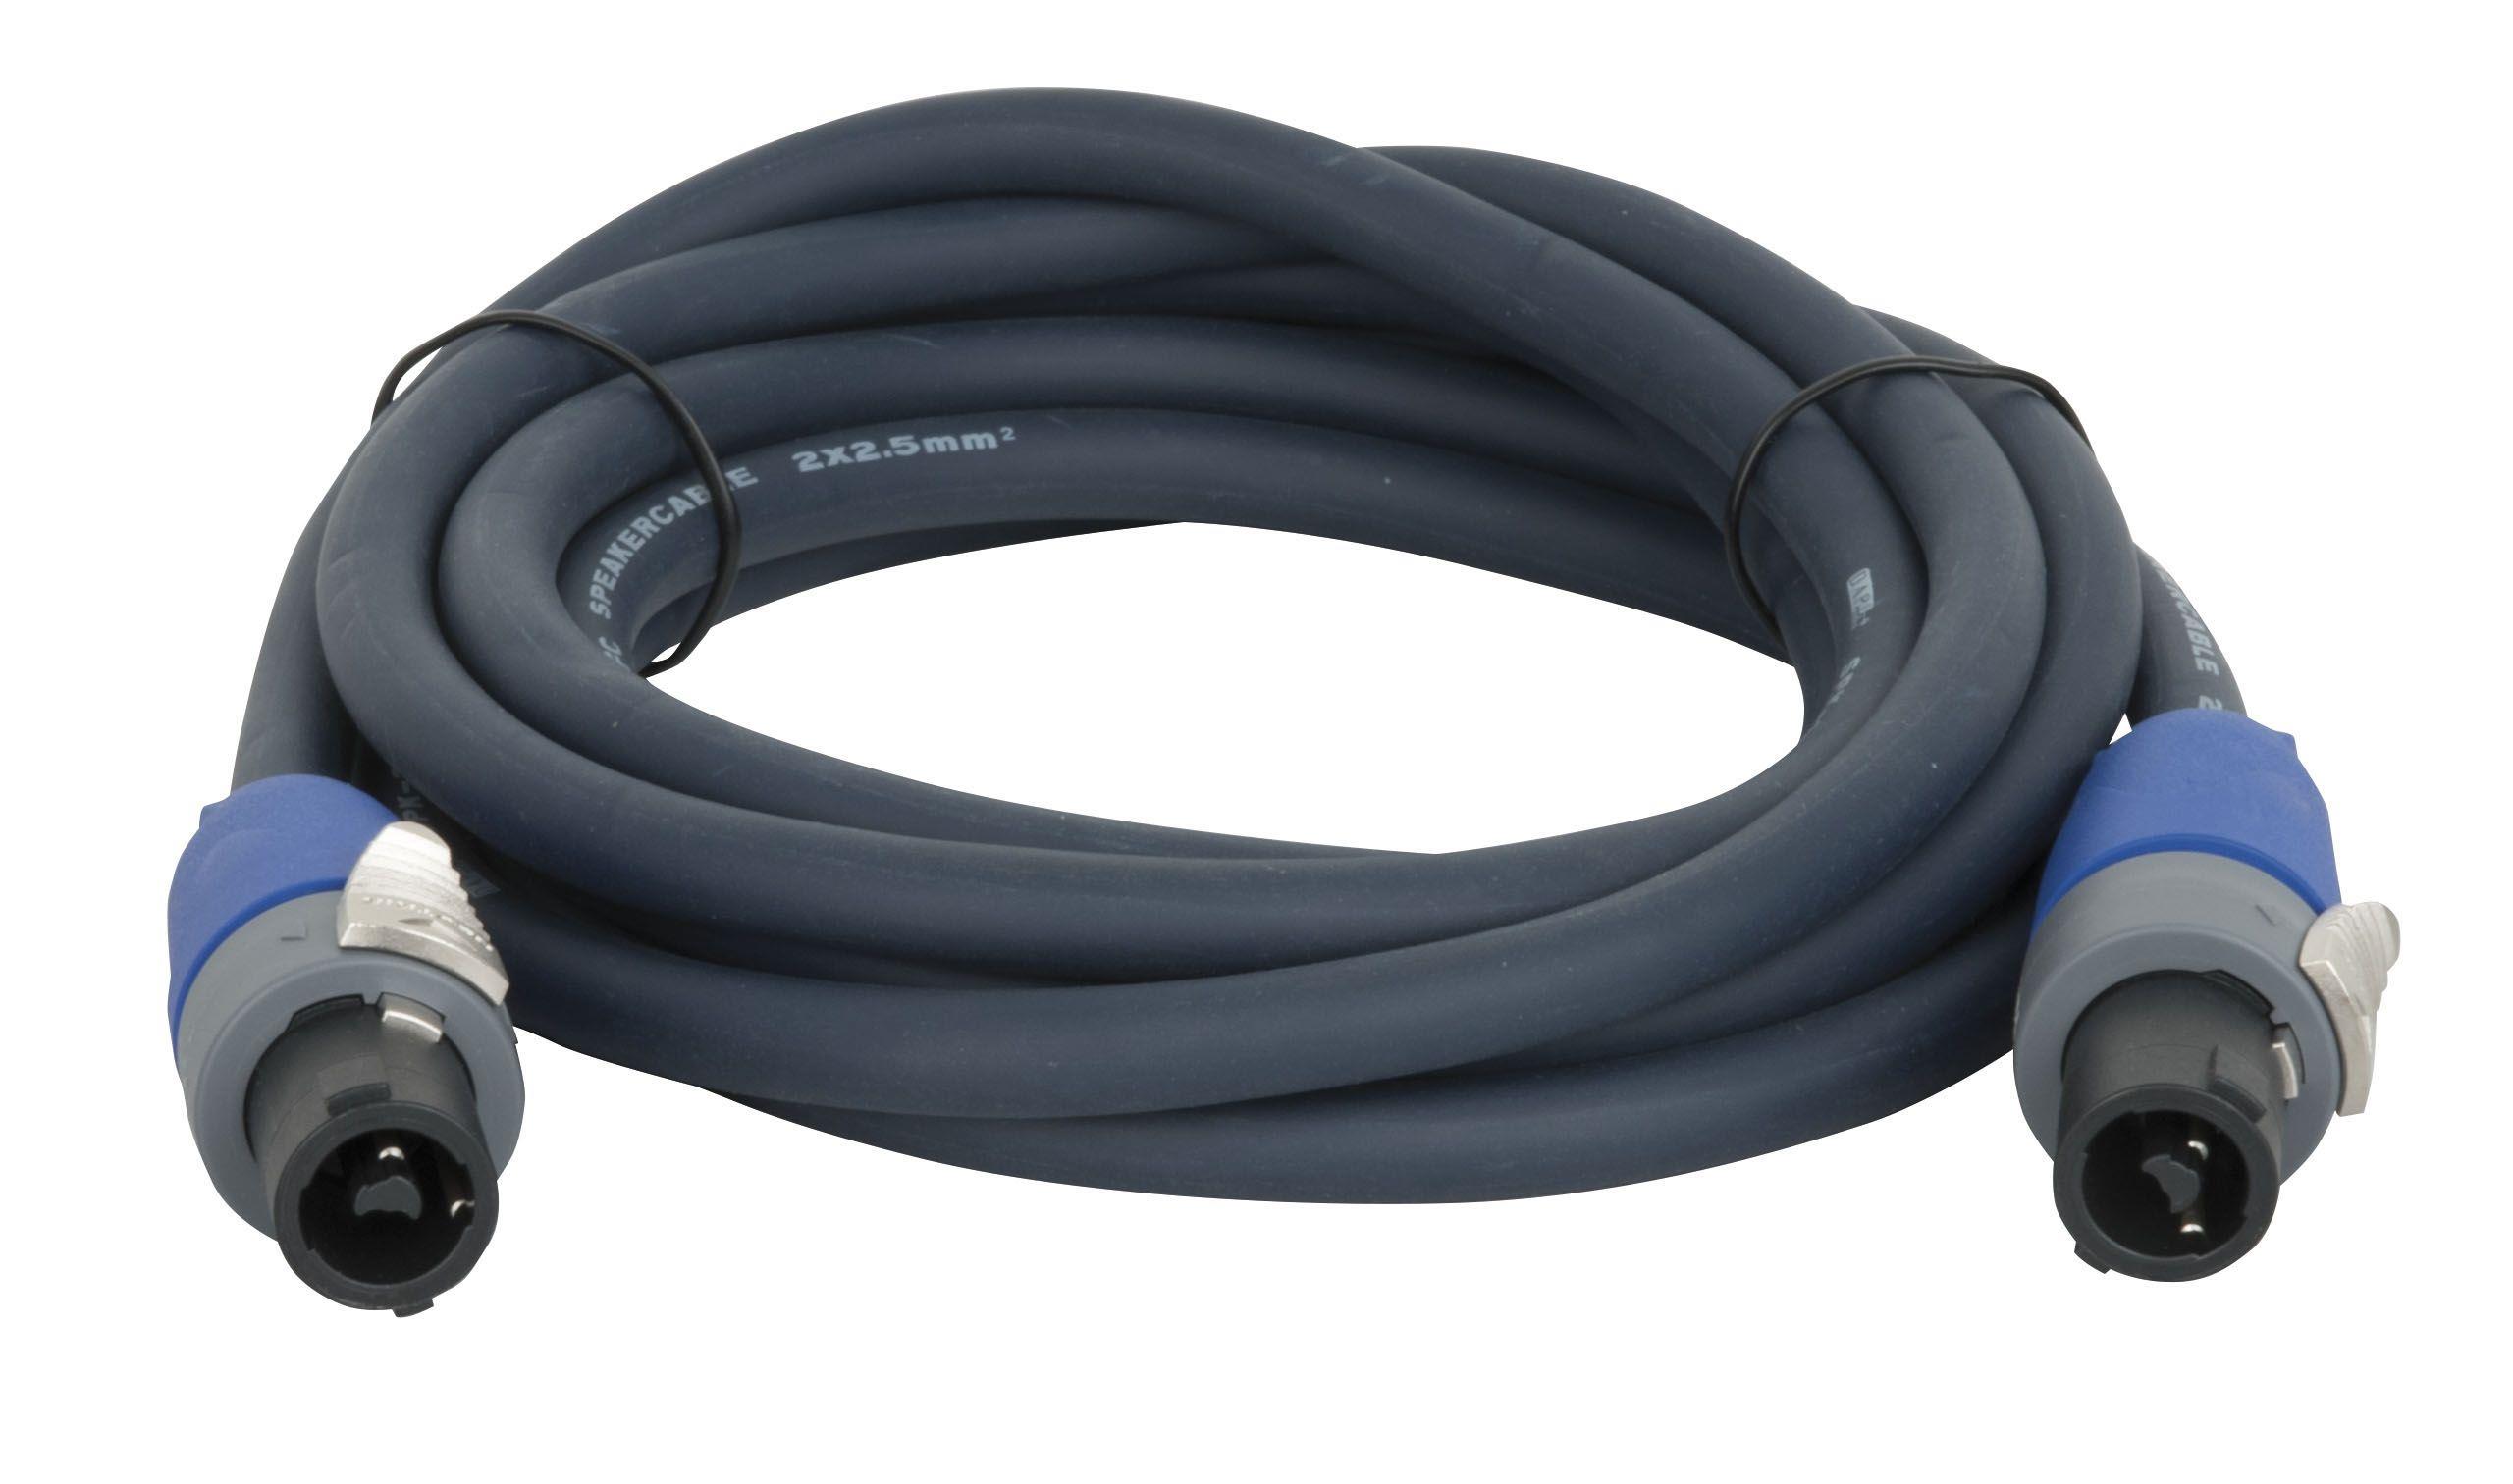
Speakon
Speakon connectors and cables are used for connecting more power-hungry speaker equipment and amplifiers together. They are used for bigger systems and can be found in theaters and at festivals. Generally, you will only use these cables in bigger setups.
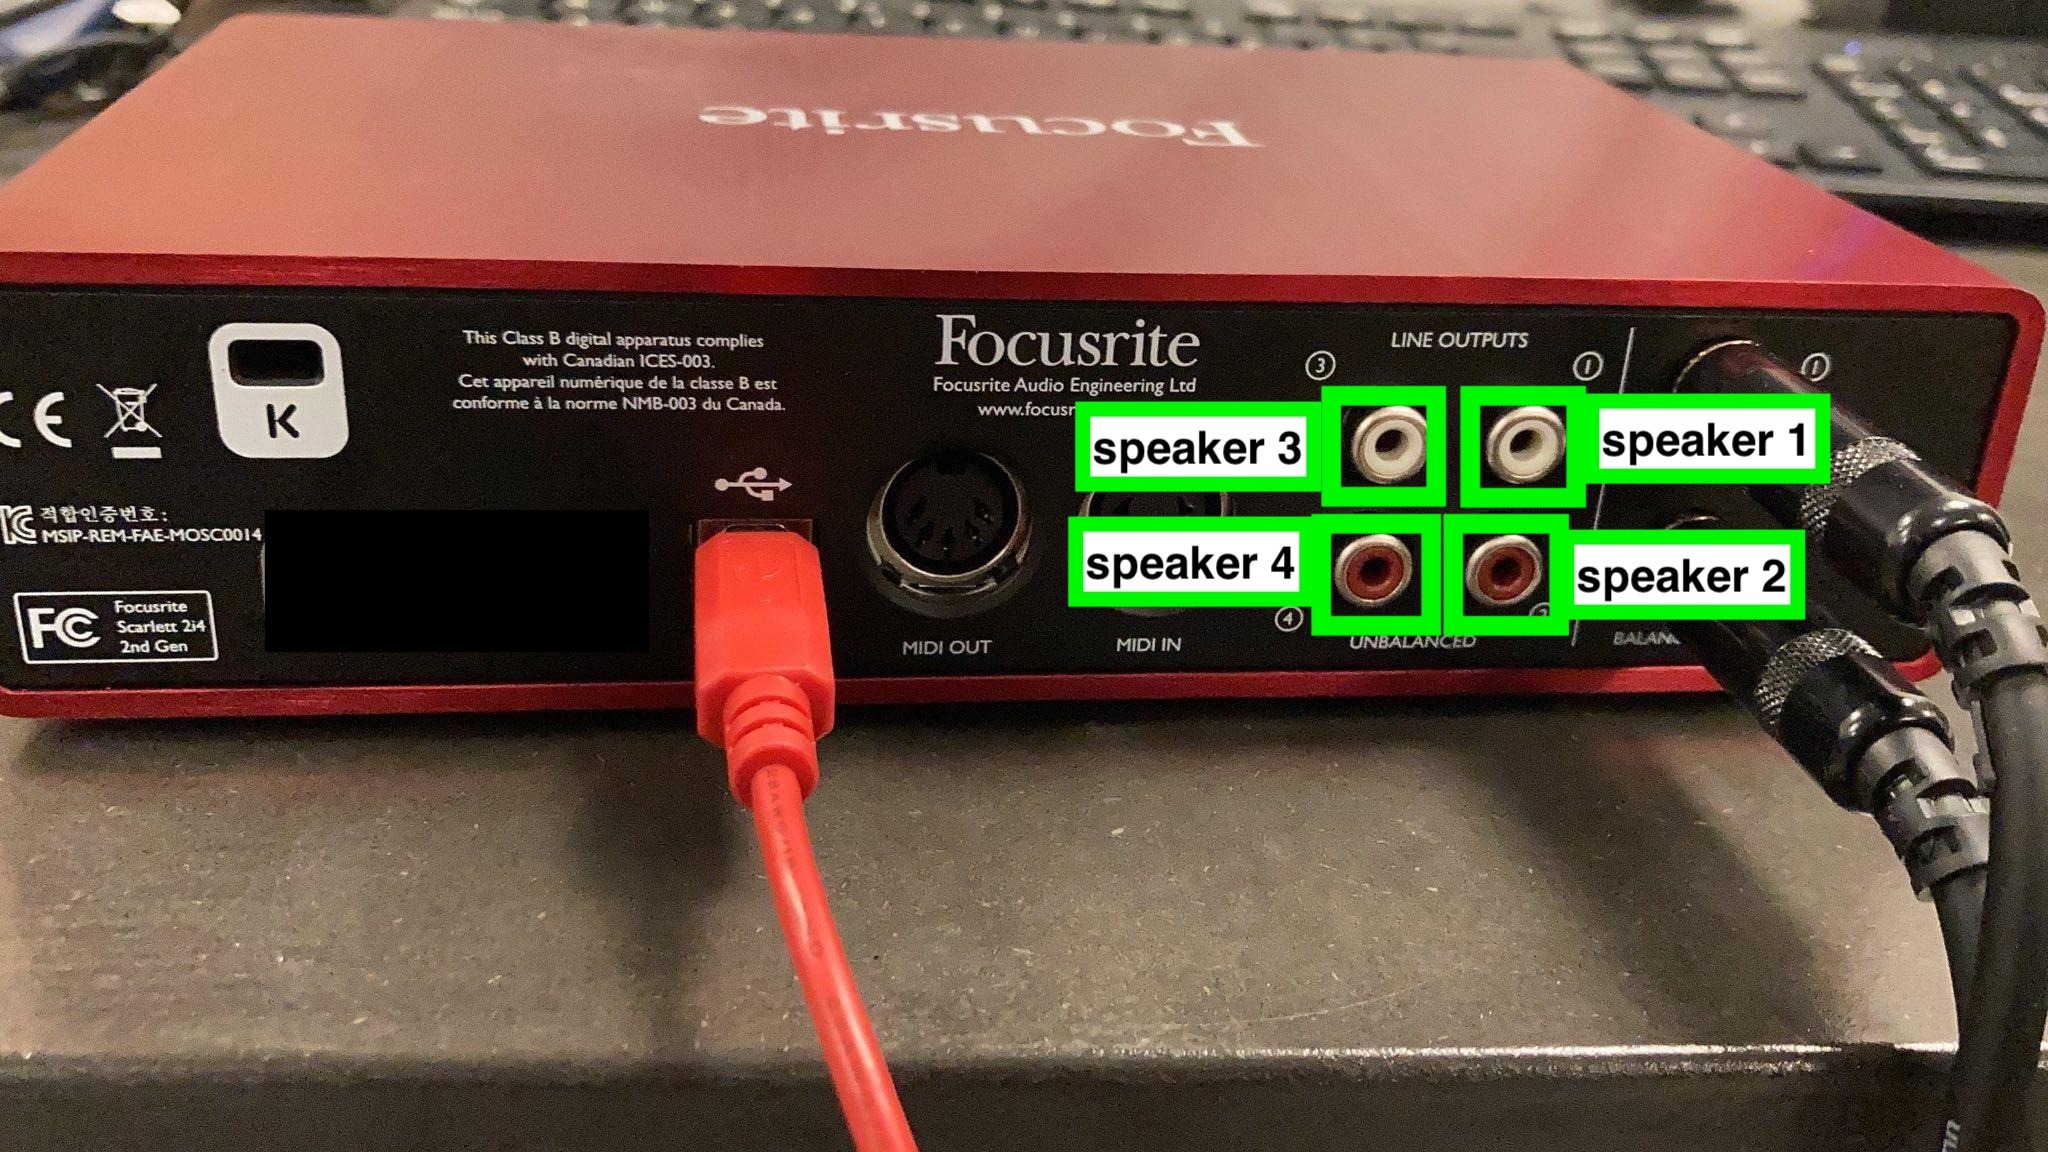
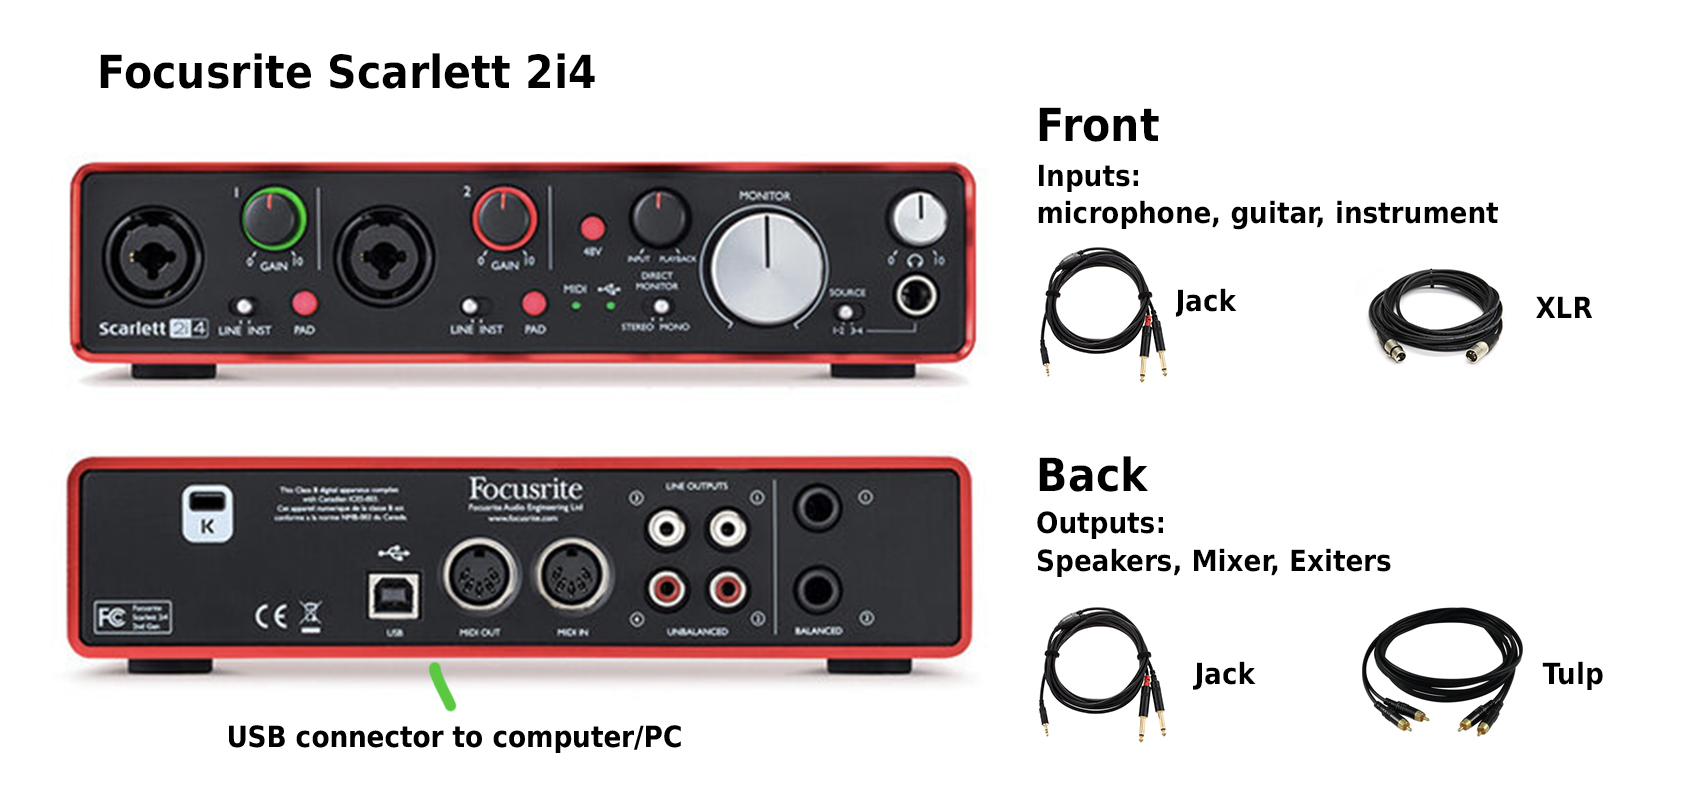
Using Audio Interfaces
Use an audio interface for recording sounds onto your computer, or to play sound from the computer back into the space.

Example with the Focusrite Scarlett 2i4
-
Connect instruments and/or microphones to a Speaker setup (no computer)
-
Connect instruments and microphones to the computer via USB for recording
-
Play sounds from your computer via USB to speakers using the audio interface
Connecting everything!
- Connect the Scarlett 2i4 to your Mac using the included USB cable
-
In system preferences on your laptop/pc select "Scarlett 2i4" as the input and output device
-
You can also select the "Scarlett 2i4" from your preferred Audio Software DAW (Digital Audio Workstation) such as AbeltonLive, StudioOne, Reaper.
Basic Stereo Speaker Setup
Generic Stereo Speaker Setup
-
An audio interface
-
A USB cable (USB cable type depends on your computer and audio interface)
-
A pair of audio cables for each channel (Depending on the output type the audio interface you need the following connectors: RCA - mono Jack / mono Jack - mono Jack / mono mono Jack - XLR)
-
A pair of active speakers

Quadrophonic Speaker Setup
Making a quadrophonic speaker setup using 4 speakers, audio interface, pc
Zoom recorder
Quick guide: https://zoomcorp.com/media/documents/E_H4n_Pro_QuickGuide.pdf
Software
Reaper
Reaper is a cost-effective and highly customizable digital audio workstation (DAW) used by musicians, audio professionals and artists. Its key benefits include:
1. Affordability: Professional-grade features at a budget-friendly price.
2. Customizability: Tailor the software to your workflow with customizable shortcuts and themes.
3. Efficiency: Runs smoothly on a wide range of computer setups.
4. Multitrack Recording: Excellent for multitrack recording and editing.
5. Plugin Compatibility: Seamlessly integrates with third-party VST and AU plugins.
6. Cross-Platform: Available for both Windows and macOS.
7. Active Community: Access to a vibrant user community and support forums
A 60 day trail is available at https://www.reaper.fm/ or you can buy discounted license.
(although reaper is worth the license, users have reported the evaluation period to be infinite, so... just try..)
Learn
click image to go to website


free signup voor an e-book on podcast editing in reaper
Ableton Live
Ableton Live is a popular digital audio workstation (DAW) known for its real-time performance capabilities, intuitive interface, extensive sound library, and Max for Live integration. Its benefits include:
- 1. Live Performance: Ideal for DJs and electronic musicians with its real-time Session View.
- 2. User-Friendly: A straightforward interface that minimizes complexity.
- 3. Rich Sound Library: Comes with a diverse collection of instruments and effects.
- 4. MIDI Power: Offers powerful MIDI control and routing for creativity.
- 5. Max for Live Integration: Seamlessly incorporates Max for Live, allowing users to create custom devices and expand functionality.
- 6. Stability: Reliable and rarely crashes, suitable for both studio work and live gigs.
A 30 day trail is available at https://www.ableton.com/en/trial/ or you can buy it with a student or education discount.
Licensed Abelton live is installed & available on most Blackbox workstations for HKU students.
Add this to send OSC from Ableton to any other software https://www.showsync.com/tools#livegrabber
Learn
click image to go to website


Audacity
Audacity is an easy-to-use, multi-track audio editor and recorder for Windows, macOS, GNU/Linux and other operating systems. Audacity is free, open source software.
download: https://www.audacityteam.org/download/
getting started:
more help: https://support.audacityteam.org/
Beware! Using Audacity to edit your source files is DESTRUCTIVE meaning any adjustments made to your file are permanent. Therefor, good practise is to work in a copy of your original file.
Adobe Audition
Audition is a comprehensive toolset that includes multitrack, waveform, and spectral display for creating, mixing, editing, and restoring audio content. This powerful audio workstation is designed to accelerate video production workflows and audio finishing — and deliver a polished mix with pristine sound.
Part of the Adobe Creative Cloud. Works seamlessly with Adobe Premiere a.o.
Learn the basics on the adobe website
or watch this to do your first audio recording & edit
Less useful for creating music but awesome for video & podcast:
for example:
- Easily remix music to fit your video
- repairing your recorded audio
Multichannel audio
In this chapter you can find tools, tutorials, system settings and tips & tricks on how to create multichannel audio set-ups
Multichannel audio in Isadora and Reaper
With Isadora you have control over your interactive performance with audio over 2 channels or more. You can work with this Isadora example file and audio files:
https://nextcloud.hku.nl/s/Bs5qoDqGHsLXdGo
here is a usefull tutorial about working with multichannel audio in Isadora: https://support.troikatronix.com/support/solutions/articles/13000084953-tutorial-getting-started-with-multi-channel-audio-in-isadora-3-0-8
Since 2024 Focusrite control software doesn't support 1st and 2nd Gen Scarlett Solo, 2i2 and 2i4. But we work with them on HKU. Use this page to configre the setup anyway.
In Reaper (audo software or DAW) you can prepare your audio file with multiple channels if you want to use your audio file in a conventional way by playing linear from start to finish or looping it. This should also be possible in other DAW's. Each channel can send your audio to a different speaker depending on your setup you can work with a 2, 4, 8 etc speakers.
Make a mutichannel audio file in reaper:
If you dont have a multichannel setup at hand READ this first!
Mac only!
Download and install BlackHole audio plugin https://existential.audio/blackhole/download/?code=1579271348
You need this to create virtual outputs so you can create multichannel audio files in Reaper (or any other audio edit software) without having an actual multichannel setup at hand.
Restart your computer Open your audio edit software (Reaper) Go to preferences and go to Audio > Device, choose BlackHole 64ch in your Audio Device settings
This is created by Simone, for questions: simone.vandordrecht@hku.nl
4 speaker setup with Reaper
In this example we work with Reaper, Focusrite interface, 4 speakers, windows desktop.
The idea is to place the speakers in a square position so you can hear the audio coming from different directions.
Software to be installed:
Reaper we work with Reaper because its free and relatively easy to setup, but there is more software to use for 4 channel setups (like Ableton or Isadora), depending on your needs
Focusrite control software (make sure you choose for the right device, Focusrite interfaces come in different types and versions which all have own control software environment) Since 2024 This software only works with version 4 hardware.
Work with mono files
In most conventional audio setups we use 2 channels (left and right) and the audio source file is stereo (2 channels). Since we use a 4 speaker setup, we use 4 audio tracks in Reaper. Thus we have to use a mono (1 channel) audio file. Each mono file will be placed in one of the 4 single channels of reaper. If your source file is stereo you need to convert your files to mono first.
With Reaper follow this short tutorial https://www.youtube.com/watch?v=jLr0FPxd3K0&t=20s
Save the file:
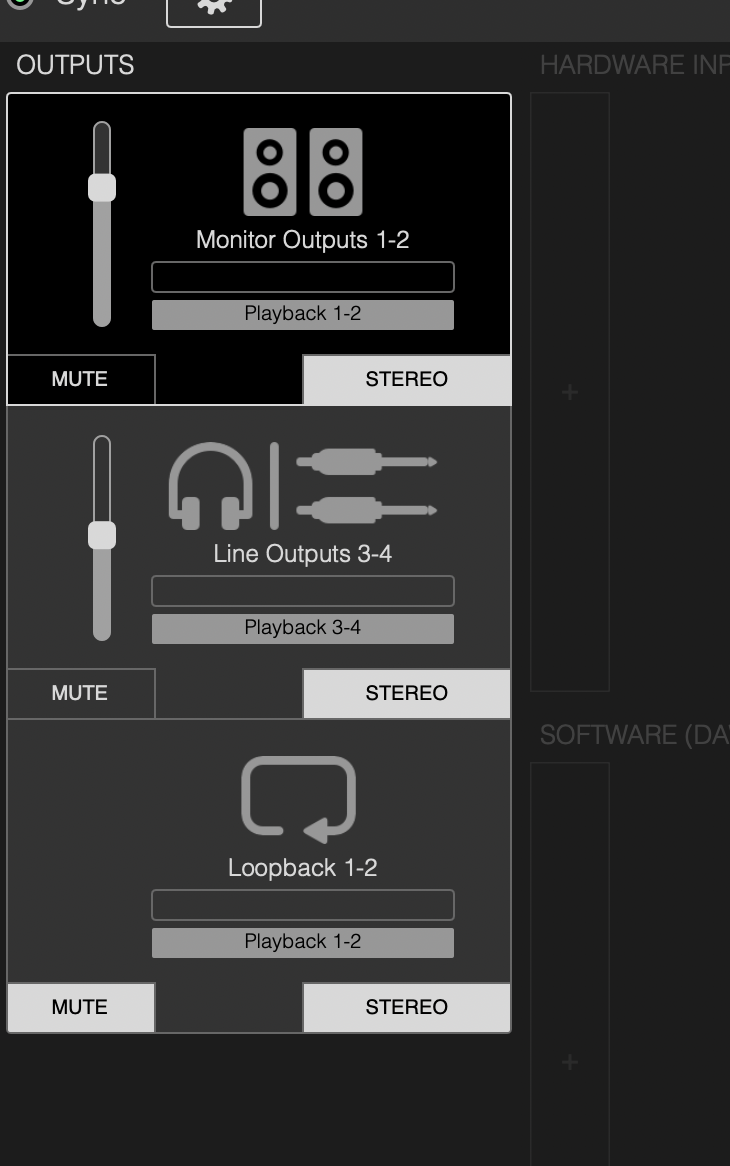
Connect Focusrite interface
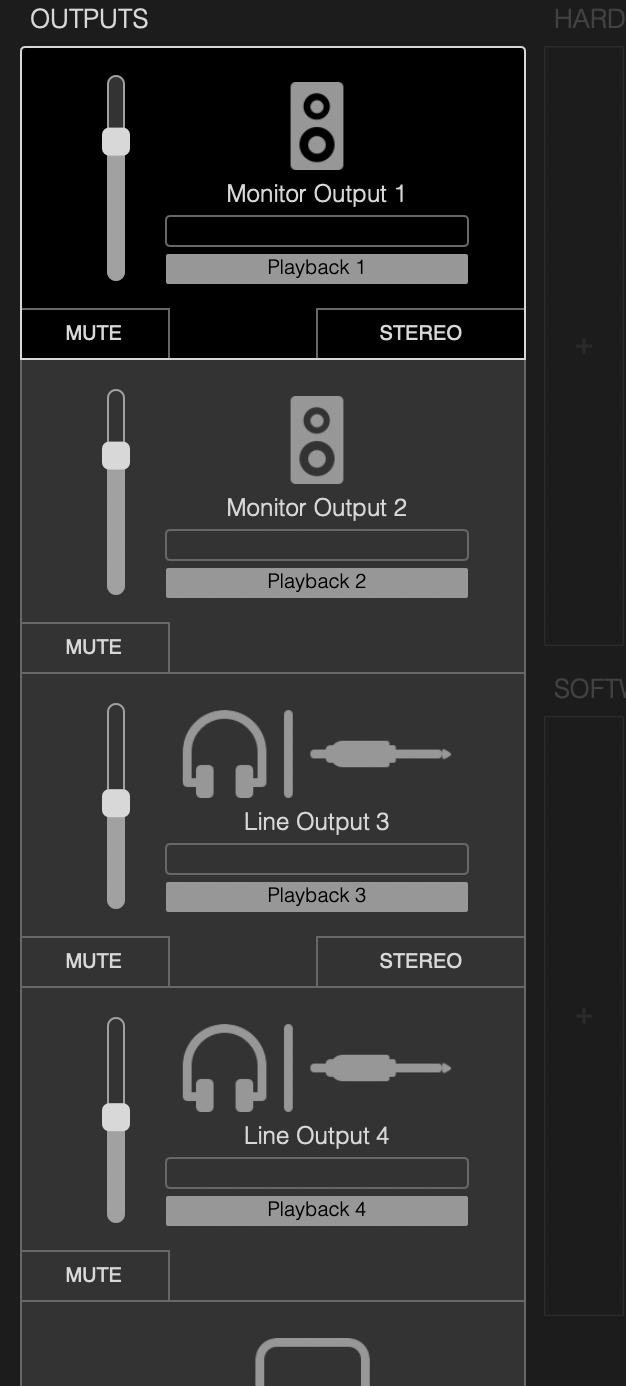
Open Focusrite control software
In the Output Routing tab Change stereo Monitor en Line outputs to mono by clicking [stereo]
To be able to hear anything through channel 1 & 2 you need to TURN UP THE MAIN VOLUME on the interface, or else you only hear channel 3 & 4 ;)
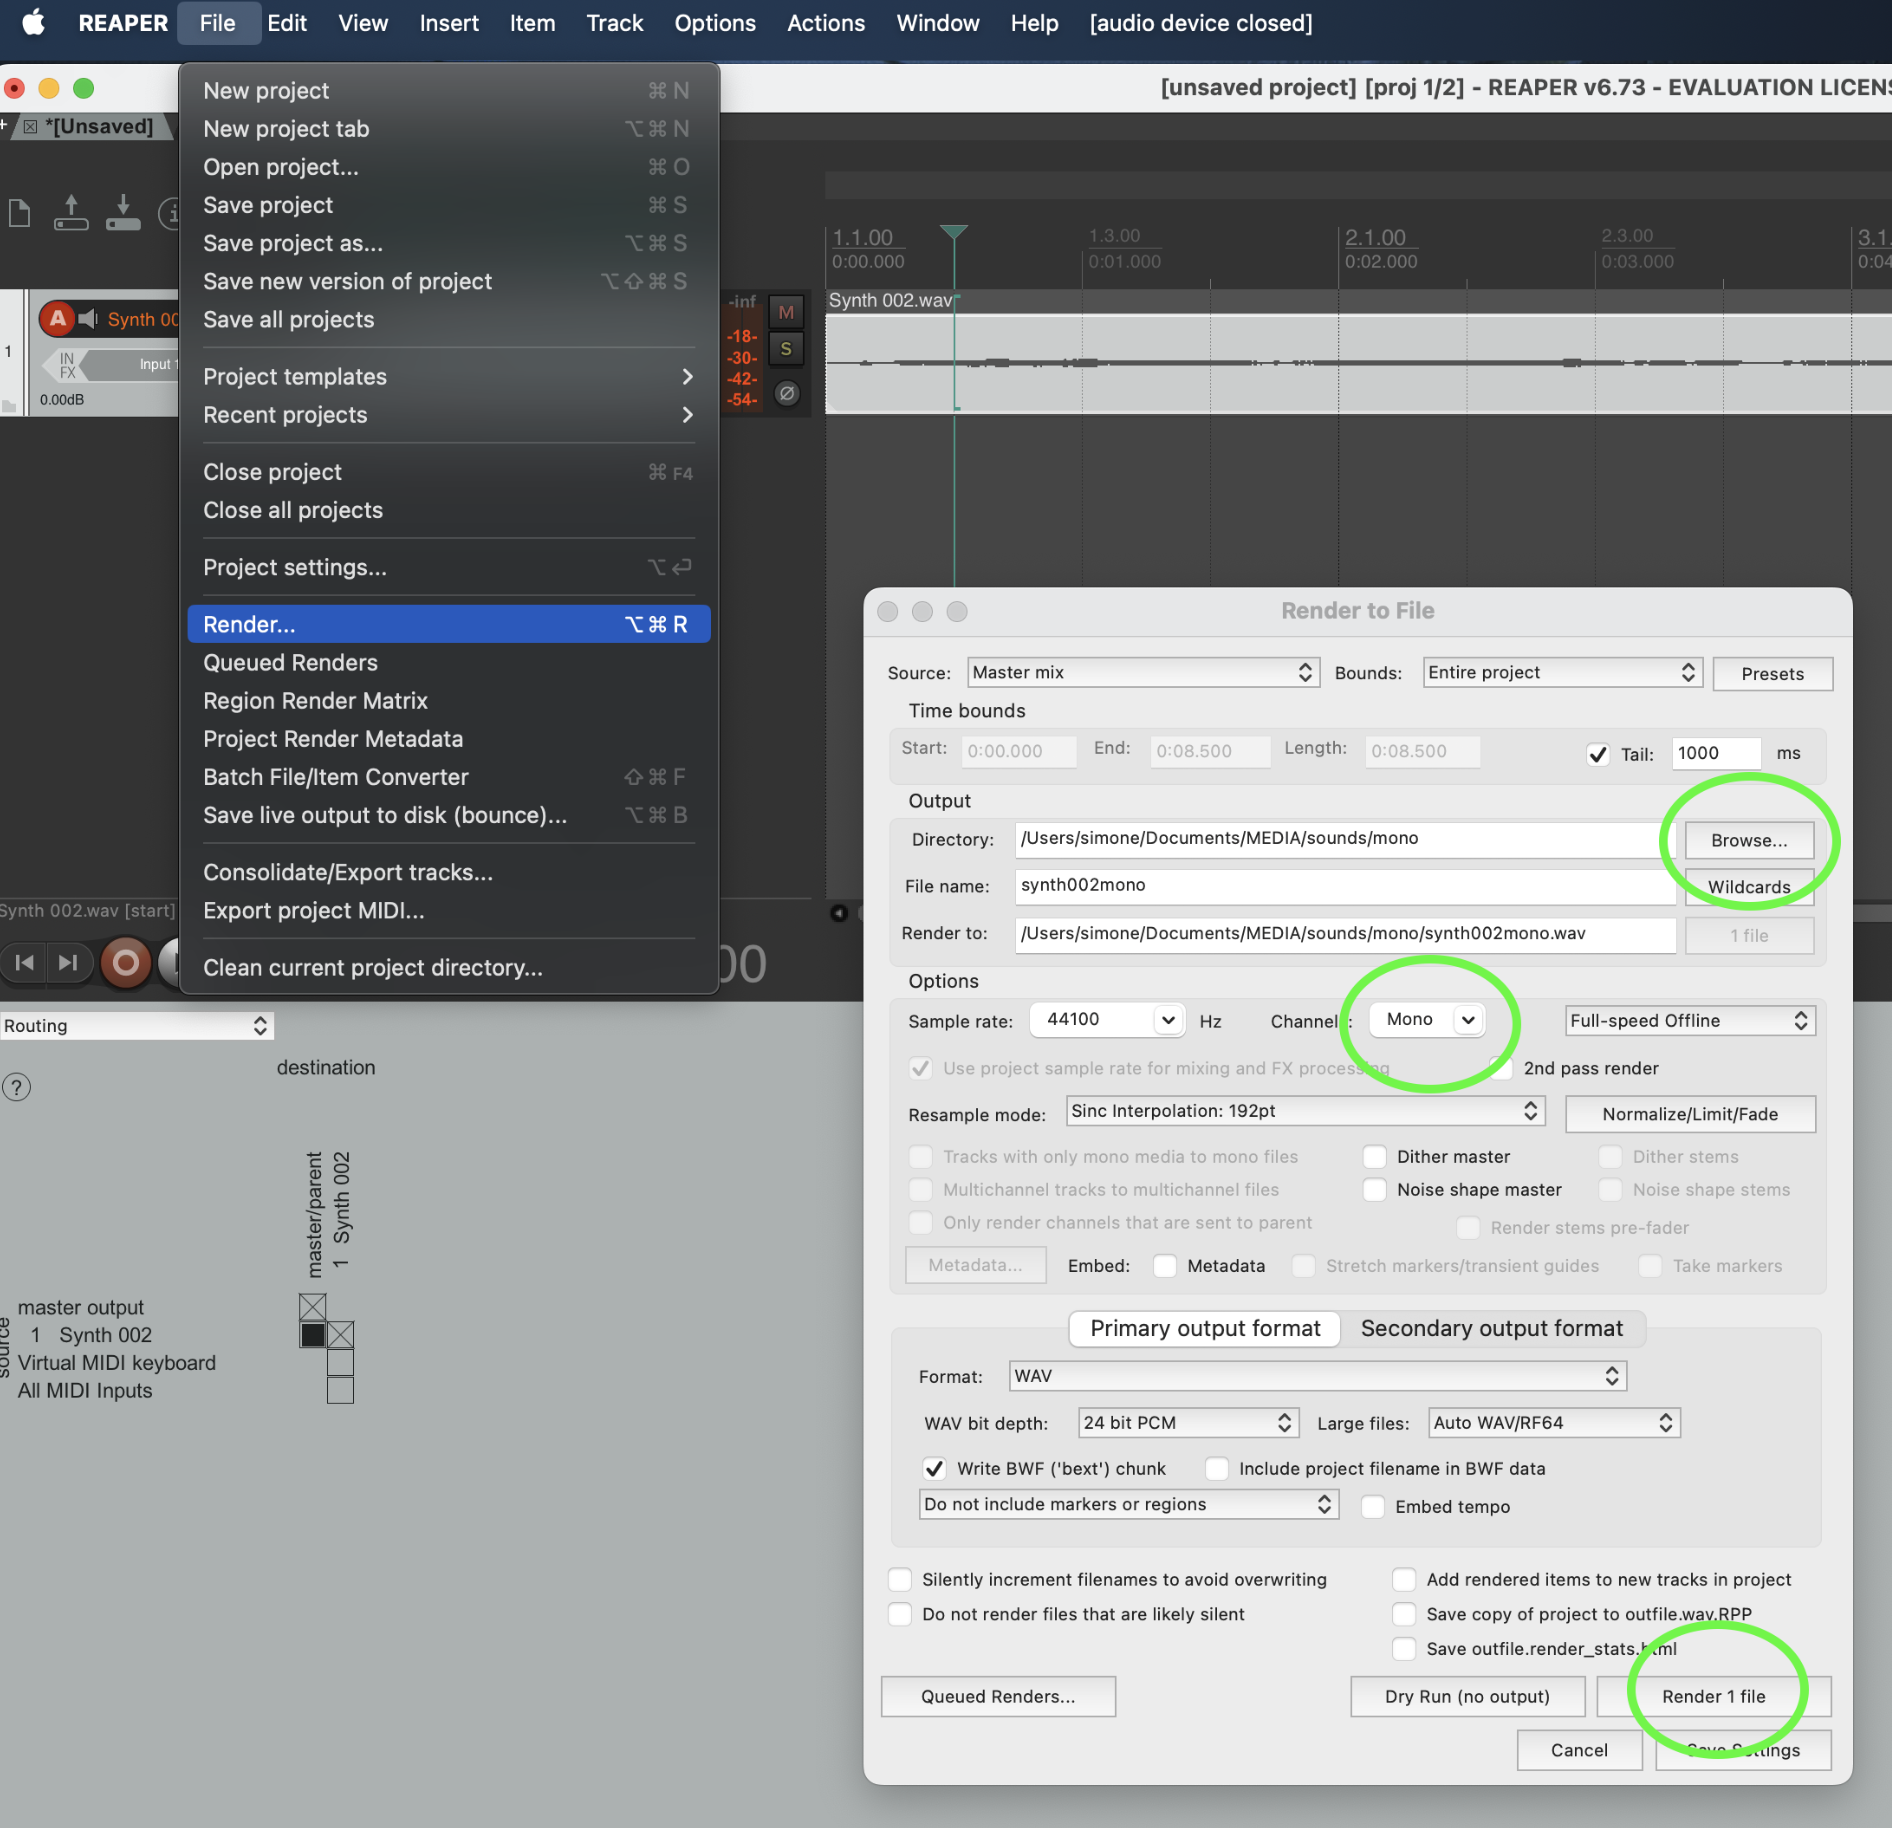
Create your Reaper multichannel audio file
Use command T(mac) or control T(windows) to make 4 tracks. Place your mono audio files on your tracks
View > Routing Matrix & Mixer
In the Routing Matrix change your settings so it looks like this:
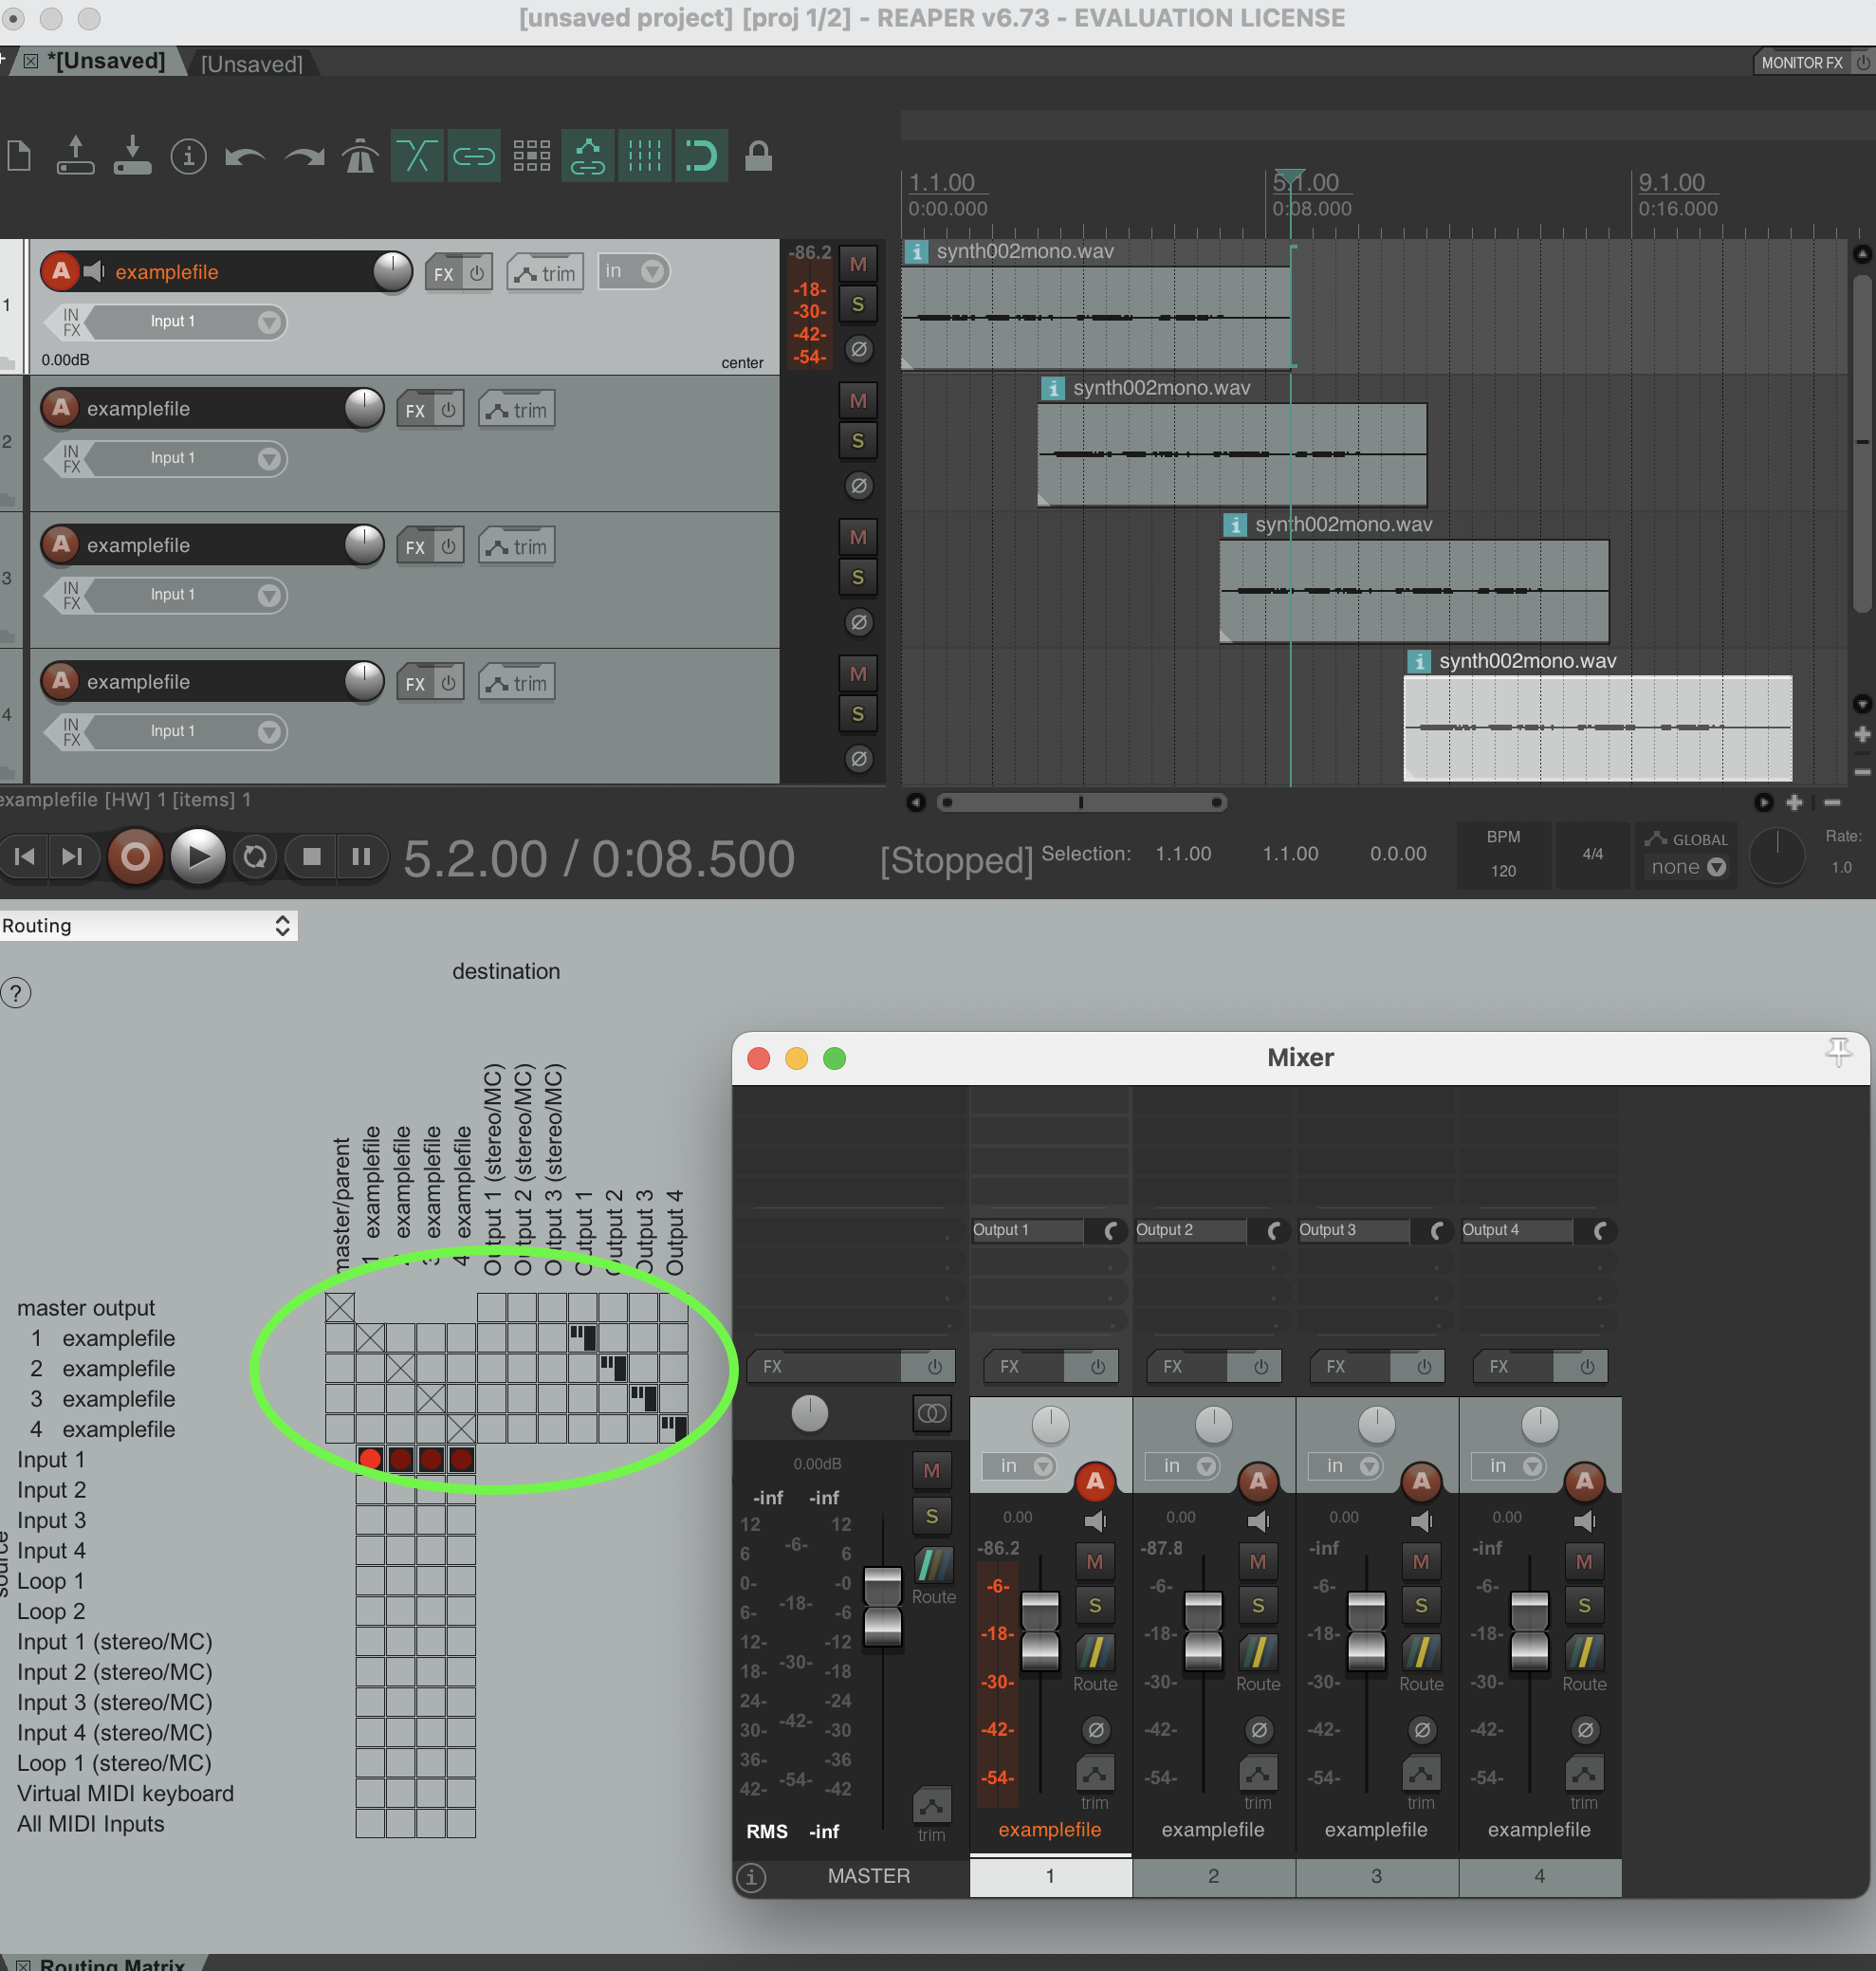
Now you should be able to play your audio through the 4 channels.
In the Focusrite control software you can adjust the level of volume of the different channels. change 3 & 4 so it matches 1 & 2.
Next step might be to automate the volume levels of the audiotrack from other software with MIDI or OSC... depending on the software you use in conjunction with Reaper. Any requests? Send an email to blackbox.ibb-pastoe@hku.nl & blackbox.oudenoord@hku.nl we'll get back to you on that!
If you dont have a multichannel setup at hand READ this:
Mac only!
You need this to create virtual outputs so you can create multichannel audio files in Reaper (or any other audio edit software) without having an actual multichannel setup at hand.
Download and install BlackHole audio plugin https://existential.audio/blackhole/download/?code=1579271348
Restart your computer Open your audio edit software (Reaper) Go to preferences and go to Audio > Device, choose BlackHole 64ch in your Audio Device settings
This is created by Simone, for questions: simone.vandordrecht@hku.nl
Ambisonics and the ATK toolkit for Reaper for multichannel playback.
This page contains links to sources containing information about Ambisonics, the Ambisonics Toolkit, and several tutorials on how to use the plugins in conjunction with soft and hardware.
Ambisonics
Ambisonics is a full-sphere surround sound technique used for recording, mixing, and reproducing three-dimensional audio. Unlike traditional stereo or surround sound systems, which typically only cover a horizontal plane (like 5.1 or 7.1 setups), ambisonics captures sound from all directions: above, below, and around the listener.
Here’s how it works:
1. Sound Field Representation:
- Ambisonics represents a sound field mathematically, using what’s called a "B-format" signal. This is a multi-channel signal that describes the sound from different directions using spherical harmonics. Typically, in the first-order ambisonics (the most basic level), there are four channels:
- W (omnidirectional): captures sound pressure equally from all directions.
- X (front-back): represents the front-back axis.
- Y (left-right): captures the left-right axis.
- Z (up-down): represents the vertical axis.
- Higher-order ambisonics (HOA) extend this by adding more channels to capture finer directional details.
2. Recording Ambisonics:
- Ambisonic microphones (like the Soundfield microphone) capture sound using multiple capsules arranged in a tetrahedral pattern. These recordings are processed into the B-format, which encodes the 3D sound field.
3. Playback:
- To reproduce ambisonic audio, the B-format signal is decoded for playback on various speaker setups, or binaurally for headphones. The decoder can adjust the signal based on the listener’s position or speaker arrangement to ensure an immersive sound experience.
- In virtual reality (VR) and 360° video, ambisonics is particularly useful because it allows for real-time head-tracking, so the sound perspective changes as you move your head, maintaining spatial accuracy.
4. Applications:
- Virtual Reality (VR): Ambisonics is widely used in VR and 360° video to create immersive soundscapes.
- Game Audio: It allows sound to move dynamically within 3D game environments.
- Cinema and Music: Some modern music and films experiment with ambisonic mixes to provide an enveloping sound experience.
In summary, ambisonics is an advanced sound format that enables full 3D audio immersion by capturing and reproducing sound from all directions, offering a much richer and spatially accurate audio experience compared to traditional surround sound methods.
Hardware setup
A typical ambisonics hardware setup includes:
-
Ambisonic Microphone: A microphone with multiple capsules arranged in a tetrahedral or other pattern (e.g., Sennheiser AMBEO, Zoom H3-VR) to capture sound in all directions.
-
Audio Interface: A multi-channel interface to record the signals from the microphone capsules, converting them into digital B-format signals.
-
Computer with DAW: A digital audio workstation (DAW) with ambisonics plugins (e.g., IEM Plugin Suite, SPARTA) to process, encode, and decode the B-format audio for playback or mixing.
-
Monitoring System: For playback, either a multi-speaker setup (for full 3D sound reproduction) or binaural headphones for VR/360 applications.
Speaker setup
Here are a few common multi-speaker configurations used in ambisonics for 3D sound reproduction:
-
Quadraphonic Setup (4 speakers): Four speakers are placed at the corners of a square or rectangle around the listener (two in front, two behind), offering a basic but immersive spatial sound experience, laying the groundwork for more complex surround systems.
-
Cube Configuration (8 speakers): Speakers are placed at the corners of a cube, with four on the ground and four at elevated positions to cover all axes (left-right, front-back, up-down).
-
Dodecahedron Configuration (12 speakers): Speakers arranged in a dodecahedron shape (12 equally spaced vertices) to capture more detailed directional sound.
-
3D Hemisphere (16+ speakers): Speakers are arranged in a half-sphere around the listener (above, in front, behind, and around) for immersive sound, often used in dome environments.
-
Icosahedron Configuration (20 speakers): Evenly spaced speakers form a spherical shape for highly detailed spatial sound representation, often in higher-order ambisonics.
-
Spherical Array (32+ speakers): A full 360° sphere of speakers, providing the most detailed and immersive sound experience for advanced higher-order ambisonics setups.
8 speaker setup configurations:
There are several different 8-speaker setups used for immersive audio experiences, especially in ambisonics, spatial audio, and surround sound configurations. Here are a few common types:
1. Cube Configuration (3D)
- Placement: Speakers are arranged at the eight corners of a cube around the listener. Four are positioned at ground level and four at elevated positions above.
- Purpose: Provides full 3D sound coverage, capturing sound from above, below, and around the listener.
- Application: Common in ambisonics for full-sphere audio experiences.
2. Octagonal Setup (2D)
- Placement: Speakers are placed in a circle around the listener, at equal angular distances (every 45°), forming an octagon.
- Purpose: Primarily used for 2D spatial sound with good horizontal imaging but no vertical depth.
- Application: Useful for ambisonic sound in settings where horizontal localization is the focus, such as concert halls or theaters.
3. 7.1 Surround Sound Configuration
- Placement: Six speakers around the listener in a horizontal plane (left, right, center, left surround, right surround, rear center) with a subwoofer for low-frequency effects (LFE).
- Purpose: Widely used in home theaters and cinemas for a high-quality surround sound experience.
- Application: Cinema, home entertainment, and gaming.
4. Double Quadraphonic Setup (Vertical and Horizontal Planes)
- Placement: Four speakers at ear level in a traditional quadraphonic square around the listener, with four more speakers above in a mirrored square formation.
- Purpose: Adds vertical sound information while keeping horizontal spatial accuracy.
- Application: Often used in ambisonics and 3D audio production for more immersive sound.
5. Dual Layer Circle (Upper and Lower Rings)
- Placement: Four speakers in a horizontal circle at ear level and four additional speakers in an elevated horizontal circle above the listener.
- Purpose: Creates a "dual ring" spatial arrangement for both horizontal and some vertical coverage.
- Application: Common in dome environments, VR, or immersive installations.
6. Surround Sound with Height Speakers (5.1 + Height)
- Placement: A standard 5.1 surround system (left, right, center, rear left, rear right, and subwoofer) with two additional height speakers positioned above the listener.
- Purpose: Adds vertical audio dimension to traditional surround sound, giving a 3D feel.
- Application: Used in home theaters with formats like Dolby Atmos or DTS.
7. Horizontal Circle (Octagonal Layout)
- Placement: The 8 speakers are evenly distributed in a 360° horizontal circle around the listener. Each speaker is positioned at equal angular intervals (every 45°) around the listener at ear level.
- Front (0°)
- Front-right (45°)
- Right (90°)
- Back-right (135°)
- Back (180°)
- Back-left (225°)
- Left (270°)
- Front-left (315°)
- Purpose: This setup provides full 360° horizontal sound imaging, allowing sound to move smoothly and precisely around the listener on a single plane, especially in cases where vertical sound (up/down) isn’t a priority. If vertical immersion is required, the setup can be enhanced with additional speakers above or below the listener, turning it into a more complex 3D configuration.
- Application: Often used in ambisonics and 360° audio experiences, like virtual reality (VR), concerts, or sound installations, where immersive horizontal sound movement is key.
Ambisonic toolkit
Via the following link you can find the download for the ATK toolkit for Reaper, and tutorials. There is a short explanation
Introduction
The Ambisonic Toolkit Workflow
ATK separates the task of production work with Ambisonics into three distinct elements.

- Author
- Capture or synthesise an Ambisonic soundfield.
- Image
- Spatially filter an Ambisonic soundfield.
- Monitor
- Playback or render an Ambisonic soundfield.
In its most simple form, Ambisonics can be regarded as splitting the panning law into two separate parts: encoding (Authoring) and decoding (Monitoring), where final panning (decoding) is deferred to an actual loudspeaker array at the time of audition. The ATK considers the Imaging (transforming) of a soundfield to be a critical step; this is where the artist shapes and processes the soundfield in a coherent way which isn’t easily available via the other models for working with spatial sound.
Many publicly distributed implementations of Ambisonics provide only encoding and decoding. While giving flexibility regarding final playback, failing to include transformers misses out the concept of imaging and fails to capitalise on the advantages of the sound-field sound-image paradigm intrinsic to Ambisonics.
What’s the difference?
The real power in working with Ambisonic over other multichannel surround sound techniques is that rather than being restricted to a sound-scene based paradigm (where the artist is presented with tools designed to build up a ‘sound scene’) Ambisonics supports a soundfield-kernel model. Here we construct a soundfield in the abstract, and can then shape it as desired. The result may be shaped into a ‘sound scene’, or perceived this way – but a soundfield-kernel approach gives much greater flexibility, and directly supports the realisation of more abstract outcomes. We regard this model as idiomatic for Ambisonics.
Along with powerful soundfield transforms – the spatial filtering tools enabling soundfield-kernel reshaping – the ATK provides a comprehensive set of Ambisonic encoders (including pseudo-inverse) and decoders (5.1, binaural, UHJ, full-3D) allowing users to thoroughly leverage the power of the Ambisonic technique.
Speaker configuration focusrite 1st and 2nd Gen Scarlett 2i4
Since 2024 Focusrite control software doesn't support 1st and 2nd Gen Scarlett Solo, 2i2 and 2i4. But we work with them on HKU.
To configure the 4 speakers setup go to your preferences in the audio software you work with.
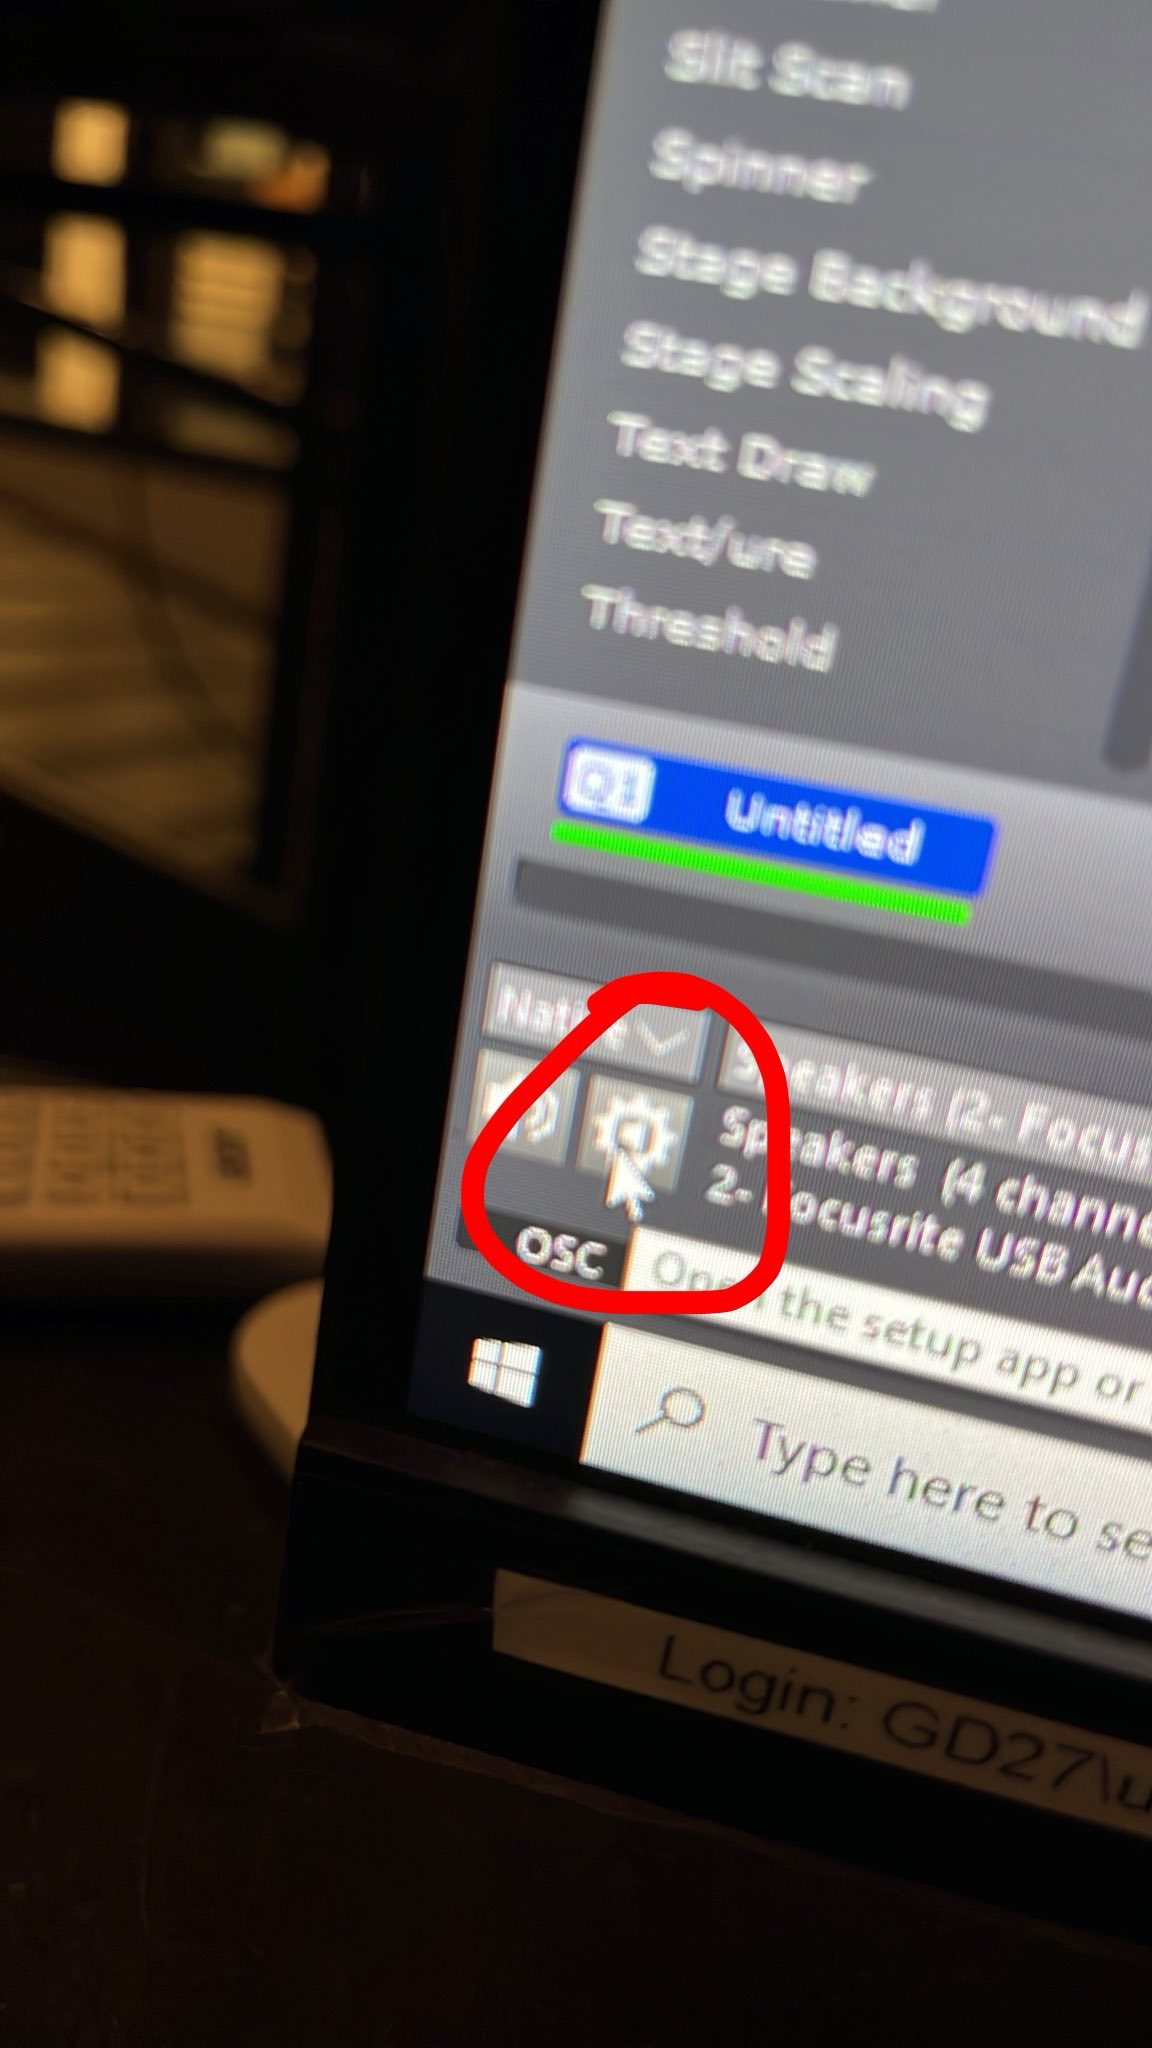
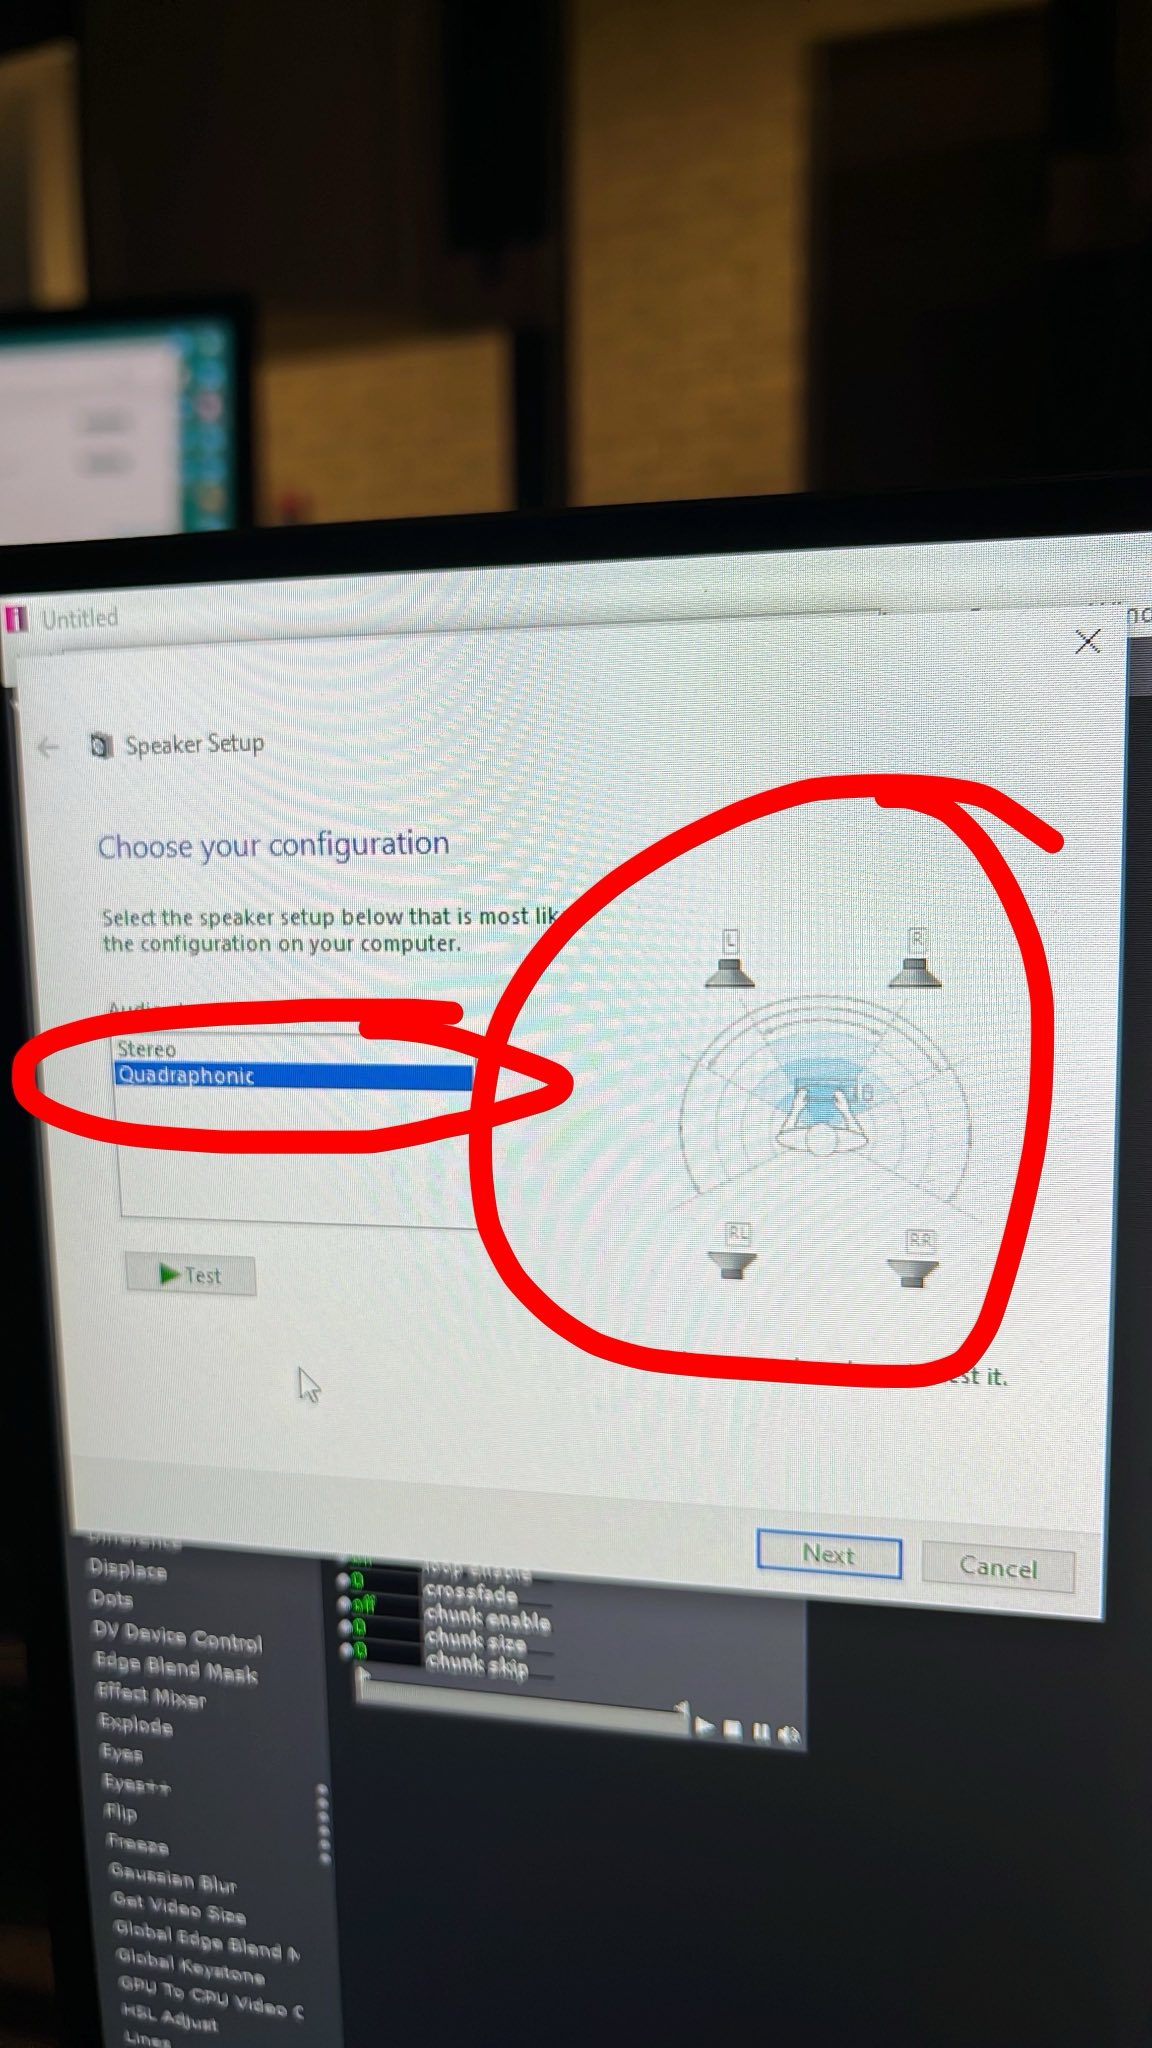
Windows settings:
Control Panel > Sound > Playback: Speakers (Focusrite USB Audio) > Configure > Quadraphonic
Example Isadora:

restart your Isadora file
Touchdesigner + audio multichannel output
For performance and stability reasons, it is not advisable to use multiple audio device output operators in 1 patch. That is why you mix your files before they are sent to the audio device output. Below are several examples.
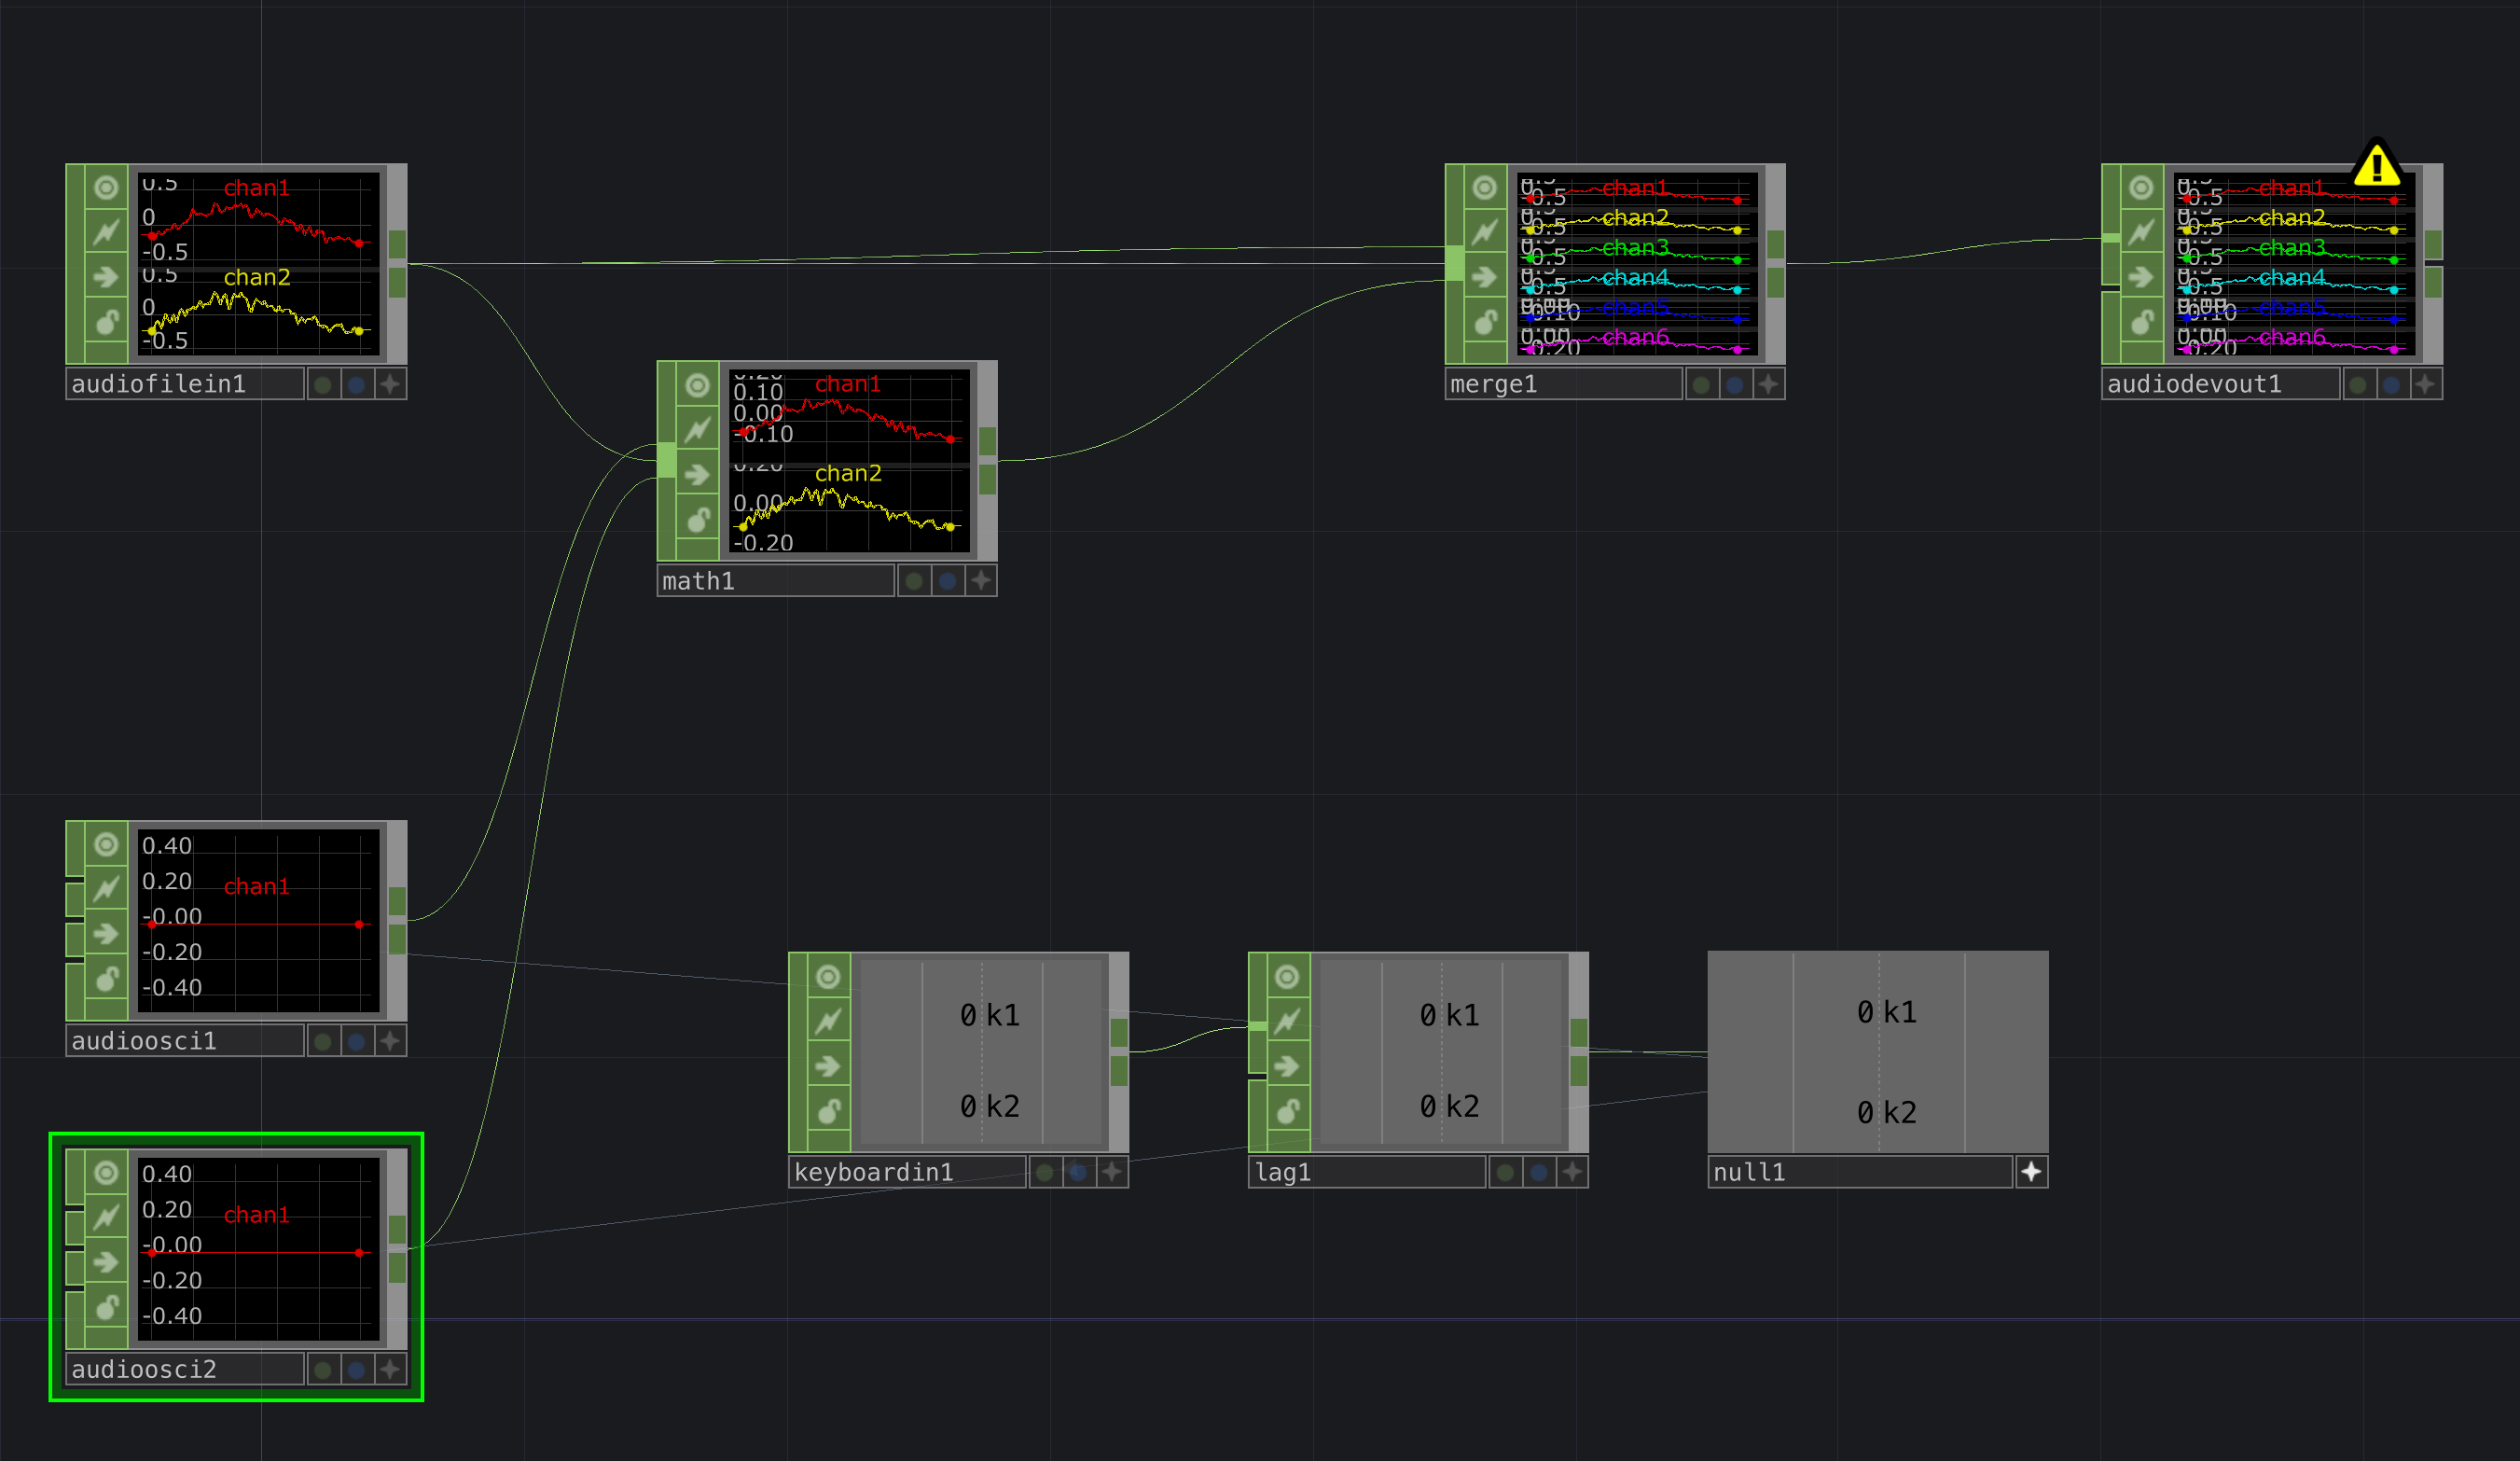
Example 1
There are 6 audio channels (speakers) in this audio out CHOP. With the merge you combine the sources. In this example I have 2 stereo files and 2 mono audio tones. 6 channels in total. You can also change the order in the merge if you want.

when you want to direct 4 audio files to 4 seperate outputs you should work with mono files.
Example 2
In this example 1 stereo file is played across all speakers. However, over speaker 5 and 6 there is a separate tone that can be activated with the keyboard buttons 1 and 2.
Audio effects and plugins
Audio plugins, often referred to simply as 'plugins,' are software components used in digital audio workstations (DAWs) and other audio processing software
General
Audio plugins, often referred to simply as 'plugins,' are software components used in digital audio workstations (DAWs) and other audio processing software. These plugins serve various functions in the world of audio production and sound processing. Here are some of the primary functions of audio plugins:
1. Sound Processing and Effects: Audio plugins are commonly used to apply various effects and signal processing to audio tracks. They can modify the sound in real-time or during post-production. Common effects include equalization (EQ), reverb, delay, chorus, flanger, and more. These plugins allow users to shape and enhance the audio signal to achieve desired sonic characteristics.
2. Instrument Emulation: Virtual instrument plugins, also known as VSTi (Virtual Studio Technology Instrument) or AU (Audio Unit) instruments, replicate the sounds of real-world musical instruments such as synthesizers, pianos, guitars, and drums. Musicians and producers can use these plugins to create realistic instrument sounds without the need for physical instruments.
3. Dynamic Processing: Plugins like compressors, limiters, and gates are used for dynamic range control. Compressors, for example, can reduce the volume of loud sounds and boost the volume of quieter sounds, helping to even out the audio levels. Limiters prevent audio from exceeding a certain level, while gates can eliminate background noise during silent parts of audio recordings.
4. Pitch and Time Manipulation: Pitch correction plugins, such as Auto-Tune, can correct or modify the pitch of vocal recordings. Time-stretching and pitch-shifting plugins can alter the tempo and pitch of audio without changing its duration.
5. Noise Reduction and Restoration: Noise reduction plugins are used to remove unwanted background noise from audio recordings, enhancing the overall sound quality. Restoration plugins can repair damaged or degraded audio, such as old vinyl records or cassette tapes.
6. Creative Sound Design: Some plugins are designed for creative sound manipulation and experimental sound design. These may include granular synthesis, spectral processing, and convolution effects, enabling users to create unique and unconventional sounds.
7. Mixing and Mastering: Audio plugins play a crucial role in mixing and mastering music. They help balance the individual tracks in a mix, apply EQ and dynamics processing, add spatial effects like stereo widening, and prepare the final audio for distribution.
8. Analog Emulation: Many audio plugins aim to emulate the warmth and character of analog hardware equipment like vintage compressors, tape machines, and analog equalizers. These plugins allow users to achieve the 'analog sound' in a digital environment.
9. Real-time Processing: Some plugins offer real-time processing capabilities for live performances, enabling musicians and DJs to apply effects and manipulate audio in real-time during their performances.
Overall, audio plugins are essential tools for audio professionals, musicians, and producers, providing a wide range of functions to shape, enhance, and create audio in various creative and practical ways. They greatly expand the possibilities for audio production and sound manipulation in the digital realm."
Independent Audio Players using a Trigger
This page is dedicated to a returning questions of students:
- "How can I play a sound over a headset in the space?"
- "How can I make it so that if you put on the headphone the audio starts playing?"
Playing an audio file in the space is Easy, you just play it on your laptop or phone. But what if you are in some kind of exhibition setup and you want the sound to start playing if you pick up the headphones? Maybe like in a museum?
Depending on what you wat exactly and your level of technical expertise there are many routes to a suitable solution on this page you will find some suggestions for you.
"Smart" Headphones
There are some modern types of Bluetooth headphones that wil automatically pause when you take them off for example:
- Sony WH-1000XM4 (probably there are many more Sony models that do this: These headphones feature a sensor that pauses music when you remove them.
- Bose Noise Cancelling Headphones 700: They pause music when you take them off.
- Sennheiser Momentum 3 Wireless: These headphones will auto-pause when you remove them from your ears.
- Apple AirPods Max: Apple's over-ear headphones feature auto-pause functionality when removed.
- Beats Solo Pro: These headphones pause playback when you take them off.
ATTENTION: These Headphones will PAUSE and will not stopt and then start again form the beginning!
Ready made Devices
There are some ready made device that you can buy that just might do what you need. The devices listed here are not tested by the author of this page.
- Adafruit Audio FX Sound Board + 2x2W Amp - WAV/OGG Trigger - 2MB link 30 euro TIP!!
- Flyrontech MP# speler met knoppen here 3 euro TIP!!
- Flyrontech triggerable audio-player link (fancy but no cheap and with speaker) 50 euro
- Flyrontech product overview AlieExpress page: here
- Amazon talking products: link (speaker could be changed for headphone jack) 17 euro
- Amazon triggerable audio player link (the longlist of amazon options is here ) 18 euro
- AlieExpress 10 Channel MP3 Sound Board Here
- Another AlieExpress option: here
- Cheap AlieExpress options that looks promising: here
- Sparkfun module (expensive) here
- Museum grade equipment: here
- Seller of audio-players for museums: here
BrightSign
One of the devices used in museums are BrightSign players. They are very robust and come in different flavours for audio & video. You can find the dedicated bookstack page here. At the HKU we have a number of these player's in the "Uitleen"
The cheapest BrighSign audioplayer is: BrightSign Interactieve audioplayer AU335 (192 euro)
Make it yourself
You can make it yourself with some off the shelf electronic components if you have some knowledge of these. There are roughly two ways:
Arduino way:
Use an Arduino and a MP3 player and hook them up with some wires and a button. Write the code to play the file when the sensor/button is triggered. (I use Arduino, but it cloud be a ESP, NodeMCU, raspberryPi pico) In the examples they often use a smal speaker, but that could also be a headphone.
With the Arduino the most used mp3 player is the DFPlayer Mini
- See an wiring example with a Node MCU Here
- See an tutorial with Arduino Here
- A youtube tutorial on the DF mini player and NodeMCU here
- Another NodeMMCU/DF mini player tutorial: here
RaspberryPi way:
Take any RaspberryPi that can play audio then write a small python script that will listen for the GPIO ports and play a sound when thoe are triggered with a button. GPIO ports on a RaspberryPi are digital not analog.
- A ready to use program for the raspberry Pi: MP3 player
- The RPI fruitbox another ready to use solution: rpi-fruitbox-v2
- Tutorial to make a self contained Raspberry Pi zero MP# player here
- Tutorial to make a RaspberryPi player with buttons: here
- Python code to play MP# file on github here