Multichannel audio
In this chapter you can find tools, tutorials, system settings and tips & tricks on how to create multichannel audio set-ups
- Multichannel audio in Isadora and Reaper
- 4 speaker setup with Reaper
- Ambisonics and the ATK toolkit for Reaper for multichannel playback.
- Speaker configuration focusrite 1st and 2nd Gen Scarlett 2i4
- Touchdesigner + audio multichannel output
Multichannel audio in Isadora and Reaper
With Isadora you have control over your interactive performance with audio over 2 channels or more. You can work with this Isadora example file and audio files:
https://nextcloud.hku.nl/s/Bs5qoDqGHsLXdGo
here is a usefull tutorial about working with multichannel audio in Isadora: https://support.troikatronix.com/support/solutions/articles/13000084953-tutorial-getting-started-with-multi-channel-audio-in-isadora-3-0-8
Since 2024 Focusrite control software doesn't support 1st and 2nd Gen Scarlett Solo, 2i2 and 2i4. But we work with them on HKU. Use this page to configre the setup anyway.
In Reaper (audo software or DAW) you can prepare your audio file with multiple channels if you want to use your audio file in a conventional way by playing linear from start to finish or looping it. This should also be possible in other DAW's. Each channel can send your audio to a different speaker depending on your setup you can work with a 2, 4, 8 etc speakers.
Make a mutichannel audio file in reaper:
If you dont have a multichannel setup at hand READ this first!
Mac only!
Download and install BlackHole audio plugin https://existential.audio/blackhole/download/?code=1579271348
You need this to create virtual outputs so you can create multichannel audio files in Reaper (or any other audio edit software) without having an actual multichannel setup at hand.
Restart your computer Open your audio edit software (Reaper) Go to preferences and go to Audio > Device, choose BlackHole 64ch in your Audio Device settings
This is created by Simone, for questions: simone.vandordrecht@hku.nl
4 speaker setup with Reaper
In this example we work with Reaper, Focusrite interface, 4 speakers, windows desktop.
The idea is to place the speakers in a square position so you can hear the audio coming from different directions.
Software to be installed:
Reaper we work with Reaper because its free and relatively easy to setup, but there is more software to use for 4 channel setups (like Ableton or Isadora), depending on your needs
Focusrite control software (make sure you choose for the right device, Focusrite interfaces come in different types and versions which all have own control software environment) Since 2024 This software only works with version 4 hardware.
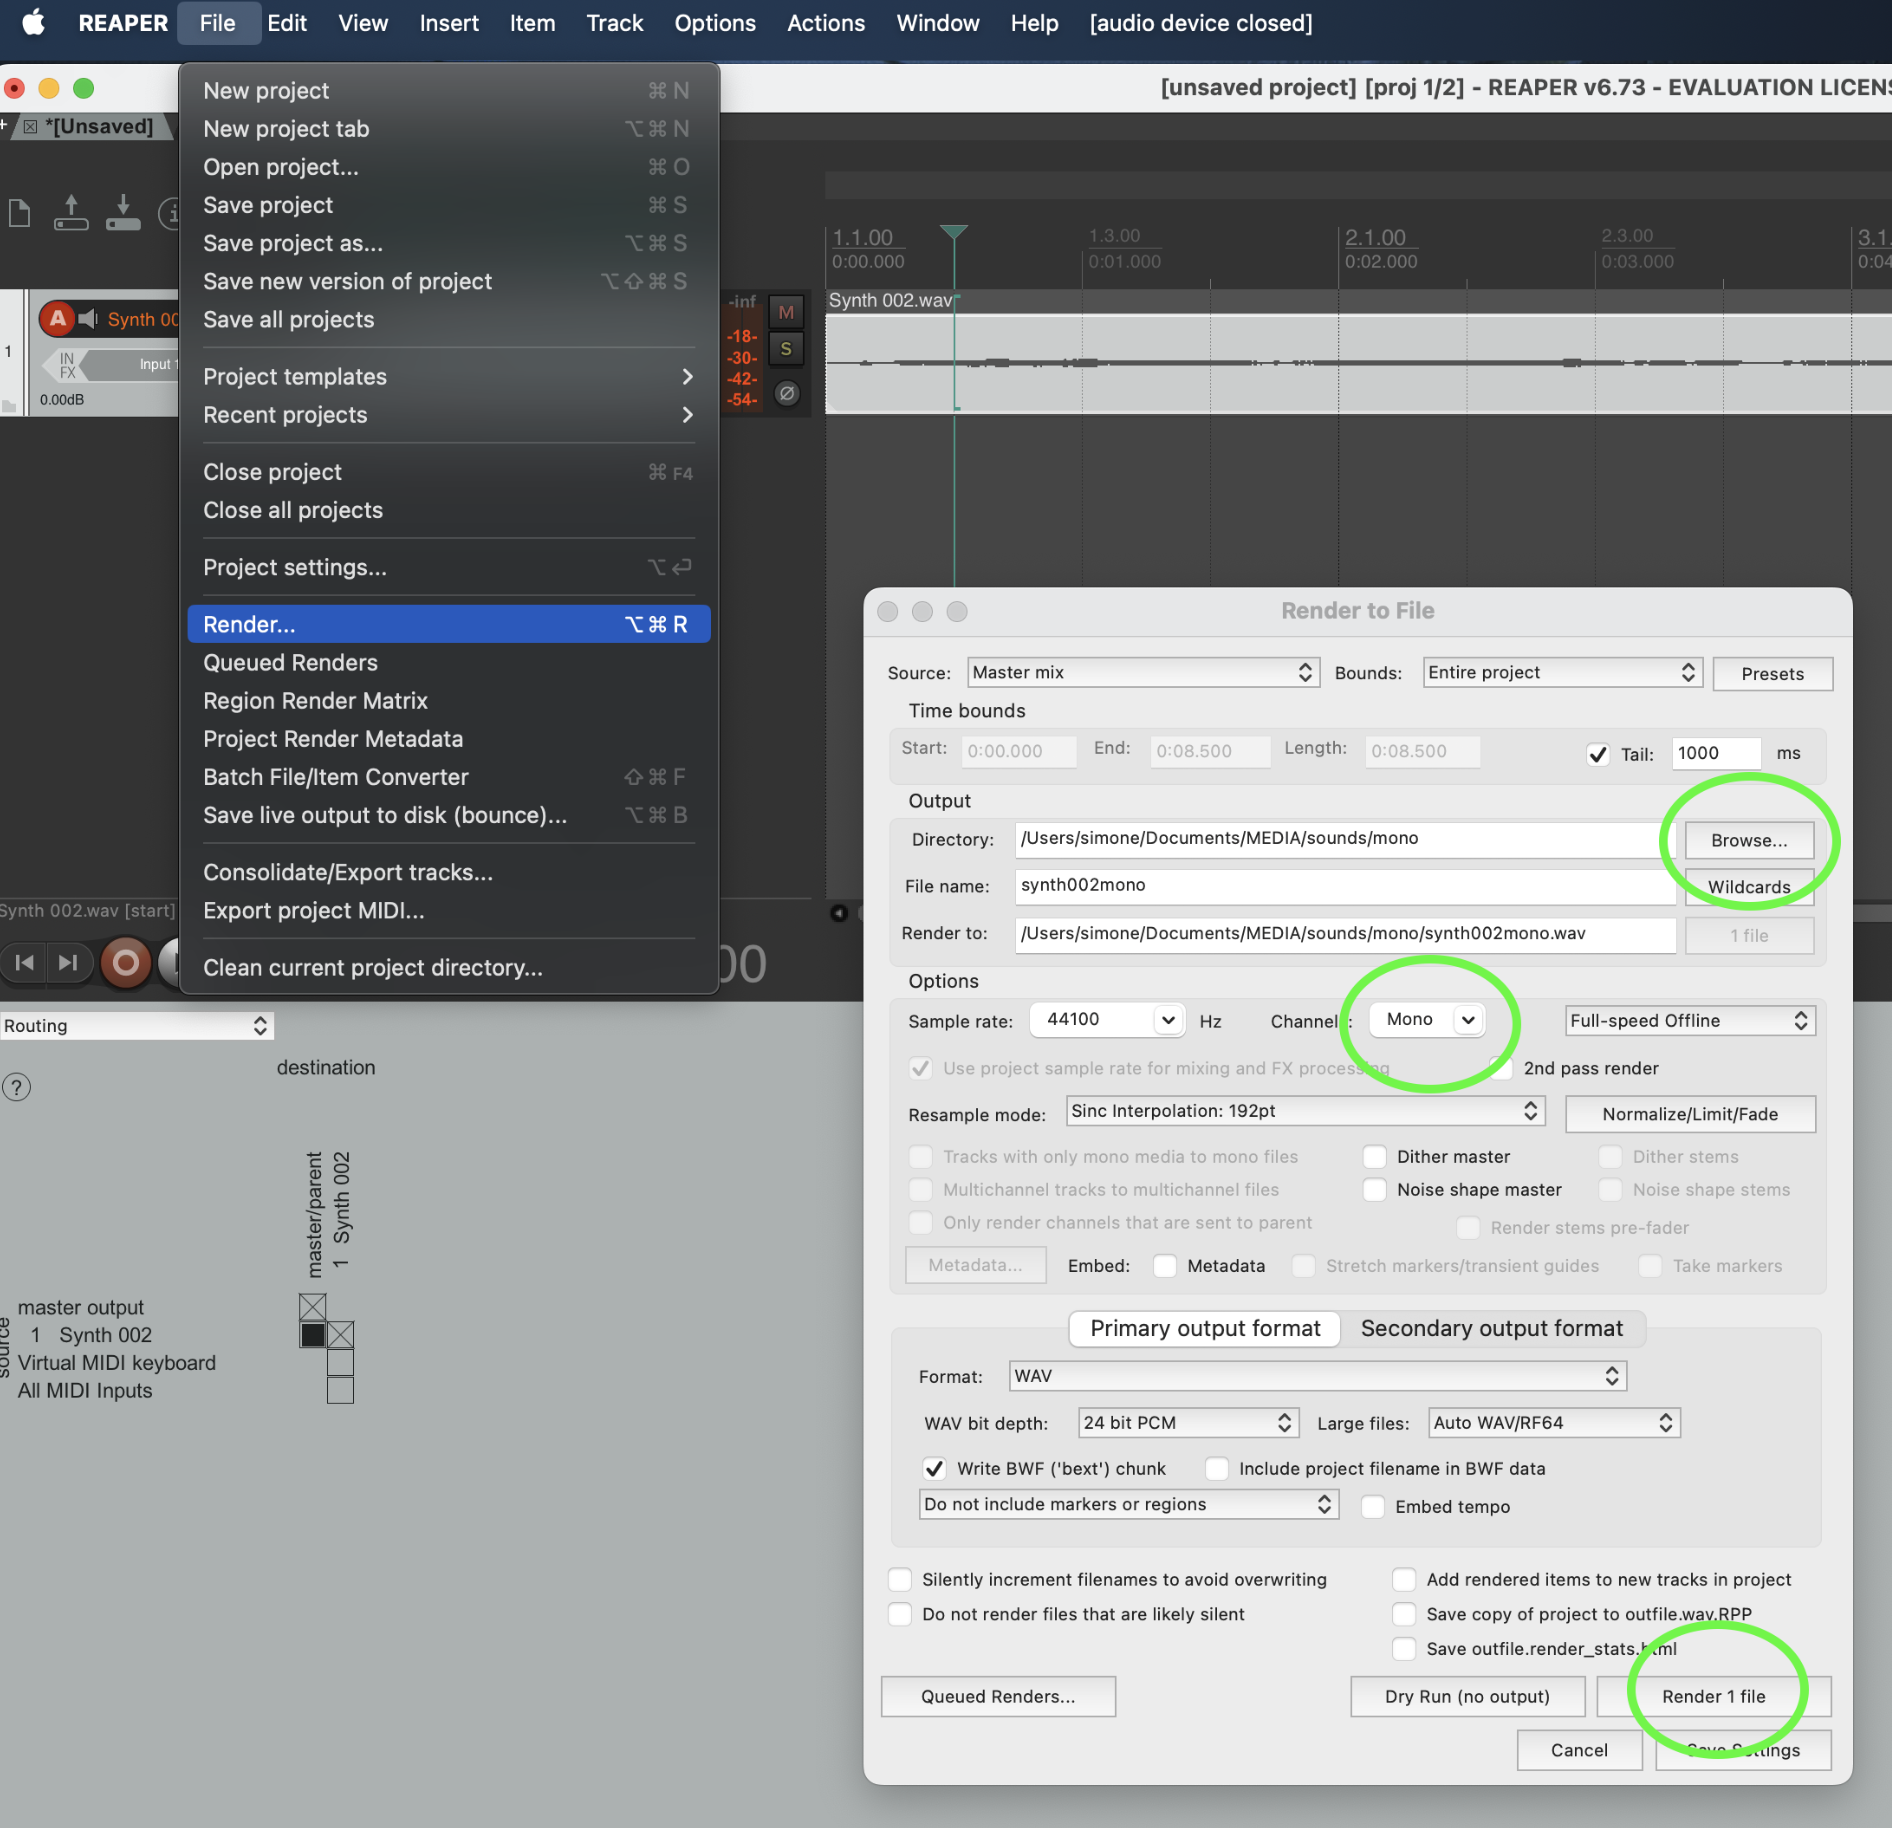
Work with mono files
In most conventional audio setups we use 2 channels (left and right) and the audio source file is stereo (2 channels). Since we use a 4 speaker setup, we use 4 audio tracks in Reaper. Thus we have to use a mono (1 channel) audio file. Each mono file will be placed in one of the 4 single channels of reaper. If your source file is stereo you need to convert your files to mono first.
With Reaper follow this short tutorial https://www.youtube.com/watch?v=jLr0FPxd3K0&t=20s
Save the file:
Connect Focusrite interface
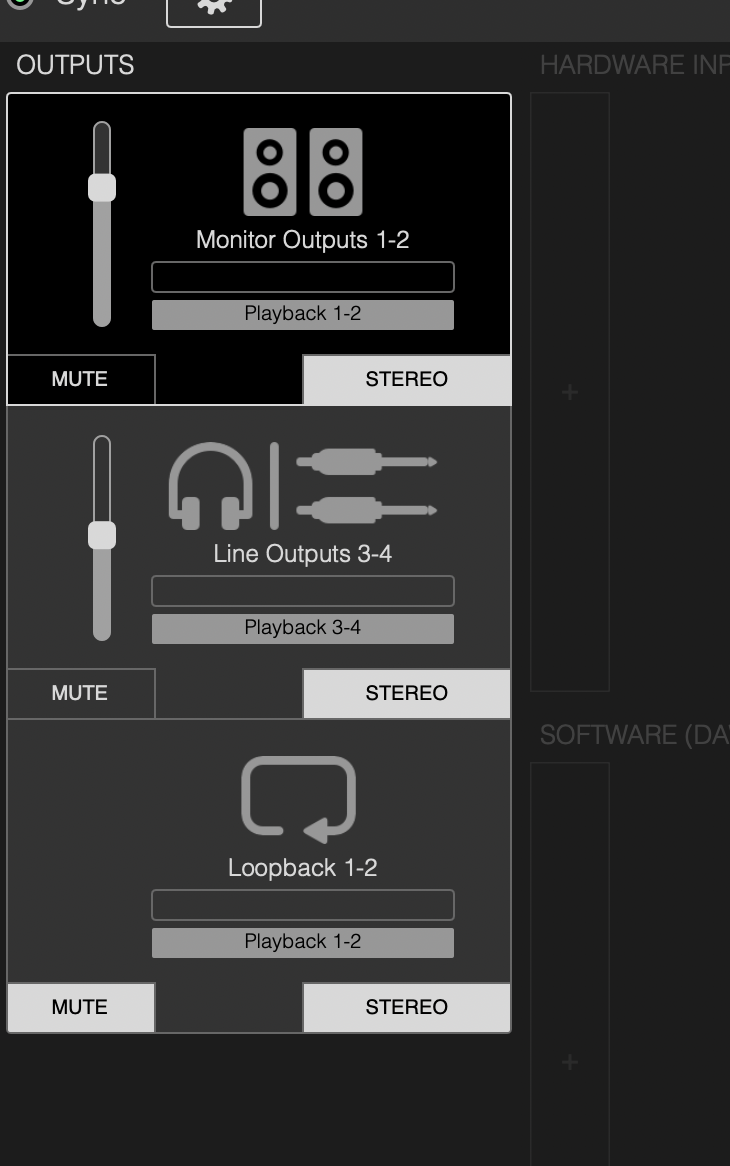
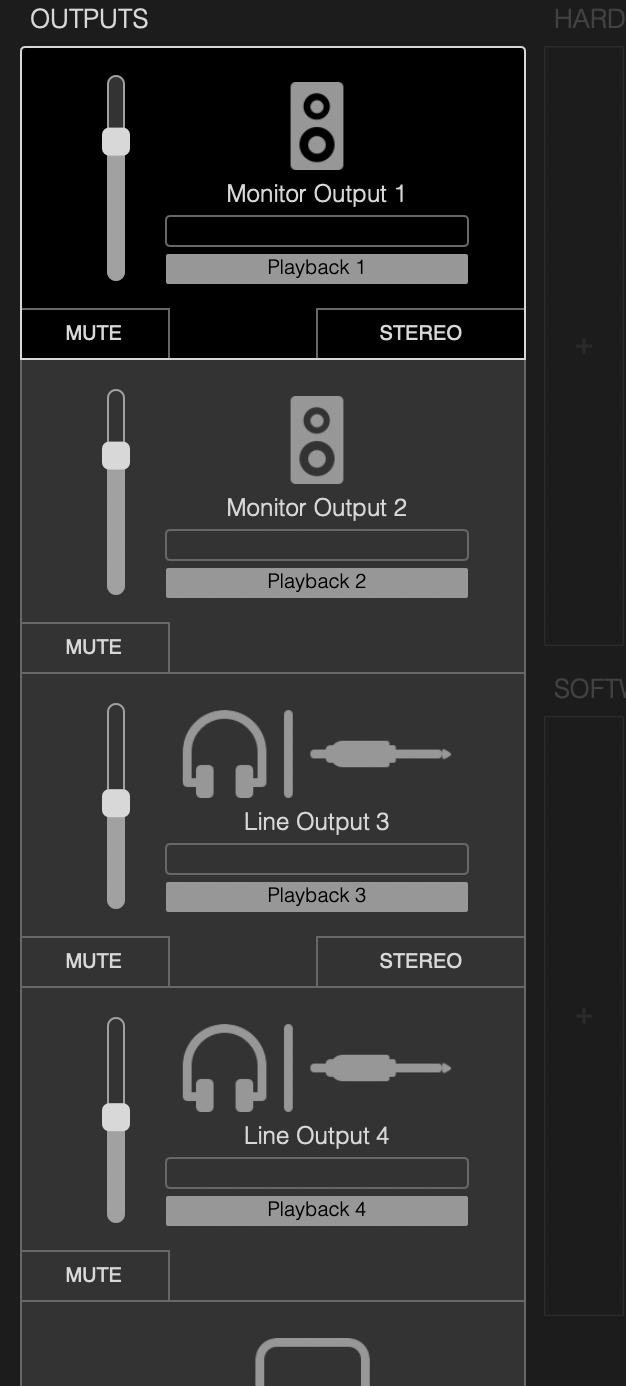
Open Focusrite control software
In the Output Routing tab Change stereo Monitor en Line outputs to mono by clicking [stereo]
To be able to hear anything through channel 1 & 2 you need to TURN UP THE MAIN VOLUME on the interface, or else you only hear channel 3 & 4 ;)
Create your Reaper multichannel audio file
Use command T(mac) or control T(windows) to make 4 tracks. Place your mono audio files on your tracks
View > Routing Matrix & Mixer
In the Routing Matrix change your settings so it looks like this:
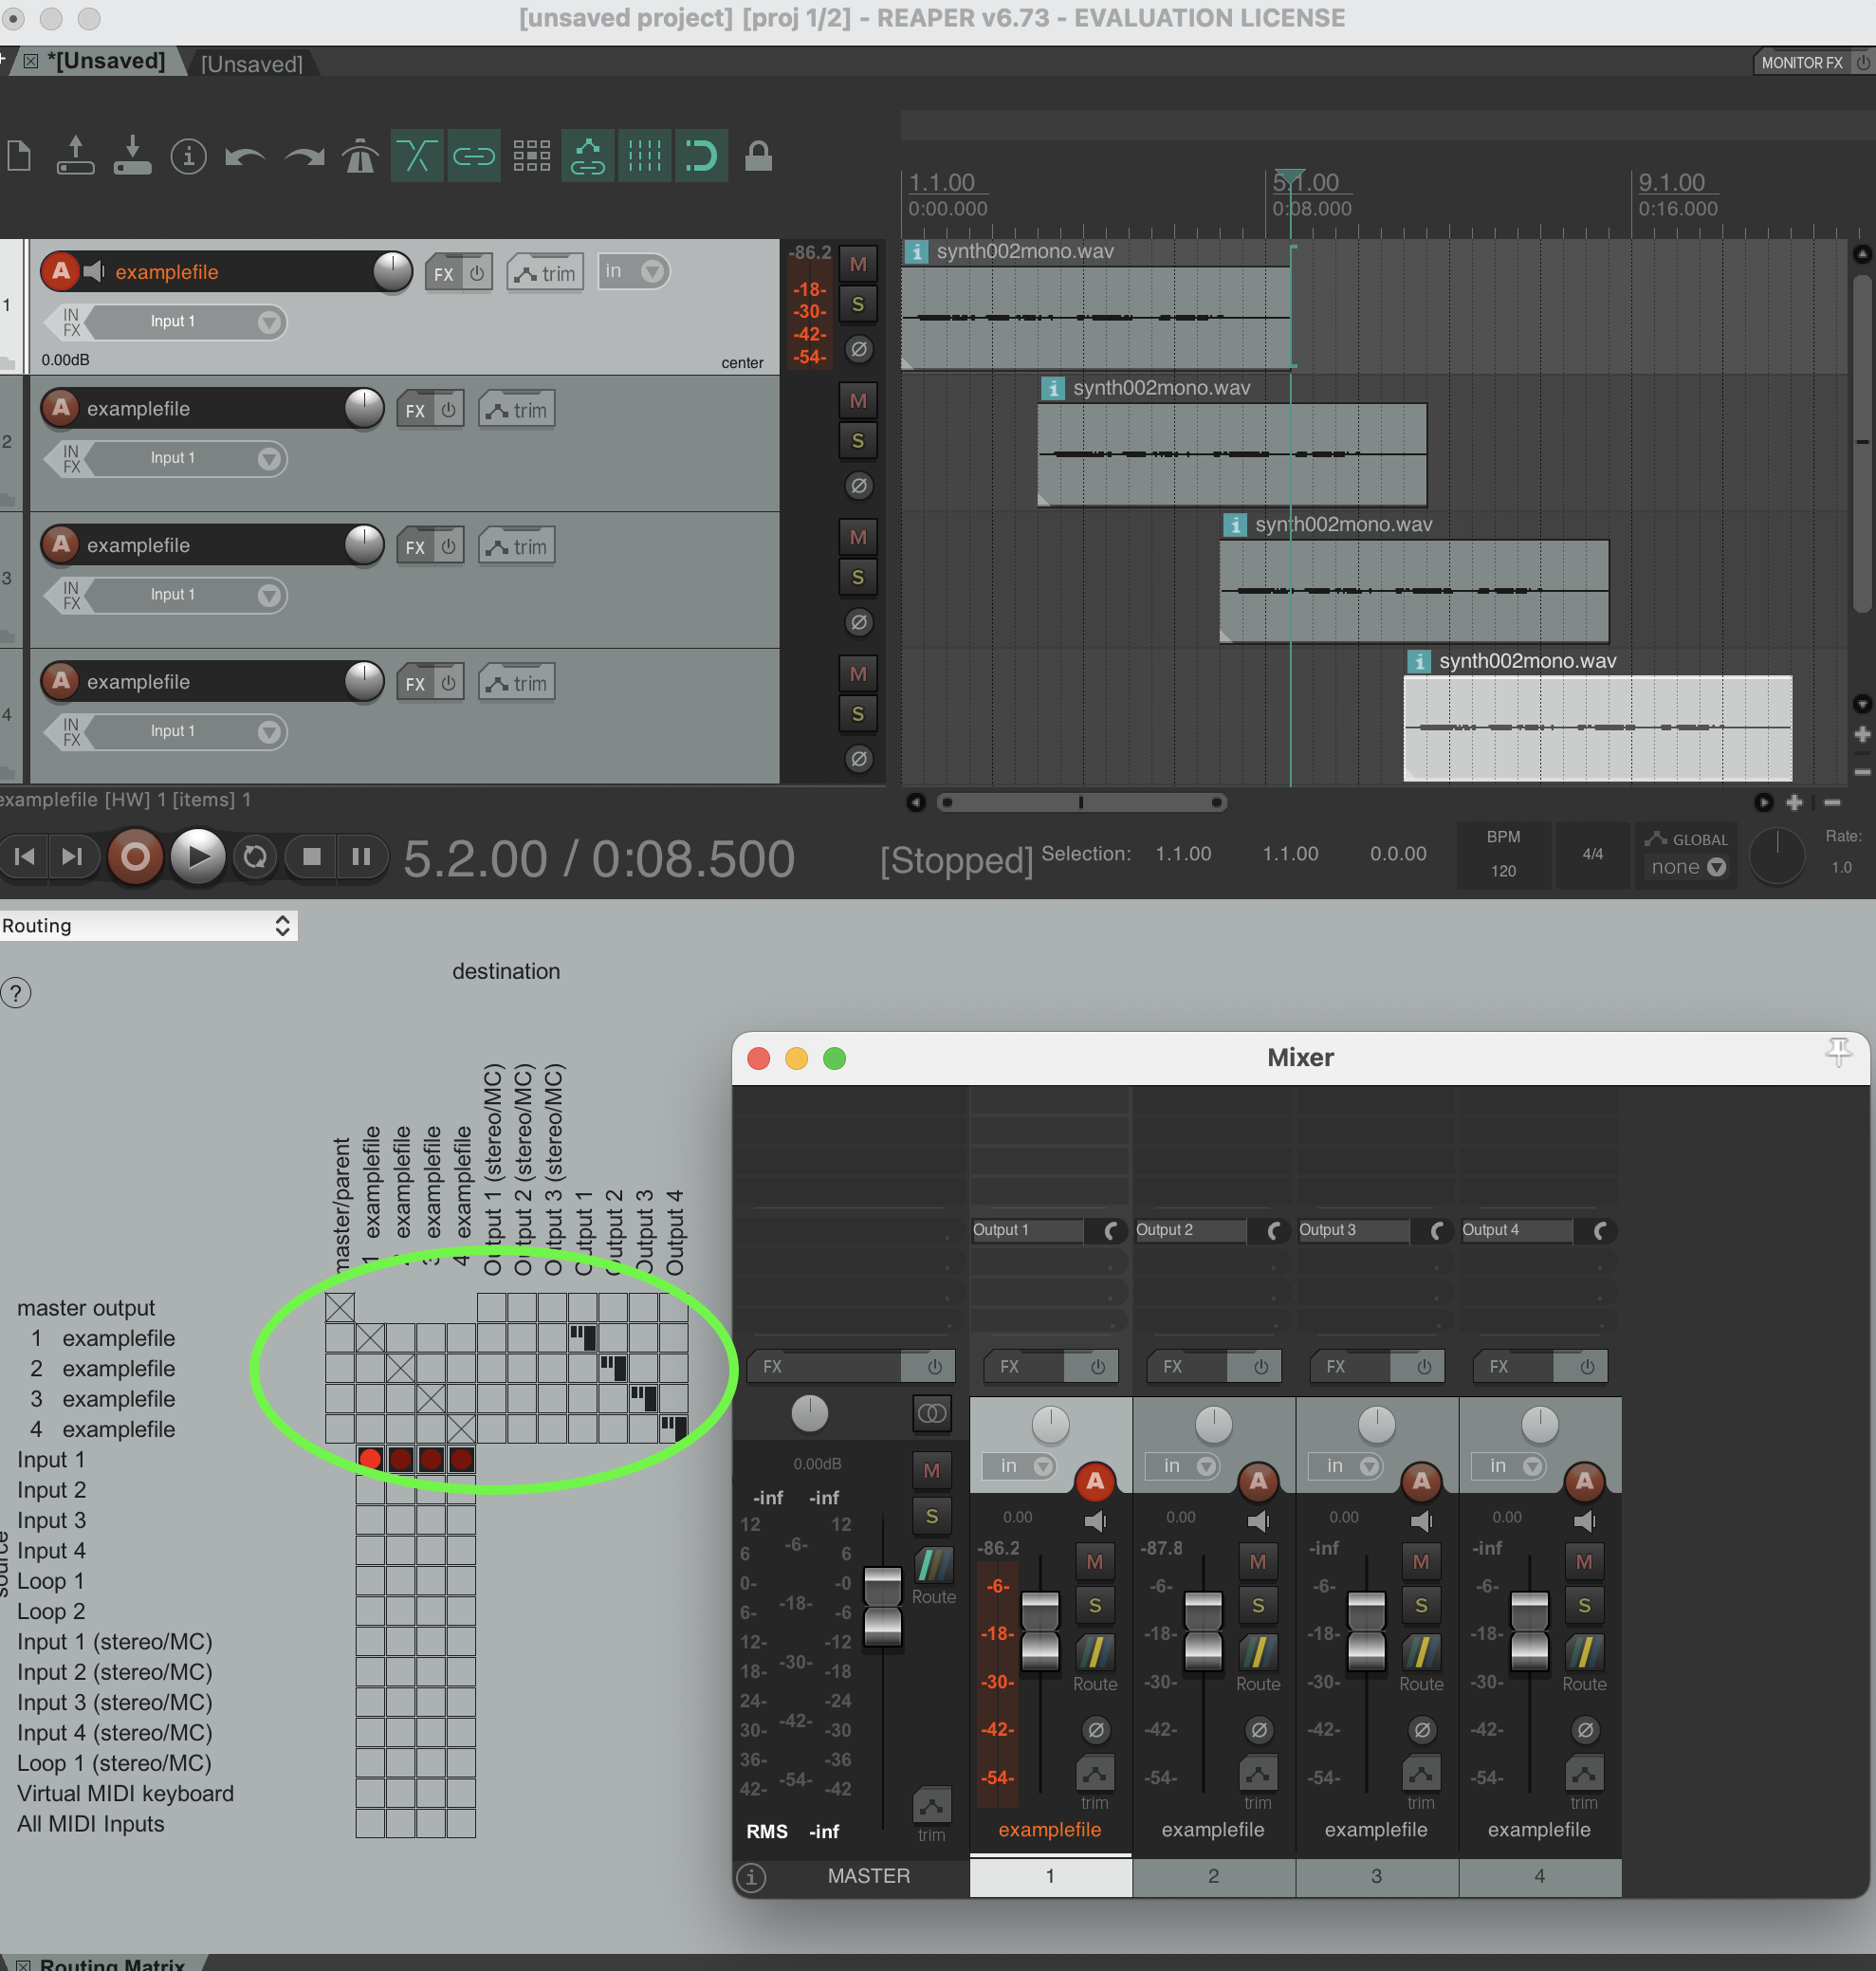
Now you should be able to play your audio through the 4 channels.
In the Focusrite control software you can adjust the level of volume of the different channels. change 3 & 4 so it matches 1 & 2.
Next step might be to automate the volume levels of the audiotrack from other software with MIDI or OSC... depending on the software you use in conjunction with Reaper. Any requests? Send an email to blackbox.ibb-pastoe@hku.nl & blackbox.oudenoord@hku.nl we'll get back to you on that!
If you dont have a multichannel setup at hand READ this:
Mac only!
You need this to create virtual outputs so you can create multichannel audio files in Reaper (or any other audio edit software) without having an actual multichannel setup at hand.
Download and install BlackHole audio plugin https://existential.audio/blackhole/download/?code=1579271348
Restart your computer Open your audio edit software (Reaper) Go to preferences and go to Audio > Device, choose BlackHole 64ch in your Audio Device settings
This is created by Simone, for questions: simone.vandordrecht@hku.nl
Ambisonics and the ATK toolkit for Reaper for multichannel playback.
This page contains links to sources containing information about Ambisonics, the Ambisonics Toolkit, and several tutorials on how to use the plugins in conjunction with soft and hardware.
Ambisonics
Ambisonics is a full-sphere surround sound technique used for recording, mixing, and reproducing three-dimensional audio. Unlike traditional stereo or surround sound systems, which typically only cover a horizontal plane (like 5.1 or 7.1 setups), ambisonics captures sound from all directions: above, below, and around the listener.
Here’s how it works:
1. Sound Field Representation:
- Ambisonics represents a sound field mathematically, using what’s called a "B-format" signal. This is a multi-channel signal that describes the sound from different directions using spherical harmonics. Typically, in the first-order ambisonics (the most basic level), there are four channels:
- W (omnidirectional): captures sound pressure equally from all directions.
- X (front-back): represents the front-back axis.
- Y (left-right): captures the left-right axis.
- Z (up-down): represents the vertical axis.
- Higher-order ambisonics (HOA) extend this by adding more channels to capture finer directional details.
2. Recording Ambisonics:
- Ambisonic microphones (like the Soundfield microphone) capture sound using multiple capsules arranged in a tetrahedral pattern. These recordings are processed into the B-format, which encodes the 3D sound field.
3. Playback:
- To reproduce ambisonic audio, the B-format signal is decoded for playback on various speaker setups, or binaurally for headphones. The decoder can adjust the signal based on the listener’s position or speaker arrangement to ensure an immersive sound experience.
- In virtual reality (VR) and 360° video, ambisonics is particularly useful because it allows for real-time head-tracking, so the sound perspective changes as you move your head, maintaining spatial accuracy.
4. Applications:
- Virtual Reality (VR): Ambisonics is widely used in VR and 360° video to create immersive soundscapes.
- Game Audio: It allows sound to move dynamically within 3D game environments.
- Cinema and Music: Some modern music and films experiment with ambisonic mixes to provide an enveloping sound experience.
In summary, ambisonics is an advanced sound format that enables full 3D audio immersion by capturing and reproducing sound from all directions, offering a much richer and spatially accurate audio experience compared to traditional surround sound methods.
Hardware setup
A typical ambisonics hardware setup includes:
-
Ambisonic Microphone: A microphone with multiple capsules arranged in a tetrahedral or other pattern (e.g., Sennheiser AMBEO, Zoom H3-VR) to capture sound in all directions.
-
Audio Interface: A multi-channel interface to record the signals from the microphone capsules, converting them into digital B-format signals.
-
Computer with DAW: A digital audio workstation (DAW) with ambisonics plugins (e.g., IEM Plugin Suite, SPARTA) to process, encode, and decode the B-format audio for playback or mixing.
-
Monitoring System: For playback, either a multi-speaker setup (for full 3D sound reproduction) or binaural headphones for VR/360 applications.
Speaker setup
Here are a few common multi-speaker configurations used in ambisonics for 3D sound reproduction:
-
Quadraphonic Setup (4 speakers): Four speakers are placed at the corners of a square or rectangle around the listener (two in front, two behind), offering a basic but immersive spatial sound experience, laying the groundwork for more complex surround systems.
-
Cube Configuration (8 speakers): Speakers are placed at the corners of a cube, with four on the ground and four at elevated positions to cover all axes (left-right, front-back, up-down).
-
Dodecahedron Configuration (12 speakers): Speakers arranged in a dodecahedron shape (12 equally spaced vertices) to capture more detailed directional sound.
-
3D Hemisphere (16+ speakers): Speakers are arranged in a half-sphere around the listener (above, in front, behind, and around) for immersive sound, often used in dome environments.
-
Icosahedron Configuration (20 speakers): Evenly spaced speakers form a spherical shape for highly detailed spatial sound representation, often in higher-order ambisonics.
-
Spherical Array (32+ speakers): A full 360° sphere of speakers, providing the most detailed and immersive sound experience for advanced higher-order ambisonics setups.
8 speaker setup configurations:
There are several different 8-speaker setups used for immersive audio experiences, especially in ambisonics, spatial audio, and surround sound configurations. Here are a few common types:
1. Cube Configuration (3D)
- Placement: Speakers are arranged at the eight corners of a cube around the listener. Four are positioned at ground level and four at elevated positions above.
- Purpose: Provides full 3D sound coverage, capturing sound from above, below, and around the listener.
- Application: Common in ambisonics for full-sphere audio experiences.
2. Octagonal Setup (2D)
- Placement: Speakers are placed in a circle around the listener, at equal angular distances (every 45°), forming an octagon.
- Purpose: Primarily used for 2D spatial sound with good horizontal imaging but no vertical depth.
- Application: Useful for ambisonic sound in settings where horizontal localization is the focus, such as concert halls or theaters.
3. 7.1 Surround Sound Configuration
- Placement: Six speakers around the listener in a horizontal plane (left, right, center, left surround, right surround, rear center) with a subwoofer for low-frequency effects (LFE).
- Purpose: Widely used in home theaters and cinemas for a high-quality surround sound experience.
- Application: Cinema, home entertainment, and gaming.
4. Double Quadraphonic Setup (Vertical and Horizontal Planes)
- Placement: Four speakers at ear level in a traditional quadraphonic square around the listener, with four more speakers above in a mirrored square formation.
- Purpose: Adds vertical sound information while keeping horizontal spatial accuracy.
- Application: Often used in ambisonics and 3D audio production for more immersive sound.
5. Dual Layer Circle (Upper and Lower Rings)
- Placement: Four speakers in a horizontal circle at ear level and four additional speakers in an elevated horizontal circle above the listener.
- Purpose: Creates a "dual ring" spatial arrangement for both horizontal and some vertical coverage.
- Application: Common in dome environments, VR, or immersive installations.
6. Surround Sound with Height Speakers (5.1 + Height)
- Placement: A standard 5.1 surround system (left, right, center, rear left, rear right, and subwoofer) with two additional height speakers positioned above the listener.
- Purpose: Adds vertical audio dimension to traditional surround sound, giving a 3D feel.
- Application: Used in home theaters with formats like Dolby Atmos or DTS.
7. Horizontal Circle (Octagonal Layout)
- Placement: The 8 speakers are evenly distributed in a 360° horizontal circle around the listener. Each speaker is positioned at equal angular intervals (every 45°) around the listener at ear level.
- Front (0°)
- Front-right (45°)
- Right (90°)
- Back-right (135°)
- Back (180°)
- Back-left (225°)
- Left (270°)
- Front-left (315°)
- Purpose: This setup provides full 360° horizontal sound imaging, allowing sound to move smoothly and precisely around the listener on a single plane, especially in cases where vertical sound (up/down) isn’t a priority. If vertical immersion is required, the setup can be enhanced with additional speakers above or below the listener, turning it into a more complex 3D configuration.
- Application: Often used in ambisonics and 360° audio experiences, like virtual reality (VR), concerts, or sound installations, where immersive horizontal sound movement is key.
Ambisonic toolkit
Via the following link you can find the download for the ATK toolkit for Reaper, and tutorials. There is a short explanation
Introduction
The Ambisonic Toolkit Workflow
ATK separates the task of production work with Ambisonics into three distinct elements.

- Author
- Capture or synthesise an Ambisonic soundfield.
- Image
- Spatially filter an Ambisonic soundfield.
- Monitor
- Playback or render an Ambisonic soundfield.
In its most simple form, Ambisonics can be regarded as splitting the panning law into two separate parts: encoding (Authoring) and decoding (Monitoring), where final panning (decoding) is deferred to an actual loudspeaker array at the time of audition. The ATK considers the Imaging (transforming) of a soundfield to be a critical step; this is where the artist shapes and processes the soundfield in a coherent way which isn’t easily available via the other models for working with spatial sound.
Many publicly distributed implementations of Ambisonics provide only encoding and decoding. While giving flexibility regarding final playback, failing to include transformers misses out the concept of imaging and fails to capitalise on the advantages of the sound-field sound-image paradigm intrinsic to Ambisonics.
What’s the difference?
The real power in working with Ambisonic over other multichannel surround sound techniques is that rather than being restricted to a sound-scene based paradigm (where the artist is presented with tools designed to build up a ‘sound scene’) Ambisonics supports a soundfield-kernel model. Here we construct a soundfield in the abstract, and can then shape it as desired. The result may be shaped into a ‘sound scene’, or perceived this way – but a soundfield-kernel approach gives much greater flexibility, and directly supports the realisation of more abstract outcomes. We regard this model as idiomatic for Ambisonics.
Along with powerful soundfield transforms – the spatial filtering tools enabling soundfield-kernel reshaping – the ATK provides a comprehensive set of Ambisonic encoders (including pseudo-inverse) and decoders (5.1, binaural, UHJ, full-3D) allowing users to thoroughly leverage the power of the Ambisonic technique.
Speaker configuration focusrite 1st and 2nd Gen Scarlett 2i4
Since 2024 Focusrite control software doesn't support 1st and 2nd Gen Scarlett Solo, 2i2 and 2i4. But we work with them on HKU.
To configure the 4 speakers setup go to your preferences in the audio software you work with.
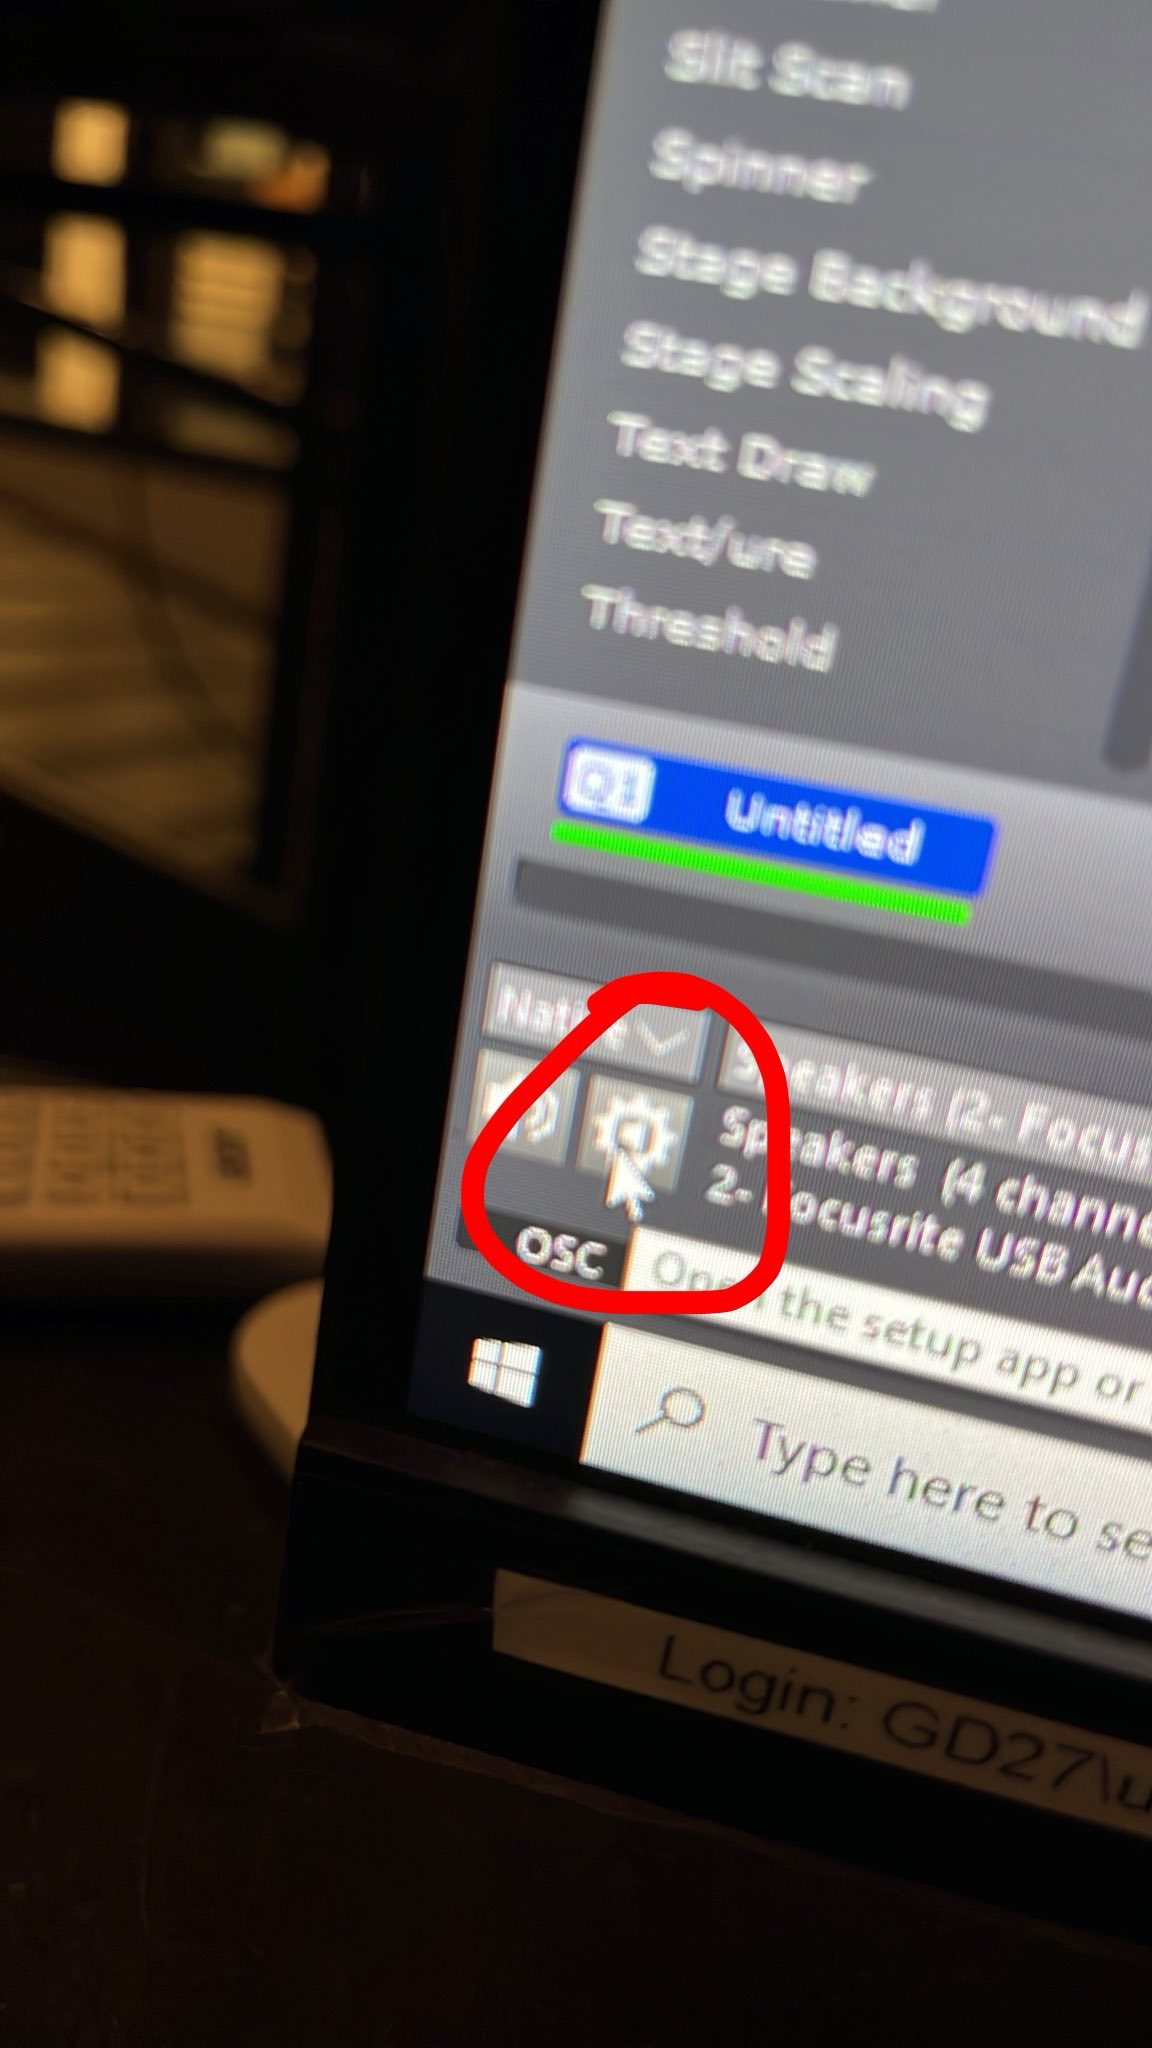
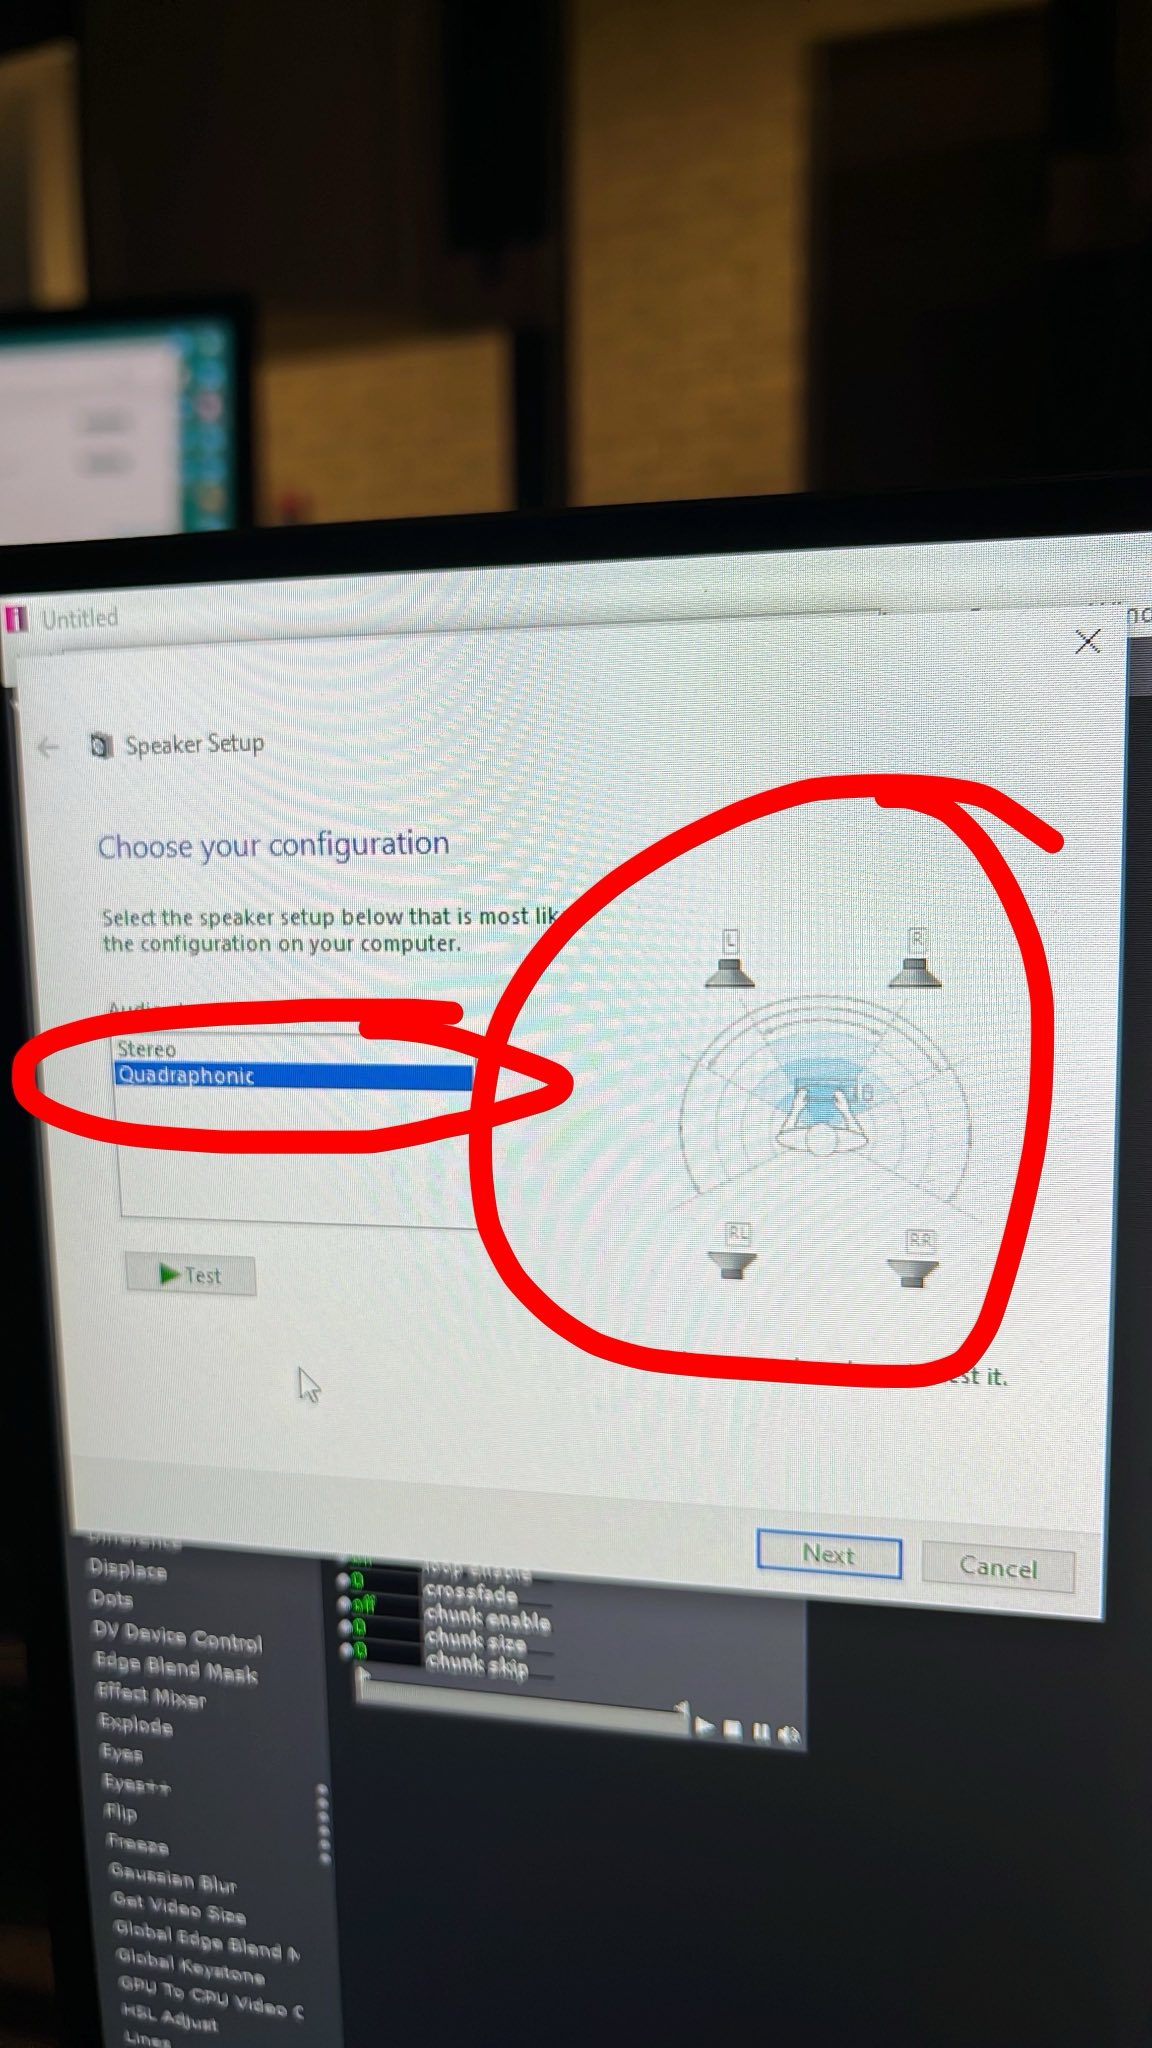
Windows settings:
Control Panel > Sound > Playback: Speakers (Focusrite USB Audio) > Configure > Quadraphonic
Example Isadora:

restart your Isadora file
Touchdesigner + audio multichannel output
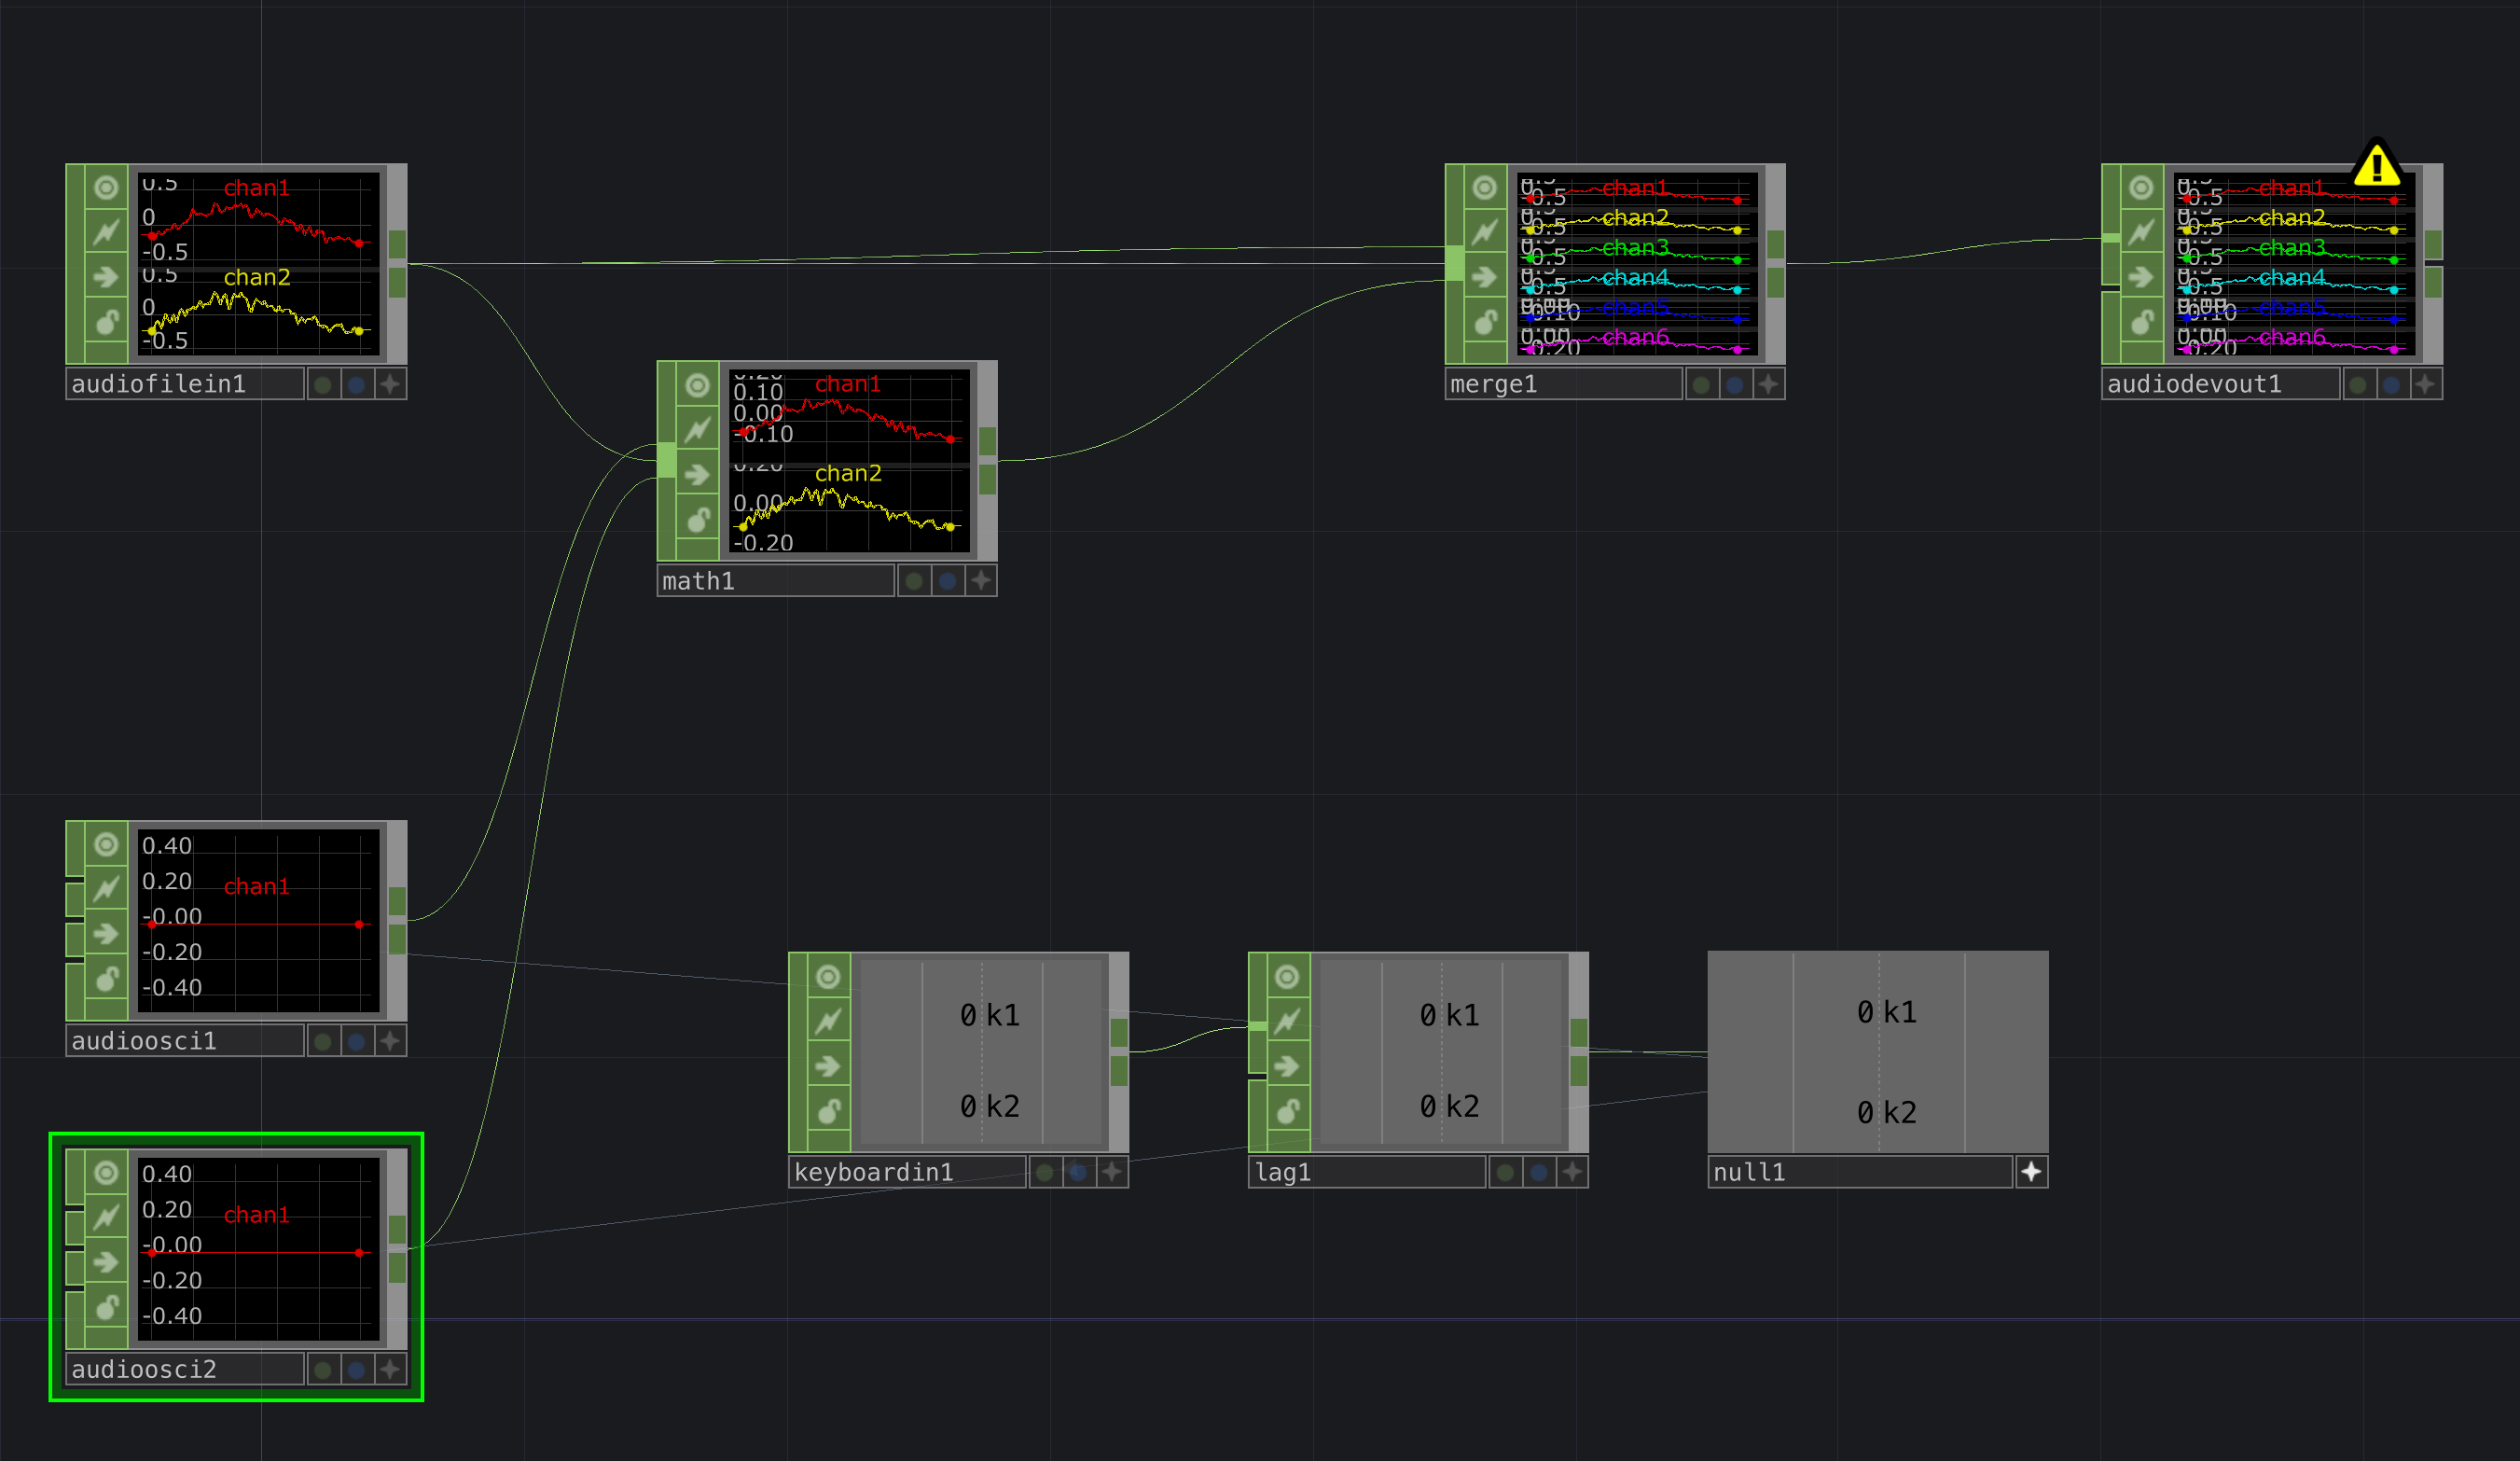
For performance and stability reasons, it is not advisable to use multiple audio device output operators in 1 patch. That is why you mix your files before they are sent to the audio device output. Below are several examples.
Example 1
There are 6 audio channels (speakers) in this audio out CHOP. With the merge you combine the sources. In this example I have 2 stereo files and 2 mono audio tones. 6 channels in total. You can also change the order in the merge if you want.

when you want to direct 4 audio files to 4 seperate outputs you should work with mono files.
Example 2
In this example 1 stereo file is played across all speakers. However, over speaker 5 and 6 there is a separate tone that can be activated with the keyboard buttons 1 and 2.