Local models (AI on your own PC)
There's lots of generative AI models you can run locally, instead of using online services. Here's a couple of options!
- Running generative models locally
- Ollama for local LLMs
- Experiment with Dutch local LLMs
- Audio transcripts with MacWhisper
Running generative models locally
All the big models run on external servers and are usually only available through a (paid) account. There are some alternatives available that you can run locally on your own machine. Installing these usually involves complex installation procedures, but there's a trend for 'one-click-installers' that get you set up relatively painlessly. Below you can find some simple installers for various generative AI's.
Note 1 All of these models take up significant amount of space on your computer. The programs can take up to 3Gb, and the models are even larger. Make sure you have around 30Gb free when you get these models running!
Note 2 Most of these models need (recent and beefy) Nvidia graphics cards to run, or an Apple M processor.
If you don't have a system that can run these models and you also don't want to use the online services, or need some help with installation, please contact us through the HKU en AI page. We have some models set up here that you can experiment with. Open for both students and employees (of HKU.)
Image generation on your own computer
These models are based on Stable Diffusion. You will not get the latest version, but you can re-train the model, or download variants from the internet. Automatic11111 also allows you to combine models.
Stable Diffusion WebUI by Automatic11111: https://github.com/AUTOMATIC1111/stable-diffusion-webui (Win, Linux, Mac)
Easy Diffusion https://github.com/easydiffusion/easydiffusion (Win, Linux, Mac)
Both programs above can be downloaded from the Github page directly, resulting in a folder containing a .bat file. Run this and it will start downloading and installing all necessary files. Once it's done, run the .bat again and the program will start in your browser.
DiffusionBee https://diffusionbee.com/ for Mac. Also runs on older Intel macs, but those will take a very long time to generate images.
Text generation ('ChatGPT') on your own computer
If you want more control over the installation, pick between various models and give the model your own instructions, check the Ollama bookstack description page here.
Ollama for local LLMs
Ollama is currently a popular option for running LLMs locally. It runs models from various companies, which you can download directly from the terminal. You can download Ollama from ollama.com, available for all systems.
You need a bit of a beefy computer for this with quite a bit of storage. Apple Macbooks with an M processor will run fine, Windows/Linux laptops run best on a recent NVIDIA graphics card.
The current version of Ollama comes with a UI so that you don't have to run everything from the terminal. However, downloading new models from the UI is not very intuitive at the moment. I would suggest installing new models from the terminal.
When Ollama is installed, open a terminal (win key, type cmd) and run ollama from here.
Ollama terminal tips
No idea where to start? Type
ollama -hSee all installed models by typing
ollama listThe first time you type this your list will be empty.
Installing a model
To install a new model, type the following command. Replace [model name] with one of the models you can find in the ollama model list. Start with a popular one for testing. Note: the 1.5B / 7B / 14B is a rough indication for the size of the model, the bigger the number the larger the size. 7B models are usually 4-5GB on your disk, and will need that amount of VRAM (memory on your graphics card)
ollama run [model name]All installed models will also show up in the UI, but you'll probably need to restart the UI before they work.
Running a model
ollama run [model name]Deleting a model
All models (and instructions, see below) are saved as blob files in C:\Users\[Username]\.ollama\models\blobs. This means you can't manually remove or edit models. To delete a model, type
ollama rm [model name]Creating Characters: build your own instructionset
One of the ways you can modify the model is to give it additional instructions before it runs conversation mode. This way you can give a model character. You can instruct it to talk a certain way, use specific kind of vocabulary or express itself in a different way. This can improve the responses you get from the model, but can also be used to make interesting interactions.
Please note that this is not the same as training your own model, just an additional set of instructions to a pre-trained model. The names ollama gave to this process are a bit confusing, the modelfile they mention here is an instructionset to an existing model.
The way to do this is to copy the instructions of an existing model (like llama3:8b), modify those instructions, and then create a new model in ollama using those new instructions. For a long description of this process, see here. The short version:
Step 1: copy a model file
You can make a copy of an existing model in Ollama by using the following command:
ollama show [modelname] --modelfile > [newname]where [modelname] is one of the models you have already installed (e.g. llama3:8b), and [newname] is the filename of the new instructionset you want to create (e.g. myfirstmodel). Where does it save the new file? In the folder that you are currently in while typing the command! On Windows, when opening a terminal this will be C:\Users\[Username] by default. In order to keep everything in one place it's a good idea to navigate to the folder where you want your workfiles to be before running these commands.
We also have two files prepared for you here: story and emo. These use the llama3:8b model, which will download automatically when you install and run this 'story' or 'emo' model (see below).
Step 2: modify the model file
Open the newly saved model file in a text editor. There's lots of things you can edit here, see the full description on the ollama page. If you only want to change the character of the AI that you are talking with, add a descriptor at "system Job Description:". In the 'story' file, the assistant will write all responses as a short story. With the 'emo' file, the assistant will reply only in one word. You can see this in the model file if you open it in a text editor.
Step 3: install your model
To install your modified model file, type:
ollama create [name] -f [file location]Under Windows, this often will give an error along the lines: "1 argument expected, 4 given". If that's the case, make sure you're command line is navigated to the folder where the modified model is located, and then use .\[filename] as location. So when you want to save the story file you just edited as a model called 'story', navigate to the folder where you have the file 'story' and type:
ollama create story -f .\storyTo check: when successful, your new model should now show up when you type: ollama list.
All modified models will still use the same pre-trained model file. If all your modified models are based on the llama3:8b model, it will only download that model once (the list command shows all of them being 5 GB, but that is not the size on your disk, just the size it will use in your memory).
Step 4: run your model
ollama run [modelname]Step 5: edit your model?
Once installed, you cannot edit a model.
You can edit the model file you saved locally, but this will NOT update the model in ollama.
To update a model, re-do all steps above: change the local file, remove the old model, create the new model.
Creating a chain of models
If you want to have models building on each other's outputs, or models talking to each other, you can chain your characters by using python scripts. For instance, using the 'story' and 'emo' models above, you can chain these together using Python and the following script:
import ollama

def get_response(model, message):
    response = ollama.chat(model=model, messages=[
      {
       'role': 'user',
        'content': message,
      },
    ])
    return response['message']['content']

def chain_models():
    inputIntoFirst = 'The summary of the day'
    # First, get the response from the 'emo' model
    emo_response = get_response('emo', inputIntoFirst)
    print("The 1st response was: ", emo_response)
    # Then, use the response from the 'emo' model as input to the 'story' model
    story_response = get_response('story', emo_response)
    # Now you can use 'story_response' as you wish
    print("The response was: ", story_response)

chain_models()
(to use ollama in Python, use pip install ollama. You will probably have to re-install your models if you ran ollama from the command line before)
Using an interface
The current Ollama comes with a very basic UI, which allows you to add documents and search the internet.
There are lots of ways of adding a more complete interface to your LLM, like LM Studio, or Open WebUI. These change all the time so there's not much use of making a list of them here. The interfaces usually allow you to make Characters (like above) directly in the browser, to add (text) files as input or to add additional local models such as Stable Diffusion for image generation.
Experiment with Dutch local LLMs
MacWhisper (Mac only) is a great local transcription tool that converts audio to text. It also has an option to add LLMs through Ollama so that you can summarize your transcripts, which would make a great complete suite for recording and summarizing meetings running only local models. For English this seems to work rather well, but local LLMs are known for not being all to reliable for Dutch. So we ran an experiment, summarizing transcripts of the HKU en AI podcast.
Conclusion: No success yet for summarizing Dutch texts, in Dutch. (May 2025)
Setup
Setting up LLMs in MacWhisper is quite straightforward: install Ollama and install your model. Next, open MacWhisper and go to Global (the settings menu), then AI, Services. If Ollama is running, you should be able to select all installed models in MacWhisper by clicking Ollama under Add another service. Now once you've made a transcript you can interact with ollama under the AI tab (three stars) at the top right.
Testing Dutch in MacWhisper (May '25)
Interacting with any model through MacWhisper in Dutch gives strange results. Replies are often in English, or seem to ignore the prompt completely.
- Gemma3 and Mistral give pretty accurate summaries, but in English only. Interestingly it does seem to understand the Dutch contents of the transcript (although it misses some key points as well).
- Deepseek goes completely off the rails
- Llama3.2 gives a very short summary that misses key points.
Changing prompts or moving to chat mode does not seem to improve anything.
Testing Dutch in LLM directly (May '25)
I thought MacWhisper might be interfering in some way (as I could not get the LLM to react to anything else than 'summarize'), so I moved to Open WebUI. In this way I could still interact with the LLM and add a text file as imput. The textfile was the transcript export from MacWhisper.
While did this improve the interaction as I could talk to the LLM directly, results were similar to above. Some additional models tested here:
- Granite3.2 gave mixed bulletpoints, some accurate, some wildly off. Granite did respond in Dutch.
- Phi3,5 and Phi4 had nonsense results, although in Dutch.
- Two Dutch LLM models Geitje-7b en Fietje-2b completely derailed. They did not answer any questions but went rambling about daycare for young children, paper crafting and Dutch politics. It's clear what these models were trained on...
Audio transcripts with MacWhisper
MacWhisper is an audio transcript tool for Mac (and iOS, not tried) with a nice interface that runs a local model for audio transcription. It has a free version with a basic model and a paid version with a one-time €60 fee lifetime license, which gets you access to bigger 'Pro' models. It's quite good at separating speakers and does well for transcribing Dutch recordings. There's also options for linking to language models so that you can get summaries and bullet-points out of the transcript, but that needs a (paid) account on online services. We've tried linking it to Ollama to get a completely local system, but we did not have a lot of success for Dutch texts. English text should do better in that setup.
For HKU employees: you can install this app through the HKU software app, search for "Whisper".
Setup
This page is a short overview to get you started with transcribing. The app does not come with a lot of documentation but is pretty straightforward to use. First thing to check when starting up is which model is running, in the top right:
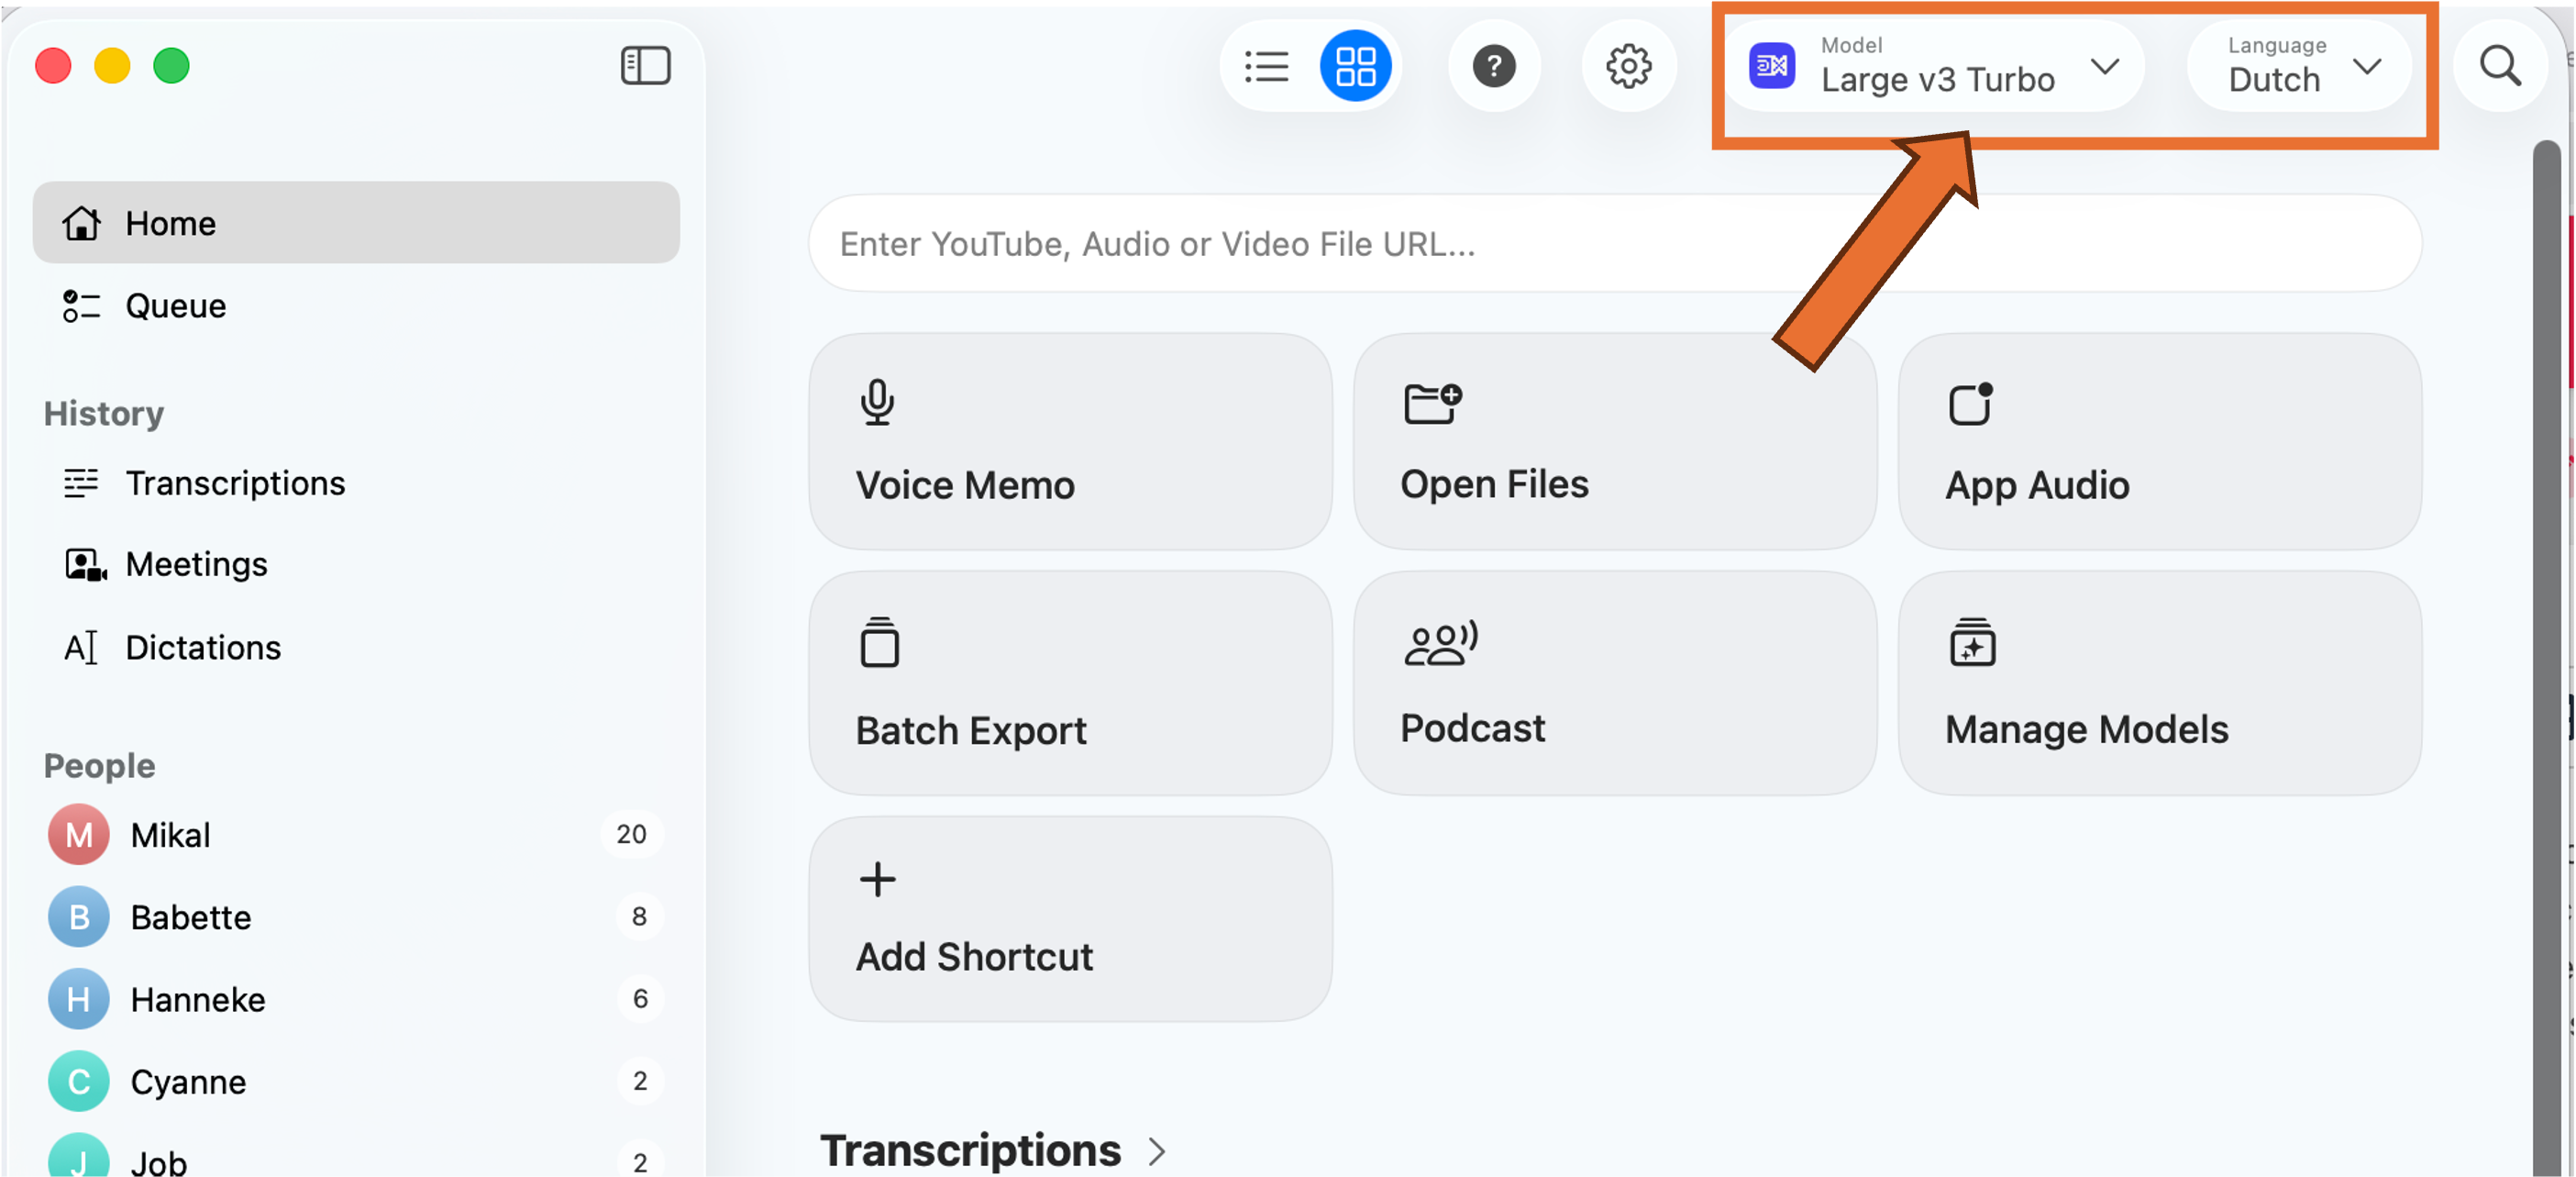
If you can't select a Large mode (with a Pro license), click Manage Local Models and install the relevant models. We've been having good results with the Whisperkit v2 and v3 models. Make sure you set the Language to Dutch. Strangely enough it doesn't really impact the word-for-word transcription, but the output will be in English if you don't do this.
And note:
Audio quality = transcript quality. The quality of the audio will greatly impact the quality of the transcript. We've been using the tool to transcribe a podcast of three people with individual microphones who (usually) take turns while talking. That leads to good and clean transcripts. A meeting with eight people in a large meeting room recorded with a laptop microphone will most likely not give you the best results, no matter how good the transcription tool is. Keep this in mind when setting up!
1. Recording options
In the Home screen you can choose a couple of ways to start transcribing.
Please request permission from everybody in the conversation before you do this. Especially for the App Audio, where the person on the other side will not automatically notice that they are being recorded.
Voice Memo
You can directly transcribe a discussion by opening Voice Memo. This will open a live transcription of whatever the microphone of your laptop is picking up. This means you don't have to pre-record the discussion in a different app.
App Audio
Use this to record and transcribe audio from an app such as Zoom for online meetings.
Open Files
This is where you import a pre-recorded conversation and what we did for the podcast.
2. Transcribe
The app will start to transcribe immediately once you select your option above. Depending on the file size and your computer this will take some time. Be patient,
the live transcript looks like one big wall of text that does not separate speakers or sentences. This will be corrected automatically when the transcription is finished.
 Initial transcript: one big wall of text
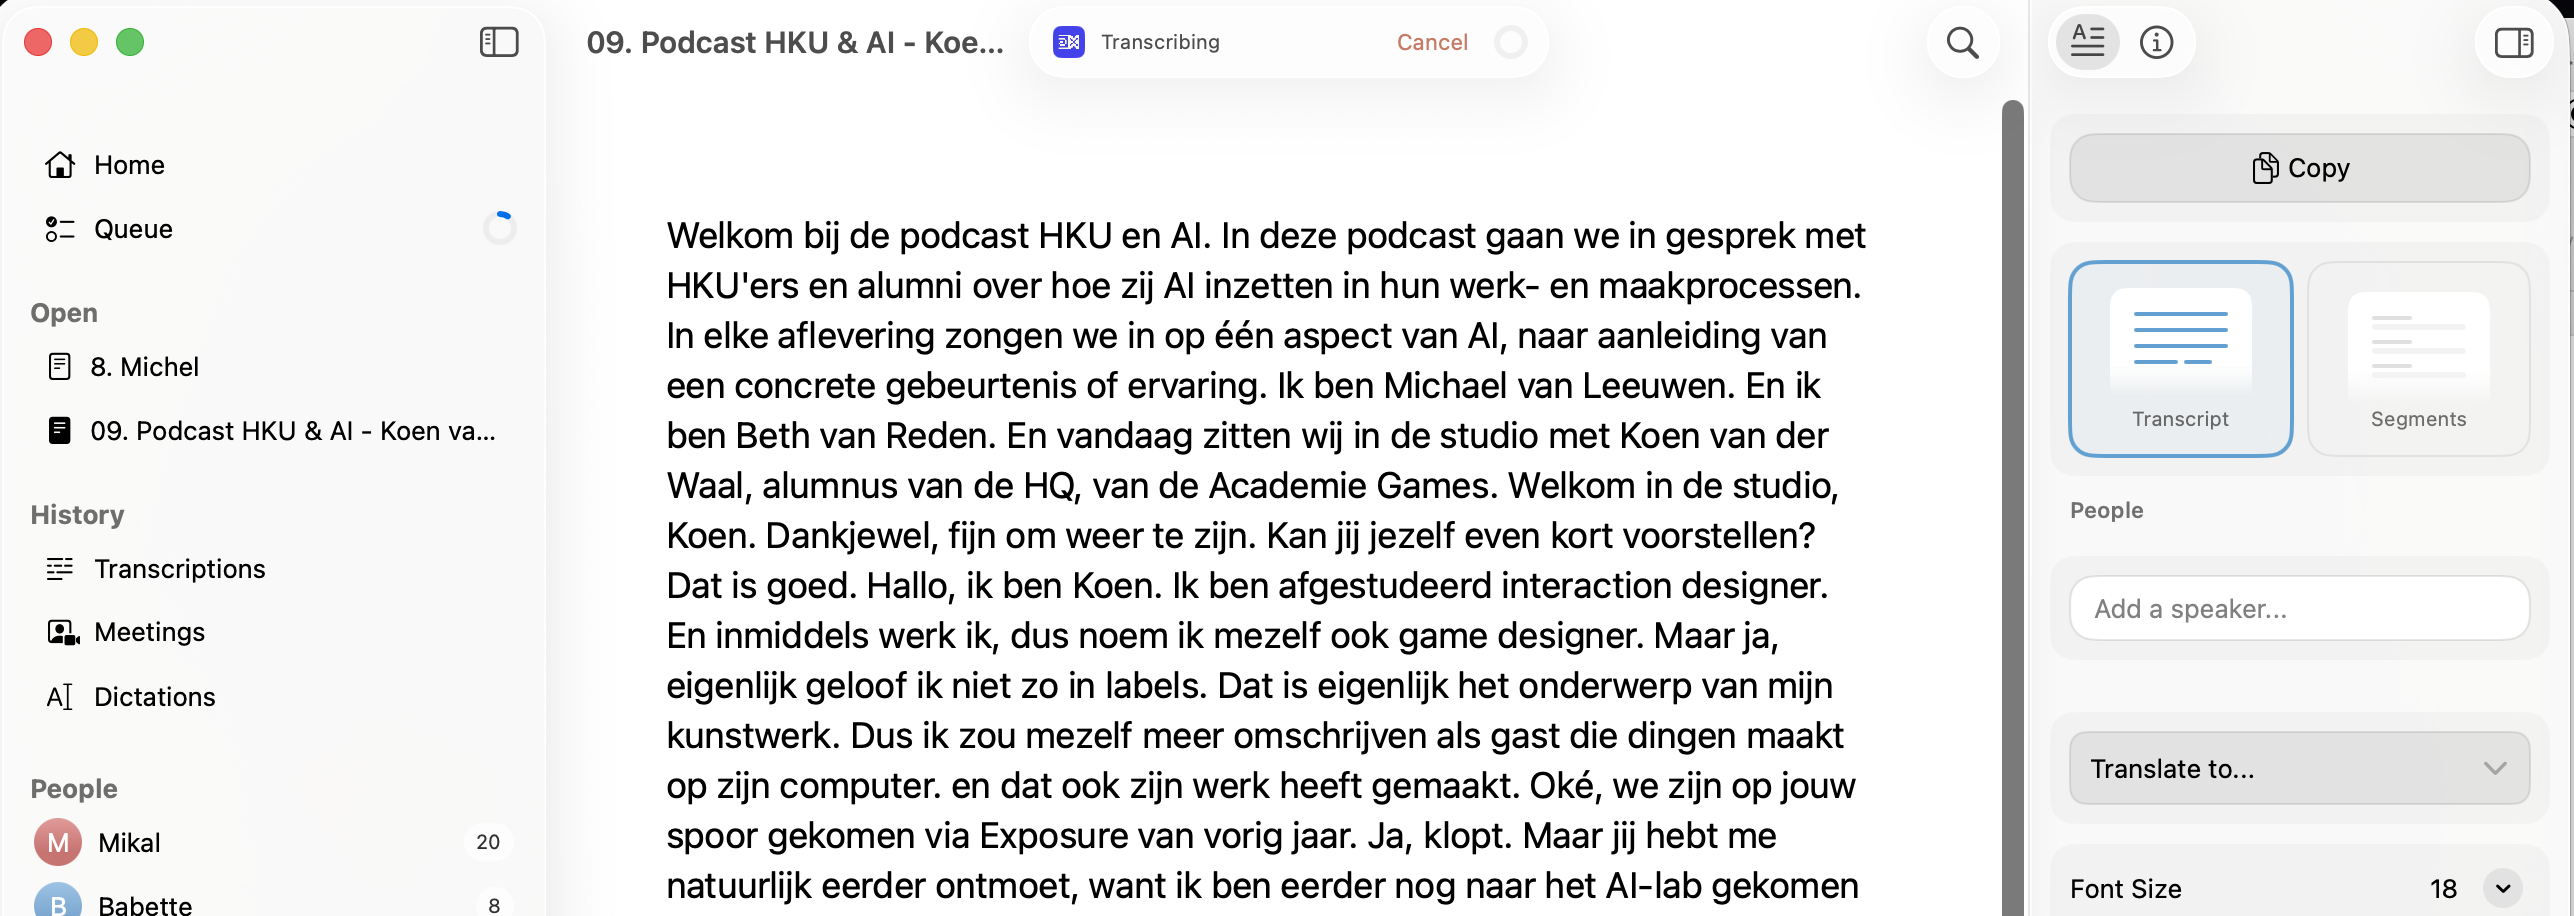
3. Clean up
The transcript is never perfect. Some words are not recognized correctly, and sentences can be attributed to the wrong speaker (especially when speakers are interrupted). You can clean this up once the transcript is finished. The app automatically saves your edits in the app itself, as a .whisper file. You can re-open this transcript when you re-start MacWhisper, no need to re-transcribe the audio every time.
First, go to the Segments view: On the right-hand side, click Segments (instead of Transcript). You now see a long list of individual sentences, attributed to individual speakers.
Rename Speaker 1, 2, ... : On the right you can rename 'Speaker 1' etc, to the relevant names, if you know them at this point.
Want to listen to who's speaking? Double-click the name that appears to the left of the sentence and the audio-playback will start at that sentence.
Wrong person attributed to the text? Right-click the name, then select the proper name (if you want to speed this process up, you can select the line, then press 1 (for speaker 1), 2 (for speaker 2), etc.)
Want to edit the sentence? Double click the sentence and start editing
Here's a short example:
After recording this, I noticed all later references of Koen were attributed to Babette. Clearly my naming of speaker 1, 2, 3 had been wrong at the start. The blue one should have been Koen, the green one Babette. Fixed by switching those names around, and re-attributing the first edits to the right people.
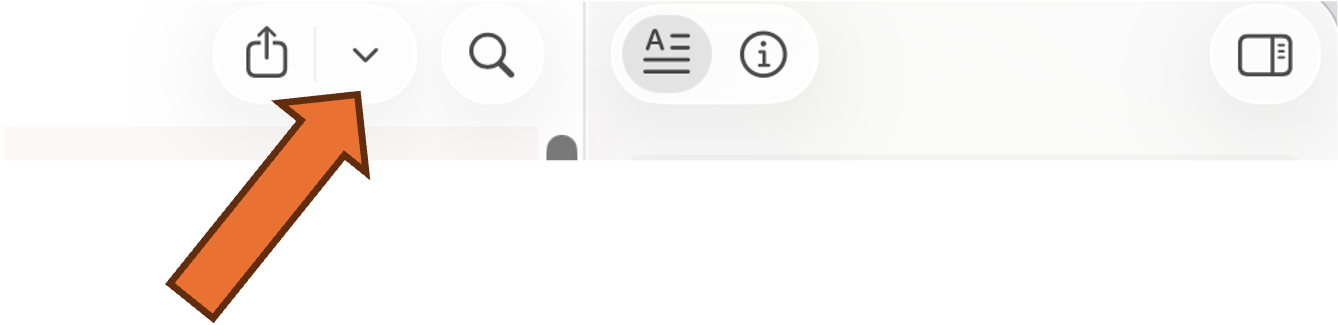
3. Export
Once the transcript has been cleaned up, you can export the text in various formats. On the top of the app, click the small arrow next to the Export button (square with an arrow pointing out)
You now get a selection of export options. Most likely you will want a .docx of the Transcript, but you can also get Subtitles for podcasts.