3D scan
- 3d body scan
- Photogrammetry
- Polycam
- Abound
- RealityScan
- Tools to aid in photogrammetry
- Gaussian Splatting: online and local
- Core principles of photogrammetry
- LiDAR
- Stereo vision
- 3D scan Quickstart & tips
3d body scan
Een snelle verzameling van opties en tips die ik ben tegengekomen online, bevindingen moeten hier nog aan toegevoed worden. Dit book is dus niet compleet.
Tips van gebruikers in mode industrie
True to Form
Luma Al
Photogrammetry
Photogrammetry is a technique through which you can extract 3D information from photographs. By extensively photographing an object from all sides, you can use software like Polycam or Abound to create a 3D mesh from these photo's. This mesh can then be imported into 3D software like Blender, and can be rendered using the photo's as textures.
Polycam
Polycam is an app that can use photogrammetry, gaussian splatting and LiDaR (with apple iPad/iPhone Pro models) to make 3D captures. It can be used for free and paid. The free version offers 20 object scans with a maximum of 100 images per capture. It also offers a free gaussian splatting tool. The paid version has unlimited scans and images per capture. Here's an overview of functions, both free and paid: https://poly.cam/pricing
Unlike in other software, the Polycam app helps you make scans. While you are circling around an object, the app takes photos for you and tells you when to slow down. It also shows you how much photos you have left. When in LiDaR mode, it overlays and previews the mesh that its building in real time. After you're done capturing, it uploads your images to Polycam where it builds your scans. You can view and download them online.
In general, use LiDaR when scanning spaces or environments and use photogrammetry for objects. Gaussian splats may work in scenarios where the object you're scanning has specular, fuzzy or translucent qualities. It is harder to convert into a mesh, however. A short description of when to use LiDaR vs Photogrammetry can be found here: https://www.youtube.com/watch?v=gZ6AWrzIx6c&list=PLqnRz-4Awhm7MXTpkgq9paJLC3ONJEBUX&index=1
Working with LiDaR, photogrammetry and guanssian splatting in Polycam:
Here's a tutorial detailing how to work with LiDaR in Polycam: https://learn.poly.cam/hc/en-us/articles/27419935601940-Creating-LiDAR-Captures
For photogrammetry, see this tutorial: https://learn.poly.cam/hc/en-us/articles/27425185907348-Creating-Photogrammetry-Captures-in-Object-Mode
And for Gaussian splatting: https://learn.poly.cam/hc/en-us/articles/27740818315668-How-to-Create-Gaussian-splats-on-Polycam-mobile
Taking your scans into other software
If you want to process your scans into software like blender or unity, Polycam has great tutorials on these topics on YouTube.
Blender: https://www.youtube.com/watch?v=1HxJiwihi6g&list=PLqnRz-4Awhm7MXTpkgq9paJLC3ONJEBUX&index=9&t=105s
Unity: https://www.youtube.com/watch?v=DEbDsxETQuE&list=PLqnRz-4Awhm7MXTpkgq9paJLC3ONJEBUX&index=14
Find more software use cases here: https://www.youtube.com/playlist?list=PLqnRz-4Awhm7MXTpkgq9paJLC3ONJEBUX
Abound
Abound werkt in browser (dus beschikbaar voor mac & windows) met een limiet van 20 Photo Scans & 100 images per scan.
RealityScan
RealityScan (previously Reality Capture) is software used for photogrammetry. RealityScan offers a mobile app for iPhone and Android and software for desktop that’s only available for Windows. Both are free to use.
Pros and cons of mobile vs desktop
Mobile:
- Fast results, but less options
- IOS and Android
- Limit of 250 photo scans
- Realtime feedback - See where you took the photo in the space, which photo is good or bad, where your model needs more detail
- Data is not processed on your phone, but sent to the cloud - this is faster than if the data would be processed on your phone, but your data will be stored on Epic Games’ servers. This adds certain privacy concerns.
Desktop:
- Windows
- Processing on PC, not on cloud
- Limit of 100.000 photo scans
- AI masking, aerial LiDAR support
To start using the desktop app you have to download the Epic Games Launcher. From there, navigate to RealityScan, and download and install.
Tools to aid in photogrammetry
Circular polarisation filters
Anti-reflective coating spray
Gaussian Splatting: online and local
This is an experiment in progress. Current status: We've succeeded in fully generating the splat from the Blender interface, on Windows. See option 1 Sky Splat below.
Gaussian splatting offers an interesting alternative to photogrammetry for specific use cases, particularly where real-time rendering, photorealistic results, and the ability to capture reflective and transparent surfaces are necessary. There are lots of online options for Gaussian splatting, both paid and unpaid. Kiri Engine seems to be a very complete suite and now has the option to make meshes out of splats, for use in for instance Blender in the paid version.
If you don't want to rely on external systems, you can make Gaussian splats (and photogrammetry) yourself on a somewhat beefy computer. The main difference between splats and photogrammetry is that splats make point clouds, no meshes. This makes the renders lighter but harder to manipulate. Also see the Tested video for this discussion.
For all online platforms (paid or unpaid), please be aware of your data and privacy!
Gaussian Splatting locally 1: with Sky Splat
Full workflow from video to splat runs from within Blender, uses the Colmap tool for making the splats. Tried on Windows.
Additional notes to the video above:
Install the skysplat plugin. Plugin appears in the plugin bar on the right (press N).
Tab 1: open video. This will extract stills from the video.
Tab 2: Colmap. First under Colmap settings, enter the location of the Colmap folder (Colmap.exe in the Bin map). Then:
- Click Load colmap model,
- Manually rotate the point cloud upright,
- Click Export transformed model, (and Export camera if you want to)
- Click Prepare Brush Dataset
Tab 3: run brush training. When opening the brush training on Windows, this only works when Blender is opened with Administrator rights. If it's not this step will result in an error, or hangs on starting the training.
2: with LichtFeld
Open source splatting tool, not yet tested
https://github.com/MrNeRF/LichtFeld-Studio
LichtFeld needs a more detailed dataset than 'just' the images, it requires "undistorted images + pointcloud + camera locations". The pointcloud and camera locations can be generated using the Colmap process above, or from Reality Scan.
3: with PostShot (tried first, no longer free)
March 2026 Update: Can't export to .ply in the free version of Postshot anymore...
Workflow in Postshot:
- Install Postshot from https://www.jawset.com/
- Make a video of the object or space. You can import multiple videos in the software, taking all videos with the same camera will have better results.
- Drag the videos into Postshot
- Render. Postshot mainly runs on GPU. The render below (50 sec video) took about 20 minutes.
- After rendering you can crop the image to exclude all the fuzzy blobs. For this look under Paramters - Edit in the menu on the right
- After rendering you can export to .ply
- To import to different software you will need a plugin
There are plugins for
- After Effects (not tested here)
- Unreal (paid plugin, not tested here)
- Blender (lower resolution, slightly more abstract results).
- Unity (not tested here)
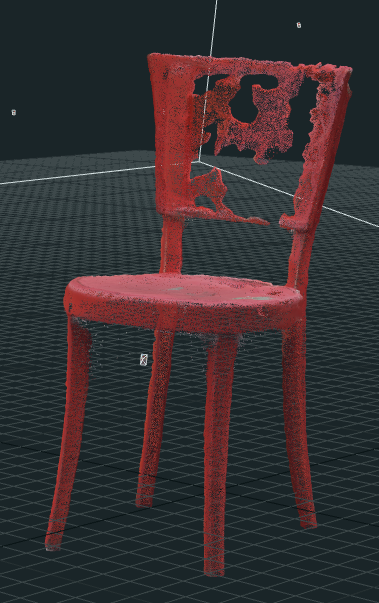
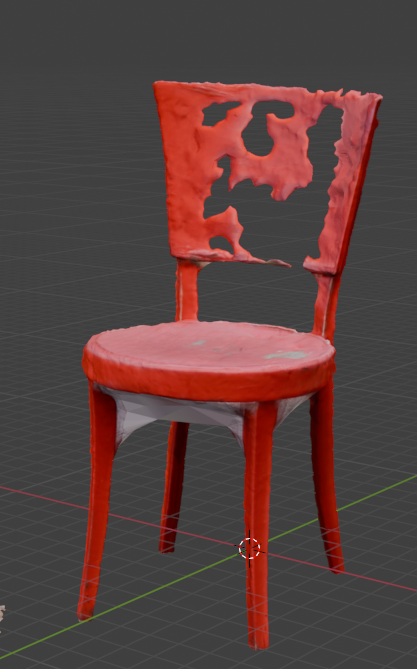
Below: the same chair model in Postshot and Blender
|
Postshot |
.ply in Blender |
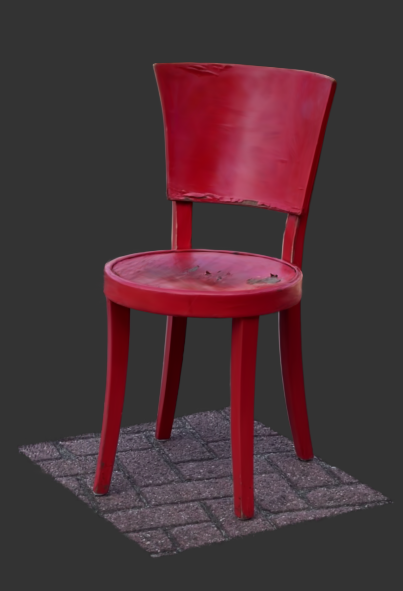
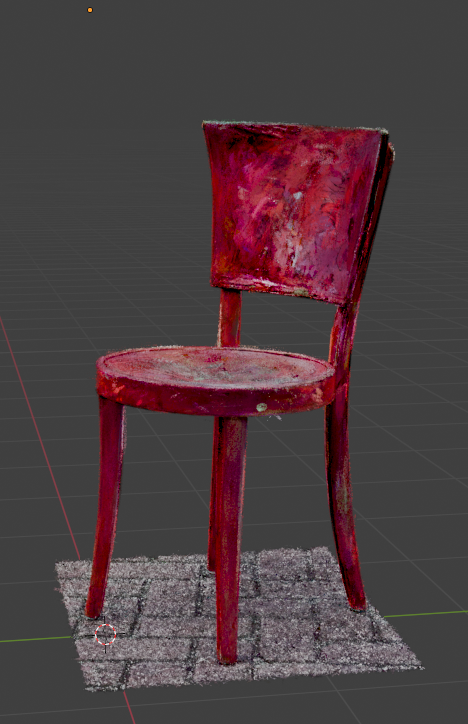
Compared to local photogrammetry (RealityCapture)
We've used the same source video for a render in RealityCapture. This render took about three minutes and shows one of the problems with photogrammetry: shiny objects become invisible. You can fix this by using a polarizing filter over your lens.
|
In RealityCapture |
.obj imported in Blender |
Full workflow: filming->After Effects->Reality Scan->Postshot->Octane (Cinema4D)
This vid has a full workflow with great tips on every step. After effects is used for extracting photos from the video, Reality scan for aligning the photos, Postshot for generating the splats, and Octane for rendering them in Cinema4D.
Re-lighting the scene starts here: https://www.youtube.com/watch?v=OzUxL_UDMTk&t=3436s
Thoughts on using Gaussian Splatting
As long as Gaussian splatting does not easily convert to meshes, it's use in live 3d engines might be limited. It might be more applicable to pre-rendered applications, where you have can re-edit the camera from the original recording. Change angles, change camera movement, etc. With the newer options to change lighting this will become even more relevant.
More Splatting stuff
Turning a Gaussian Splat into a game
Playcanvas is an open-source online splat viewer. It can clearly do more than just view them, as you can walk through them as if it's a game environment. And of course: you can turn it into a game: https://blog.playcanvas.com/turning-a-gaussian-splat-into-a-videogame
Editing splats with SplatShop
Open source, with VR editor.
Edit splats, remove parts, move parts, clone parts, etc.
https://github.com/m-schuetz/Splatshop
Re-lighting Splats
Apparent you can re-light Splatted scenes. One option menioned is in the Octane rendering engine, another is using a UE5-plugin called Volinga
Re-lighting in Blender
Using the Kiri Engine plugin from here: https://github.com/Kiri-Innovation/3dgs-render-blender-addon
Manual and quick guides for Kiri Engine: https://www.kiriengine.app/blender-addon/3dgs-render
Various tutorials on Gaussian Splatting
importing .ply gaussian splat in Blender
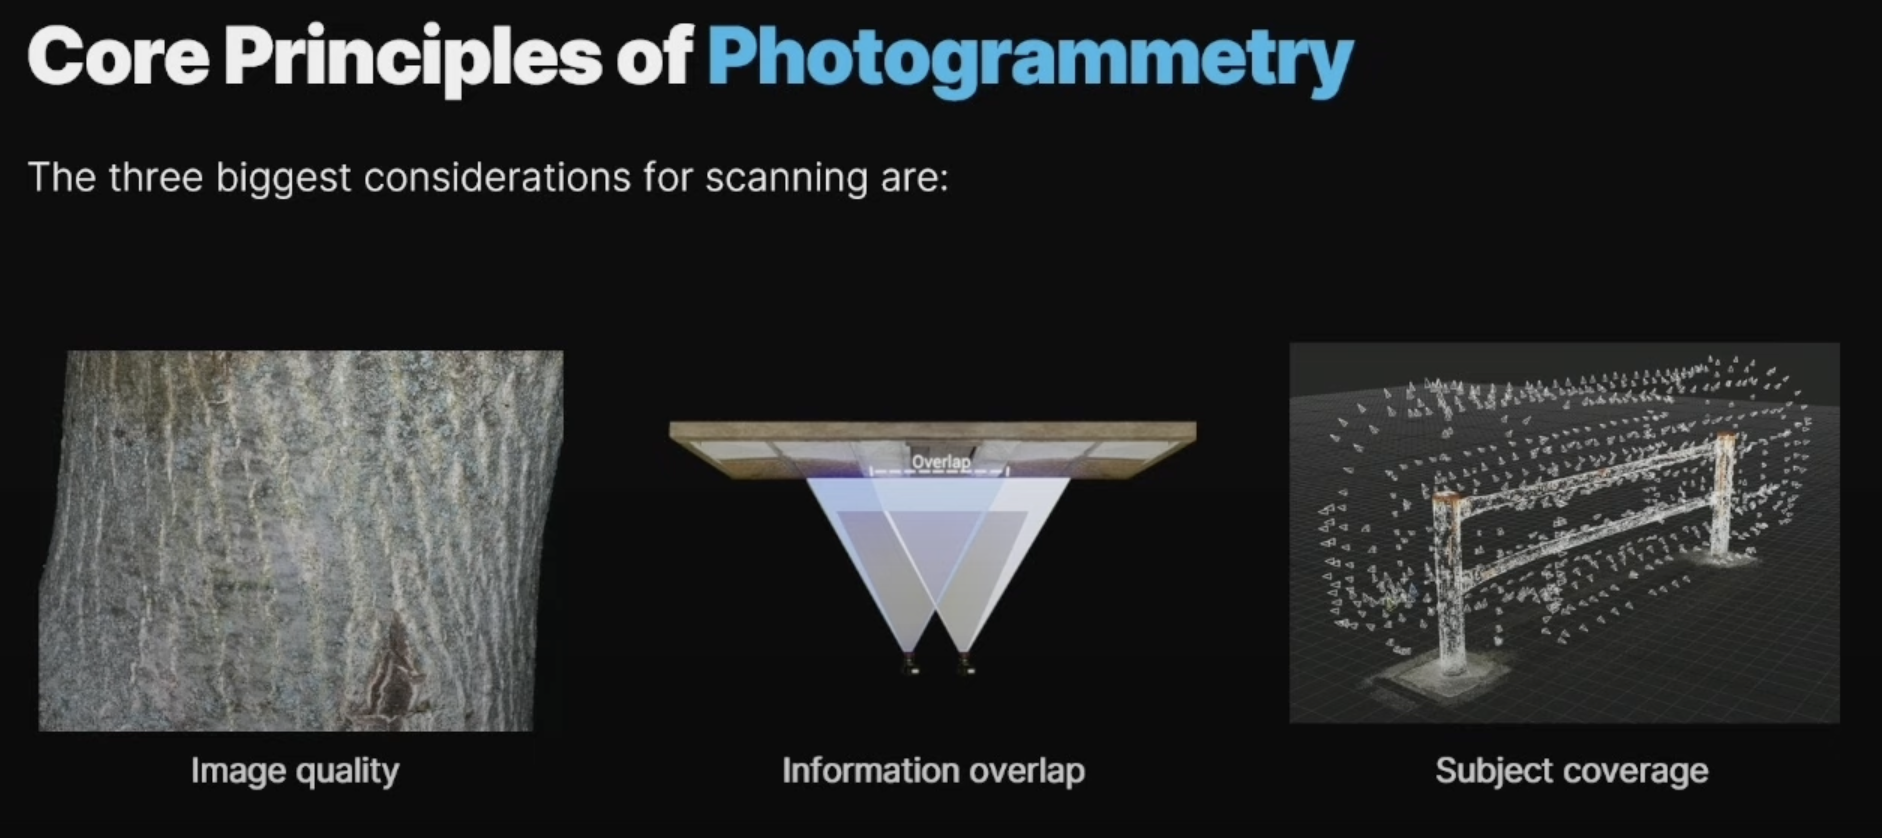
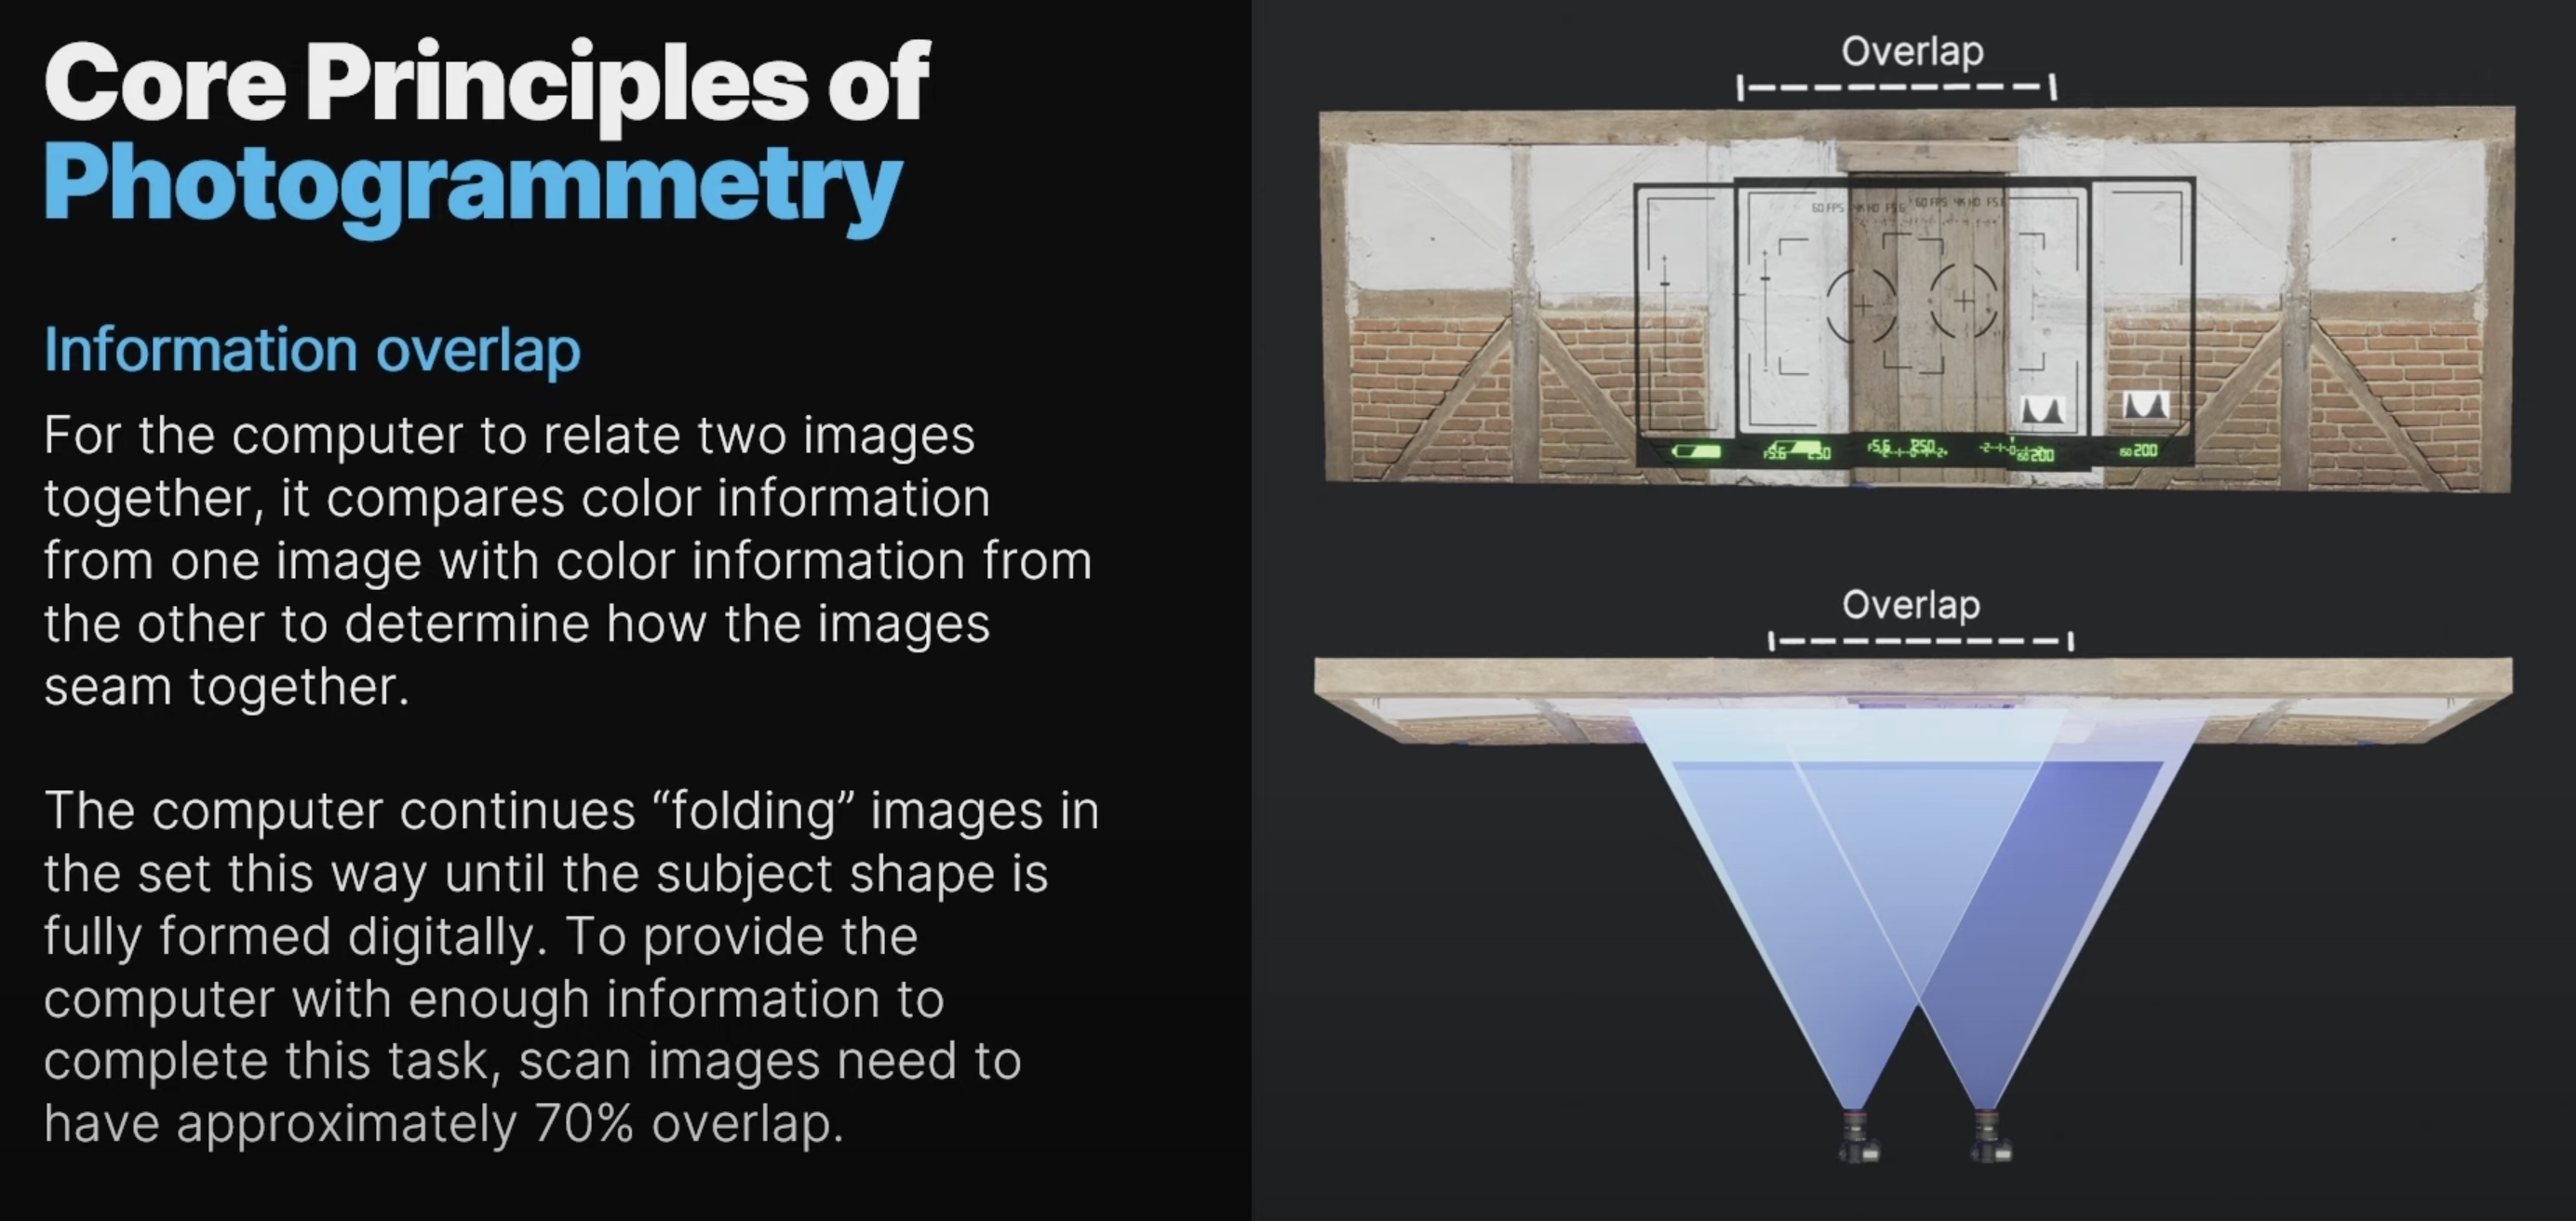
Core principles of photogrammetry
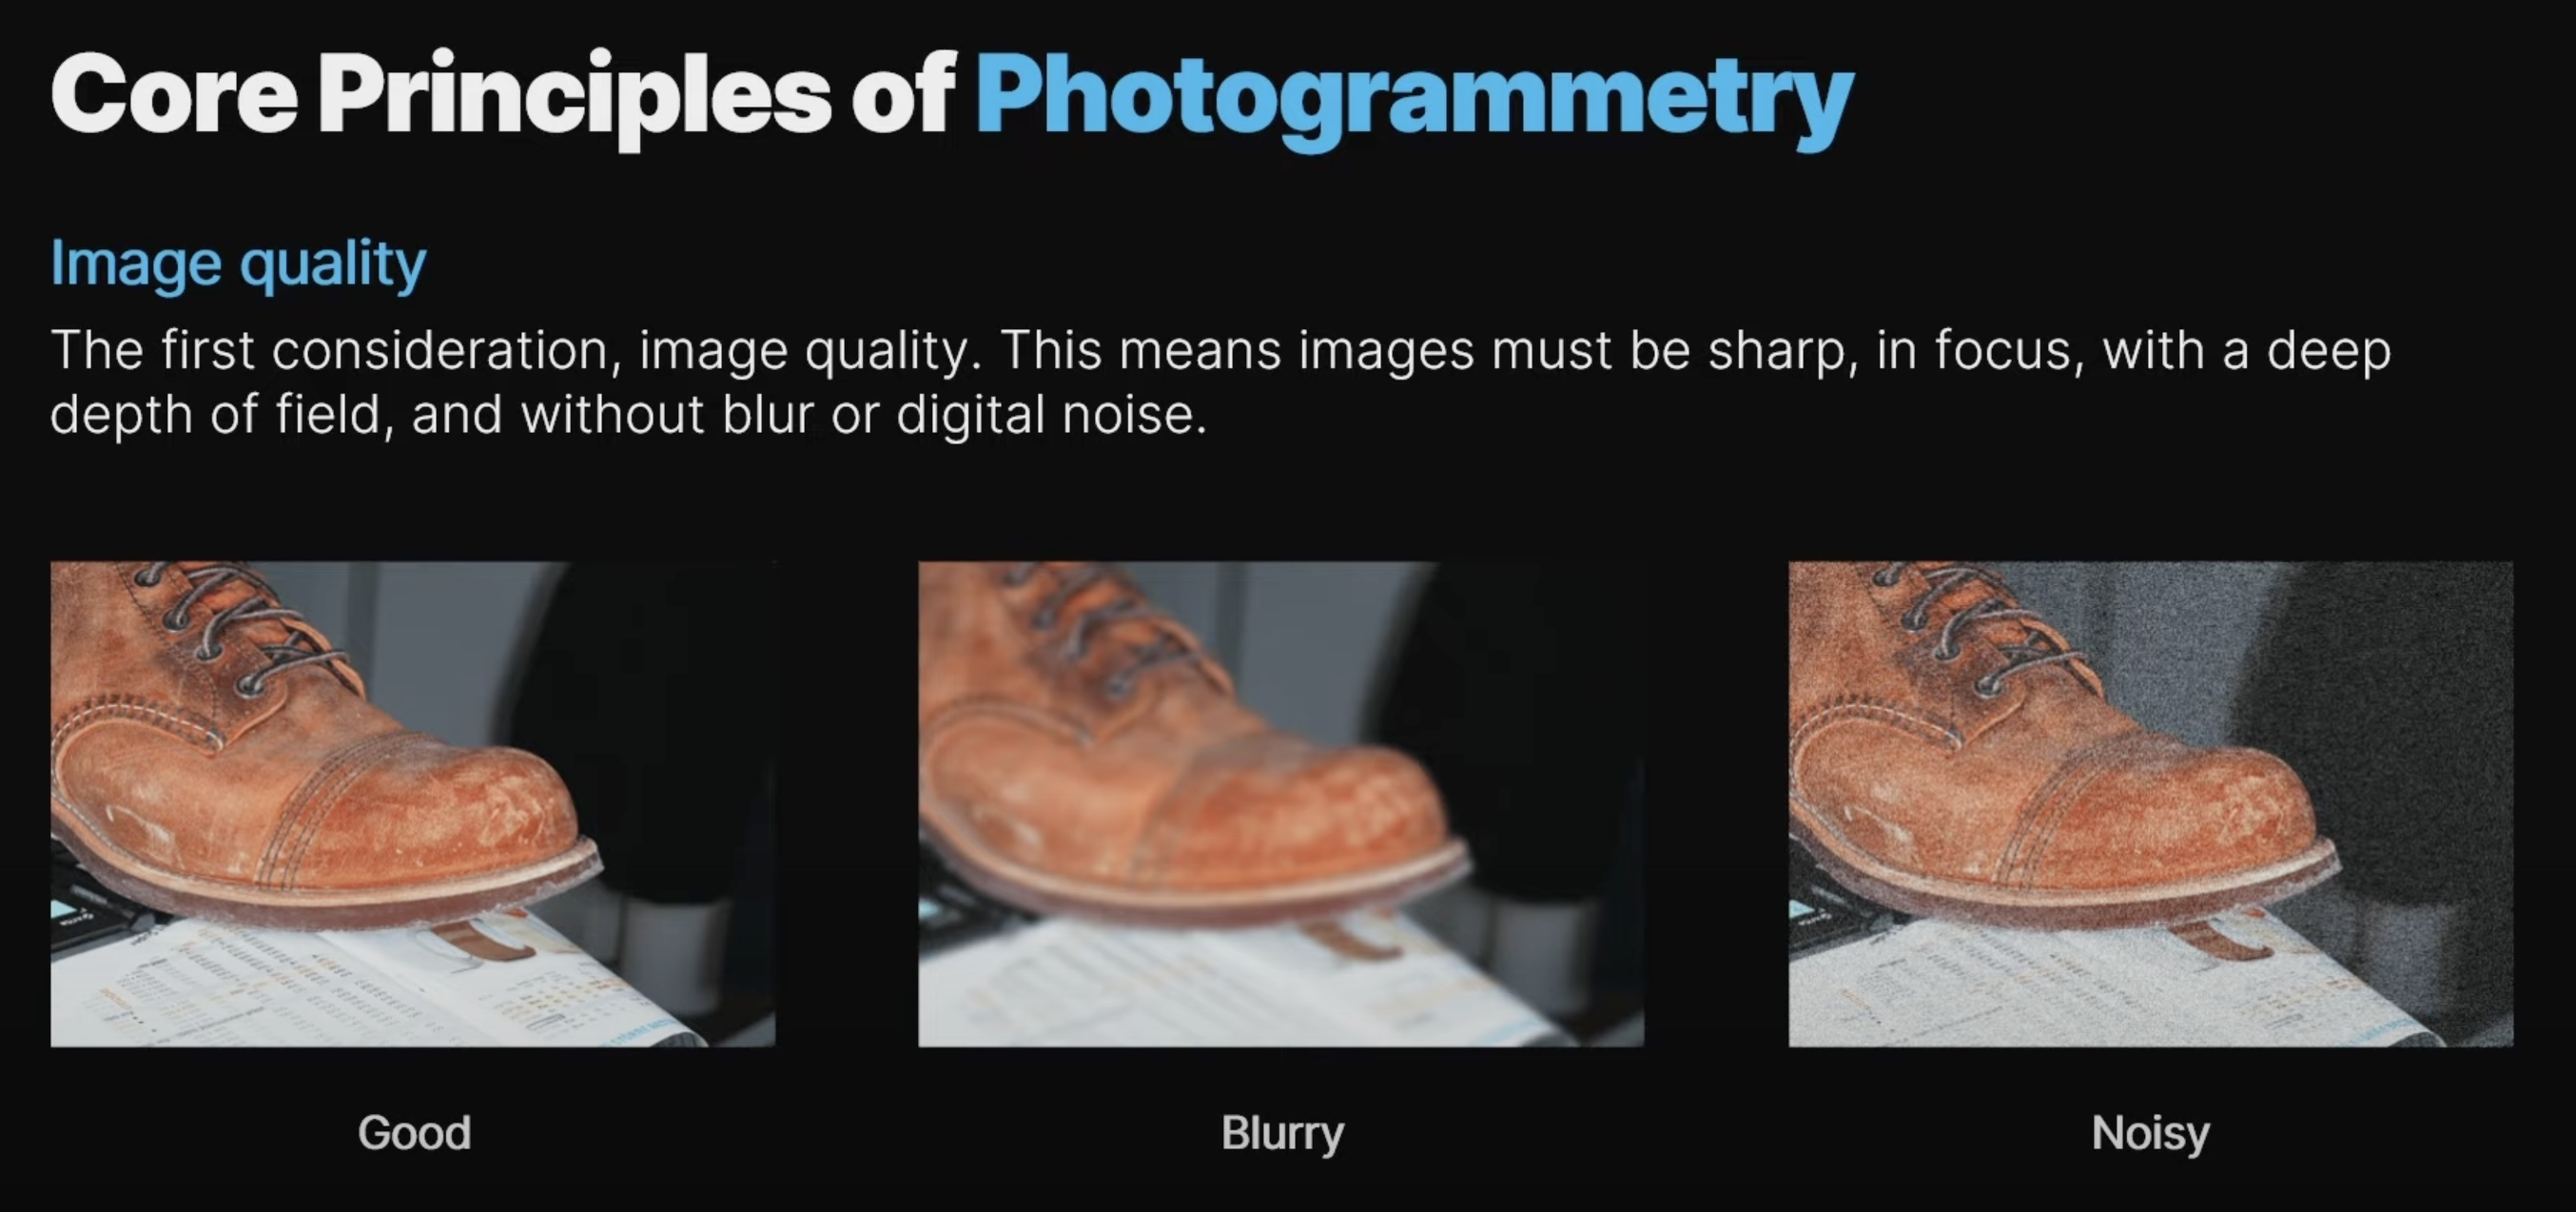
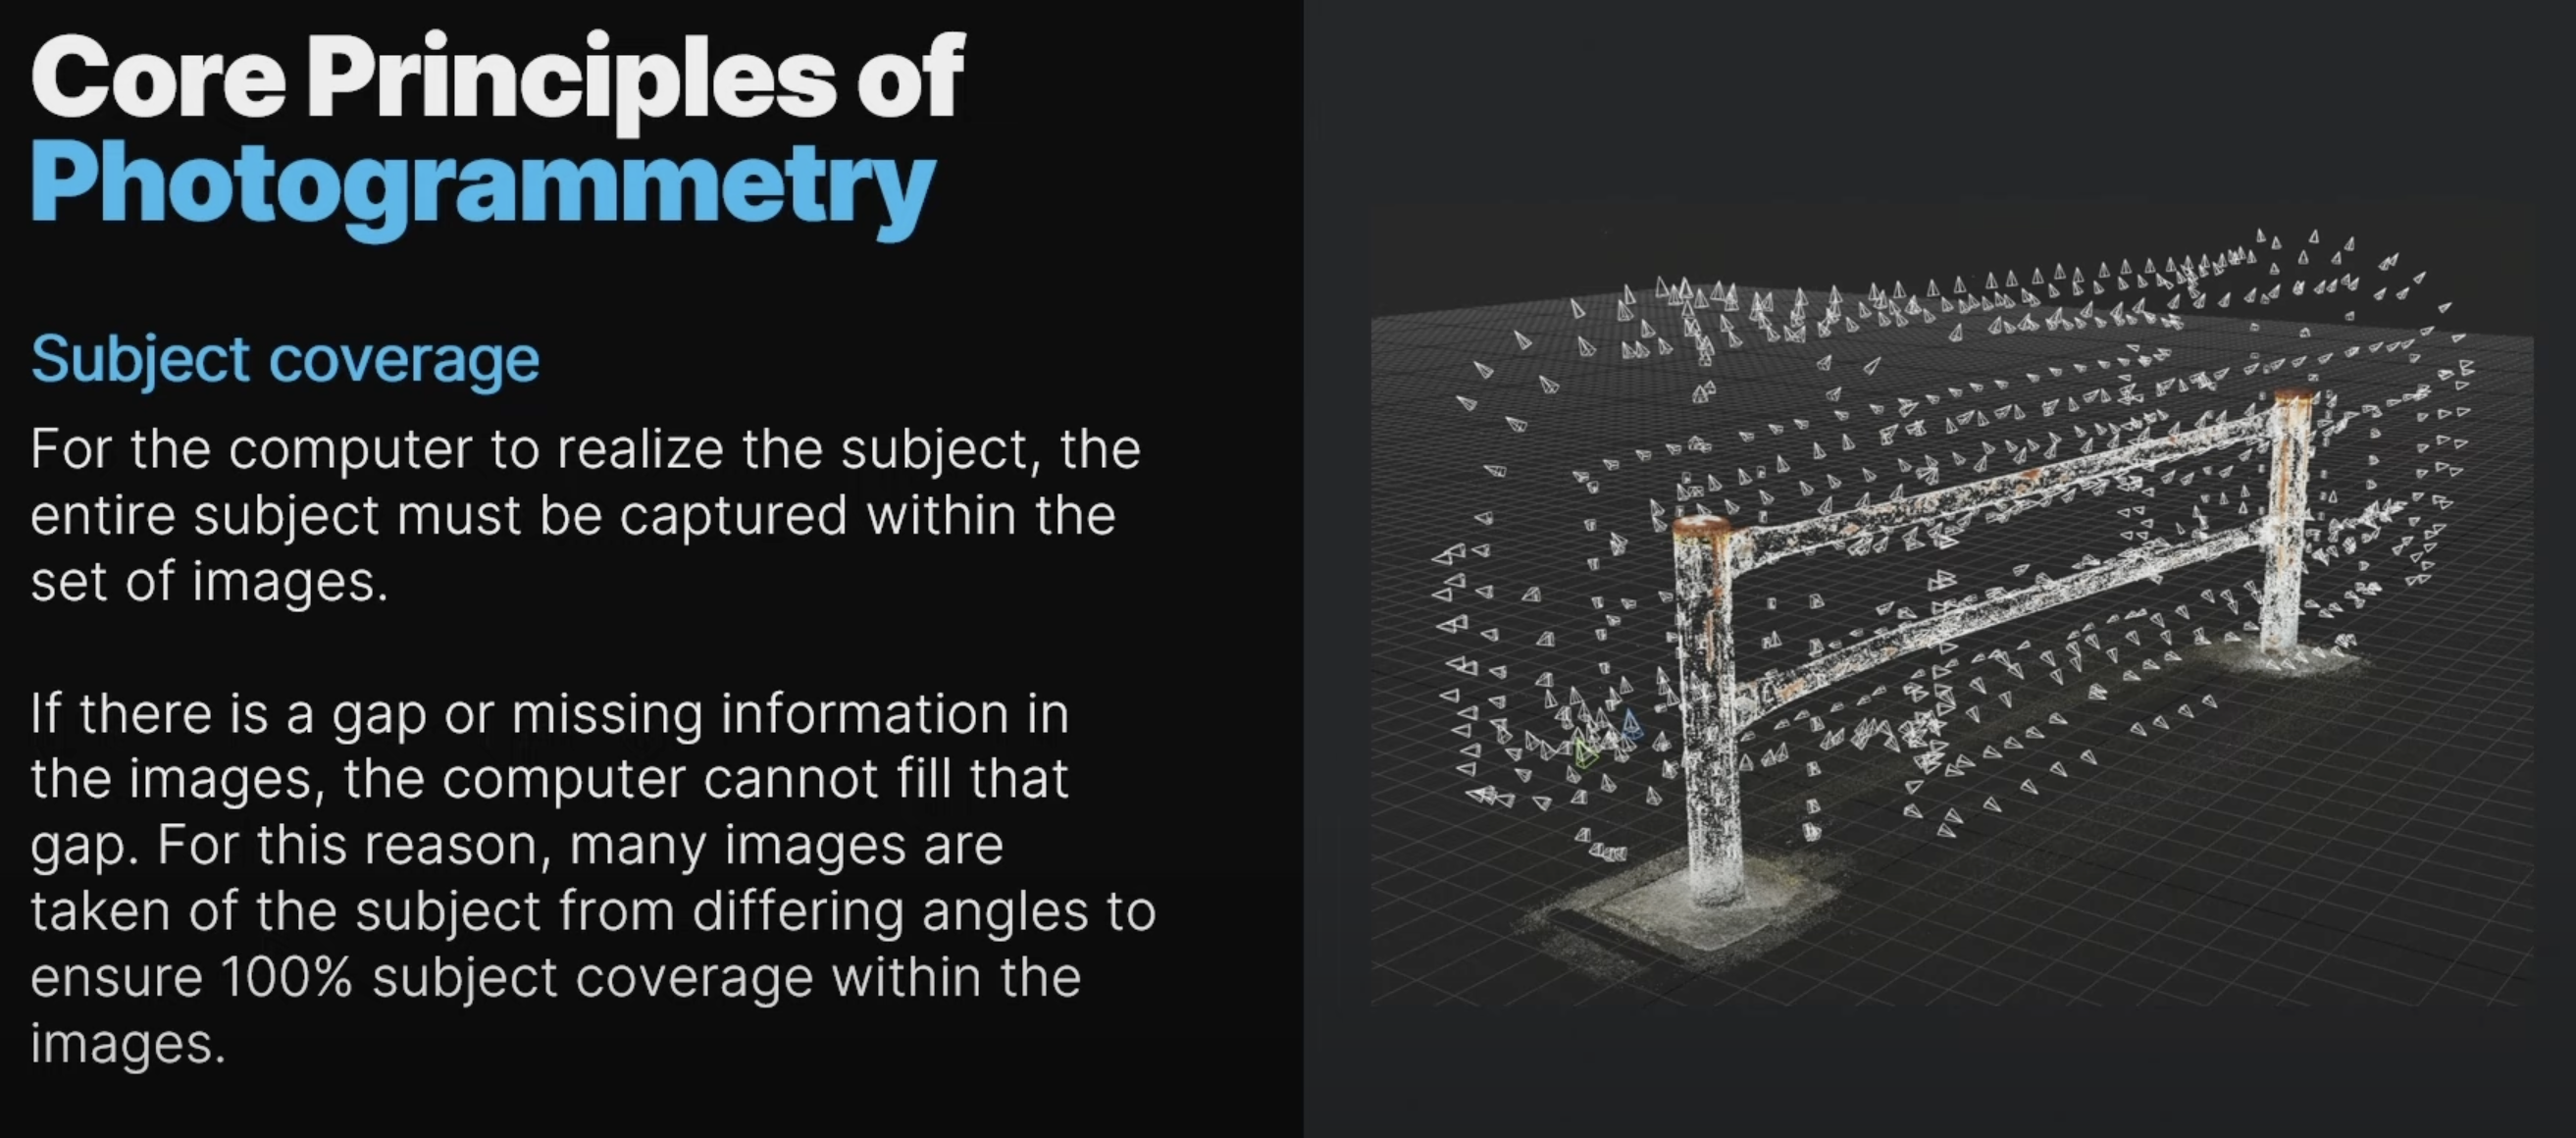
Image quality, Information overlap, Subject coverage
Very good guide: Photogrammetry Basics
Screenshots below were taken from this Unreal Engine YouTube seminar
LiDAR
Light Detection and Ranging (LiDAR) is a technique that uses lasers to measure distance to an object.
What is Lidar scanning?
LiDAR stands for Light Detection and Ranging.
-
It works by shooting out tiny pulses of infrared light (lasers).
-
Each pulse bounces back when it hits a surface.
-
The device measures the time it takes to return → this gives the distance to that surface.
-
Millions of these measurements build up a point cloud = a digital 3D map of the environment or object.
LiDAR captures the shape of real objects in 3D, with depth and scale, not just flat photos.
Artists use LiDAR scanning to:
-
Capture sculptures, costumes, installations, or landscapes as precise 3D models.
-
Create digital doubles of their work for archiving or documentation.
-
Remix physical works in VR/AR, projection mapping, or dataflow software like TouchDesigner.
-
Use scans as a starting point for fabrication (3D printing, CNC, etc.).
It’s not about photorealistic color but about geometry—a solid spatial “skeleton” you can texture, render, or transform artistically.
Depth camera's on Apple iPad and iPhone Pro models
Apple uses both depth cameras and LiDAR in different products, and while they sound similar (both measure distance), they work in different ways and are suited for different use cases.
TrueDepth = short range, detailed face/hand depth → Face ID & AR effects.
LiDAR = room-scale, larger depth sensing → AR, scanning, 3D modeling.
You can think of it like this:
-
Depth camera = microscope for your face 👤
-
LiDAR = flashlight that measures the whole room 🌌
Depth Camera
|
LiDAR Scanner
|
Here's a nice blog on how to use Apple Lidar & integrate with Touchdesigner:
https://interactiveimmersive.io/blog/touchdesigner-3d/3d-scanning-with-apples-lidar/
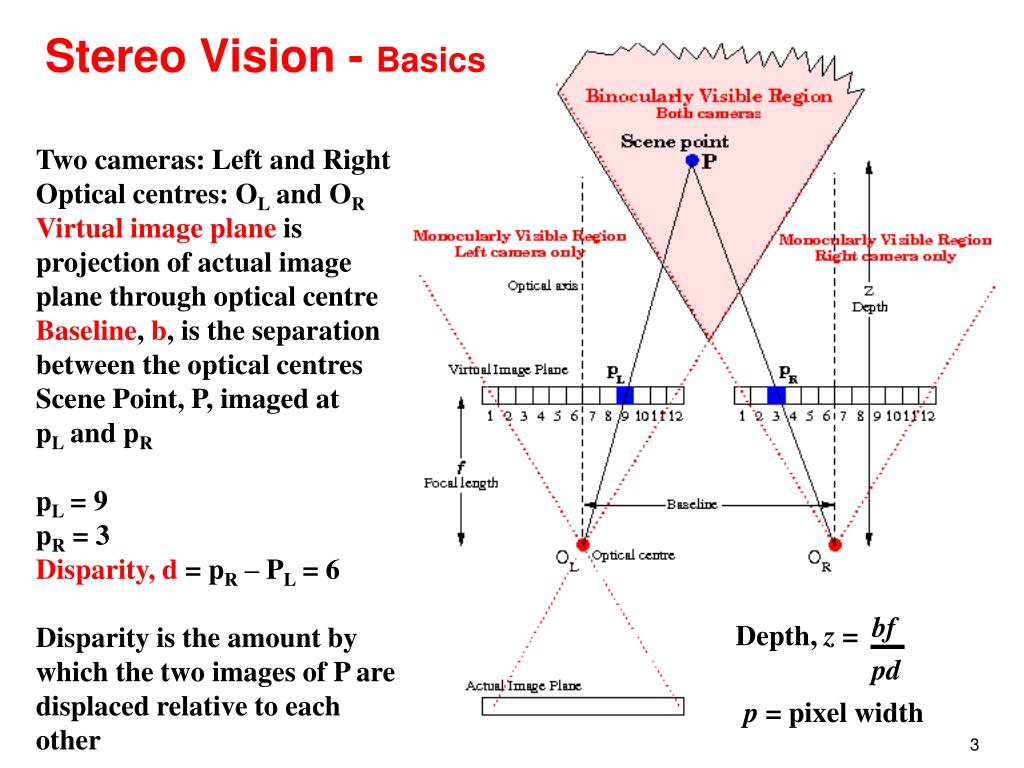
Stereo vision
two aligned cameras plus neural depth perception—to determine 3D depth and spatial structure. Proces depth through software algorithms rather than laser-based sensing.
Stereo Vision Basics
Zed 2i
ZED 2i is an IP66-rated Rolling Shutter camera built for spatial analytics and immersive experiences, powered by Neural Depth Engine 2. Ready to deploy, it has a robust aluminum enclosure, high-performance IMU and USB 3.1 connection.
ALL the info on ZED camera's
Works on PC only
How to install: https://www.stereolabs.com/docs/installation/windows
Main Features
- Dual-Lens Stereo Vision: Provides advanced depth perception and 3D mapping capabilities.
- Spatial Understanding: Offers a detailed understanding of the surrounding environment.
- Motion Tracking: Tracks objects and people in real-time with high accuracy.
- High-Resolution Imaging: Captures high-quality images, essential for detailed visual work.
- Robust Build: Designed for a variety of environments, enhancing versatility.
- Integrated Sensors: Includes IMU, barometer, and magnetometer for comprehensive data collection.
- Flexible Connectivity: USB 3.1 connection for easy integration with various systems.
Here are the links to the TouchDesigner documentation regarding ZED TOP, CHOP and SOP:
TOP: https://docs.derivative.ca/ZED_TOP
CHOP: https://docs.derivative.ca/ZED_CHOP
SOP: https://docs.derivative.ca/ZED_SOP
Also, if this is a topic of your interest, it might come in handy to have a look at the official ZED documentation:
https://www.stereolabs.com/docs
more info on https://interactiveimmersive.io/blog/touchdesigner-integrations/updated-zed-camera-features-in-touchdesigner/
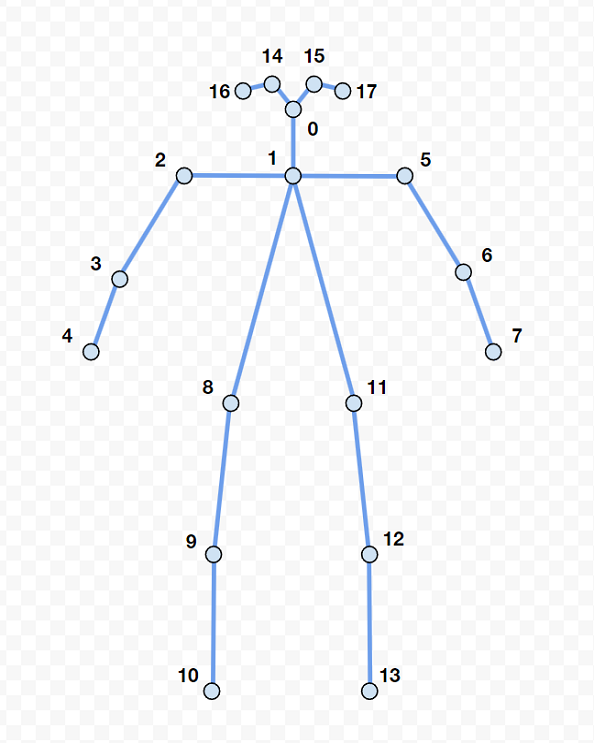
Skeleton tracking keypoints (there are various options)
OAK-D (Lite)
A small depth camera that combines stereo vision with an onboard AI processor.
The OAK-D can be used for 3D scanning because it produces RGB + depth maps that you can turn into a point cloud and mesh. You move the camera around an object or space, capture overlapping frames, and then stitch them together with software (e.g. Open3D, MeshLab, or ROS).
But: it’s not the preferred tool for 3D scanning.
-
Accuracy is lower than LiDAR or photogrammetry.
-
Shiny/transparent surfaces don’t scan well.
-
Range is limited (~10 m).
It’s great for real-time depth perception and robotics, but for high-quality 3D models you’d usually go with photogrammetry or LiDAR.
---------------------------------------------
-
How it works:
-
Two synchronized monochrome cameras capture slightly different views of the same scene.
-
Depth is computed by comparing the disparity (shift) between the two images.
-
An onboard neural depth engine accelerates the calculations, so the host computer doesn’t have to.
-
Optionally, an RGB camera provides color overlays on the depth map.
-
-
Key features:
-
Depth range: ~0.3 m – 10 m.
-
Field of view: ~70–80°.
-
USB-C powered, plug-and-play.
-
Runs AI models (object detection, face recognition, body pose estimation) directly on the device.
-
-
Why it matters for stereo vision:
-
Demonstrates that stereo vision can be compact, affordable, and real-time.
-
Doesn’t need external GPUs/CPUs for heavy lifting.
-
Provides a good bridge between basic stereo rigs (like DIY dual webcams) and advanced research hardware (like ZED cameras).
-
-
Use cases:
-
Robotics navigation.
-
Human pose tracking.
-
AR/VR prototyping.
-
Object recognition combined with depth.
-
Here's info on how to use it in Touchdesigner: https://derivative.ca/UserGuide/OAK-D
The example file is OAKExamples.toe. Instructions and tips are inside the file. The file is located in C:/Program Files/Derivative/TouchDesigner.2023.xxxxx/Samples/OAK.
3D scan Quickstart & tips
Photogrammetry
Je kunt met je de camera van je telefoon of tablet foto's maken en deze inladen in software die vervolgens deze foto's omzet naar een scan. Dit heet photogrammetry.
Je kunt daarvoor je camera app gebruiken of een 3Dscan app die je kunnen helpen als guide om de juiste strategie/route (opeenvolgende foto's of overlap) te volgen voor het fotograferen. Deze foto's zet je vervolgens op de computer waarmee je ze kunt omzetten(processen of renderen) met software zoals Abound of RealityScan) naar een 3D model met texture.
Software
Abound werkt in browser (dus beschikbaar voor mac & windows) met een limiet van 20 Photo Scans & 100 images per scan. Processing in cloud. Weinig informatie over resultaat of aanpas mogelijkheden.
Reality Scan is beschikbaar op windows en heeft (vooralsnog) geen limiet. Veel mogelijkheden en informatie over het resultaat.
Als je Reality Scan wilt gebruiken: download de Epic Games launcher en installeer > links > Unreal Engine > Bovenin rechts > Reality Scan (niet beschikbaar voor Mac)
Apps
Je kunt in de meeste apps ook je scan processen maar dan heb je minder controle over het resultaat en het is onhandig in geval van slecht internet. Let op je bundel, gebruik WIFI! De bestanden worden eerst geupload naar een cloud service, aldaar geprocessed en vervolgens weer gedownload. Daarom zijn deze apps meestal niet gratis.
3DScannerApp (ios) of Scaniverse (iOs of android), Abound, RealityScan.
Polycam is bekend en heeft goede reviews maar ook beperkt gratis te gebruiken.
De Abound app is alleen voor iOS telefoon of ipad. De process functie maakt gebruik van cloud.
Reality Scan heeft ook een app (iphone & android) die goede tips geeft tijdens het maken van je photogrammetry.
Tips
- Zorg voor een heel goed verlichte omgeving met verspreid licht. Buiten kun je heel goed scannen op een bewolkte dag. Geen felle lichtbronnen.
- Objecten zonder reflecterende oppervlakten.
- Zet je wit balans en focus op automatisch
- Raw kwaliteit voor goede scan
- Groot mogelijke scherpte diepte met zo klein mogelijke diafragma want je wilt geen geblurde achtergrond. De achterond informatie is nodig om de juiste diepte referentie te kunnen maken bij het verwerken van de foto's.
- Omgeving niet leeg. De achtergrond is nodig voor referentie tijden het verwerken tot 3D scan.
- 20% overlap tussen je foto's
- Maak bogen om je onderwerp tijdens het fotograferen
- Houd rekening met gemiddeld 80 - 150 foto's voor een redelijk resultaat.
Afhankelijk van waar je je 3D scan voor wilt gebruiken is het handig om rekening te houden met de hoeveelheid polygonen die de scan heeft. Dit zou je kunnen uitleggen als de resolutie van de scan en details die de scan heeft. Hoe meer hoe groter het bestand en hoe zwaarder om in te laden in sommige toepassingen. Voor 3D printen zou je een hoge polygon dichtheid willen. Voor VR juiste en lage want VR wordt continu live gerenderd. Dan zorgt minder polygonen voor een snelle weergave. (lowpoly)
Deze website is heel uitgebreid en leerzaam: https://dev.epicgames.com/community/learning/courses/blA/unreal-engine-capturing-reality-photogrammetry-basics-by-quixel/r222/unreal-engine-capturing-reality-an-introduction-to-photogrammetry